| Author |
Message |
Mat Billings

Location: Kelowna, BC Joined: 05 Jan 2005
Posts: 30
|
 Posted: Wed 08 Jun, 2005 7:44 pm Post subject: My toy (a work in progress) Posted: Wed 08 Jun, 2005 7:44 pm Post subject: My toy (a work in progress) |
 |
|
...Well, it will be, once I finish it. 


It's based loosely off the Dresden found here; I saw that, and it inspired me to challenge myself...conveniently on my breaks at work (As thrilling as welding and constantly grinding bumpers is, it just doesn't quite "cut" it *groan*)
The blade's a Hanwei, the handle itself is the stock hanwei; the pommel is a triplette creation....Needless to say, I havn't figured those parts out yet! This would be my 9th guard attempt. I'll post the older ones later, along with dev pics of this one...and the all so important "builders rant of doom!" 
*must...finish...ringage...*
Last edited by Mat Billings on Thu 09 Jun, 2005 2:07 pm; edited 1 time in total
|
|
   |
 |
|
Aaron Schnatterly
|
| Posted: Wed 08 Jun, 2005 7:48 pm Post subject: |
|
|
You're referencing this piece, I presume:
Looks like a pretty neat project. It'll be interesting to see how it turns out and get your impressions on how it handles.
-Aaron Schnatterly
_______________
Fortior Qui Se Vincit
(He is stronger who conquers himself.)
|
|
 |
|
Mat Billings
Location: Kelowna, BC Joined: 05 Jan 2005
Posts: 30
|
| Posted: Thu 09 Jun, 2005 4:22 am Post subject: |
|
|
Yeah, that's the one. 
|
|
|
|
|
Mat Billings
Location: Kelowna, BC Joined: 05 Jan 2005
Posts: 30
|
| Posted: Thu 09 Jun, 2005 2:33 pm Post subject: |
|
|
I should say it's loosely based; I'm pretty fond of "free expression."
Anyway, all giddiness aside...
It was cut and shaped by hand with an angle grinder, and many 1/4", 1/8" and 1/16" grinding disks, a die grinder, and a lot of hand sanding. After about three days, I had it to this state...seeing as how I couldn't see myself using the practical hanwei guard ever again, it was sacrificed unto my cause. I have made my own quillon blocks in the past, but I decided to take a shortcut this time and just "borrow it." (yeah, that's it..."Borrow.")

A part breakdown.

While there isn't a noticeable difference to the above few, this one actually has some of the edges cleaned up.

Once I had that completed, I hit the sides with an 80 grit sanding disk, to remove the outer layer. Shortly hereafter, I gave it a light sanding by hand. It's pretty obvious which is which.

Both parts sanded.

This one shows the enlargement process, and while not one of the best methods for an accurate repro, it was actually pretty effective. I enlarged the image until it matched up with the blade more or less, and traced out the frame, then made a pattern for the cutting stage. Fun.

Having the parts completed to that stage, I then tack welded them together. If you look hard enough, you can see where it grounded out on the table.

The polished version came shortly after. Once I had the frame completed, I began work on the rings. I knew they were going to be a pain (especially at my current ability levels; minimal; I've been welding for a year and a bit, plus about 7 months at trade school learning that fact.), so I figured the easiest route was to break them down into pieces. These parts, while wider than the one in the reference drawing, are the start of the two lower rings. Now two...I know the original has one, but I've opted for a symmetrical guard, for balancing reasons; it'll handle equally well in both hands without throwing the lateral balance out.

Cut to size; I have to taper the outer most parts so the joints will match up with the frame. The outer ring will remain wide, to offer more hand protection (simply put, I haven't quite the "moving the hand out of the way" down yet...and if you've ever gotten a blood blister on the tip of your finger...it isn't fun.)...The black scribble represents the ring taper. 

That's about where I am to date. Still a lot of work to go, but I'm open to more suggestions and comments! 
Oh, for sheer amusement; this was the first guard I ever made....stick welded, obviously built solly for function. It defines "gehto"...heck, I believe it went soaring across the grinding room at the college when it caught an edge (the joys of learning...this is what not to do!).

Last edited by Mat Billings on Thu 09 Jun, 2005 2:44 pm; edited 3 times in total
|
|
|
|
|
Nathan Robinson
myArmoury Admin


|
|
 |
|
Mat Billings
Location: Kelowna, BC Joined: 05 Jan 2005
Posts: 30
|
| Posted: Fri 10 Jun, 2005 7:17 pm Post subject: |
|
|
It's why I go to a lot of the message boards; I love seeing how things are made; gets rid of some of the guesswork.
Steady progress. The ring in front was just sanded to take the mill slag and welds off.

|
|
|
|
|
|
David R. Glier
|
| Posted: Wed 15 Jun, 2005 9:02 pm Post subject: |
|
|
For the pommel, it looks like a little piece of 5/8" plate with seven spins of a drill-press and a little quality time with a plasma-cutter.
Aren't "break-time" projects fun?
|
|
|
|
|
Mat Billings
Location: Kelowna, BC Joined: 05 Jan 2005
Posts: 30
|
| Posted: Thu 16 Jun, 2005 2:52 pm Post subject: |
|
|
Plasma cutters rule; it's the lack of a tap set that gets me *must acquire die and tap set*
Anyway, the guard itself has made steady progress; it's been long going, but it's ALMOST done...and I'll be glad when it is, I mean, without taking breaks at work, it's almost doubled the arm pain (doesn't help that I work with guys twice my size, heh )
Ringage welded.

Welds ground.

(Not pictured: guard polishinated to a more consistant finish)
Bent stock for upper ringage.

Upper ringage.

|
|
|
|
|
|
Jesse Frank
Industry Professional
Location: Tallahassee, Fl Joined: 04 May 2005
Posts: 144
|
| Posted: Thu 16 Jun, 2005 4:32 pm Post subject: |
|
|
|
Wow. That is really nice
|
|
|
|
|
|
Ryan A. C.
|
| Posted: Fri 17 Jun, 2005 8:43 pm Post subject: |
|
|
|
Impressive! I really like the step by step posting.... It's pretty cool watching something take shape.
|
|
|
|
|
|
David R. Glier
|
| Posted: Sat 18 Jun, 2005 3:23 pm Post subject: |
|
|
|
Most impressive. I take it you're using a die grinder to get in there?
|
|
|
|
|
Mat Billings
Location: Kelowna, BC Joined: 05 Jan 2005
Posts: 30
|
| Posted: Mon 20 Jun, 2005 2:51 pm Post subject: |
|
|
| David R. Glier wrote: | | Most impressive. I take it you're using a die grinder to get in there? |
Yup, but only for the joints; the bars are hand sanded. And a lot of spatter block...that stuff is a godsend.
Of course, the downside with a die grinder is that unless you have a really small carbide bit (which I don't), you aren't able to get into the tighter areas, and also you have to be careful about gouging chunks out of the metal. I discovered VERRRY quickly to use one with a rounded tip, as opposed to a flat tip, as the flat tip had a habbit of grabbing and gouging if it was held at the wrong angle. Right now, I'm in the process of cleaning the joints and whatnot up, but I'll try and get some newer (bigger) pics up in the near future, which by then, hopefully it'll have a better finish if I apply myself.

|
|
|
|
|
Mat Billings
Location: Kelowna, BC Joined: 05 Jan 2005
Posts: 30
|
|
|
|
|
|
David R. Glier
|
| Posted: Sun 26 Jun, 2005 6:30 pm Post subject: |
|
|
|
|
|
|
|
|
Mat Billings
Location: Kelowna, BC Joined: 05 Jan 2005
Posts: 30
|
| Posted: Mon 27 Jun, 2005 5:34 pm Post subject: |
|
|
For whatever insane reasoning, I've decided to age it using the method described here
http://www.myArmoury.com/feature_antique.html
the early beginnings, after a second dousing; from what I saw from the first dousing, the idea is to give it some distinguishing characteristics; it's surprising how fast it the acid reacted to the surface of the metal; fun part's going to be cleaning the rust off.  Everything was hit but the tang, for obvious reasons. Everything was hit but the tang, for obvious reasons.
...clearly, the stainless steel handle had to go. Does anybody have any advice on how to make a wooden handle?

|
|
|
|
|
Mat Billings
Location: Kelowna, BC Joined: 05 Jan 2005
Posts: 30
|
| Posted: Tue 28 Jun, 2005 3:13 pm Post subject: |
|
|
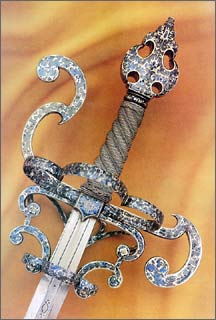
Lets play a game; "find the stainless part "

After cleaning; finally done


|
|
|
|
|
|
|

