| Author |
Message |
Sean Flynt

|
 Posted: Tue 17 May, 2005 6:53 am Post subject: My New Glaive Posted: Tue 17 May, 2005 6:53 am Post subject: My New Glaive |
 |
|
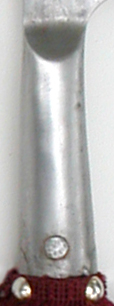
This is a 16th c. European glaive/ couteau de breche,/kuse– essentially a big knife on the end of long stick. The head is by Windlass Steelcrafts and has recently been offered through MRL as a discount item for around $50. I significantly modified the head (socket and langets,) carved the haft, mounted the piece and, finally, made my best attempt at creating an authentic-looking tassle from off-the shelf materials. Total cost was approximately $65 USD. This is a sweet weapon, and has done much to convince me of the value of polearms. As usual, I'm sure, it helps to have a weapon custom-fit to the user. Mine is just short of what George Silver would consider the "perfect" length for me. It's over 7.6' and I'm 6'1". I can almost reach the tip, standing with the weapon upright at my side. Silver would add room for two hands (or another 6"-7" or so in my case).
Vital Statistics
Length of Blade: 17”
Length of Blade & Socket: 20.5”
Length of Blade, Socket & Langets: approx. 36”
Length of Finished Weapon: 7’6”
Weight of Finished Weapon : 4 lbs
POB: 35” from tip (near the next-lowest rivet of the langets)
Max thickness of blade: 2.5/16ths”
Modification of the Head
The blade is excellent, featuring proper temper and appropriate distal taper. The socket and langets are not as pictured in recent MRL catalogs, however. The socket is plain and the langets are obtrusively welded to the outside of the socket to allow the purchaser to simply stick the head on the end of a pole and pin the langets to the surface of the pole. As shipped, the langets were oriented with the edge and back of the blade, and I wanted them on the sides of the weapon. I sawed off the langets and sawed/ground down the welds. So, my langets are not attached to the socket, and that’s not historically accurate. Historically, secondary langets were not necessarily attached to the socket, but the primary langets almost always were, as far as I can tell. Fortunately, my tassle conceals this shortcoming.
Preparation of the Haft
Ash is preferred, but I used a round poplar dowel for convenience. I carved the end of the haft so that the transition between the wood and the socket of the head would be as seamless as possible. Then I flattened both sides of the haft so that the overall cross-section is a more appropriate round-ended rectangle. I then inlet the langets (an almighty time-suck, let me tell you). The inletting not only looks better and is more historically accurate, but also improves the weapon’s handling by allowing the user to easily slide a hand all the way up to the base of the blade to shorten the weapon as needed.
Mounting
Historically, socket and langets could be riveted to the haft (the rivet passing all the way through the haft and facing steel,) but seem more commonly to have been pinned. I chose to rivet because rivets hold the langets tightly in their channels. Plus, I like the hammered finish of the rivet heads (I use ordinary bright steel nails for the rivets). It would be harder to get that look with pins. I’d have to hammer the heads in a vise first, I think. Anyway, each langet had three pre-drilled holes, which seemed too few compared to historic examples. After placing rivets through the existing holes I simply marked two new holes per langet, then drilled straight through one langet and the haft and out through the other langet. Then I just popped two more nails through and peened them down tightly, as with the other rivets. I put a single rivet through the socket as well.
Tassle
You can find the raw material-a coarse fringe sold by the yard in various colors-at Hobby Lobby and probably most equivalent craft stores. The strands of the fringe are looped, so you need to cut through the end of each loop with a craft knife and separate the strands. Separating the strands makes the finished tassle much fuller and more authentic-looking. Once you’ve separated the strands, just wind the material onto the haft where you want it, creating multiple layers until the tassle is as full as you desire. Then simply pin it in place with four brass or steel furniture tacks and trim the excess length. I think my tassle required four layers (much less than a yard of fringe). This looks pretty convincing to me, and I can’t imagine getting a better result with off-the-shelf materials. It looks better with the weapon upright so that the fringe is evenly distributed around the haft.
Finish
I gave this piece a light antiquing inspired by 16th century polearms in the regional armory in Graz, Austria.
Tools
Wood-shaping rasp (like a giant, slender cheese grater)
Electric drill (for drilling holes for the rivets. NOTE: A metal bit will drill through wood, but a wood
bit will not drill through metal)
Chisel (for fine inletting work)
Dremel Tool (for cutting off the langets, grinding the welds on the socket and rough inletting work.
If you don’t have access to one of these miracle-tools, use a hacksaw, file and chisel. Then
you’ll believe me when I tell you that a Dremel Tool will actually pay for itself in time savings. If you already have a drill, I
guess you could still use Dremel bits for coarse work such as cutting/grinding steel.)
Sandpaper
Ball-peen hammer
Anvil (you can use a sledge hammer head, but Harbor Freight stores sell a little 15 lb anvil for less than $20 USD.)
 Attachment: 94.91 KB Attachment: 94.91 KB
[ Download ]
-Sean
Author of the Little Hammer novel
https://www.amazon.com/Little-Hammer-Sean-Flynt/dp/B08XN7HZ82/ref=sr_1_1?dchild=1&keywords=little+hammer+book&qid=1627482034&sr=8-1
|
|
   |
 |
|
Matthew Kelty
|
| Posted: Tue 17 May, 2005 7:05 am Post subject: |
|
|
|
Oooooh, pretty! Good job!
|
|
 |
|
|
Matthew Kelty
|
| Posted: Tue 17 May, 2005 8:04 am Post subject: |
|
|
Just to get some more dimensions, what diameter opening was the socket, how long is the actual socket (meaning how much "pole" is stuffed into it, and what's the diameter of the socket at the closed end (guessing is fine... 
|
|
|
|
|
Sean Flynt
|
| Posted: Tue 17 May, 2005 8:50 am Post subject: |
|
|
Thanks! At its widest, the inside of the socket is slightly smaller than the diameter of a standard closet rod (1.25", I think). So, it would not be possible to use an untapered haft. The options are to just taper the haft to fit or do as I did--create a shoulder for the socket to rest upon and taper the haft only above that shoulder. My method left perhaps a 1/16" step up from the unaltered surface of the haft to the exterior surface of the socket. That's versus maybe a 1/8" step up with the simpler method, sans-shoulder.
The head was made by inserting the tang of the blade into a slit in the top of the socket and then welding everything and finishing to remove seams. So, the blade actually intrudes well into the socket interior (a good thing, structurally). Only about 2"-2.5" of haft will fit into the socket unless you cut a notch in the top of the haft to fit around the exposed tang of the blade concealed inside the socket. The amount of tang exposed would vary from piece to piece depending on how much of the end of the socket is filled with flux(?). I didn't notch the end of my haft because I didn't feel like the extra .5" to be gained would make any difference. There's plenty of wood in there.
It's tough to estimate the exterior diameter of the closed end of the socket because it flows pretty seamlessly into the blade (apart from the side facets). I'd guess that it's an oval 7/8" or 1" where the socket meets the blade. If I can remember to do it, I'll double-check tonight and correct my guesses as needed.
By the way, this blade took a wicked edge. It would do terrible things to the body, either slicing, slashing or thrusting. The base of the blade forms a nice, deep hook, too. The piece is short enough to lead with the butt, which I've left unshod (just slightly rounded over).
-Sean
Author of the Little Hammer novel
https://www.amazon.com/Little-Hammer-Sean-Flynt/dp/B08XN7HZ82/ref=sr_1_1?dchild=1&keywords=little+hammer+book&qid=1627482034&sr=8-1
Last edited by Sean Flynt on Tue 17 May, 2005 9:14 am; edited 1 time in total
|
|
|
|
|
Sean Flynt
|
|
|
|
|
|
Russ Ellis
Industry Professional
|
|
|
|
|
|
Patrick Kelly
|
| Posted: Tue 17 May, 2005 9:36 am Post subject: |
|
|
Sean that's an outstanding job!
You're really inspiring me with some of your projects.
"In valor there is hope.".................. Tacitus
|
|
 |
|
William Goodwin

|
| Posted: Tue 17 May, 2005 10:03 am Post subject: |
|
|
Very cool Sean! any others projects in the works we can look forward to?
You've taken this antiquing gift of yours to an interesting aspect of repro- collecting and inspried others (myself included) to venture into new territory. Brilliant!
Bill
Roanoke Sword Guilde
roanokeswordguilde@live.com
"I was born for this" - Joan of Arc
|
|
|
|
|
Sean Flynt
|
| Posted: Tue 17 May, 2005 10:10 am Post subject: |
|
|
Thanks, fellas!
Russ: I don't intend to do any test cutting with it, mainly because I'm not convinced of the utility of test cutting for other than martial training reasons (learning to gauge distance, strike efficiently, properly orient the blade, etc.) No modern target--none--is going to provide any credible indication of how a reproduction would perform in the heat of combat against living, moving human targets trying very hard not to be hit. Too many variables. However, I hafted this piece as strongly as I could and it is sharp. It is a fully functional weapon. I'm going to design a display to keep all my collection safely out in the open but easily accessible for study/pawing. I do play enough with these pieces, short of test cutting, to get some sense of how they can and can't move. That's why I try to get them as close as I can to the proportions/specs of the originals.
Patrick: Just think of all the wonderful polearms you could choose from without getting away from your chronological focus! Spears! Axes! Bills! I can definitely see a Danish axe whipping around that cool new helmet. If you haft 'em yourself, they're also very, very inexpensive.
-Sean
Author of the Little Hammer novel
https://www.amazon.com/Little-Hammer-Sean-Flynt/dp/B08XN7HZ82/ref=sr_1_1?dchild=1&keywords=little+hammer+book&qid=1627482034&sr=8-1
|
|
|
|
|
Sean Flynt
|
|
|
|
|
|
Russ Ellis
Industry Professional
|
| Posted: Tue 17 May, 2005 11:28 am Post subject: |
|
|
| Sean Flynt wrote: | Thanks, fellas!
Russ: I don't intend to do any test cutting with it, mainly because I'm not convinced of the utility of test cutting for other than martial training reasons (learning to gauge distance, strike efficiently, properly orient the blade, etc.) No modern target--none--is going to provide any credible indication of how a reproduction would perform in the heat of combat against living, moving human targets trying very hard not to be hit. Too many variables. However, I hafted this piece as strongly as I could and it is sharp. It is a fully functional weapon. I'm going to design a display to keep all my collection safely out in the open but easily accessible for study/pawing. I do play enough with these pieces, short of test cutting, to get some sense of how they can and can't move. That's why I try to get them as close as I can to the proportions/specs of the originals.
Patrick: Just think of all the wonderful polearms you could choose from without getting away from your chronological focus! Spears! Axes! Bills! I can definitely see a Danish axe whipping around that cool new helmet. If you haft 'em yourself, they're also very, very inexpensive. |
Okay, that's what I was wondering about. Did I understand you to say that your haft is poplar?
TRITONWORKS Custom Scabbards
|
|
|
|
|
Sean Flynt
|
| Posted: Tue 17 May, 2005 12:01 pm Post subject: |
|
|
It is poplar, so technically a hardwood (albeit a soft one) and hopefully not too different from ash, weight-wise. That's my biggest concern. If I did want to test cut with this, I'd try to find an ash dowel. For what it's worth, when I hafted my Kern axe I happened to have on hand both a poplar dowel and a red oak dowel. I couldn't (subjectively) tell that there was much weight difference between the two in that relatively small amount of wood, though the oak arguably was denser/stronger. The poplar was MUCH easier to work. I figured ash would be somewhere between poplar and oak, so was satisfied with the poplar.
-Sean
Author of the Little Hammer novel
https://www.amazon.com/Little-Hammer-Sean-Flynt/dp/B08XN7HZ82/ref=sr_1_1?dchild=1&keywords=little+hammer+book&qid=1627482034&sr=8-1
Last edited by Sean Flynt on Tue 17 May, 2005 12:33 pm; edited 1 time in total
|
|
|
|
|
|
Russ Ellis
Industry Professional
|
| Posted: Tue 17 May, 2005 12:21 pm Post subject: |
|
|
| Sean Flynt wrote: | | It is poplar, so technically a hardwood (albeit a soft one) and hopefully not too different from ash, weight-wise. That's my biggest concern. If I did want to test cut with this, I'd try to find an ash dowel. |
Okay cool, it sounds like you are well aware of the realities of the situtation.
TRITONWORKS Custom Scabbards
|
|
|
|
|
|
Matthew Kelty
|
| Posted: Tue 17 May, 2005 12:21 pm Post subject: |
|
|
| Quote: | | It is poplar, so technically a hardwood (albeit a soft one) and hopefully not too different from ash, weight-wise. That's my biggest concern. If I did want to test cut with this, I'd try to find an ash dowel. |
They are significantly different woods in their behavior and attributes. While Ash is technically a softwood, it's very tough and stiff, but springy, kind of like hickory. Poplar will tend to shear off in a series of jagged edges, and Ash fibers tend to separate before shearing, similar to oak, but lighter.
I'd say an Ash shaft would probably add a tiny bit to the weight, but it would help deliver some "oomph" on your strikes.
|
|
|
|
|
Sean Flynt
|
| Posted: Tue 17 May, 2005 12:43 pm Post subject: |
|
|
That's about what I figured--that the difference would be seen in both the durability of the haft and the density/flexibility of the fibers as that relates to impact. No impact, no worries, but I do want a weapon that gives me a realistic sense of weight and balance. If any of y'all can provide a weight for a 6' ash dowel (1.25",) I'd sure love to have that info so I can get some idea of the weight difference between poplar and ash hafts. I suspect we're talking about only ounces, and that spread out over the length of the haft. I'm not sure I'd be able to discern, either in weight or balance, less than about half a pound of difference.
-Sean
Author of the Little Hammer novel
https://www.amazon.com/Little-Hammer-Sean-Flynt/dp/B08XN7HZ82/ref=sr_1_1?dchild=1&keywords=little+hammer+book&qid=1627482034&sr=8-1
|
|
|
|
|
|
Matthew Kelty
|
| Posted: Tue 17 May, 2005 12:59 pm Post subject: |
|
|
I'm tempted to say that my 9' X 1 1/2" poles are about 5 lbs, so maybe 2-2.5 pounds?
I'll be weighing my pikes shortly, so I can tell you definitively what a 16' pole weighs...
|
|
|
|
|
|
Aaron Schnatterly
|
| Posted: Tue 17 May, 2005 1:13 pm Post subject: |
|
|
Sean, you really did a fine job with this piece!
I'm getting this odd feeling that my collection will grow into some hafted weapons soon... thanks for the inspiration, though my wallet grows thinner...
-Aaron Schnatterly
_______________
Fortior Qui Se Vincit
(He is stronger who conquers himself.)
|
|
|
|
|
|
George Hill
Location: Atlanta Ga Joined: 16 May 2005
Posts: 616
|
| Posted: Wed 18 May, 2005 12:09 am Post subject: |
|
|
MRL still has these? I had no idea.... Can anyone be so kind as to tell me which page of the catalog? I bought one a few years ago at the bargin sale, and I was rather convinced I had the last. I adore it abjectly.
Also, If I may be so bold, why did you desire to move the langets? I adore mine, and compared to my MRL spear, which is only on by friction, the idea of the langets gave me tremendous faith in the weapon, that the head would NEVER come off no matter how hard I swung it. A faith drilling my spearhead for a single bolt would not have.
OH, Mine is not sharp, but will cut a pumpkin like a laser beam even without an edge. 
To abandon your shield is the basest of crimes. - --Tacitus on Germania
|
|
 |
|
Sean Flynt
|
| Posted: Wed 18 May, 2005 5:54 am Post subject: |
|
|
| Matthew Kelty wrote: | I'm tempted to say that my 9' X 1 1/2" poles are about 5 lbs, so maybe 2-2.5 pounds?
I'll be weighing my pikes shortly, so I can tell you definitively what a 16' pole weighs... |
Excellent info! Thanks!
By the way, my guesses yesterday were pretty on-target. However, the closed end of the socket is slightly more robust than I thought. It's 7/8" on the long side and .5" on the short.
I also consulted a couple of sources just to get a better idea about the wood issue. One author mentions that although "almost all" of the Swiss halberd hafts he examined were of ash, it was not uncommon to use whatever wood was available, including oak and others. That matches what the author of the longbow article in Blood Red Roses had to say about arrow shafts (ash preferred, but contemporary writers commplained about how common it was to find shafts of different wood). I also read somewhere recently about 16th or 17th century British laws restricting the staining of wood to prevent substandard woods from being passed off as premium. So, the concern about wood for arms use is not a new one.
My guess is that a weapon for guards (such as a glaive) would have the best wood available. For those of you who want to train seriously, I'd suggest buying an ash pole. Those are available from a few online vendors, but they're pricey. Using one for this project would be like putting Pirellis on a Pinto. 
-Sean
Author of the Little Hammer novel
https://www.amazon.com/Little-Hammer-Sean-Flynt/dp/B08XN7HZ82/ref=sr_1_1?dchild=1&keywords=little+hammer+book&qid=1627482034&sr=8-1
|
|
|
|
|
Sean Flynt
|
| Posted: Wed 18 May, 2005 6:09 am Post subject: |
|
|
| George Hill wrote: | MRL still has these? I had no idea.... Can anyone be so kind as to tell me which page of the catalog? I bought one a few years ago at the bargin sale, and I was rather convinced I had the last. I adore it abjectly.
Also, If I may be so bold, why did you desire to move the langets? I adore mine, and compared to my MRL spear, which is only on by friction, the idea of the langets gave me tremendous faith in the weapon, that the head would NEVER come off no matter how hard I swung it. A faith drilling my spearhead for a single bolt would not have. |
Maybe somebody here has catalog #84 (or was it #83?) available. If so, this item is in the little plain paper insert in the middle of the catalog. I bet you could call MRL toll-free and tell them you're interested in the glaive, but don't know the cat. #. They'd find it for you.
As for the langets: I could either leave them as-is, which didn't look historically accurate to me but at least served the basic purposes of securing the blade to the haft and distributing impact down the haft OR I could sever them and move them into more aesthetically/historically pleasing positions. The latter option theoretically reduces the durability of the weapon, but also makes it much easier to handle the weapon in an historically accurate fashion. Since I'm not planning on test-cutting with the weapon, I preferred that it look and feel right. I've seen the primary langets in different positions on historic pieces, but they do seem to most commonly run down the sides. Plus the attachment of the langets as shipped is just ugly and ungainly-looking. Suffice it to say that all parts of this weapon feel very secure.
I know exactly what you mean about the confidence of a riveted (as opposed to a "loose" or pinned) head. The rivet through the socket of this weapon removes my concern about the lack of attachment to the langets. This head is not coming off.
-Sean
Author of the Little Hammer novel
https://www.amazon.com/Little-Hammer-Sean-Flynt/dp/B08XN7HZ82/ref=sr_1_1?dchild=1&keywords=little+hammer+book&qid=1627482034&sr=8-1
|
|
|
|
|
|
|
You cannot post new topics in this forum
You cannot reply to topics in this forum
You cannot edit your posts in this forum
You cannot delete your posts in this forum
You cannot vote in polls in this forum
You cannot attach files in this forum
You can download files in this forum
|
All contents © Copyright 2003-2026 myArmoury.com — All rights reserved
Discussion forums powered by phpBB © The phpBB Group
Switch to the Basic Low-bandwidth Version of the forum
|