I'm fishing for some advice or opinions and hoping I can get some here as I have in the past :)
I've spent the last few years collecting and creating some few pieces of armor, but they have all been maille suits in one form or another. Displaying them was done easily on a basic cross type display that I generally make from sch40 PVC. It holds up well, lighter then wood if I have to move it, and I can remove the shirts easily as needed.
Just recently I purchased a suit of 15th century Milanese style armor and while it will be some time before I actually see it I would like to have some method to display it. I've looked around the web and found a few stands for sale, but they are in the several hundred dollar range. While I am sure they will work I'd hate to spend the money on something that I could make myself.
Does anyone have any experience or suggestions on what I could build? The suit is a full harness, including gauntlets, sabatons, etc and I'm guessing that will factor into the display. I've thought about looking on Ebay or at some of my local department stores to see if I could purchase a used mannequin, but again I'm not sure if this will do the trick.
Any information is appreciated as always :)
Dominic
Me too: Same question no ideas yet, although I did think about the mannequin route or a lot of 2"X4" in a cross mounted on a wide plywood base.
Maybe a length of wood at the ends of the cross / shoulder to take the place of arms and a lower cross piece at hip level for the legs. Would have to think this through to make the armour easy to suspend and take off.
Various holes drilled at strategic places for attachement points using the armours strapping or rope suspension ( A bit like arming points. )
Dominic-
At least I know I am in good company... seems my story is almost identical to yours - plenty of maille, and now a fair amount of plate (pieces as well as a full transitional 14th and a full 16th C) with nowhere to properly display them. I, too, looked around, finding the following:
1) fairly to very nice, but very expensive stands
2) moderate to cheap, not at all what I want stands
3) mannequins that don't articulate, aren't remotely built like me, might possibly work, but just aren't what I need
4) mannequins that do articulate, still aren't built like me (more the stocky football-player - find a mannequin like that!), and cost half what the harness did!
This leaves me with the feeling that I am going to have to do as you mention - build it myself. Like most things, there are two sides to this coin... On one side, I love woodwork. On the other, I don't have the tools. If I can remedy the second, I'm in business. I think a friend's uncle will be kind enough to help. :D
The 15th C harness you mention is complete - literally head to toe. This begs a number of questions on how you plan to display it:
1) What pose do you plan on putting it in? Arms / hands straight by the side is the easiest, but also the least aesthetic. The more classic hands in front resting on the guard of a sword is more difficult. A fighting pose with a sword overhead is extreme - much, much more effort.
2) Do you plan to display solely the armour, or are you going to dress the stand with the appropriate garments, boots, etc. Anything with a sole will require the stand's "pelvis" to be mounted on a central post, with legs attached and hanging off of "hips". I have this issue with a full Templar kit where the chausses and hosen have soles. I will not be placing boots inside my sabatons and greaves of the 16th C harness, however, and will be able to have the legs firmly set to the base.
3) How poseable do you want this to be? Making articulated joints isn't nearly as simple as fixed ones, but shouldn't be too much of a challenge if you are familiar with wood and have the proper tools to do so.
Here's my plan so far... but it's all in my head and far from complete. I have multiple harnesses, and I wish to vary the poses. As such, I want a fairly poseable piece in the arms, but the legs, back, shoulders, and head will be solid. I figure the body to be a boxy "A" with a post coming out of the top to be the neck/head.
The arms I plan on having rotate and bend at the shoulder, elbow, and wrist such that I can simulate all motions the arm is capable of.
As I am putting these out for display in my house, I will be finishing them nicely. I will turn the legs and arms on a lathe, and will sand, stain, and finish them... well, at least I hope to. Besides, I don't have much in my arms & armour collection that sits dormant - I use it for living history and I "fight" in the stuff, so a "naked" stand still needs to be presentable.
Another possibility for the arms would be to use tubing and bend it to the form you want the armour to be posed in. Mount it in some appropriate fashion to the shoulder of your frame, and you got it made. Probably a lot easier than all the fancy wood work... possibly a lot cheaper, too.
A third possibility for a fixed-pose mannequin still uses PVC but would have wood blocks with holes drilled in at the appropriate angles to serve as joints. The stand would be lighter, and quite inexpensive, but likely ugly as sin without the armour.
Don't know if this was much help - especially without plans. I'm not looking to build these things for profit, so if and when I get decent drawings made up, I'll be happy to share them with the community.
-Aaron
Thanks for the ideas so far and I apologize for the delays in responding. Took a couple vacation days and the last thing I wanted to look at was a computer.
Anyway, at least I am not alone in this boat. I've been mulling over some of the ideas you mentioned, but have yet to come to any firm decision. Much like yourself Aaron I plan on using the suit from time to time and so I would like the stand to be somewhat presentable when unadorned.
Unfortunately, while I can usually find my way through a carpentry project, I am by far not a master of the trade. I do like the idea you mention about using tubing for the appendages and using wood for the base. I have a good friend with a mandrel bender that is used for making smooth bends in exhaust pipes. I know he has a load of excess pieces laying around as well so I think this week I'll stop by and see if its a feasible alternative.
I'd love to see the plans you have cooked up once you get them on paper and I'll make sure to put mine down as well for whatever its worth. :)
Dominic
| Dominic Dellavalle wrote: |
| Unfortunately, while I can usually find my way through a carpentry project, I am by far not a master of the trade. |
Neither am I, but my brother is. I've run some ideas across him, and he's compiling some suggestions. Unfortunately, he's about 1000 miles away.
| Quote: |
| I do like the idea you mention about using tubing for the appendages and using wood for the base. I have a good friend with a mandrel bender that is used for making smooth bends in exhaust pipes. I know he has a load of excess pieces laying around as well so I think this week I'll stop by and see if its a feasible alternative.
I'd love to see the plans you have cooked up once you get them on paper and I'll make sure to put mine down as well for whatever its worth. :) Dominic |
I was thinking of small-gauge tubing, but hadn't considered using pipe. That's not a bad idea - especially if your friend (or you) can weld. Another thought I had was to use ball-joints like they use to attach antennas to vehicles. Would take 2 for the elbows, 2 for the shoulders, and maybe 2 for the wrists. I don't know how much this would cost or how secure it would be...
I'll be glad to share my plans - in fact, will do a decent job of documenting either with drawings or with photos. Maybe both. I look forward to seeing what you are able to come up with as well.
I made a nice,sturdy museum-type stand for my wife's lorica segmentata and helm. I have the full instructions and photos somewhere. I'll try to dig them out tonight and post them here.
First, I'd suggest using wood. Lighter isn't always better. Yes, the fully-loaded stand can be a pain to move (I take my wife's kit around to her university department's recruiting events), but I appreciate the stability of the piece when it's on display. Plus, the stand alone isn't all that heavy.
First, I'd suggest using wood. Lighter isn't always better. Yes, the fully-loaded stand can be a pain to move (I take my wife's kit around to her university department's recruiting events), but I appreciate the stability of the piece when it's on display. Plus, the stand alone isn't all that heavy.
| Sean Flynt wrote: |
| I made a nice,sturdy museum-type stand for my wife's lorica segmentata and helm. I have the full instructions and photos somewhere. I'll try to dig them out tonight and post them here. |
Would be much appreciated, Sean! Biggest issue I have is in stable articulation of the limbs - does this stand have arms?
| Quote: |
| First, I'd suggest using wood. Lighter isn't always better. Yes, the fully-loaded stand can be a pain to move (I take my wife's kit around to her university department's recruiting events), but I appreciate the stability of the piece when it's on display. Plus, the stand alone isn't all that heavy. |
True - having a solid, sturdy piece is important, especially when it is in contact with the public. It does, of course, have to be able to withstand whatever burden is placed upon it. Base 70 lbs for the armour, and add in the garments, gussets, and an appropriate sword, I may be looking at 85 - 90 lbs this will have to withstand. Yup - in a classroom full of middle-schoolers, this falling over would be a VERY bad thing.
Mine has "shoulders" which could serve as attaching points for additional arm structures, but I'm not sure what those would look like. If you mainly just need something of arm-like diameter, I think the PVC solution would serve.
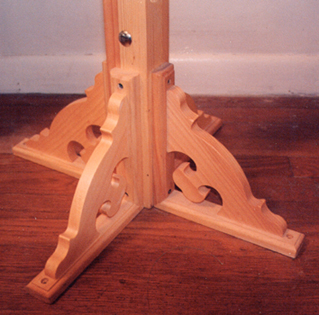
I took my cue from the antique stands in the Graz armoury. However, instead of the typical box-type base, I got four L-shaped ornamental wooden brackets from Lowe's and used them upside down at the base of the stand. I found these to be kind of flimsy, so you might want to reinforce those with screws OR cut the brackets out of thick wooden planks (simple triangles should work fine). I think the base is the most important feature as far as stability is concerned. Tipping is the great danger, and no amount of weight is going to tip the stand as long as the bases extend far enough out from the central post.
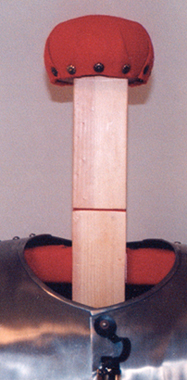
4x4 seemed like overkill for the main shaft of my design, so I used three 1x3 boards, glued them together and then used a few shiny steel carriage bolts on the shaft both for decoration and strength. The trick I figured out was to to leave the middle 1x3 short, cut off at shoulder height. Slide a shoulder width length of 1x3 horizontally into that space (shape the ends so that you have a long, flat pyramid). Then cut another piece of 1x3 to fit vertically on top of that piece and make up the rest of the difference to the top of the stand. Put a screw, NOT a bolt, into the stand and shoulder piece from the back of the stand.
My stand has a removable helmet rest, so is constructed slightly differently. What I've described above is for a stand that includes the helmet rest. To finish the top, go to Lowes and check the craft wood section for a cylindrical piece of wood (whose intended purpose I have not discovered). It's about 2" thick and 4" across and has a bolt pre-installed so you can just drill a hole in the top of your stand and scew this thing in. It's perfect! I covered mine with felt (over a disk of close-cell foam) and used decorative furniture tacks to secure it. Alternately, go to Hobby Lobbby, Michaels, etc. and get a small circular wooden plaque. Works the same way, it's just not as robust (though you could use two of these back-to-back).
While you're running around Lowe's, pick up a good handtruck with pneumatic tires. That's the way I transport my wife's stand and armour to schools and such. You might also look into getting a '93 Toyota Corolla wagon. :lol:
I'll try to find some pics.
I took my cue from the antique stands in the Graz armoury. However, instead of the typical box-type base, I got four L-shaped ornamental wooden brackets from Lowe's and used them upside down at the base of the stand. I found these to be kind of flimsy, so you might want to reinforce those with screws OR cut the brackets out of thick wooden planks (simple triangles should work fine). I think the base is the most important feature as far as stability is concerned. Tipping is the great danger, and no amount of weight is going to tip the stand as long as the bases extend far enough out from the central post.
4x4 seemed like overkill for the main shaft of my design, so I used three 1x3 boards, glued them together and then used a few shiny steel carriage bolts on the shaft both for decoration and strength. The trick I figured out was to to leave the middle 1x3 short, cut off at shoulder height. Slide a shoulder width length of 1x3 horizontally into that space (shape the ends so that you have a long, flat pyramid). Then cut another piece of 1x3 to fit vertically on top of that piece and make up the rest of the difference to the top of the stand. Put a screw, NOT a bolt, into the stand and shoulder piece from the back of the stand.
My stand has a removable helmet rest, so is constructed slightly differently. What I've described above is for a stand that includes the helmet rest. To finish the top, go to Lowes and check the craft wood section for a cylindrical piece of wood (whose intended purpose I have not discovered). It's about 2" thick and 4" across and has a bolt pre-installed so you can just drill a hole in the top of your stand and scew this thing in. It's perfect! I covered mine with felt (over a disk of close-cell foam) and used decorative furniture tacks to secure it. Alternately, go to Hobby Lobbby, Michaels, etc. and get a small circular wooden plaque. Works the same way, it's just not as robust (though you could use two of these back-to-back).
While you're running around Lowe's, pick up a good handtruck with pneumatic tires. That's the way I transport my wife's stand and armour to schools and such. You might also look into getting a '93 Toyota Corolla wagon. :lol:
I'll try to find some pics.
Go to this site:
http://www.zeughaus.at/frameset_e.html
Click on the "some objects in 3-D" button
Choose one of the half-armours and open the large image. Drag the cursor over the image while holding the mouse button to turn the armour 360 degrees. This allows to see at least a little bit about the construction of the stand. Unfortunately, these images don't show the bases.
Last edited by Sean Flynt on Tue 22 Feb, 2005 1:45 pm; edited 1 time in total
A-ha! Look at the lower left corner background of Blaz Berlac's photo from Graz. There's the simplest and strongest way to make the base. For this, and for the whole project, you need only a saw, a drill and a cheapo wooden miter box to cut the angles on the base struts.
http://www.zlate-ostroge.org/slike%20za%20gal...%20034.jpg
http://www.zlate-ostroge.org/slike%20za%20gal...%20034.jpg
Sean-
Thanks for the links, man! The stand for the half harnesses looks like a T with stubby arms coming off at approx. a 30^ angle. That'd work ok if I can't manage to articulate the elbows and wrists with the other plan... just point the armour to the arms, and some lesser attachment could be rigged to tie the vambraces to the gauntlets. Make 2 uprights instead of 1 - gotta hold up both legs, right? Unless, of course, I want to emulate the Black Knight from the Holy Grail - then I could make it a lot shorter, too! :p
At any rate, this type will work very well for my maille collection - relatively inexpensive, sturdy enough, and simple to construct. Could make a few of these in one day... For the plate harnesses, I am hoping to be able to build something with more of the box base like is seen in the same link, but with the fluted armour. I would, however, like to put a drawer in mine to hold rags and polish or whatever else I might come up with that would be useful to maintain it's nice appearance. I'll keep the legs straight, unless I can think of some way to set them in a pose (not articulated) to simulate a more natural stance.
Yeah, theirs seems to be almost a true T shape, with the helm just resting on the armour. That simplifies things greatly, as you could just drop in the cross piece for the shoulders and pin it in place from the back. As for the legs, you could do what I did for the shoulders, but at waist level to create a faux-pelvis that you could attach legs to.
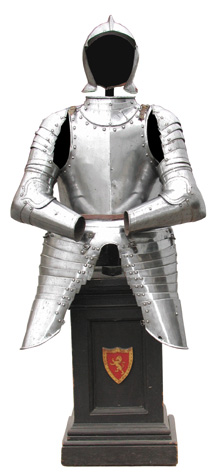
Here's a nice example of the box-type base. Notice that in this case the main shaft extends to form a helm rest. The arm defenses seem to be simply resting against the tassets.
 Attachment: 28.43 KB
| Sean Flynt wrote: |
| Here's a nice example of the box-type base. Notice that in this case the main shaft extends to form a helm rest. |
Exactly. Just for a full harness instead, so a shorter box, but yes. Exactly.
| Quote: |
| The arm defenses seem to be simply resting against the tassets. |
I'm not sure if this is the case... I'm wanting to say with some conviction that there is a square object you can make out in the right (the armour's right arm) vambrace. This would be possible if the vambrace is hinged, as the cannon / rarebrace is definitely not. Placing it in this pose, it would be possible to use a simple hook and eye to suspend the arm from the shoulder. Point the arm harness and gauntlet to the arm, then install the arm under the pauldrons. That's the pose I want the arms in, assuming I go with a stiff "at attention" pose. This would work for both the 16th C and the 14th C harnesses.
As for the other type, yes. I could have a lower "shoulder" to serve as a pelvis, and simply point the chausses to. That would save me from making at least one of the more complex ones... the Templar kit would go nicely here. This is probably what I will do. This design will also allow for some "hips" to hold up a belt. Just the T (with the helmet post) would work well for the rest of the maille, and the lamalar.
I definitely appreciate your help, Sean!
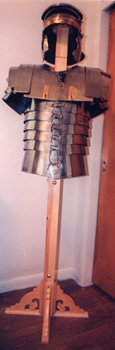
Here are some crappy scans of some terrible matte prints of some trashy images :(
The lens distortion on the full length shot makes the base look too small, but it's much better in person. Hopefully, these are mostly self-explanatory. I made this four years ago, and would do a few things differently, but the basic design is sound.
Attachment: 53.57 KB
Attachment: 84.15 KB
Attachment: 107.05 KB

Attachment: 101.12 KB

Attachment: 114.24 KB
The lens distortion on the full length shot makes the base look too small, but it's much better in person. Hopefully, these are mostly self-explanatory. I made this four years ago, and would do a few things differently, but the basic design is sound.
Sean-
Thanks for the pics. That's pretty much what I had envisioned through your explanation. I see what you mean about the shelf brackets - don't know how they would do under the strain of a full harness - the Lorica and helm are enough. I'm liking the helmet rest - enough security and cushion to not have it wobble off. That's a touch I hadn't really considered much. For things with leather or linnen liners, not having the stress of a post is definitely a good thing.
What I may well end up doing with at least my Hastings kit is beef up the base, and carve knotwork up the center pole and brace work. Dremels are wonderful tools...
Yeah...what did people do before the Dremel?
Man...this is what happens when I go home for the day, fall asleep early, then have a line up meetings the following morning. You all have certainly been busy. :)
Sean thanks for the great lineup of pictures and ideas and the brackets at the base with the scrollwork adds a nice touch. A little stain and urethane and I could match the dining room furniture...if my wife would let me keep my maille in the dining room, but that's another story. :p
Nonetheless, its a great start to getting the wheels in my head moving towards a design that can accomodate the full arms and legs of my harness. Once I get the sketches together I'll scan and post them and see what everyone thinks before I go ahead with actually building it.
Dominic
| Sean Flynt wrote: |
| Yeah...what did people do before the Dremel? |
I heard of this thing called "skill" once... not sure quite what it means... :p
I can carve, but not exceedingly well. With so friggin' many other projects out there to accomplish, I have to cut a few corners now and then. We'll see...
| Dominic Dellavalle wrote: |
| Man...this is what happens when I go home for the day, fall asleep early, then have a line up meetings the following morning. You all have certainly been busy. :)
Sean thanks for the great lineup of pictures and ideas and the brackets at the base with the scrollwork adds a nice touch. A little stain and urethane and I could match the dining room furniture...if my wife would let me keep my maille in the dining room, but that's another story. :p Nonetheless, its a great start to getting the wheels in my head moving towards a design that can accomodate the full arms and legs of my harness. Once I get the sketches together I'll scan and post them and see what everyone thinks before I go ahead with actually building it. Dominic |
I like to call this phenomenon "Life getting in the way of living :eek: " - It happens to the best of us.
Sean did hook us up with some good stuff here... hopefully we can get some solid work done now.
Page 1 of 2
You cannot post new topics in this forumYou cannot reply to topics in this forum
You cannot edit your posts in this forum
You cannot delete your posts in this forum
You cannot vote in polls in this forum
You cannot attach files in this forum
You can download files in this forum
All contents © Copyright 2003-2006 myArmoury.com — All rights reserved
Discussion forums powered by phpBB © The phpBB Group
Switch to the Full-featured Version of the forum
Discussion forums powered by phpBB © The phpBB Group
Switch to the Full-featured Version of the forum