Hello everyone,
I made a wood core for my rondel dagger, and am not sure how to proceed in terms of how to set up the attachment for the belt. I've looked at effigies and manuscripts but they don't seem to show much on specifics of how it was attached to the sword belt.
I figure I can make a kind of integrated strap, which I can then attach to a loop at the back which will then slide around the belt, like earlier sword scabbards:
[ Linked Image ]
OR, put some risers under the leather, which I can then simply tie a leather thong around the scabbard between the risers, and then tie it off to the belt:
[ Linked Image ]
Or option 3, which I haven't thought of yet.
I greatly appreciate any help, since I can't move forward with the project until I figure this out. Thanks!
In limited practice I've mostly seen people go with option 2.
K Thanks. I'll see if anyone else chimes in, I don't want to screw this up lol
Both methods were used historically - mostly with simply a longish cord or thong that could then be tied or looped to your belt at whatever height you want the dagger to hang - along with a couple of others like lacing the thong through the raised seam or the back of the scabbard leather in a U shape, or tying it around the core under the leather and exiting through the back seam (so it makes up another riser on its own).
Try looking for Leo Todeschini's work and his threads here on myArmoury for some good examples.
PS. It was also not uncommon to carry large daggers on a longer cord or thong slung around the neck or shoulders.
Try looking for Leo Todeschini's work and his threads here on myArmoury for some good examples.
PS. It was also not uncommon to carry large daggers on a longer cord or thong slung around the neck or shoulders.
Thanks Mikko. I looked at Todd's site and drooled lol.
Of course, much depends on the style and period of the dagger - what's appropriate and practical for a 14th Century noble might not be so for a 16th Century mercenary. :)
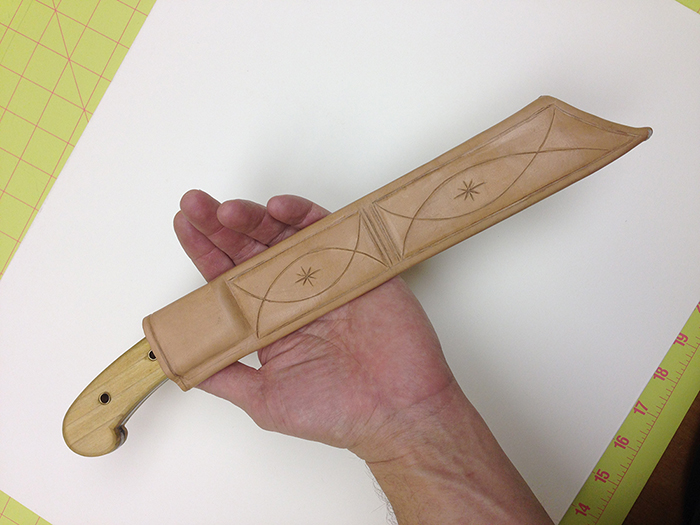
This is a correct and very practical method. I used this for the medieval-style sheath I made for a camp knife, which I wear for days at a time when camping. I've never had the slightest problem with it. I use this method for most of my knife sheaths.
NOTE: I make two-layer sheaths for knives of this size, and you're seeing only the unfinished external sheath in the construction shot here. I inserted/stitched and glued the internal sheath after forming both around the protected knife and stitching the external sheath. You can see here that the external sheath is still damp for forming. The nails are holding open the thong slits as it dries. When dry, fully assembled and waxed, the duplex sheath is very hard.
 Attachment: 190.56 KB
Attachment: 243.77 KB
Attachment: 231.03 KB
Attachment: 131.03 KB
NOTE: I make two-layer sheaths for knives of this size, and you're seeing only the unfinished external sheath in the construction shot here. I inserted/stitched and glued the internal sheath after forming both around the protected knife and stitching the external sheath. You can see here that the external sheath is still damp for forming. The nails are holding open the thong slits as it dries. When dry, fully assembled and waxed, the duplex sheath is very hard.
Some paintings suggest that the sheath of some large knives had vertical slots for a slender belt rather than a thong. That's what I did for this large knife, using the same basic technique shown above. I just used a thin piece of wood instead of nails to hold open the belt slots. I should point out that the slots are only in the external sheath.
That belt is not tied to the sheath. It just slides through the slots. I then tied the ends around the sheath this way just for display.
Attachment: 258.72 KB
Attachment: 404.3 KB
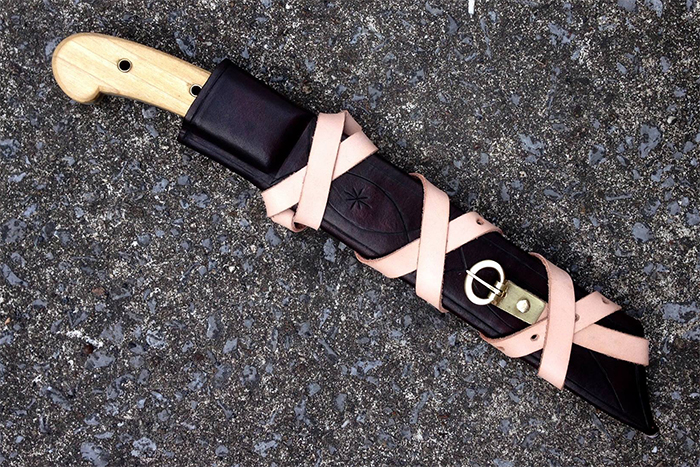
That belt is not tied to the sheath. It just slides through the slots. I then tied the ends around the sheath this way just for display.
Sean,
Forgive this extremely lame question, but your internal scabbards are wood, correct?
I ask this as I'm wondering if double-ply leather was ever done. It seems plausible - if boiled leather was quite stiff, it might make for a decent inner core of the scabbard. The scabbard would also not be as susceptible to breakage, though warping could be a problem.
Leather sheaths are actually more common on historical knives and daggers than wood-cored scabbards. Sometimes it's one layer of leather, sometimes two; in the latter case the layers can be separate pieces of leather (possibly with a significantly thinner outer layer when you want to do finely detailed embossed decoration, as seen on many cinquedea sheaths, for example), or it can be one piece folded over at the throat (like this).
You don't need to cook the leather, just form it over the blade while moist; it will stiffen as it dries and retain its shape quite rigidly. Glue can be used between the layers to further stiffen the construction, but it isn't strictly necessary. Even my single-layer seax sheath goes "thunk" like a piece of wood when you knock on it. :)
(Just make sure to only use vegetable tanned leather, to ensure that it actually can be formed like this and doesn't contain potentially corrosive trace chemicals.)
But since you do have a wooden core done, you might as well use it. It's not at all unheard of, historically.
yes, my sheaths are two layers of leather, with opposed seams and rough sides together. i’ll find some photos and post later.
Well, I can't find any in-progress shots that show the process clearly. I'll just describe it.
-wrap thin craft foam around the knife and tape. remove knife and cut a straight line down the back of the foam sheath. that's the pattern for the internal scabbard.
-trace the foam pattern onto the veg-tan leather, taking care to do this so that the finished internal sheath will have the smooth side against the blade. cut so that this piece of leather is slightly oversize to allow for shrinkage.
-wrap the knife in self-sticking plastic wrap. soak leather and wrap knife so that the seam is on the front of the blade. overlap the edges of the leather. tape around the leather in two or three bands to keep the leather in place as it dries.
-while the leather is still plastic, use a smooth object (pen barrel is ideal) to compress the edges of the sheath, define the area in which the hilt will rest, etc.
-when the leather is thoroughly dry, remove the knife and cut a straight line down the middle of the overlap/seam side.
-return knife to sheath and repeat this process for the external sheath, taking care to cut the leather so that the smooth side will be facing out, and that the seam of this sheath will be down the back of the knife. repeat all other processes, wrapping and molding the wet external sheath around the internal sheath and knife, creating the channels for thongs, compressing, defining, etc.
-i always leave ample material at the mouth of the sheath to trim later.
-when the external sheath is dry, remove it and punch for stitching. i use waxed thread for large sheaths. if the fitting was done properly, you can stitch the external sheath without worrying that the internal sheath won't fit.
-when everything is ready to go together, i put one stitch at top and bottom of the internal sheath, coat its exterior with glue and slide it into the external sheath. you can put a stitch through both sheaths at bottom if you wish, but it probably isn't necessary.
-when the sheath is assembled and the glue dried, then i trim the mouth of the sheath as needed, cutting through both layers a the same time, beveling edges, blending, etc. dye, insert belt/thong and you're done.
Here's one photo showing the internal sheath in progress--dried and untrimmed at the distal end. in this case i did have to finish the mouth since the knife does not fit down inside the sheath. as described above we're looking at the back of the knife here. the seam of the internal scabbard should be on the front. notice how closely i've fitted it, and note the horizontal marks left by the tape binding. the dark vertical marks on the edge are evidence of compressing the leather with the barrel of a Sharpie marker.
Attachment: 202.47 KB
Wow thats great Sean. I am definately going to do a strapping method like that. Do I have to glue my leather to the wood core?
It might not be necessary, but it's a good idea, especially if the blade is a snug fit in the internal sheath. Just be careful about the kind of glue you use, as some will damage steel. I use the original Titebond wood glue for everything NOT the blue cap Titebond.
And don't use too much glue, either! You don't want it seeping through the seams. :)
Right. It should not be running anywhere.
Ok thanks!
Nice work Sean
In answer to the OP, you generally see rondel dagger scarred on a thong and that seems to be pretty general over a long period. Higher status daggers were sometimes carried on a pair of chains. What I would add is that people tried and made all sorts of things so I would say that an integrated strap would also be fine, though I can't think of a particular example.
Good work on the scabbard so far so show us good things in time.
Tod
Thanks Tod! I will keep everyone posted once I get to work on it.
Page 1 of 1
You cannot post new topics in this forumYou cannot reply to topics in this forum
You cannot edit your posts in this forum
You cannot delete your posts in this forum
You cannot vote in polls in this forum
You cannot attach files in this forum
You can download files in this forum
All contents © Copyright 2003-2006 myArmoury.com — All rights reserved
Discussion forums powered by phpBB © The phpBB Group
Switch to the Full-featured Version of the forum
Discussion forums powered by phpBB © The phpBB Group
Switch to the Full-featured Version of the forum