| Author |
Message |
Leo Todeschini
Industry Professional

|
 Posted: Mon 01 Oct, 2018 3:48 pm Post subject: Schnepper crossbow WIP Posted: Mon 01 Oct, 2018 3:48 pm Post subject: Schnepper crossbow WIP |
 |
|
Hi All,
I have just finished a reproduction of a German Schnepper hunting crossbow and would like to talk you through some of the process. Rather unfortunately I took photos of the stock manufacture and then forgot to carry on for the trigger system, so I will have to talk you through it instead.
These crossbows were popular in the late 17th and 18thC in the German states, but never really seemed popular in the UK.
The medieval crossbows that were used militarily, generally used a single axle rotating nut trigger system that had not really changed since late Roman times (as far as we can tell), but the crossbow stopped being used for military uses around 1500 and then the golden age of the hunting crossbow began. The rotating nut works just fine, is simple, cheap to make and effective, but it is not very sensitive and perhaps importantly is 'old fashioned'. It was important that wealth was displayed and that was often done by having the latest kit and I strongly suspect that the rapid and very complex development of crossbow triggers was part of this. The trigger system used in these bows was part of the rapid spread and development of different triggers systems.
The drawing and description of how the system operates as given in Payne Galweys' - The Book of the Crossbow, is very helpful.
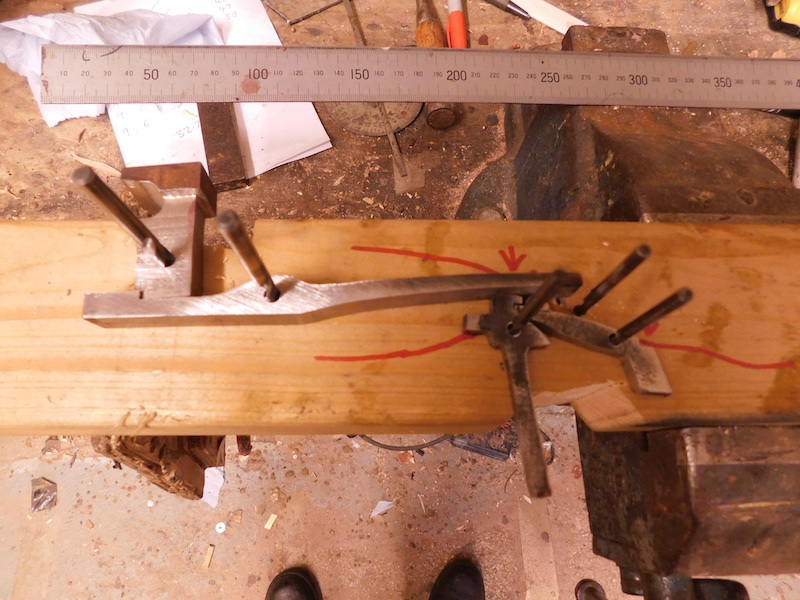
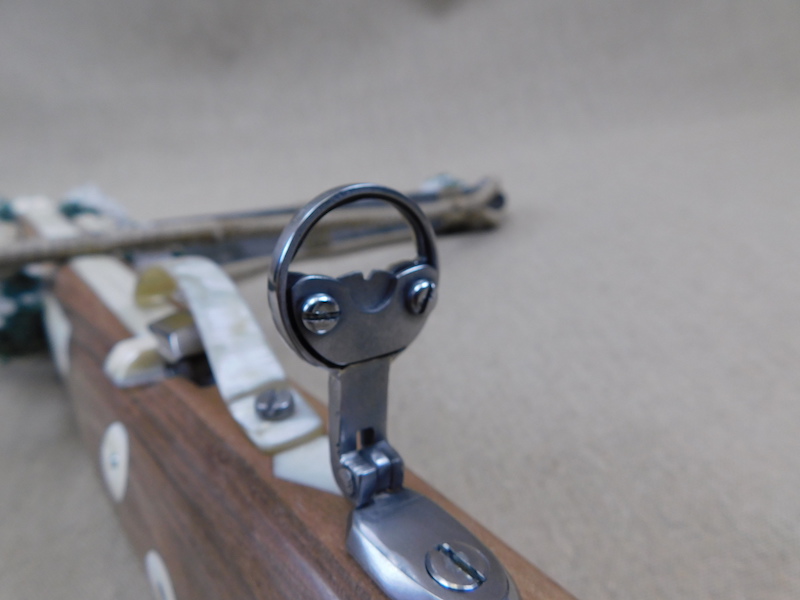
The klap lock catch captures the string in a groove in the top of the stock and is retained by a long trigger bar. The trigger holds back a hammer driven by a strong spring and when the trigger is pulled, the hammer strikes the trigger bar and allows the catch to open. After each shot, the trigger system is re-cocked and all the parts move back into place. The components are all driven by springs that are carefully balanced against each other, so the fettling and setting up procedure is quite long.
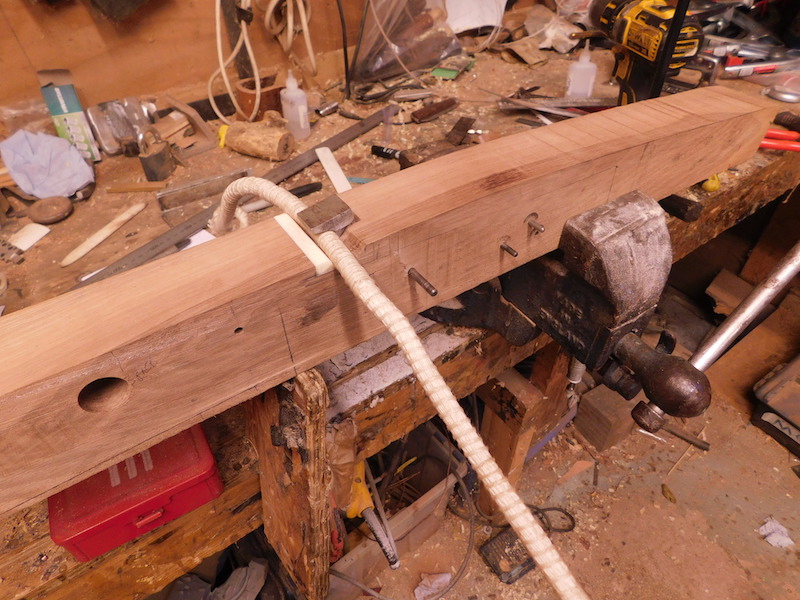
The crossbow is spanned using a gaffe lever or wippe lever and as the string is driven along the stock, it slips into the groove, pushes down onto the klap lock catch and causes it to close. The whole system works very well and smoothly when it is set, but it can a take a while to get there.
The first stage is to string the bow and get it positioned in the stock and then before any further work on the stock takes place, all the trigger components need to be made and tested as best as possible. This is done by mounting the components on a scrap piece of wood and testing all the movements and spring weights. This is all fine, in theory, but it is not possible to test the system under load until it is all finished and assembled in the crossbow, so everything that comes after this is clouded in the knowledge that the trigger system may not be functional.
So I cross my fingers and keep going......
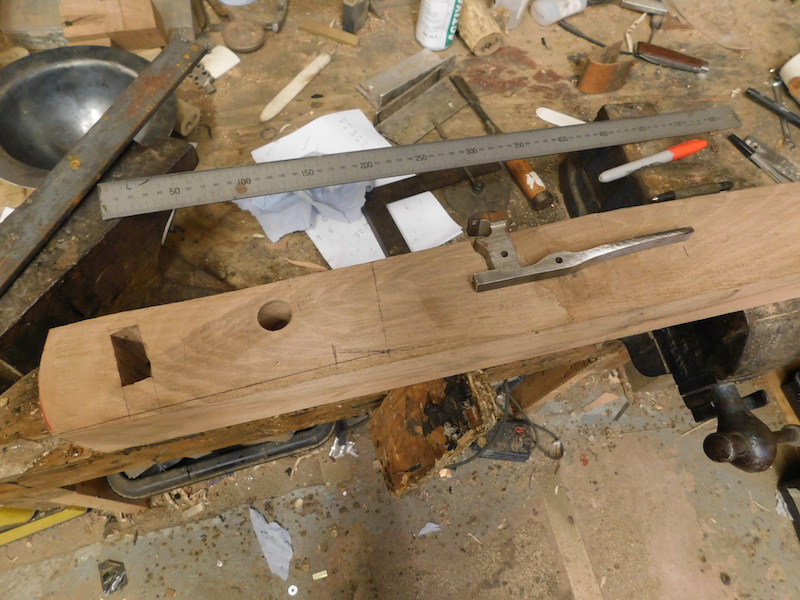
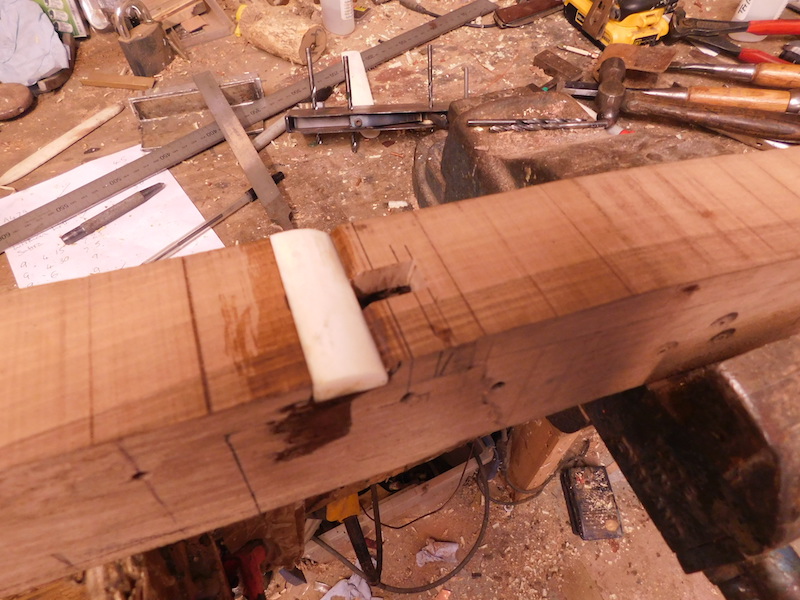
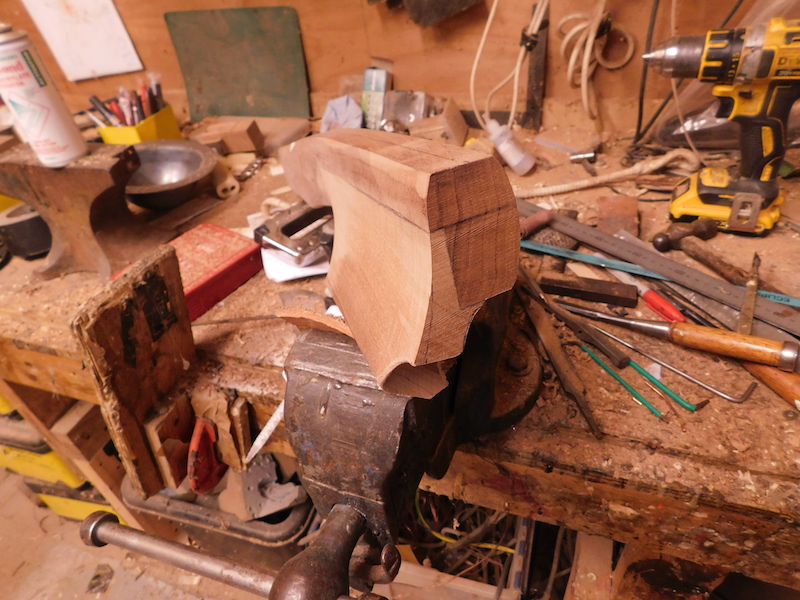
In the case of this crossbow I decided to make a box to house all the trigger components to allow me to fettle the system without having to work in the wood of the stock and once I was as satisfied as I could be I set the box into the stock and then shaped it.
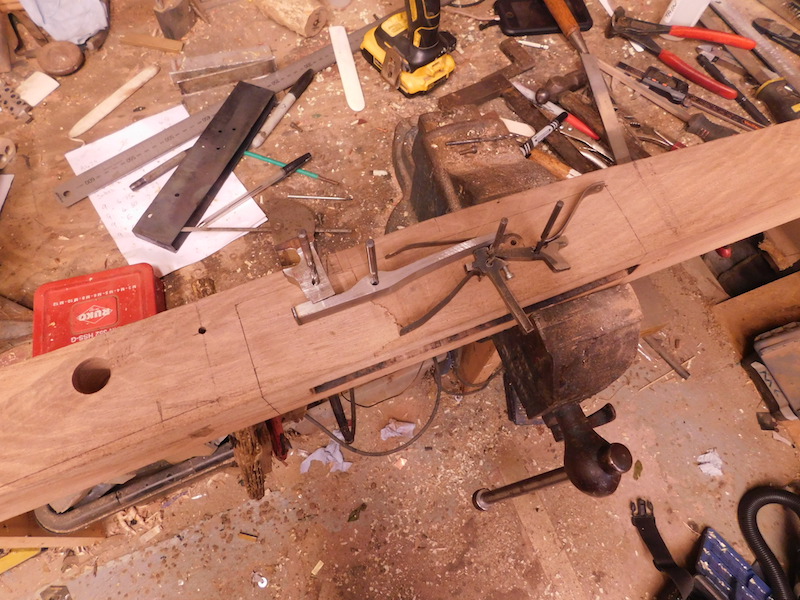
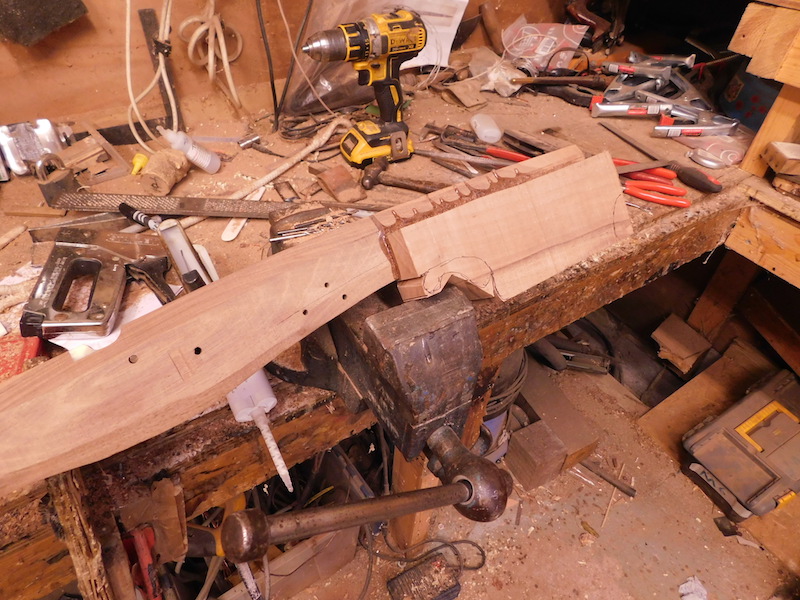
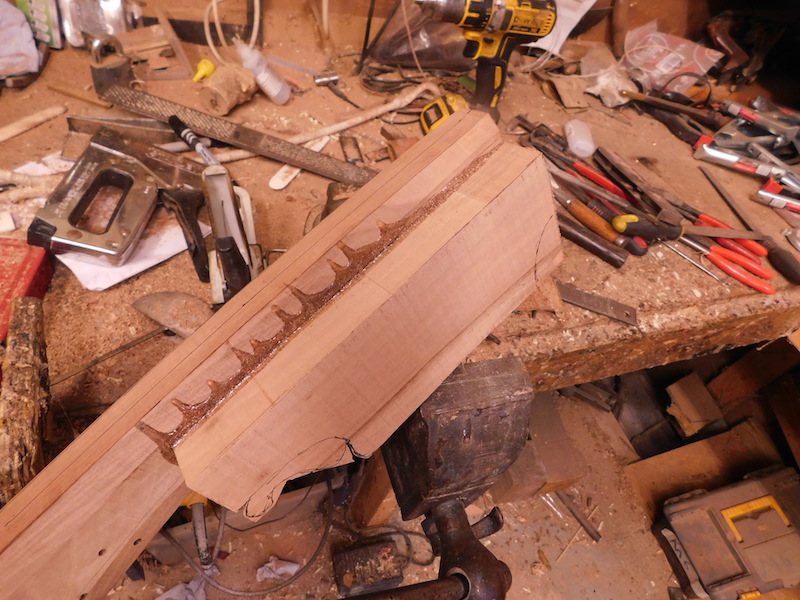
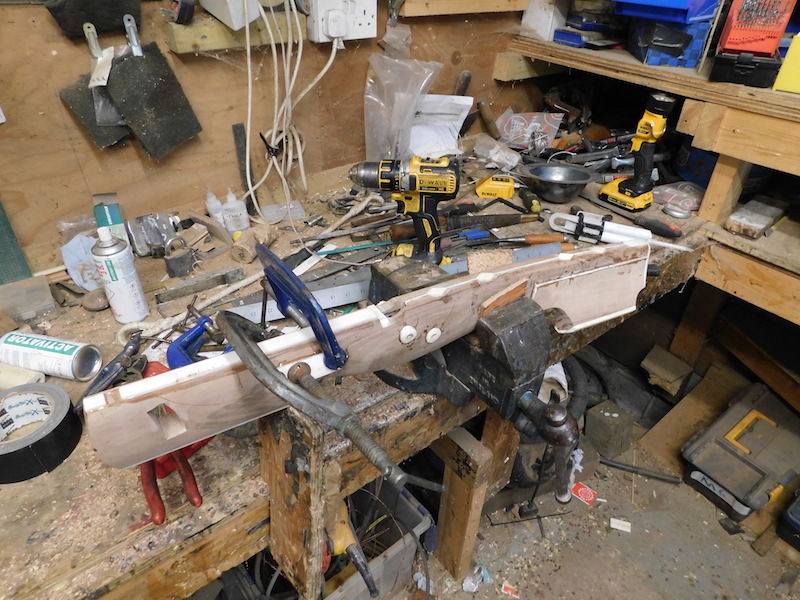
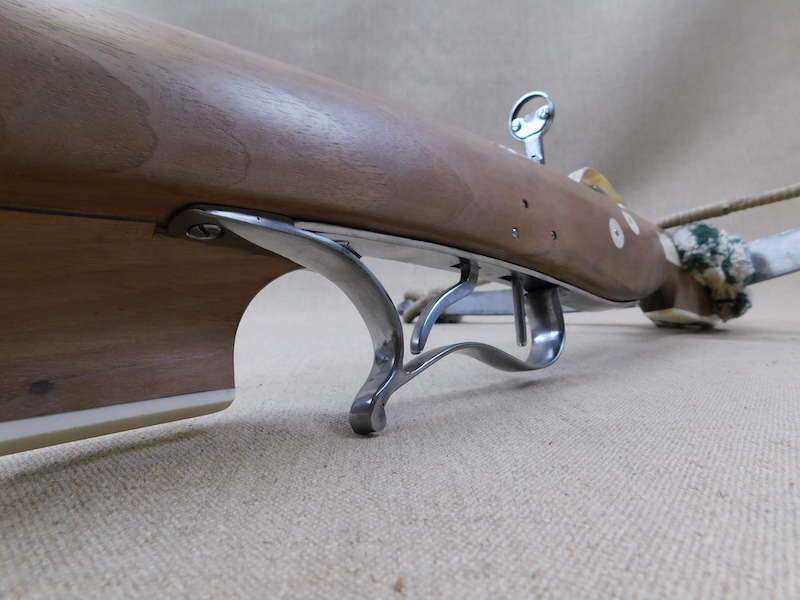
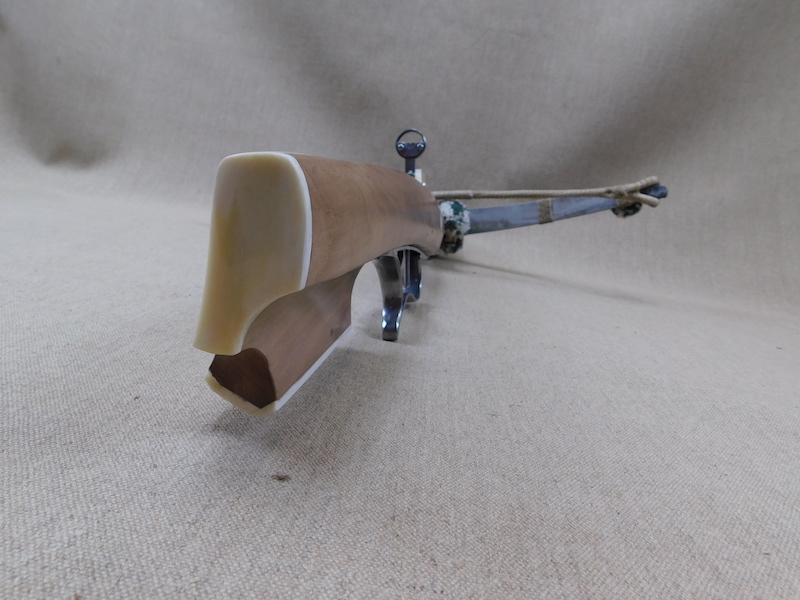
Now the trigger components are complete the stock can be shaped. The first step is to set the bone plate into the notch and make sure the depth of the notch works with the string and the klap lock catch. After this the cheek piece can be set in and glued into position. Once everything is dry, the main shaping and curving of the stock is undertaken and the bone plates and pin striping are cut in and glued. Again, after this has dried, everything is cleaned back and polished.
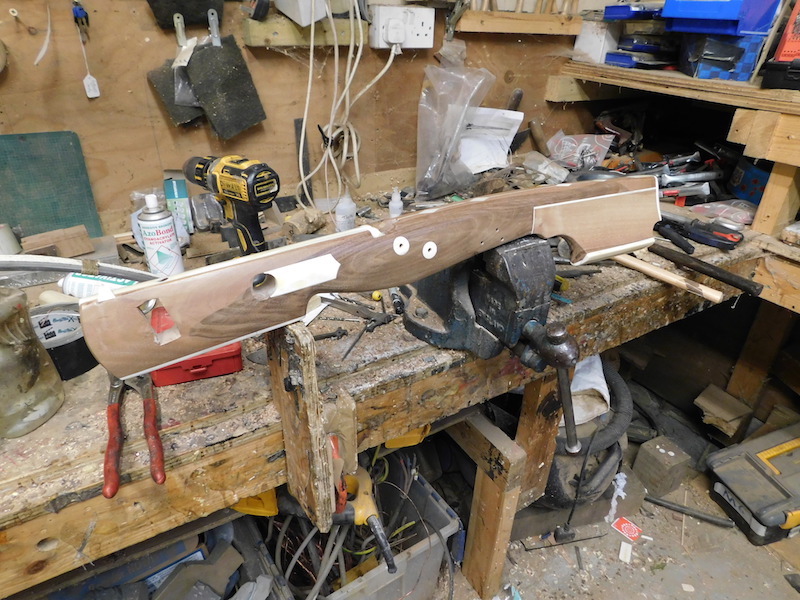
Once the stock is finished, the trigger system can be assembled back in and the cover plate and the trigger guard fabricated and fixed.
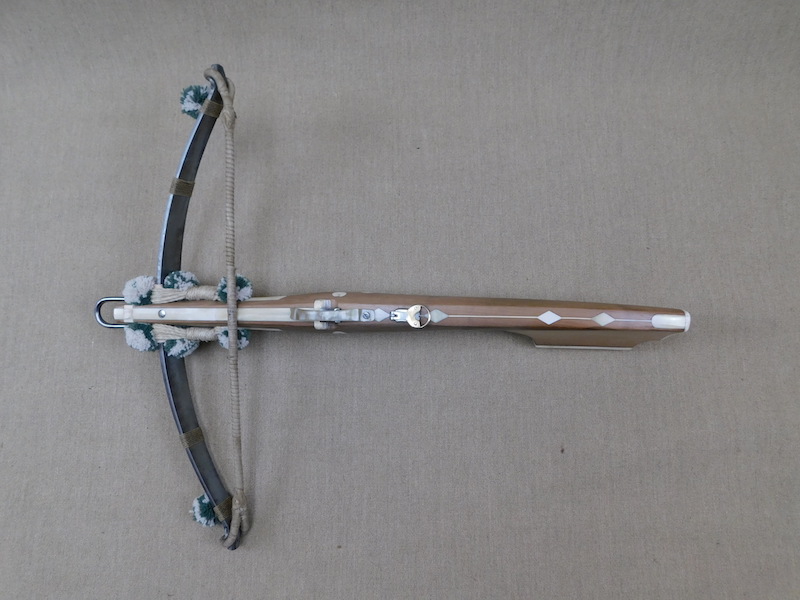
The stock and trigger are now finished and all that is left is to lash the bow into place, cross my fingers and then test the bow....and all is good.
I hope you like the results and of course if there is anything you would like to know or any comments, please fire away.
Tod
 Attachment: 185.49 KB Attachment: 185.49 KB
Attachment: 140.28 KB
Attachment: 174.37 KB
Attachment: 200 KB
Attachment: 185.5 KB

Attachment: 179.52 KB
Attachment: 181.01 KB
Attachment: 202.93 KB
Attachment: 194.32 KB
Attachment: 192.48 KB
www.todsworkshop.com
www.todcutler.com
www.instagram.com/todsworkshop
https://www.facebook.com/TodsWorkshop
www.youtube.com/user/todsstuff1
|
|
   |
 |
Leo Todeschini
Industry Professional
|
| Posted: Mon 01 Oct, 2018 3:50 pm Post subject: |
|
|
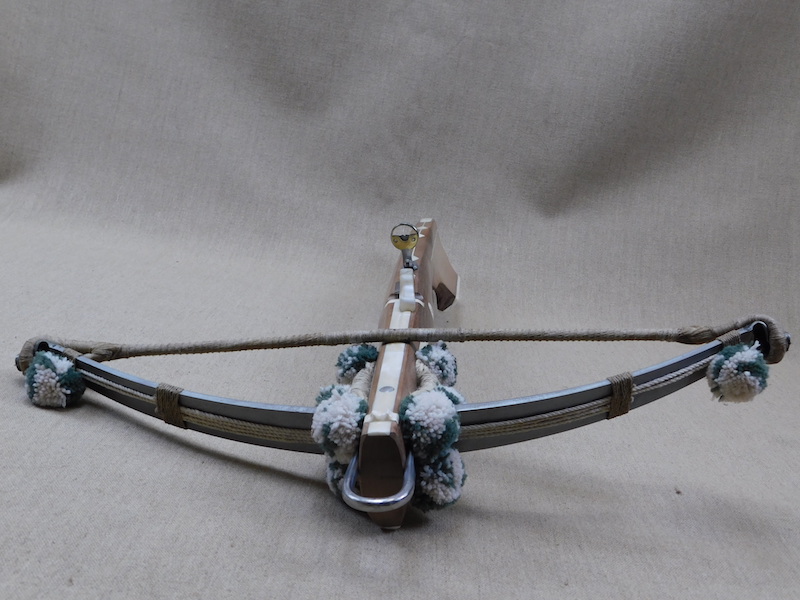
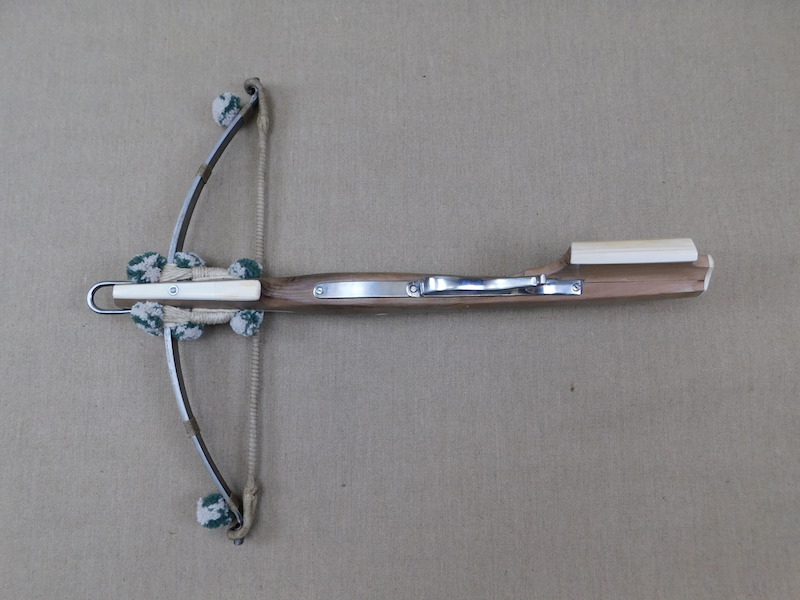
Once assembled and tested the final dressing needed to be done and that of course means pom-poms!
One of the weirdest things in history was the 17thC need for German hunters to put pom-poms on their crossbows, but there you are. I cannot see there being any practical reason for them, so that only leaves fashion and decoration as far as I can see.
Here are the final pictures.
Attachment: 205.87 KB
Attachment: 203.25 KB
Attachment: 145.28 KB

Attachment: 144.49 KB
Attachment: 169.01 KB

Attachment: 101.93 KB
Attachment: 142.5 KB
Attachment: 152.08 KB
Attachment: 118.73 KB
Attachment: 114.67 KB
www.todsworkshop.com
www.todcutler.com
www.instagram.com/todsworkshop
https://www.facebook.com/TodsWorkshop
www.youtube.com/user/todsstuff1
|
|
|
|
|
|
Ben Joy
|
| Posted: Mon 01 Oct, 2018 10:04 pm Post subject: |
|
|
Interesting trigger system. I'm glad it worked out for you after assembly was completed. Having to make and set all of those springs, while not being able to do an actual full-load stress test must have been more stressful and unnerving then just "keeping your fingers crossed".
If you don't mind, though, I'm rather curious and would love a little more clarity on the trigger assembly, please.
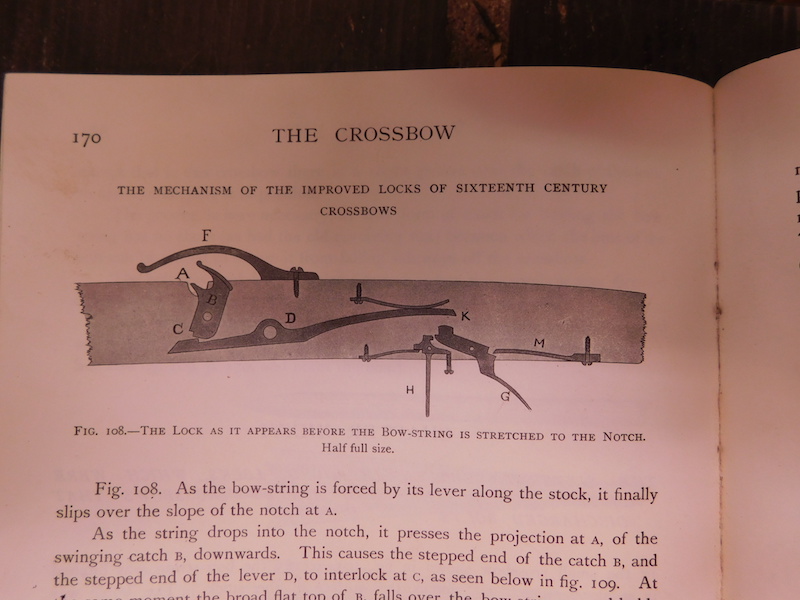
Using the provided image from your book of figure 108, is "G" a lever utilized for resetting the trigger while "H" is the actual trigger? "G" looks like what people would typically imagine the trigger looking like, but mechanically it doesn't appear to be the trigger . . . "H" does.
It looks like, to me, you squeeze (given a hand wrapping around the stock) "G" to set the hammer and move "H" into a locking position to hold the hammer until you're ready to fire . . . setting the trigger. Then "H" is your actual trigger when you want to fire.
It also looks like you can span the bow without actually arming the trigger . . . providing a sort of safety, while having an already spanned crossbow. Is this also true? That actually seems like quite an improvement over the "old fashioned" rotating nut system, unless there were those with safeties that I'm not aware of; and that's certainly quite possible, as my knowledge on the subject is quite limited.
Thank you, in advance. Again, the work is quite impressive, and your sharing of it is sincerely appreciated.
"Men take only their needs into consideration, never their abilities." -Napoleon Bonaparte
|
|
|
|
|
Leo Todeschini
Industry Professional
|
| Posted: Tue 02 Oct, 2018 12:53 pm Post subject: |
|
|
Thanks Ben,
Your analysis of the system is correct.
You also ask if it is possible to load the bow without the trigger being set and so use it as a safety. This cannot be done as the hammer pushes up against lever 'D' and so the catch will be left free and the string would not get caught.
If a safety is required because of the solid and conveniently positioned closing plate at the bottom of the stock, there are plenty of opportunities for rotating catches and the like, to interfere with the trigger and prevent a discharge.
Tod
www.todsworkshop.com
www.todcutler.com
www.instagram.com/todsworkshop
https://www.facebook.com/TodsWorkshop
www.youtube.com/user/todsstuff1
|
|
|
|
|
|
Ben Joy
|
| Posted: Tue 02 Oct, 2018 3:00 pm Post subject: |
|
|
This particular bow fascinated me enough that, given your description gave a sourced book with exact references, I picked up a digital copy. This statement now confuses me, further.
| Leo Todeschini wrote: |
You also ask if it is possible to load the bow without the trigger being set and so use it as a safety. This cannot be done as the hammer pushes up against lever 'D' and so the catch will be left free and the string would not get caught.
|
Figure 109, and the accompanying text from p. 170-171, indicates that you can secure the bowstring and bolt into place without setting the hammer. However you're saying that this isn't possible? Is this just a difference in construction between your bow and the bow in the book? Is it something just inadvertently overlooked? Miscommunication of concepts? For reference:
| Quote: | As the string drops into the notch, it presses the projection at A, of the swinging catch B, downwards. This causes the stepped end of the catch B, and the stepped end of the lever D, to interlock at c, as seen below in fig. 109. At the same moment the broad flat top of B, falls over the bow-string E, and holds it from escaping upwards out of the notch, figs. 109, 110.
Fig. 109. The bolt is now placed on the stock ; its butt-end, it will be seen, not quite reaching the notch. The rounded end of the piece of curved horn F, ( f in. wide,) presses lightly on the butt of the bolt and prevents it from falling off the crossbow should the latter be aimed downwards. The top of this piece of horn has a V-shaped nick cut along its centre at F, (see dotted line,) to act as a back-sight. The point of the bolt acts as a fore-sight. As the bow-string is forced to the
notch by the lever of the crossbow, it is pushed under the end o f the horn F. Though the bolt is now on the stock, the b ow bent and the string stretched (fig. 109), the crossbow is safe and cannot be discharged without further manipulation. |
Figure 109 shows the string clearly set, yet the trigger is not set; and the accompanying text says that it needs further manipulation to fire. Then it goes on to show in figure 110, with accompanying text, how the trigger is set after the bow is spanned and the bolt in place.
Attachment: 658.69 KB
Book of the Crossbow, Figure 109 [ Download ]
"Men take only their needs into consideration, never their abilities." -Napoleon Bonaparte
|
|
|
|
|
Leo Todeschini
Industry Professional
|
| Posted: Wed 03 Oct, 2018 3:21 pm Post subject: |
|
|
Hi Ben,
There may well be differences, and perhaps it is a difference in spring weights and I have not handled and original to know for sure, however consider the following.
For the bow to work as PG says, the light hammer must strike the heavy bar and drive it off the catch against its spring pressure using only its momentum, as the spring for the trigger set lever cannot engage during the whole travel otherwise it would always push up against the main bar (as I have done).
I am not saying PG is wrong, but I would say that I cannot see how it could work exactly as described. Please also consider that PG is a good primer and there is much of great value in the book, however don't take everything as gospel.
I hope that helps
Tod
www.todsworkshop.com
www.todcutler.com
www.instagram.com/todsworkshop
https://www.facebook.com/TodsWorkshop
www.youtube.com/user/todsstuff1
|
|
|
|
|
|
Ben Joy
|
| Posted: Wed 03 Oct, 2018 6:56 pm Post subject: |
|
|
Thank you for the insight.
While I don't take it as gospel, I can certainly see how it would work as he describes in the book. The hammer's spring and the hammer itself would need to be a bit more "weighty", so to speak, while the locking bar's spring would need to be a bit lighter. The tension of the spanned bow, on the swinging catch, would be enough to retain the bar in place. I've seen similar premises work plenty of times in various mechanical tinkering (namely firearms, no less, and those I'm quite familiar with).
It is extremely worth noting that there's nothing in the book that documents the weights, spacing, etc. with regards to the construction of the trigger assembly's parts. That is extremely frustrating. He could have certainly exaggerated the gap between the hammer and the swinging catch's locking bar; and that would make illustrating the whole assembly that much easier. You'd only need few mm of gap to ensure a built in spanning "safety" with regards to the trigger; and that wouldn't require anywhere near of an extreme in the strength of the hammer and its spring.
That said, I'll have to chalk it up as a difference in construction. Regardless, it's still an exquisite crossbow. If you get a chance to make another one in the future, maybe attempting to exactly replicate the functionality of the book would be a challenging and/or worthwhile venture of research.
"Men take only their needs into consideration, never their abilities." -Napoleon Bonaparte
|
|
|
|
|
Leo Todeschini
Industry Professional
|
| Posted: Thu 04 Oct, 2018 10:52 am Post subject: |
|
|
I know what you mean Ben, but the catch/main bar interaction is the one most prone to wear because of the loading and if it is set to 'just hold' so that he hammer can knock it away, then the difference between 'just hold' and 'damn, shot my loader' will be very little and prone to change with wear.
I can see it is possible, I just don't see how it can be practical which is why I haven't tried. No problem if your chap redresses the trigger every month in 1676, but less good when the bow is in the US and I am in the UK in 2018. Thats my take on it.
I agree it would be interesting to try, but I have plenty of other things to try as well....
Tod
www.todsworkshop.com
www.todcutler.com
www.instagram.com/todsworkshop
https://www.facebook.com/TodsWorkshop
www.youtube.com/user/todsstuff1
|
|
|
|
|
|
Ben Joy
|
| Posted: Thu 04 Oct, 2018 11:27 am Post subject: |
|
|
Fair enough. The never-ending bucket list of research and recreation, I suppose. Regardless, thank you again for sharing the work that you do. It's always fascinating to see and ponder.
"Men take only their needs into consideration, never their abilities." -Napoleon Bonaparte
|
|
|
|
|
Jean Thibodeau

|
| Posted: Thu 11 Oct, 2018 11:34 pm Post subject: |
|
|
Leo, that trigger mechanisms gives me a headache just trying to visualize it with the parts moving and locking in place !
Understanding how it works in a geometric sense is one thing, getting it to work is another thing as all the angles and internal pressures and spring pressures have to be just right or the thing would just seize up and jamb or not work at all !
So getting this " puzzle " working must have been a delicate job with a lot of planning and/or fit and file some more and not file too much ...... WOW !
You can easily give up your freedom. You have to fight hard to get it back!
|
|
|
|
|
|
Michael Beeching
|
| Posted: Fri 12 Oct, 2018 2:26 pm Post subject: |
|
|
Tod,
I was thinking about the poms on the crossbow, and was wondering if they perhaps had the function of sound or vibration dampeners... Take a look at this page pertaining to modern crossbows - note that dampeners are attached in similar locations to where the poms are on your bow:
http://www.deeranddeerhunting.com/articles/de...-crossbows
Obviously, there are no poms to slow down the drawstring after it's been fired, but perhaps mounting them under the final area of the stroke helps to cut down on noise and wobble regardless. Testing the noise output of a hunting bow with and without poms might therefore be a good scientific test for you to consider in the future!
|
|
|
|
|
Leo Todeschini
Industry Professional
|
| Posted: Sun 14 Oct, 2018 2:31 am Post subject: |
|
|
Michael Beeching wrote | Quote: | I was thinking about the poms on the crossbow, and was wondering if they perhaps had the function of sound or vibration dampeners... Take a look at this page pertaining to modern crossbows - note that dampeners are attached in similar locations to where the poms are on your bow:
|
I am a little torn over this and I agree that actually doing a test is the only way to get more info.
1. just decoration and hell why not? It could just simply be this and our historical contemporaries certainly liked to decorate things and often paid more attention to this than practicality, so quite possibly just this and to be honest, I suspect this.
2. vibration/sound damping. Absolutely, I assume the modern use has been analysed so it must do something, but our ancestors worked empirically and I wonder if they could extract the required information. What I mean is that a guy one day tied a pompom to his bow and noticed that the sharpness of the sound was reduced very, very slightly and his friend could hear the bow discharge at only 490feet but could hear it pre-pompom at 500 feet. The two guys found this so useful that they shared their fortunate discovery and hey presto - pompoms on bows.
I guess we will never know.
Tod
www.todsworkshop.com
www.todcutler.com
www.instagram.com/todsworkshop
https://www.facebook.com/TodsWorkshop
www.youtube.com/user/todsstuff1
|
|
|
|
|
|
Ben Joy
|
| Posted: Sun 14 Oct, 2018 9:31 pm Post subject: |
|
|
Well, in the bow silencer department, there are a lot of silencers that are like the pom poms on the bow. There are "Cat Whiskers", (Yarn or Wool) Puffs, or Beaver Balls (these are made out of beaver fur, literally) aside from modern synthetic ones. I hadn't given it thought before as far as this bow's design, but my Cousin bow hunts and has them on his bows . . . they do make a HUGE difference.
As far as development, humanity has learned a great deal by watching nature, so who knows what the origins are, but there are plenty of animals with sound dampening techniques (owls stand out in my mind, in particular) that it could have been learned from.
Also, traditional bow string silencers have been around for centuries, so maybe it was a technology on traditional bows first and someone thought, "Hey, think this could work on a crossbow, now that we're using these more for hunting and less for war?"
Just some thoughts.
"Men take only their needs into consideration, never their abilities." -Napoleon Bonaparte
|
|
|
|
|
|
|
You cannot post new topics in this forum
You cannot reply to topics in this forum
You cannot edit your posts in this forum
You cannot delete your posts in this forum
You cannot vote in polls in this forum
You cannot attach files in this forum
You can download files in this forum
|
All contents © Copyright 2003-2026 myArmoury.com — All rights reserved
Discussion forums powered by phpBB © The phpBB Group
Switch to the Basic Low-bandwidth Version of the forum
|

