Info Favorites Register Log in
myArmoury.com Discussion Forums

Forum index Memberlist Usergroups Spotlight Topics Search
Forum Index > Historical Arms Talk > DIY: 17c JagdmesserDIY Project Reply to topic
This is a standard topic  
Author Message
Radovan Geist


Location: Slovakia
Joined: 19 Aug 2010
Likes: 5 pages

Posts: 399

PostPosted: Wed 03 May, 2017 11:47 pm    Post subject: DIY: 17c Jagdmesser         Reply with quote

I have started to work on a 17th century German hunting sword, something along these lines: picture 1.
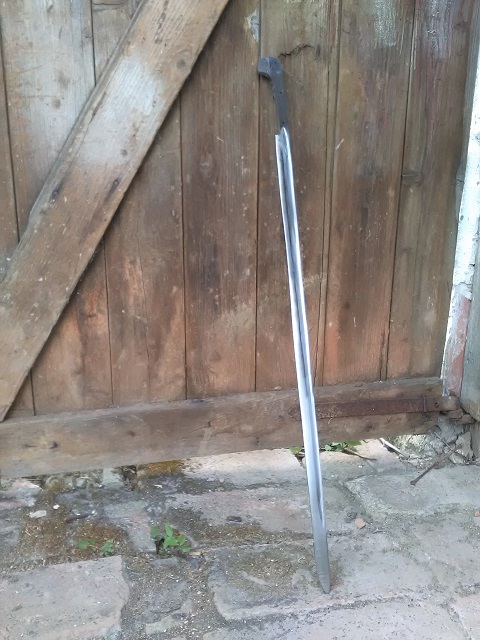
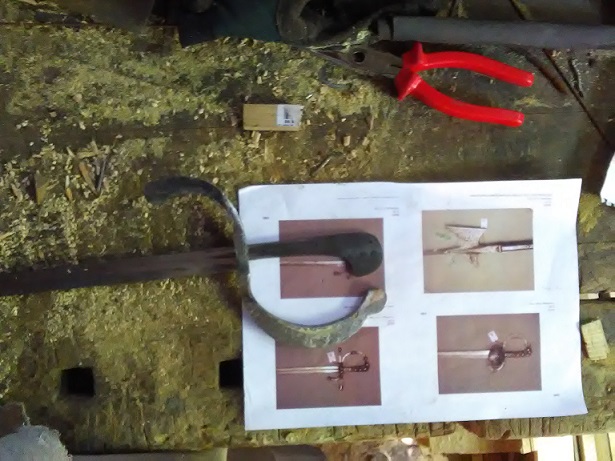
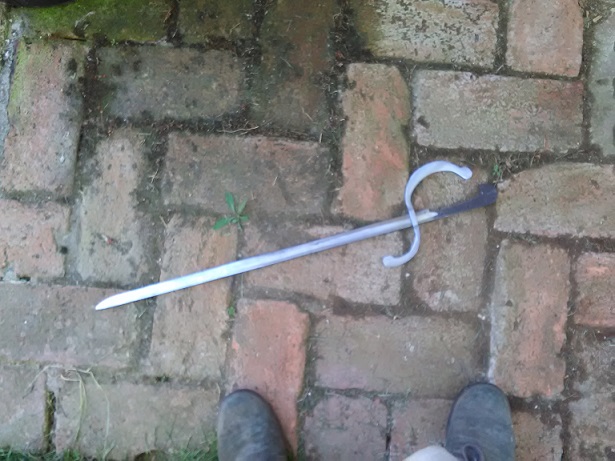
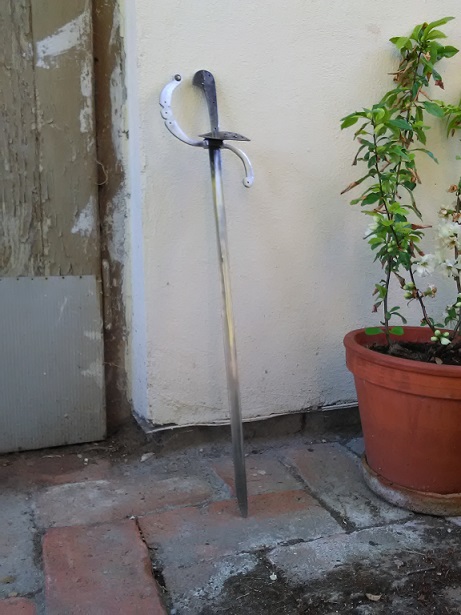
So far, I have only worked on the blade. The basic shape was made a long time back, and I have it hardened and tempered at a local company. Last weekend I have re-profiled the blade a bit (making a long, broad fuller), and did some first cleaning & polishing (picture 2).

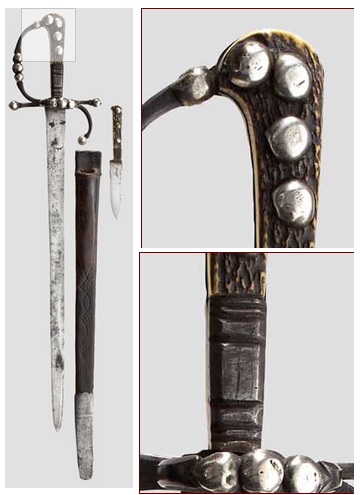
Now the question is: how would be hilts on these swords constructed? Probably it would not be possible to slide them "from the pommel" - the slot would need to be too large. If I slide through the blade, how to secure it? Should I pin it through the blade?
Alternatively, I could make a "sandwich". However, it would be little tricky to make it with a knuckle-guard and a finger loop... Ufff. Any advice would be appreciated:)


 Attachment: 45.82 KB
jagdmesser.jpg


 Attachment: 142.44 KB
IMG_20170501_160454.jpg

View user's profile Send private message
Mark Moore


Location: East backwoods-assed Texas
Joined: 01 Oct 2003
Likes: 6 pages
Reading list: 1 book

Posts: 2,294

PostPosted: Thu 04 May, 2017 6:25 am    Post subject:         Reply with quote

Without being able to see and handle the original in real life, I can't really say exactly how it was constructed. If I, myself, were building it, I would build it in pieces and then weld them together over the blade. Then, smooth out the welds and add the grip. Not historical construction, but---hey---it would be fairly easy to do, IMO. Happy .....McM
''Life is like a box of chocolates...'' --- F. Gump
View user's profile Send private message
Sean Flynt


Location: Birmingham, Alabama
Joined: 21 Aug 2003
Likes: 10 pages
Reading list: 13 books

Spotlight topics: 7
Posts: 5,981

PostPosted: Thu 04 May, 2017 7:38 am    Post subject:         Reply with quote

The slot in the guard is long enough to allow it to pass over the big end of the tang. The base of the blade has a narrow section the length of the slot and depth of the guard. If you were to remove the scales and look down at the top of the cross, you would see the top of the blade, flush with the top of the guard. The guard rests on the shoulder created by that narrowed section.


 Attachment: 178.82 KB
jagdmesser.gif


-Sean

Author of the Little Hammer novel

https://www.amazon.com/Little-Hammer-Sean-Flynt/dp/B08XN7HZ82/ref=sr_1_1?dchild=1&keywords=little+hammer+book&qid=1627482034&sr=8-1
View user's profile Send private message Visit poster's website
Mark Moore


Location: East backwoods-assed Texas
Joined: 01 Oct 2003
Likes: 6 pages
Reading list: 1 book

Posts: 2,294

PostPosted: Thu 04 May, 2017 8:14 am    Post subject:         Reply with quote

Or THAT....yeah. Duuuhhh. Laughing Out Loud ....McM
''Life is like a box of chocolates...'' --- F. Gump
View user's profile Send private message
Sean Flynt


Location: Birmingham, Alabama
Joined: 21 Aug 2003
Likes: 10 pages
Reading list: 13 books

Spotlight topics: 7
Posts: 5,981

PostPosted: Thu 04 May, 2017 8:20 am    Post subject:         Reply with quote

I still have the imprint on my forehead from when I realized how this is done.
-Sean

Author of the Little Hammer novel

https://www.amazon.com/Little-Hammer-Sean-Flynt/dp/B08XN7HZ82/ref=sr_1_1?dchild=1&keywords=little+hammer+book&qid=1627482034&sr=8-1
View user's profile Send private message Visit poster's website
Mark Moore


Location: East backwoods-assed Texas
Joined: 01 Oct 2003
Likes: 6 pages
Reading list: 1 book

Posts: 2,294

PostPosted: Thu 04 May, 2017 8:27 am    Post subject:         Reply with quote

Me too, Sean. Laughing Out Loud I tend to talk first and think later. Laughing Out Loud .......McM
''Life is like a box of chocolates...'' --- F. Gump
View user's profile Send private message
Dan D'Silva


Joined: 28 Apr 2007

Posts: 314

PostPosted: Fri 05 May, 2017 3:12 am    Post subject:         Reply with quote

If the pommel is wider than the blade shoulders and you don't want to reduce it, putting the guard over the blade and pinning it is a valid method (even if not the one used on this type of sword). I had a duh moment myself recently when Dale Martin pointed out to me that that's how M1 bayonets were constructed.

It would, of course, be easier to drill the pin holes before hardening...
View user's profile Send private message
Radovan Geist


Location: Slovakia
Joined: 19 Aug 2010
Likes: 5 pages

Posts: 399

PostPosted: Sun 28 May, 2017 12:18 pm    Post subject:         Reply with quote

Thank you for all your suggestions, they were very helpful. In the end I decided to put it over the blade.Unfortunately, reducing the pommel was not an option: the jagdmesser I´m trying to re-create has it usually quite large.
I was working on the project over the weekend. The cross-guard was made from a bar of soft steel, 2*1 cm. I have drilled and filed a slot for the tang (picture 1; on picture 2 it´s put on the blade), and used an angle grinder for the first rough shaping (picture 3).
Then came the difficult part - I had to bend it. Doing it without a forge was hell of a work, but at it end it was OK and the cross-guard did not crack (picture 4).


 Attachment: 114.13 KB
diy-jagdmesser-2.jpg


 Attachment: 146.83 KB
diy-jagdmesser-4.jpg


 Attachment: 110.64 KB
diy-jagdmesser-5.jpg

View user's profile Send private message
Radovan Geist


Location: Slovakia
Joined: 19 Aug 2010
Likes: 5 pages

Posts: 399

PostPosted: Sun 28 May, 2017 12:30 pm    Post subject:         Reply with quote

Now, after some more shaping and cleaning the cross-guard started to take shape (picture 1).
The shell was made from a 2mm thick soft steel sheet. I have dished it and filed some decorations (picture 2).
Next I have grilled holes to the cross-guard for decorative rivets, the shell-guard and for riveting it to the blade (picture 3), and I have riveted the hilt together (picture 4).
The last picture shows the messer after the first assembly. Next I will work on the handle.


 Attachment: 110.71 KB
diy-jagdmesser-6.jpg


 Attachment: 149.76 KB
diy-jagdmesser-7.jpg


 Attachment: 138.75 KB
diy-jagdmesser-8.jpg


 Attachment: 94.25 KB
diy-jagdmesser-9.jpg


 Attachment: 96.84 KB
diy-jagdmesser-10.jpg

View user's profile Send private message
Tim Lison


Location: Chicago, Illinois
Joined: 05 Aug 2004
Likes: 1 page
Reading list: 6 books

Spotlight topics: 1
Posts: 1,606

PostPosted: Sun 28 May, 2017 6:41 pm    Post subject:         Reply with quote

That looks great! I can't wait to see it finished....
View user's profile Send private message
Radovan Geist


Location: Slovakia
Joined: 19 Aug 2010
Likes: 5 pages

Posts: 399

PostPosted: Sun 09 Jul, 2017 12:26 pm    Post subject:         Reply with quote

I´ve finally had some few spare hours this Sunday, so I´ve moved on with the project, working on the scales. First, I´ve made the lower part from soft steel. They´re pinned to blade and have some simple decoration - picture 1. As you could maybe see, I´ve put a leather spacer between the guard, and the scales.

The upper part is made from black horn. Picture two shows them before the final shaping, with holes drilled and pins with brass rosettes - these are purely decorative. Scales were pinned to the blade with three steel pins.


 Attachment: 134.12 KB
diy-jagdmesser-11.jpg


 Attachment: 98.25 KB
diy-jagdmesser-12.jpg

View user's profile Send private message
Radovan Geist


Location: Slovakia
Joined: 19 Aug 2010
Likes: 5 pages

Posts: 399

PostPosted: Sun 09 Jul, 2017 12:29 pm    Post subject:         Reply with quote

And this is the result, so far. It still needs some polishing (especially on some parts of horn scales), and I will work on scabbard (leather, two layers) and a by-knife.


 Attachment: 134.67 KB
diy-jagdmesser-14.jpg


 Attachment: 175.85 KB
diy-jagdmesser-13.jpg


 Attachment: 134.25 KB
diy-jagdmesser-15.jpg

View user's profile Send private message
Radovan Geist


Location: Slovakia
Joined: 19 Aug 2010
Likes: 5 pages

Posts: 399

PostPosted: Tue 07 Jan, 2020 4:40 am    Post subject:         Reply with quote

And finally, this project has been finished: with scabbard, side-knife and a pricker.
View user's profile Send private message
Dan D'Silva


Joined: 28 Apr 2007

Posts: 314

PostPosted: Tue 07 Jan, 2020 5:19 am    Post subject:         Reply with quote

Looks amazing!
View user's profile Send private message
J.D. Crawford


Location: Toronto
Joined: 25 Dec 2006

Spotlight topics: 1
Posts: 1,903

PostPosted: Wed 08 Jan, 2020 3:58 pm    Post subject:         Reply with quote

I don't know anything about this type of sword, but it looks great. I like the way you decorated the hilt!
View user's profile Send private message Visit poster's website
Ben Sweet


Location: 831
Joined: 21 Aug 2003

Posts: 519

PostPosted: Wed 08 Jan, 2020 4:35 pm    Post subject:         Reply with quote

That there is a beauty...
View user's profile Send private message Visit poster's website


Display posts from previous:   
Forum Index > Historical Arms Talk > DIY: 17c JagdmesserDIY Project
Page 1 of 1 Reply to topic
All times are GMT - 8 Hours

View previous topic :: View next topic
Jump to:  
You cannot post new topics in this forum
You cannot reply to topics in this forum
You cannot edit your posts in this forum
You cannot delete your posts in this forum
You cannot vote in polls in this forum
You cannot attach files in this forum
You can download files in this forum


All contents © Copyright 2003-2024 myArmoury.com — All rights reserved
Discussion forums powered by phpBB © The phpBB Group
Switch to the Basic Low-bandwidth Version of the forum