Info Favorites Register Log in
myArmoury.com Discussion Forums

Forum index Memberlist Usergroups Spotlight Topics Search


myArmoury.com is now completely member-supported. Please contribute to our efforts with a donation. Your donations will go towards updating our site, modernizing it, and keeping it viable long-term.
Last 10 Donors: Graham Shearlaw, Anonymous, Daniel Sullivan, Chad Arnow, Jonathan Dean, M. Oroszlany, Sam Arwas, Barry C. Hutchins, Dan Kary, Oskar Gessler (View All Donors)

Forum Index > Off-topic Talk > Windlass Hanger Project (with pics)DIY Project Reply to topic
This is a standard topic  
Author Message
Chip F.


Joined: 05 Jan 2015

Posts: 33

PostPosted: Sun 03 Jan, 2016 1:02 pm    Post subject: Windlass Hanger Project (with pics)         Reply with quote

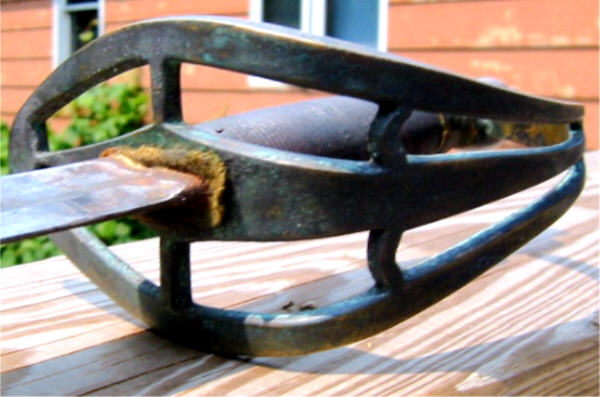
I've owned the Windlass Captain's Hanger for a few years now. I have antiqued it, sharpened it, and done some test cutting. As time has gone by, the blade has loosened in the grip - enough to affect the sword's performance. I have disassembled the hanger in an effort to see where improvement can be made. The tang is threaded and attached via a pommel nut. I the grip is slightly too small for the tang, but the real issue is the guard. As the pictures below show, there is a gap between the guard and the blade which is allowing for wobble.

My question to those with experience working on their swords is, what is the best solution here? Ideally I want the hilt to be tight enough to continue to use this sword for test cutting. When re-assembling the sword I can tighten the pommel nut snugly, however I suspect that it will come loose again soon after use.

The pictures below are for reference - any and all input is greatly appreciated.


[/URL]


[/URL]


[/URL][/img]
View user's profile Send private message
Glen A Cleeton


Location: Nipmuc USA
Joined: 21 Aug 2003

Posts: 1,973

PostPosted: Sun 03 Jan, 2016 1:39 pm    Post subject:         Reply with quote

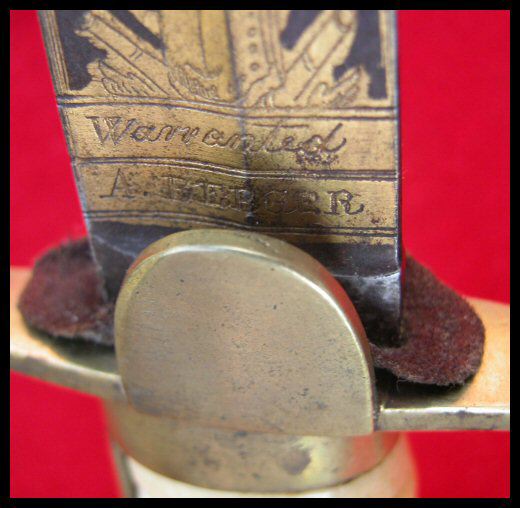
I don't know the material of the guard but the fit can be improved in a number of ways. Braze or solder the opening, then file to a press fit. Displace the metal of the guard to close the gap using a punch and hammer (working from the grip side). Or, while assembled, drive wooden splints up into the guard. Adding or displacing the metal better bets. Keep in mind a lot of 18th century swords had blades seated on pads (leather or felt) between the blade shoulders and guards, Something to consider when assembling.

Grips can be built up with JB Weld and other epoxies. Or just shim with wood.

As to the pommel thread and nut. If there is enough room to drill a hole crosswise, it makes it easy to do/undo. Fingernail polish or Loc-tite thread locker. IIRC, the blue stuff is softer for undoing again.

Cheers

GC


 Attachment: 47.92 KB
aaspadforte.jpg


 Attachment: 43.11 KB
CCR4045200991194773.jpg

View user's profile Send private message
Andrew Gill


Joined: 19 Feb 2015

Posts: 150

PostPosted: Mon 04 Jan, 2016 3:24 am    Post subject:         Reply with quote

If the sword were mine, I'd use this as an opportunity to customise it a bit. I'd start by making an entirely new grip - this is not a lot of effort and can be done with a minimal number of hand tools. You could either leather-wrap it afterwards or just make it out of some sort of water-resistant hardwood like teak (old wooden parquet flooring tiles can be a cheap source of this). If you're brave you could even try something like bone although that is more effort, and you need to protect your lungs from the dust from working it. I like to epoxy wooden grips onto the tang for strength, even though it isn't historical; if that's important, cutler's pitch would be better (and is apparently easier to remove for future repairs).

Regarding the gap in the guard, what Glen suggests is probably the most historically appropriate method from what little I know, but if you don't have hard-soldering equipment to do it, you could make a small metal plate which fits either over or inside the guard but has a tight-fitting slot for the blade tang, and is rivetted or screwed onto the guard. If you want it to be nearly invisible, you should put it inside and choose countersunk brass/bronze rivets and a plate of a similar colour to the guard, then maybe put a leather washer over it like in Glen's photos, but I'd personally go the other route and give the plate a decorative outline and and use decorative rivets or screws (I'm almost certain I've seen something like this on some spanish cup-hilted swords; I'm not sure about naval hangers though). A steel plate would also probably wear more slowly than a brass one for a given thickness, and will give an interesting colour contrast with the rest of the guard. If you do try this, be careful to position the rivet heads where they won't get in the way of the scabbard mouth. You might have to dish the plate slightly with a hammer.
View user's profile Send private message
Radovan Geist


Location: Slovakia
Joined: 19 Aug 2010
Likes: 5 pages

Posts: 399

PostPosted: Tue 05 Jan, 2016 12:38 am    Post subject:         Reply with quote

Customisation proposed by Andrew would be an interesting upgrade. If you need a quick fix and soldering /brazing is technologically off limits, just drive soft steel wedges along the blade, through the guard and into the handle (that would secure them). If you fit them well, they would be barely visible from the outside.
View user's profile Send private message
Chip F.


Joined: 05 Jan 2015

Posts: 33

PostPosted: Fri 15 Jan, 2016 1:03 pm    Post subject:         Reply with quote

Thank you all for the input. I prefer to do a more permament solution, such as the brazing/soldering of the shoulder, along with a new grip. This will have to wait unfortunately, as I currently live in an apartment and am without the appropriate space to do anything other than very minor work on my blades. However, I will refer to this forum if and when I get around to this project.
View user's profile Send private message


Display posts from previous:   
Forum Index > Off-topic Talk > Windlass Hanger Project (with pics)DIY Project
Page 1 of 1 Reply to topic
All times are GMT - 8 Hours

View previous topic :: View next topic
Jump to:  
You cannot post new topics in this forum
You cannot reply to topics in this forum
You cannot edit your posts in this forum
You cannot delete your posts in this forum
You cannot vote in polls in this forum
You cannot attach files in this forum
You can download files in this forum


All contents © Copyright 2003-2025 myArmoury.com — All rights reserved
Discussion forums powered by phpBB © The phpBB Group
Switch to the Basic Low-bandwidth Version of the forum