The proceeding will be a combination DIY project with a little bit of a review:
The arming clothes that we wear beneath our armor forms the foundation necessary for a good fit and comfort of movement. If neglected, it would be akin to building a beautiful home on naught but the bare earth. However, our arming clothes do often go neglected for none other than the simple fact that they are neither glamorous nor visible when we don our kits.
I've been through many iterations of my arming clothes, and I believe I've finally found the solution, as both practical and historic to the best of my knowledge. My period of interest is the late 14th century, the tail end of the transitional period from the maille hauberks of before, to the white harness of Agincourt. During the age of maille, the standard foundation for the hauberk is a thickly padded gambeson, perhaps made from many layers of linen, or padded with raw cotton, horse hair or other materials. The padding beneath maille serves not only as a cushion for the wearer, but when struck, the outer skin of the maille flexes into the cushioning of the gambeson beneath and acts to dissipate the force of the blow. As plate began to cover the knight, padding got lighter, and disappeared altogether by the time of the white harness, when a tightly fitted doublet replaced a padded gambeson completely. In the late 14th century, the maille hauberk had shrunk to a three-quartered sleeve garment, and the skirt only approached mid-thigh. With a majority of the body being covered in plate, the need for the older thickly padded textile armors of before became redundant and unnecessary.
The late 14th century pourpoint, or aketon, or gambeson (the language of the Middle Ages is not nearly as precise as our modern sentiments would prefer), was most likely the foundation for the late 14th century harness. This garment is much more closely tailored to the body than the older heavily padded gambesons. Similar to the arming doublets of the 15th century, it must also serve as the support garment from which to point plate armor, specifically the leg harness.
As my knowledge increased, so too did my collection of arming garments. For the last several years I had settled on the combination of a vest-like garment, very closely fitted to support my leg harness, and a lightly padded gambeson worn over it to support the maille. The vest-like garment is a modern solution and there is little evidence for such a garment in the historical record. The late 15th century does depict some vest-like garments from which hose could be supported, but this is too late for my period of interest, and also not appropriate for martial use. In order to correctly support a leg harness, the garment absolutely must be very fitted and tight through the waist and hips. If you can imagine pulling down on the bottom of the garment (as the leg harness will when supported by it), if the garment creates this girdling effect, it will support the weight of the legs on the hips instead of transferring the weight up to the shoulders. If your garment is even slightly too large, it will not girdle the waist and hips, and you will be holding up your leg armor with your shoulders, resulting in vertical compression of the spine, and thus fatigue will set in much quicker than you want it to and your armor will be incredibly uncomfortable to wear for anything other than a few minutes.
It seemed that the only way I could really get what I wanted was to either have a custom tailored garment done in person, or make it myself. I decided to try my hand at making the garment myself. As a complete novice to sewing (my wife had to show me how to turn on and operate the machine), I was a bit intimidated, but I found the ideal solution. Tasha Kelly (some of you may be familiar with her as Tailoress on the Armour Archive) has for sale an excellent pattern for the Charles de Blois pourpoint. The actual surviving garment is a civil garment, but as was custom, many civil garments mimicked their martial counterparts. This particular pattern is very approachable for someone who has little to no sewing experience. I contacted Tasha directly and asked some questions before I began and she was immediately helpful with all kinds of advice on how to get started and what I should do to make it work for me.
Here's a photo set of the progress on the garment I've been reproducing. I elected to machine-sew for the sake of speed, sanity, and ease of construction. The outer layer is heavy linen. In between the outer layer and lining are layers of cotton batting to provide padding (ahistorical, but invisible and easy to use, this of course can be done using more historical techniques if preferred), and the lining is a medium weight linen. The lacing eyelets and arming point eyelets are hand-sewn and made using embroidery floss
.
Here is the pattern booklet, followed by the pattern laid out before cutting.
[ Linked Image ]
[ Linked Image ]
This is a quick prototype I did in muslin before committing to the linen and batting.
[ Linked Image ]
Here are pieces of the linen quilted garment prior to being assembled
[ Linked Image ]
[ Linked Image ]
The inside of an arming point. Each cuisse has two pairs of 4 eyelets from which to suspend it from the garment. I've placed a square piece of leather inside the garment as well through which my arming points go to take some of the stress off the garment itself.
[ Linked Image ]
Here you can see the cuisse properly suspended from the pourpoint.
[ Linked Image ]
In this shot you can see why the grand assiette sleeve design is so important. The grand assiette sleeve is inset into the torso of the garment much further than any modern cut jacket. If you imagine a modern suit jacket, when you raise your arms, you also raise the body of the garment itself. This would be less than optimal for arming clothes, because it would mean that every time you lift your arms over your head, you'd also be pulling your leg harness up in to your groin! The grand assiette sleeves allows full mobility of the shoulder joint while keeping the torso of the garment in place.
[ Linked Image ]
There are still a couple small tweaks I would like to make before I declare it 'done.' But it's fully functional at this stage. It is relatively light in the padding compared to some of my other arming garments, but I find this to be a good thing with this particular style of harness. All during the construction process, Tasha was always available to answer any questions I had. She made the process very pleasant and I really didn't run in to any major problems. She stands by her product and I recommend it 100% to anyone interested in making something similar, be it an arming garment or a civil garment. The pattern itself has multiple construction methods depending on how historic you woud like your garment to be. It also has options for button up or lace up front closures, as well as button up or pull on cuffs. The step by step instructions are clear enough for people of all experience levels to walk away with a very well constructed garment when it's all said and done, and if you run in to any snags, Tasha was always there to help.
If you're at all interested in the reconstruction of medieval garments and textiles, please stop by Tasha's website, La Cotte Simple. There you can see some of the museum grade reconstructions of garments she has done, including the magnificent reproduction of the Charles VI Jupon.
Tasha's Website:
http://cottesimple.com
Charles de Blois Pourpoint Pattern:
http://www.lulu.com/shop/tasha-kelly/the-pour...26605.html
What is this - 200 views and not one comment on this extraordinary work?
Ian, that's a really neat reconstruction! A lot of work for sure. And I am a little bit envious, since I am not THAT good with the needle... I can't believe you didn't sew anything before...:eek:
Best wishes,
Thomas
Ian, that's a really neat reconstruction! A lot of work for sure. And I am a little bit envious, since I am not THAT good with the needle... I can't believe you didn't sew anything before...:eek:
Best wishes,
Thomas
Congrats on a great arming garment. That is my favourite late 14th century option. You have put together a great presentation that I'm very envious of.
Tomas
Tomas
Great work, Ian! This turned out fantastic. Hard to believe that THIS was your first sewing project.
Really impressed when anybody undertakes to make their own stuff...especially since its just not in my bag of tricks! Thanks for sharing your project with us!
A truly fomidable garment! It makes me fortunate to try myself one day on a similar project which I am somewhat hesitant to start out. But how about the weight? How much is it and is there really such a great difference to your old pourpoint? I saw your suit in your "how to don armour" video - by the way a great presentation as well. So do you got any experience yet with the tight fitting pourpoint in contrast to your west-like under garment? I would be very interested in some details.
great job! and thanks for insights on sleeve construction and great links (esp. cotte simple, with very good tutorials).
Thank you everyone for the kind words! Truly, the credit belongs to Tasha who created instructions and a pattern simple enough for a beginner to make such a complex garment with little to no experience! It's truly broken down in such a step by step manner that the normal non-sewer like myself need not turn away from such a project!
Julian,
The weight of the garment is really up to the maker. I elected to make this particular one fairly lightly padded. It's lighter in the padding than the gambeson you saw me put on in my video. Also, when you consider this pourpoint has replaced the two garments you saw my wear in that videol, this set up is much lighter and more comfortable than what I was previously wearing.
As far as the fit goes, I tried to make this garment as tight as possible to match the function I was getting out of the vest. This was the key factor in making the CdB Pourpoint, because I wanted it to pull double-duty as that vest and the gambeson all-in-one like I believe a true 14th century arming cotte would have. Once I had the muslin prototype completed I started tweaking the pattern a little bit to achieve that really tight fit through the waist and hips. Once I got it to the point where it would provide the same girdling effect as the vest, I took the muslin garment apart and traced it over the paper pattern to show what I had cut away so that when I cut the real thing from linen it would achieve the same result.
There are two other factors in getting the proper leg suspension besides it being tight in the right areas. We know that in order to support the legs without excess fatigue, the weight of the legs should be supported by the hips and waist, and not the shoulders. So when the garment is tightly fitted and being pulled down by the legs, the goal is that it can't move further down because your waist is theoretically the narrowest part of your body, and since your hips are wider than your waist, the garment is 'stuck' in the vertical plane and can't shift lower. To prevent any weight from going to the shoulder however, you need to ensure that the torso of the garment is long enough, that when the legs pull downward and the garment is locked in to position, that the top of the garment is not pulling on the shoulders at all. It just needs the smallest amount of excess up top and it will work just fine.
The last part to the proper fit is that the garment in my opinion should use spiral lacing and not buttons. Buttons will work if your garment is perfectly tailored and you never change size. Spiral lacing allows more flexibility in the fit and function of the garment. If you get bigger for instance, you can still lace it nice and tight. There may be a slight gap in the front closure, but the garment will still function appropriately, and truly that is all that matters with an arming cotte.
So, the too-long did not read version:
Ensure the garment is tight enough to firmly girdle the hips and waist
Ensure the garment's torso is long enough that when supporting a leg harness it does not put tension on the shoulders
Preferably use a spiral laced closure instead of buttons to control how tight the garment is
If you achieve those three things, than the cotte will serve you just as well as the modern vest solution in properly suspending a leg harness. The bonus here is of course that I got to shed a full layer of clothing, and I was in full control of how padded my garment is. All of this was driven by a desire to have a more historically appropriate set of arming clothes, and shed a little unnecessary bulk.
| Julian Behle wrote: |
| A truly fomidable garment! It makes me fortunate to try myself one day on a similar project which I am somewhat hesitant to start out. But how about the weight? How much is it and is there really such a great difference to your old pourpoint? I saw your suit in your "how to don armour" video - by the way a great presentation as well. So do you got any experience yet with the tight fitting pourpoint in contrast to your west-like under garment? I would be very interested in some details. |
Julian,
The weight of the garment is really up to the maker. I elected to make this particular one fairly lightly padded. It's lighter in the padding than the gambeson you saw me put on in my video. Also, when you consider this pourpoint has replaced the two garments you saw my wear in that videol, this set up is much lighter and more comfortable than what I was previously wearing.
As far as the fit goes, I tried to make this garment as tight as possible to match the function I was getting out of the vest. This was the key factor in making the CdB Pourpoint, because I wanted it to pull double-duty as that vest and the gambeson all-in-one like I believe a true 14th century arming cotte would have. Once I had the muslin prototype completed I started tweaking the pattern a little bit to achieve that really tight fit through the waist and hips. Once I got it to the point where it would provide the same girdling effect as the vest, I took the muslin garment apart and traced it over the paper pattern to show what I had cut away so that when I cut the real thing from linen it would achieve the same result.
There are two other factors in getting the proper leg suspension besides it being tight in the right areas. We know that in order to support the legs without excess fatigue, the weight of the legs should be supported by the hips and waist, and not the shoulders. So when the garment is tightly fitted and being pulled down by the legs, the goal is that it can't move further down because your waist is theoretically the narrowest part of your body, and since your hips are wider than your waist, the garment is 'stuck' in the vertical plane and can't shift lower. To prevent any weight from going to the shoulder however, you need to ensure that the torso of the garment is long enough, that when the legs pull downward and the garment is locked in to position, that the top of the garment is not pulling on the shoulders at all. It just needs the smallest amount of excess up top and it will work just fine.
The last part to the proper fit is that the garment in my opinion should use spiral lacing and not buttons. Buttons will work if your garment is perfectly tailored and you never change size. Spiral lacing allows more flexibility in the fit and function of the garment. If you get bigger for instance, you can still lace it nice and tight. There may be a slight gap in the front closure, but the garment will still function appropriately, and truly that is all that matters with an arming cotte.
So, the too-long did not read version:
Ensure the garment is tight enough to firmly girdle the hips and waist
Ensure the garment's torso is long enough that when supporting a leg harness it does not put tension on the shoulders
Preferably use a spiral laced closure instead of buttons to control how tight the garment is
If you achieve those three things, than the cotte will serve you just as well as the modern vest solution in properly suspending a leg harness. The bonus here is of course that I got to shed a full layer of clothing, and I was in full control of how padded my garment is. All of this was driven by a desire to have a more historically appropriate set of arming clothes, and shed a little unnecessary bulk.
Thanks for the elaborate explanation. I take it as a brief answer for such great information. It will take some more time but I hope I will wear my suit as comfortable as you will from now on.
Ian,
You said that the weight could be altered to suit the user. How suitable do you think the pattern would be for a more sparring level protection? Would it just be a matter of increasing the padding?
Thanks
You said that the weight could be altered to suit the user. How suitable do you think the pattern would be for a more sparring level protection? Would it just be a matter of increasing the padding?
Thanks
| Ben Coomer wrote: |
| Ian,
You said that the weight could be altered to suit the user. How suitable do you think the pattern would be for a more sparring level protection? Would it just be a matter of increasing the padding? Thanks |
I see no reason why this pattern wouldn't be sound for use as a sparring garment with increased padding in the right places. The great thing is you get to control exactly where it has added thickness and added padding to suit your specific needs.
I am also wearing a de Blois type pourpoint beneath my 1380-1390 Kit an the pourpoint is padded with just a few layers of cotton an without any pressure in "fluffy" conditions 1 cm thick in the maximum. I wore it years befor and i wore it on this years BoN i i have to say with the period armor suiting to the de blois type you wont need an extremly thick padding even wehen you are facing russian halberts
| Frederik K. wrote: |
| I am also wearing a de Blois type pourpoint beneath my 1380-1390 Kit an the pourpoint is padded with just a few layers of cotton an without any pressure in "fluffy" conditions 1 cm thick in the maximum. I wore it years befor and i wore it on this years BoN i i have to say with the period armor suiting to the de blois type you wont need an extremly thick padding even wehen you are facing russian halberts |
Excellent to know! Thank you!
| Ian S LaSpina wrote: |
| Tasha Kelly (some of you may be familiar with her as Tailoress on the Armour Archive) has for sale an excellent pattern for the Charles de Blois pourpoint. The actual surviving garment is a civil garment, but as was custom, many civil garments mimicked their martial counterparts. This particular pattern is very approachable for someone who has little to no sewing experience. I contacted Tasha directly and asked some questions before I began and she was immediately helpful with all kinds of advice on how to get started and what I should do to make it work for me.
Here is the pattern booklet, followed by the pattern laid out before cutting. [ Linked Image ] If you're at all interested in the reconstruction of medieval garments and textiles, please stop by Tasha's website, La Cotte Simple. There you can see some of the museum grade reconstructions of garments she has done, including the magnificent reproduction of the Charles VI Jupon. Tasha's Website: http://cottesimple.com Charles de Blois Pourpoint Pattern: http://www.lulu.com/shop/tasha-kelly/the-pour...26605.html |
Yeah, Tasha is a great lady and VERY knowledgable of the subject of medieval clothing. You cannot go wrong with her patterns and instructions if you want something that is spot on historically speaking (unless you decide to make it out of modern materials like polyester).
Thank you so much for the kind words, Ian. I really do appreciate this write-up and the conscientious attention you gave to this project. As I've said previously, it's an absolute pleasure to help people out who want to learn and spend the time understanding what they are making.
This is my first post here in a long time -- I had forgotten my login info and had given up previously... but it turns out that if you spend a few years away, you magically can remember it again!... or just take a really good guess and get it right. :p (And for the record, my name is Tasha Kelly these days. I'll look into changing my login name so as not to confuse people.)
Regards,
Tasha
Ian, this is great work. I actually made an account here just so I could comment on this. I've been making historic pirate garb for years now, and I just recently decided that I want to switch gears and make some historic knight garb. I'm not sure in what years I want to focus, but I know more or less what I want to make. You seem to have a pretty good working knowledge of this era, so I was wondering if you'd be willing to answer some questions I have. Also, thank you so much for name dropping Tasha Kelly, I'm on her site now.
| S. Andrew B. wrote: |
| Ian, this is great work. I actually made an account here just so I could comment on this. I've been making historic pirate garb for years now, and I just recently decided that I want to switch gears and make some historic knight garb. I'm not sure in what years I want to focus, but I know more or less what I want to make. You seem to have a pretty good working knowledge of this era, so I was wondering if you'd be willing to answer some questions I have. Also, thank you so much for name dropping Tasha Kelly, I'm on her site now. |
Thank you, I'd love to answer any questions you have. This particular iteration of the Charles de Blois pourpoint is a couple years old now and I've since made a better one using the lessons learned from this one. My new one is hand-finished and hand-quilted for living history use. For instance, the padding is now differentially thick depending on the location. I've made the upper chest, shoulders, and upper arm thicker with padding than the rest of the garment. I've also made the upper back and shoulders a little taller to accommodate for my natural posture. Finally, I added a port-piece that will cover any gapping in the front closure if present. You can view the rest of the photos here. A garment like this is probably appropriate for martial use from about the mid 14th century to early 15th century, give or take, to give you an idea of where something like this would focus you.
The 2015 version, assembled on a machine, all seams finished by hand, reinforced by hand and quilted by hand:
[ Linked Image ]
Simply amazing. It's good to see your'e still improving and customizing. Immediately I have some questions about padding the garment.
1) is there a benefit to quilting horizontally over vertically? or is that an aesthetic choice? or were you simply following the direction of Tasha?
2) are the upper sleeve gussets also quilted (the front/back/armpit) and how did you go about doing that?
The only other immediate question I have is do you prefer the angle-sewn elbows to a straight sleeve? or is that again a by-product of the nature of the garment itself?
Thank you for such a fast response on a two-year-old post, btw.
| S. Andrew B. wrote: |
| Simply amazing. It's good to see your'e still improving and customizing. Immediately I have some questions about padding the garment.
1) is there a benefit to quilting horizontally over vertically? or is that an aesthetic choice? or were you simply following the direction of Tasha? 2) are the upper sleeve gussets also quilted (the front/back/armpit) and how did you go about doing that? The only other immediate question I have is do you prefer the angle-sewn elbows to a straight sleeve? or is that again a by-product of the nature of the garment itself? Thank you for such a fast response on a two-year-old post, btw. |
1. Admittedly I just followed the same quilting pattern as the original garment. I don't know how much it would affect the function of the garment, but the historical examples of martial garments from this time period (both extant and in artwork) show a variety of quilting patterns including vertical, horizontal, radial, and a combination of those on the same garment. The actual extant Charles de Blois doublet is a civil garment, not a martial garment. The martial version is generally made from thicker fabric (in my case heavy weight linen on the outside as opposed to the silk of the original), and I've added the series of 16 eyelets around the bottom hem to support a leg harness. The original garment has many integrated points sewn into the lining around the hem to support the wearing of hosen.
2. The upper sleeves are fully quilted. The pattern of the quilting goes around the upper arm along the circumference like lines of lattitude, so it makes no difference that all the gores are there. The gores basically turn the upper arm into a giant circle. The quilting lines then run around the circumference of the wrist all the way up to and including the armpit. I attached photos from the 2015 version of the garment below that highlights the quilting stitches as viewed from the outside, and from inside of the arm hole. They look irregular from the inside because the sleeve is not supported and is folded on itself, but they're really just following the circumference of the sleeve.
3. Because the garment is thick the pre-bend at the elbow is nice because you don't have to fight the natural lay of the fabric to bend your arms. As a martial garment this has an added benefit because your arms are almost always going to be bent in the context of fighting.
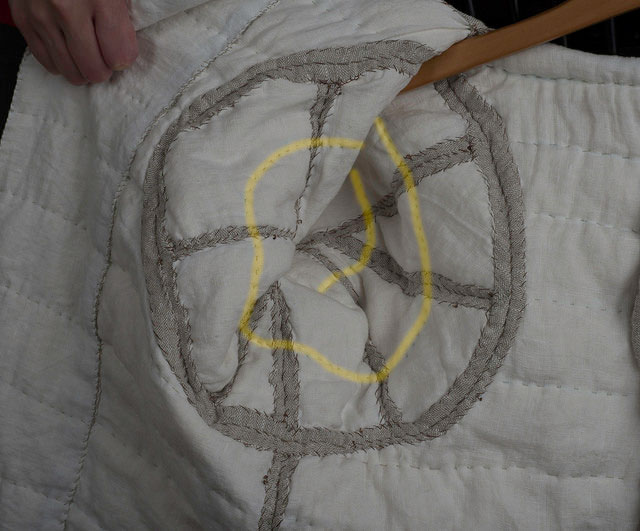
Arm quilting pattern from the inside
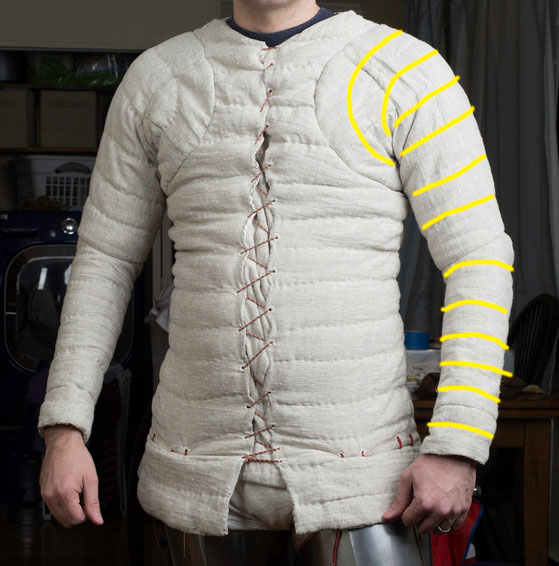
Arm quilting pattern from the outside
Thank you Ian, this is super helpful. Am I right in assuming that you padded the gores before attaching them to the sleeve, then did the quilting stitches after they were attached? That seems the best way to make all the quilting stitching line up. I'm wanting to do the quilting stitches vertically on mine, but the way the shoulder flairs out into a circle is making my brain hurt a bit trying to figure out how I'd do that without it looking like a Spider-man costume. A normal pattern with a normal sleeve would be no problem, but I definitely like the unencumbered range of motion this pattern provides.
P.S. your finishing stitches look really good.
P.S. your finishing stitches look really good.
Page 1 of 3
You cannot post new topics in this forumYou cannot reply to topics in this forum
You cannot edit your posts in this forum
You cannot delete your posts in this forum
You cannot vote in polls in this forum
You cannot attach files in this forum
You can download files in this forum
All contents © Copyright 2003-2006 myArmoury.com — All rights reserved
Discussion forums powered by phpBB © The phpBB Group
Switch to the Full-featured Version of the forum
Discussion forums powered by phpBB © The phpBB Group
Switch to the Full-featured Version of the forum