Info Favorites Register Log in
myArmoury.com Discussion Forums

Forum index Memberlist Usergroups Spotlight Topics Search
Forum Index > Historical Arms Talk > Authentic mail pictures Reply to topic
This is a Spotlight Topic Go to page Previous  1, 2, 3 ... 12, 13, 14 ... 25, 26, 27  Next 
Author Message
Eric S


Location: new orleans
Joined: 22 Nov 2009
Reading list: 8 books

Posts: 805

PostPosted: Mon 22 Sep, 2014 10:10 pm    Post subject:         Reply with quote

Robert MacPherson wrote:
I thought I would put money where my mouth is this morning, so I spent some time experimenting with mail.

You certainly did that, fantastic results.


An example of Erik Schmid's wedge riveted mail.


Sinigaglia hauberk on the left, German bishops mantle on the right.
View user's profile Send private message Visit poster's website
Robert MacPherson
Industry Professional


Location: Jeffersonville USA
Joined: 27 Feb 2008

Posts: 141

PostPosted: Tue 23 Sep, 2014 6:11 am    Post subject:         Reply with quote

Thank you, Eric!

About every five years or so I try making riveted rings. This has gone on since I first became interested in armor in the late 70s. It always ends in some technical impasse or another and I put the project down again. Yesterday was a good day. I made several process breakthroughs, and the results are not so bad at all.

Mac

Robert MacPherson
http://www.lightlink.com/armory/
http://billyandcharlie.com/
View user's profile Send private message Visit poster's website
Kai Lawson


Joined: 26 Aug 2010
Likes: 7 pages

Posts: 589

PostPosted: Tue 23 Sep, 2014 6:24 am    Post subject:         Reply with quote

I think (from just looking at the results you posted) that the next step may be to get properly sized pliers with some sort of transverse triangular channel cut across the pliers, to try to generate the 'watershedding.'

Looking great so far--what would you say the time estimate for what you have is?

"And they crossed swords."
--William Goldman, alias S. Morgenstern
View user's profile Send private message
Robert MacPherson
Industry Professional


Location: Jeffersonville USA
Joined: 27 Feb 2008

Posts: 141

PostPosted: Tue 23 Sep, 2014 7:23 am    Post subject:         Reply with quote

Kai,

I have a bit of the watershed thing going in these rings, but it's hard to see for all the random tool marks. The setting tool I used was a hand-held punch because that was easier to experiment with than modifying a pliers.

I would be loathe to try to guess how much time it takes per ring. I am still in the minutes-per-ring range rather than the seconds-per-ring range. This might be acceptable for repair work, but not for production.

The slowest operations are about making, handling, and inserting the rivets. I need a breakthrough or a paradigm shift here. The good news is that the rivet making and handling protocol is more or less independent of the ring making protocol, and can be worked on as a separate problem.

Mac

Robert MacPherson
http://www.lightlink.com/armory/
http://billyandcharlie.com/
View user's profile Send private message Visit poster's website
James Arlen Gillaspie
Industry Professional


Location: upstate NY
Joined: 10 Nov 2005

Posts: 587

PostPosted: Tue 23 Sep, 2014 10:53 am    Post subject:         Reply with quote

It looks like you're closing in fast, Mac! Your links look better than Erik's do in the photo.
jamesarlen.com
View user's profile Send private message Visit poster's website
Robert MacPherson
Industry Professional


Location: Jeffersonville USA
Joined: 27 Feb 2008

Posts: 141

PostPosted: Tue 23 Sep, 2014 5:41 pm    Post subject:         Reply with quote

I have the process down to about 65seconds per ring; for rings that are are closed, but not knitted into the fabric. That time does not include the annealings, because they are batch processes and subject to economies of scale. Of the 35 seconds required to rivet, all but about 8 of them are about making, cutting, and inserting the rivets. There's got to be a better way to deal with the rivets.

I imagine that it's taking me about four times what it should take. I'm in the right order of magnitude anyway.


Mac

Robert MacPherson
http://www.lightlink.com/armory/
http://billyandcharlie.com/
View user's profile Send private message Visit poster's website
Eric S


Location: new orleans
Joined: 22 Nov 2009
Reading list: 8 books

Posts: 805

PostPosted: Thu 25 Sep, 2014 5:30 am    Post subject:         Reply with quote

Robert MacPherson wrote:
I have the process down to about 65seconds per ring; for rings that are are closed, but not knitted into the fabric. That time does not include the annealings, because they are batch processes and subject to economies of scale. Of the 35 seconds required to rivet, all but about 8 of them are about making, cutting, and inserting the rivets. There's got to be a better way to deal with the rivets.

I imagine that it's taking me about four times what it should take. I'm in the right order of magnitude anyway. Mac

Mac, if you have a way to show the final process of setting the rivet more clearly that would be helpful, I think you have shown everything up to the rivet setting step in a way that anyone can follow.


Last edited by Eric S on Thu 25 Sep, 2014 7:14 am; edited 1 time in total
View user's profile Send private message Visit poster's website
Mart Shearer


Location: Jackson, MS, USA
Joined: 18 Aug 2012

Posts: 1,302

PostPosted: Thu 25 Sep, 2014 7:07 am    Post subject:         Reply with quote

Closing the rivet is simply a matter of squeezing it with the tongs with dimple. Many folks suggest the tongs need to be tapped with a hammer, but I think more leverage is enough.
ferrum ferro acuitur et homo exacuit faciem amici sui
View user's profile Send private message
Erik D. Schmid


Location: St. Cloud, MN
Joined: 21 Aug 2003

Posts: 80

PostPosted: Thu 25 Sep, 2014 11:05 am    Post subject:         Reply with quote

For what it's worth, the image of my mail should be listed under ancient history as I have not crafted links like that in over a decade.
http://www.erikds.com
View user's profile Send private message Visit poster's website
Robert MacPherson
Industry Professional


Location: Jeffersonville USA
Joined: 27 Feb 2008

Posts: 141

PostPosted: Thu 25 Sep, 2014 1:34 pm    Post subject:         Reply with quote

Erik D. Schmid wrote:
For what it's worth, the image of my mail should be listed under ancient history as I have not crafted links like that in over a decade.


Erik,

Nice to see you here!

Thank you for not saying anything disparaging about my rings. Wink

Mac

Robert MacPherson
http://www.lightlink.com/armory/
http://billyandcharlie.com/
View user's profile Send private message Visit poster's website
Kai Lawson


Joined: 26 Aug 2010
Likes: 7 pages

Posts: 589

PostPosted: Thu 25 Sep, 2014 4:47 pm    Post subject:         Reply with quote

Erik--would you mind posting a picture or two of some of your new rings? I think many here would love to see them.
"And they crossed swords."
--William Goldman, alias S. Morgenstern
View user's profile Send private message
Robert MacPherson
Industry Professional


Location: Jeffersonville USA
Joined: 27 Feb 2008

Posts: 141

PostPosted: Fri 26 Sep, 2014 8:53 am    Post subject:         Reply with quote

Eric S wrote:

Mac, if you have a way to show the final process of setting the rivet more clearly that would be helpful, I think you have shown everything up to the rivet setting step in a way that anyone can follow.


I built a new tool for closing the rings. It works OK.....but it's not all it should be. It started of as a crimping tool from "Horrible Freight" http://www.harborfreight.com/9-1-2-half-inch-...36411.html


...which I modified.


Here is a ring with the rivet placed in the slit.


The closing procedure is pretty straightforward. It happens in two stages. The ring is placed in the first "station" in the tool and given a squeeze. This presses the rivet all the way in and gives the back of the ring a bit of curve.


Then the ring goes to the second "station" in the tool and given another squeeze. This collapses the point of the rivet and any of the surrounding ring material into a nice neat bump.


The problem with this tool is that it is too bulky to close the rings once they are knitted in. It is not so bad on an edge like here in this pic, but getting at a ring that is already linked with four others is too difficult. I am not quite ready to abandon the overall idea of this tool yet, but I think the next one needs to have the two "stations" closer together.


Mac

Robert MacPherson
http://www.lightlink.com/armory/
http://billyandcharlie.com/
View user's profile Send private message Visit poster's website
Julio Junco


Joined: 08 Jan 2006

Posts: 16

PostPosted: Fri 26 Sep, 2014 10:05 am    Post subject:         Reply with quote

Maybe it would be better to put your "stations"in parallel, something like this tool, it is a plier carpenter modified.
The work area is very narrow so you can knit easily.

Juliio


 Attachment: 26.19 KB
Peening tool.jpg

View user's profile Send private message
Robert MacPherson
Industry Professional


Location: Jeffersonville USA
Joined: 27 Feb 2008

Posts: 141

PostPosted: Fri 26 Sep, 2014 1:14 pm    Post subject:         Reply with quote

Julio,

Funny you should mention it. I started in on a new tool right after I posted.

The new tool is based on an end nipper from the same economical source as the other. http://www.harborfreight.com/10-heavy-duty-end-nipper-60815.html


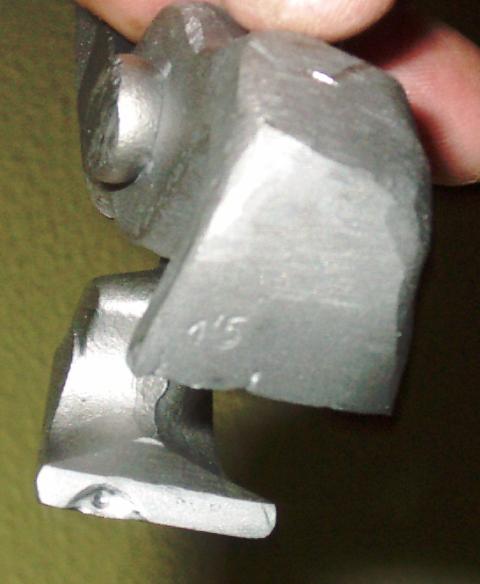
I ground away much of the width, and changed the shape of the jaws a bit to bring bring the working surfaces closer to the pivot.


The rivet driving station is on one side......


....and the rivet closing station on the other. One flips the tool over between operations.


Here are a couple of test rings. I cut these with less "pointy" overlaps because I was having trouble getting the longer points to behave. (so many different problems, and they are all interrelated)


Mac

Robert MacPherson
http://www.lightlink.com/armory/
http://billyandcharlie.com/
View user's profile Send private message Visit poster's website
Eric S


Location: new orleans
Joined: 22 Nov 2009
Reading list: 8 books

Posts: 805

PostPosted: Sun 28 Sep, 2014 12:47 am    Post subject:         Reply with quote

Mac, thanks for sharing your secrets.
View user's profile Send private message Visit poster's website
Eric S


Location: new orleans
Joined: 22 Nov 2009
Reading list: 8 books

Posts: 805

PostPosted: Sun 28 Sep, 2014 1:09 am    Post subject:         Reply with quote

Eric S wrote:
I am putting some information from a thread on this forum and a thread from another forum together here. Mart posted some information on Wade Allens hauberk M2. ( http://www.allenantiques.com/M-2.html ) It is a long horsemans type with a split up the front and back, all European wedge riveted mail, it has been suggested that the mail is 14th or early 15th (possibly Milanese).


I noticed a similarity between Wade Allens M2 hauberk and three other hauberks that I know of, these were also of the same type with a long split up the front and back. All four have some similarities and differences, it has been suggested that possibly all or some of these hauberks were either made for or sold to the Indo-Persian market. There is evidence of trade between European countries and several Indo-Persian countries in both arms and armor.

All four have a long front and back split and a split at the collar, three of the hauberks have similar standing leather collars, all four appear to be made with wedge riveted mail with one of the four having alternating wedge rivets and solid links, two have a wide flat area at the top of the front and back splits which looks typically Indo-Persian. The outer rivet heads on all four hauberks are very worn, to the point that the metal appears to be smooth and the rivet heads look like small rounded bumps instead of being pronounced, showing age and use. So far two of the hauberks have been said to possibly be constructed with Italian mail with a time period ranging from 14th or early 15th century on one to 15th to 16th century for the other, two have no opinions yet on age or origin. Two have been weighed one was 16 lbs, the other 18 lbs.


Here are some photographs of the four hauberks along with some detailed images of the links.

Wade Allens hauberk M2 is top left.


#1. Wade Allens M2, 16 lbs.


#2. Wedge riveted with alternating solid links, 18 lbs.


#3.


#4.


Here are two more examples of the same type of riveted mail hauberks, #5. is round riveted, it does not look like Indo-Persian mail to me, it looks European, #6. appears to be all wedge riveted and European as well.

#5 Round riveted.


All wedge riveted.
#6.
View user's profile Send private message Visit poster's website
Robert MacPherson
Industry Professional


Location: Jeffersonville USA
Joined: 27 Feb 2008

Posts: 141

PostPosted: Sun 28 Sep, 2014 7:17 am    Post subject:         Reply with quote

Eric S wrote:
Mac, thanks for sharing your secrets.


You are quite welcome. I have a policy about "secrets". I am willing to share techniques anyone who is interested. On the whole, I give more than I get, but that's OK.

The craftsmen of old had secrets, and those secrets died with them. We are not the better for that, and neither are they.

Mac

Robert MacPherson
http://www.lightlink.com/armory/
http://billyandcharlie.com/
View user's profile Send private message Visit poster's website
Mart Shearer


Location: Jackson, MS, USA
Joined: 18 Aug 2012

Posts: 1,302

PostPosted: Sun 28 Sep, 2014 12:15 pm    Post subject:         Reply with quote

Eric,

I think your sample #5 is not European. The demi-riveted construction, round rivets, and interior point at the overlap suggest otherwise. Erik mentioned that interior point near the break of pages 2 & 3 in a previous discussion.
http://www.myArmoury.com/talk/viewtopic.php?t=29799

ferrum ferro acuitur et homo exacuit faciem amici sui
View user's profile Send private message
Eric S


Location: new orleans
Joined: 22 Nov 2009
Reading list: 8 books

Posts: 805

PostPosted: Mon 29 Sep, 2014 5:38 am    Post subject:         Reply with quote

Mart Shearer wrote:
Eric,

I think your sample #5 is not European. The demi-riveted construction, round rivets, and interior point at the overlap suggest otherwise. Erik mentioned that interior point near the break of pages 2 & 3 in a previous discussion.
http://www.myArmoury.com/talk/viewtopic.php?t=29799


Mart, here are links to some larger images of hauberk #5. Take a look and let me know what you think after you view the larger images. I do not think the links have an Indo-Persian point after closely examining these images.

http://media-cache-ec0.pinimg.com/originals/5...56ddfd.jpg

http://media-cache-ak0.pinimg.com/originals/b...05c84c.jpg

http://media-cache-ak0.pinimg.com/originals/f...471d91.jpg

http://media-cache-ak0.pinimg.com/originals/f...5364ab.jpg

http://media-cache-ak0.pinimg.com/originals/d...cea46d.jpg
View user's profile Send private message Visit poster's website
Eric S


Location: new orleans
Joined: 22 Nov 2009
Reading list: 8 books

Posts: 805

PostPosted: Tue 30 Sep, 2014 6:44 am    Post subject:         Reply with quote

I finally found an image of the links from a Tibetan armor, it is all riveted, unfortunately no view of the back side of the links.


View user's profile Send private message Visit poster's website


Display posts from previous:   
Forum Index > Historical Arms Talk > Authentic mail pictures
Page 13 of 27 Reply to topic
Go to page Previous  1, 2, 3 ... 12, 13, 14 ... 25, 26, 27  Next All times are GMT - 8 Hours

View previous topic :: View next topic
Jump to:  
You cannot post new topics in this forum
You cannot reply to topics in this forum
You cannot edit your posts in this forum
You cannot delete your posts in this forum
You cannot vote in polls in this forum
You cannot attach files in this forum
You can download files in this forum


All contents © Copyright 2003-2024 myArmoury.com — All rights reserved
Discussion forums powered by phpBB © The phpBB Group
Switch to the Basic Low-bandwidth Version of the forum