Info Favorites Register Log in
myArmoury.com Discussion Forums

Forum index Memberlist Usergroups Spotlight Topics Search


myArmoury.com is now completely member-supported. Please contribute to our efforts with a donation. Your donations will go towards updating our site, modernizing it, and keeping it viable long-term.
Last 10 Donors: Daniel Sullivan, Anonymous, Chad Arnow, Jonathan Dean, M. Oroszlany, Sam Arwas, Barry C. Hutchins, Dan Kary, Oskar Gessler, Dave Tonge (View All Donors)

Forum Index > Historical Arms Talk > 17th century gauntlets project.DIY Project Reply to topic
This is a standard topic  
Author Message
Daniel Wallace


Location: Pennsylvania USA
Joined: 07 Aug 2011

Posts: 580

PostPosted: Wed 03 Jul, 2013 10:16 am    Post subject: 17th century gauntlets project.         Reply with quote

I finally got going in my little metal shop again. i spent a lot of time in a lull due to a family member's passing, but finally got back into the swing of this this week.

i came across a video of a person building a fantasy gauntlet a few weeks ago - with what i saw on the video - i knew i could make a period looking set as the guy in the video was using very few tools. then researched a few other videos of a master armor making a full suit of plate. i was really surprised at how much of the work was being done cold. so i finally come up with an idea i could do this myself too.

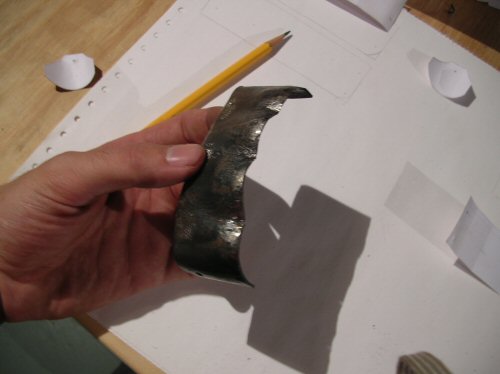
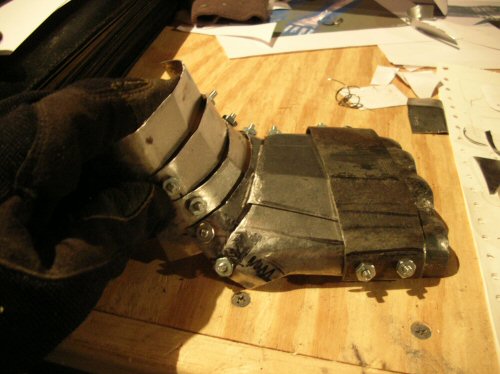
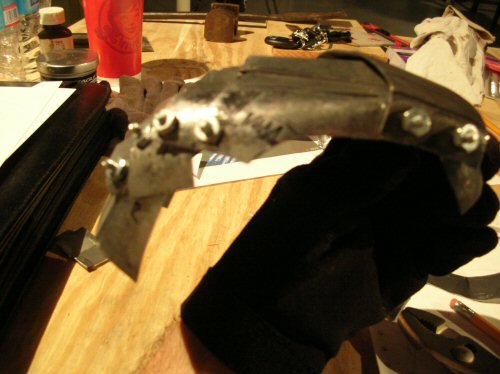
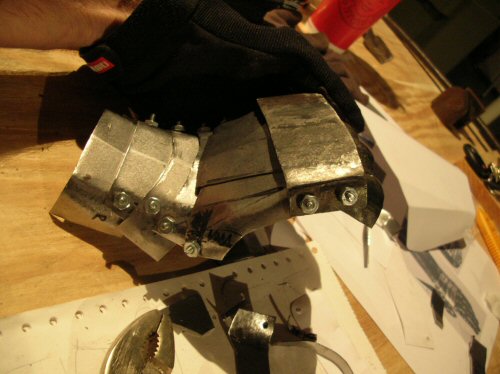
i did some research here on the sight - got some period example photos and broke down a set of 17 century finger gauntlets. what lead me to them was the plate over the knuckles is relatively flat - i also seen them on 3 quarter armor and like them even more due to my research with two handed swords.

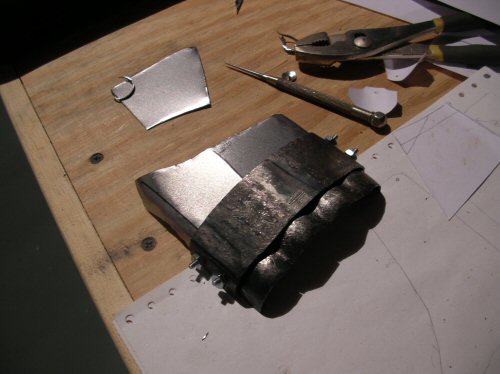
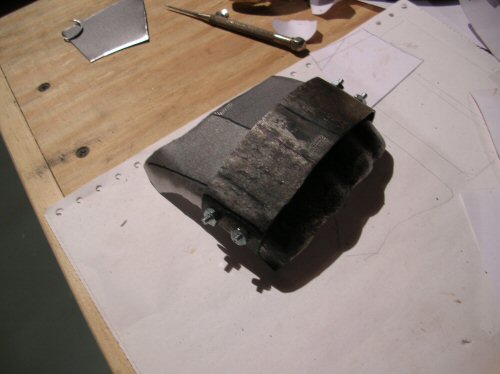
there's going to be some photos here in following, so that if my little project inspires you, you'll give it a try yourself too. but - i do have to say, this is a little more tricky than just having the plates articulate with each other. i did have to stretch and shape the metal in a few places to get the desired shape. that does take a little bit a knowledge in how to move metal with your hammers, and a little bit of heat. i used a mapp gas plumbing kit for my heat source as i did not need too much.

the finished work i'm hoping will look like blackened armor with polished accents that you see on period 3 quarter armor.

so for this beginning post, I'll go over the tools I'm using so far.


 Attachment: 100.21 KB
DSCN2119.JPG
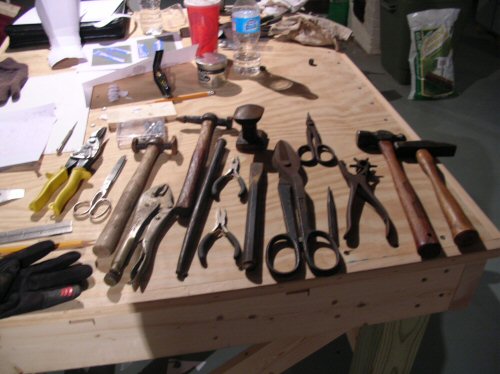
cutting sheers, i have 3 types here, 16gage cutters, a tiny set and a very large set for heavy metal. automotive body hammers, 16ox ball peen, and cross peen hammer. pliers of many sorts, cold cut chisel. etc if you can't make out whats there just ask I'

 Attachment: 90.47 KB
DSCN2110.JPG
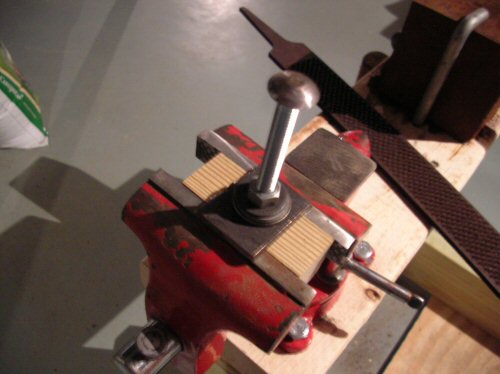
secondly i have a brick anvil just a 4 x 4 lump of steel, and this tool i made in the place of a round anvil. just a very large carriage bolt sanded down smooth to use in the place of a round anvil.

 Attachment: 82.69 KB
DSCN2109.JPG
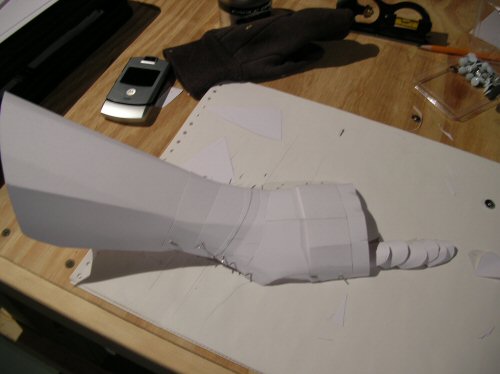
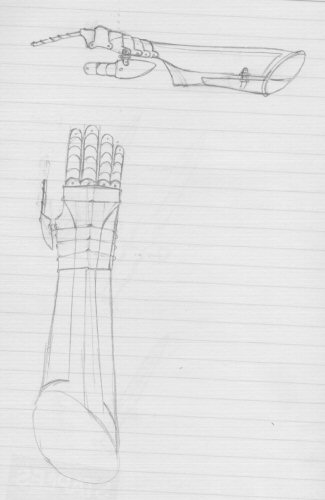
and this is the pattern i chose to follow.
View user's profile Send private message
Daniel Wallace


Location: Pennsylvania USA
Joined: 07 Aug 2011

Posts: 580

PostPosted: Wed 03 Jul, 2013 10:23 am    Post subject:         Reply with quote

this is what I've finished with so far this week.


 Attachment: 80.9 KB
DSCN2120.JPG
first plate, this is what took the majority of the time shaping to get right. this is below the knuckle plate over the fingers. all the shaping was done with that carriage bolt, and a good bit of cross peen work. and finished with the body hammers.

 Attachment: 90.01 KB
DSCN2123.JPG
this is the knuckle plate fitted. when i moved to steel from the paper model i didn't compensate for the thickness of the metal - and a result i had to heat and stretch the metal plate until it fit

 Attachment: 85.58 KB
DSCN2122.JPG
and this is what i finished with yesterday - today i gotta let my hand recover a little from all the hammering. all the curves are hammered out on this, as with the back of the hand the metal curves in and back out on the back side.
View user's profile Send private message
Daniel Wallace


Location: Pennsylvania USA
Joined: 07 Aug 2011

Posts: 580

PostPosted: Fri 05 Jul, 2013 3:43 pm    Post subject:         Reply with quote

went off to work in the shop today - got a good bit done. I've come to find the hardest thing about this is not shaping the metal, but knowing what rivet will have to be slotted and loose to articulate correctly. or else I'm just doing something out of the norm

as it is now articulating the hand forward doesn't give any resistance, but pulling the hand back, it doesn't feel like its folding itself back as easily.

all these pieces need some refining done to them at this point. some curves are a little out of shape, and some trimming is needed.


 Attachment: 96.55 KB
DSCN2126.JPG
this is as far as i can articulate the hand back.

 Attachment: 95.76 KB
DSCN2127.JPG
the rest of it freely falls

 Attachment: 96.81 KB
DSCN2128.JPG

View user's profile Send private message
Kai Lawson


Joined: 26 Aug 2010
Likes: 7 pages

Posts: 589

PostPosted: Fri 05 Jul, 2013 6:10 pm    Post subject:         Reply with quote

Aww man this looks really neat
"And they crossed swords."
--William Goldman, alias S. Morgenstern
View user's profile Send private message
David Gaál


Location: Hungary
Joined: 26 Mar 2011

Posts: 104

PostPosted: Sat 06 Jul, 2013 12:49 pm    Post subject:         Reply with quote

Great project! I like 16 and 17th century stuff really much.

One thing I discovered: most of the time the first plate overlaps the second.

A video that might be helpful to see the movement of something like that:
http://www.youtube.com/watch?v=0Jy1nZYTHeY

I think such videos like this would be really helpful for any armour lover and maker to see the movements of different objects.

Dávid

http://energie-fenster.at/
View user's profile Send private message Visit poster's website
Daniel Wallace


Location: Pennsylvania USA
Joined: 07 Aug 2011

Posts: 580

PostPosted: Sat 06 Jul, 2013 5:34 pm    Post subject:         Reply with quote

thanks for the link there David. actually i found a ton of flaws in this first attempt. although this looks like it works, its not the best idea. so i jumped around the net looking for what you offered there David.

I've come to find out that number 1 start with the top most plate and work your way back into the folding plates. its much easier to fit one into another this way instead of having to stretch the metal out like i did earlier.

secondly, and i believe this is much more important. by my observations, the rivets must be in line with each other on the plate, and their placement should be around 90 degrees from the flat of the hand. in my current configuration, the rivets are just where ever i could put them that made sense, but their actually binding against each other.

as i was able to look over a few more detailed photographs of period pieces, when the rivets line up and are at the 90 degree point, they act more like a hinge on a door. that should be a way to get these plates to butt right up against each other and still have movement. getting the articulation to fold forward seems to be an easy part making it compressible seems to be another story, and my rivet placement seems to be why.


so chalk this one up to a learning experience Cry i don't have an industry profession tag over there yet.
<-------- Razz
maybe one day I will if i make some things that catches interest. thankfully i used just 22gage sheet metal for this and I'm happy i did, if i would have gone all 16gage like i planed - that would be a good bit of wasted steel, time, and effort. with my new approach and design - I'm planning for better results. i do need to pick up some more sheet metal, and a new ban saw blade to work with the thicker material. so next Saturday, i plan to rebuild.
View user's profile Send private message
David Gaál


Location: Hungary
Joined: 26 Mar 2011

Posts: 104

PostPosted: Sun 07 Jul, 2013 1:20 am    Post subject:         Reply with quote

Do never give up!

Every try is worth for learning something new.

A another video, not from the same period, but helpful for anyone wanting to make gantlets(ca. from 1:40):
http://www.youtube.com/watch?v=muSspi7Vr_8

Dávid

http://energie-fenster.at/
View user's profile Send private message Visit poster's website
Daniel Wallace


Location: Pennsylvania USA
Joined: 07 Aug 2011

Posts: 580

PostPosted: Sun 07 Jul, 2013 10:50 am    Post subject:         Reply with quote

very true whats mentioned in that video. its one thing to get a good look at something, being able to handle an original will tell you more than any photo. just getting permission from a museum seems to be tricky enough.

i watch that video and see that gaunt just bend back on itself with out any restriction and think, man if i can only get mine to do half of that i would consider it a success.

once i get the new stuff started, we'll see what i can come up with. whats in my mind is pretty cool, just hope i can bring as much of this new plan to reality before hitting another road block.
View user's profile Send private message
Daniel Wallace


Location: Pennsylvania USA
Joined: 07 Aug 2011

Posts: 580

PostPosted: Sat 13 Jul, 2013 8:32 am    Post subject:         Reply with quote

just when i thought it was safe to go back to work - my real job went berserk and is now on mandated O.T. which kills my Saturdays the only day i can get into my shop. but work is work, i have to make money in order to build up this little hobby shop. so all i got for you this week is the new plan I'm going after - crudely draw out below.

the design may change depending on now much of this I'm able to actually do with the limited knowledge i have in shaping metal. I'm still keeping these as finger gauntlets with a flat knuckle plate. I'm going to try to add a central 'rope' on the bridge of the knuckles as i see in period pieces but how i do that is a little of a mystery. there will be a slight central ridge along the back of the hand accompanied by a raised accent that I've seen in blackened armors. the accent will be a matte finish of steel, the rest will be matte black paint. I've got an idea of mixing the paint myself, that way i can tone the black to a blue side using straight factory mixed black is dull in comparison to when you mix it yourself. also the cuff - well, I'm now not totally decided on it. i do see a a lot in the short cuff in reproductions, so i may stick with this longer forearm cuff just to be different.


 Attachment: 20.87 KB
brides 016.jpg

View user's profile Send private message


Display posts from previous:   
Forum Index > Historical Arms Talk > 17th century gauntlets project.DIY Project
Page 1 of 1 Reply to topic
All times are GMT - 8 Hours

View previous topic :: View next topic
Jump to:  
You cannot post new topics in this forum
You cannot reply to topics in this forum
You cannot edit your posts in this forum
You cannot delete your posts in this forum
You cannot vote in polls in this forum
You cannot attach files in this forum
You can download files in this forum


All contents © Copyright 2003-2024 myArmoury.com — All rights reserved
Discussion forums powered by phpBB © The phpBB Group
Switch to the Basic Low-bandwidth Version of the forum