Info Favorites Register Log in
myArmoury.com Discussion Forums

Forum index Memberlist Usergroups Spotlight Topics Search
Forum Index > Historical Arms Talk > Regripping a Windlass war swordDIY Project Reply to topic
This is a standard topic Go to page 1, 2  Next 
Author Message
Antonio Ganarini


Location: Trentino, Italia
Joined: 20 Mar 2012
Likes: 1 page
Reading list: 10 books

Posts: 76

PostPosted: Thu 26 Apr, 2012 1:04 am    Post subject: Regripping a Windlass war sword         Reply with quote

Hi everyone!
Waiting for my first Del Tin, I came across this Windlass "War Sword", definitively much cheaper than a Del Tin, but I think it's not bad at all! In effect... I like it very much! Happy
Here are some specs:

Blade: 36”
Overall: 44 ½”
Blade Width: 2”
Weight: 3 lbs
PoB: 5 ½”

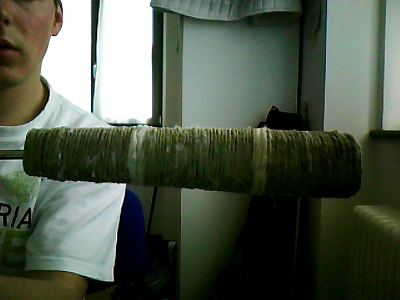
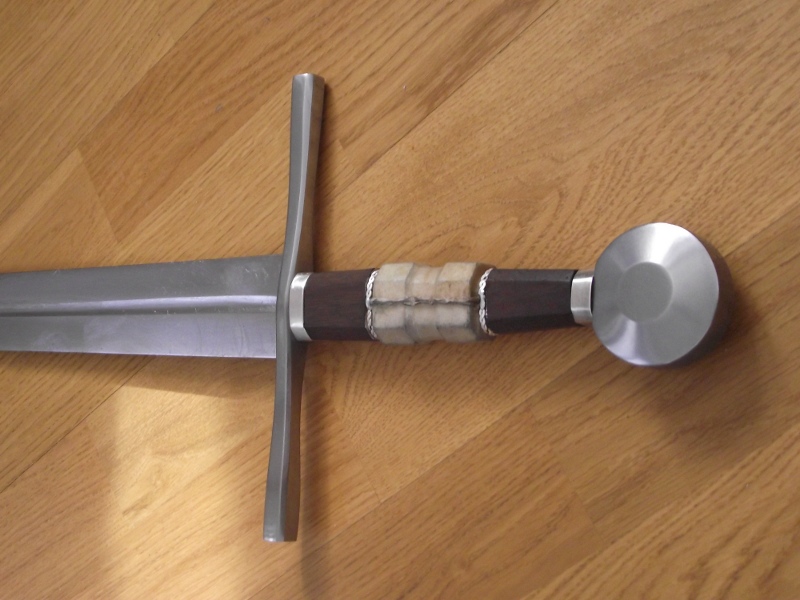
The grip is bare wood (I actually don't know which type of wood), with a piece of gut stitched over the shaped central section. The metal wires are only decorative elements! The pommel is screwed.
I tried it with and without gauntlets: while without gaunts the gripping is quite confortable, with gauntlets I found it terrible, maybe for the central rising that doesn't allow a good hold (below are some photos of the grip).

So, I want to regrip it, but I'm not an expert at all, this would be my first attempt, so I would be grateful to everyone could help me!
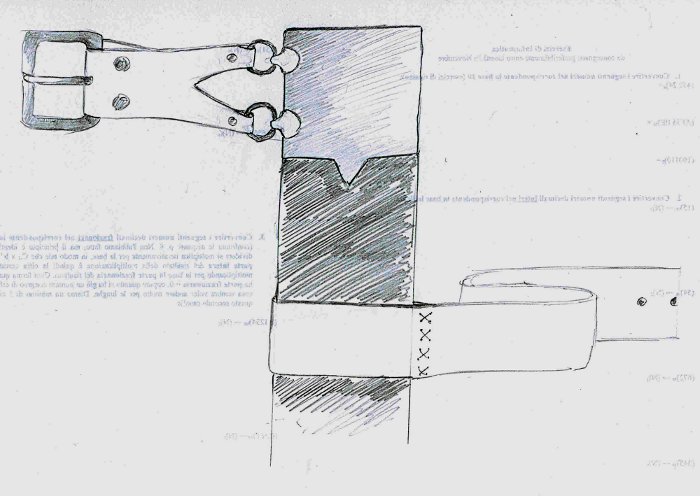
I think to remove the gut, make plane the central section, maybe to machine the entire wood core to make it thinner, wrap around it a hemp twine with some glue only at the top and bottom of the grip and finally apply some type of leather (I don't know which type is better for such a work)...


 Attachment: 162.86 KB
grip_downside.JPG


 Attachment: 186.75 KB
[ Download ]

 Attachment: 199.61 KB
[ Download ]

 Attachment: 206.22 KB
[ Download ]

Ciao a tutti!
View user's profile Send private message
Antonio Ganarini


Location: Trentino, Italia
Joined: 20 Mar 2012
Likes: 1 page
Reading list: 10 books

Posts: 76

PostPosted: Thu 26 Apr, 2012 1:17 am    Post subject:         Reply with quote

Here's a picture of the sword!


 Attachment: 87.94 KB
[ Download ]

Ciao a tutti!
View user's profile Send private message
Sean Flynt


Location: Birmingham, Alabama
Joined: 21 Aug 2003
Likes: 10 pages
Reading list: 13 books

Spotlight topics: 7
Posts: 5,981

PostPosted: Thu 26 Apr, 2012 9:04 am    Post subject:         Reply with quote

There's a tutorial/photos in this OLD article: http://www.myArmoury.com/feature_bench_ws_estoc.html
-Sean

Author of the Little Hammer novel

https://www.amazon.com/Little-Hammer-Sean-Flynt/dp/B08XN7HZ82/ref=sr_1_1?dchild=1&keywords=little+hammer+book&qid=1627482034&sr=8-1
View user's profile Send private message Visit poster's website
Joel Chesser


Location: Oklahoma
Joined: 23 Oct 2003

Posts: 724

PostPosted: Thu 26 Apr, 2012 10:12 am    Post subject:         Reply with quote

Also check out these links:

http://www.yeoldegaffers.com/project_grip.asp

http://forums.dfoggknives.com/index.php?showtopic=15010&st=0

Good luck on the project, I'm interested to see how it comes out.

..." The person who dosen't have a sword should sell his coat and buy one."

- Luke 22:36
View user's profile Send private message
Antonio Ganarini


Location: Trentino, Italia
Joined: 20 Mar 2012
Likes: 1 page
Reading list: 10 books

Posts: 76

PostPosted: Thu 26 Apr, 2012 1:55 pm    Post subject:         Reply with quote

Thank you very much!!
I'll post the photos of the 'workinprogress' and result!

Ciao a tutti!
View user's profile Send private message
Antonio Ganarini


Location: Trentino, Italia
Joined: 20 Mar 2012
Likes: 1 page
Reading list: 10 books

Posts: 76

PostPosted: Thu 26 Apr, 2012 11:40 pm    Post subject:         Reply with quote

Big Grin Oops... Just another question:
I decided to wrap the wood core with twine and, over it, leather... Do I have to glue all the hemp to the wood core, or a small amount of glue only at top/bottom could be enough to make it to remain tight in place? So, I think, I could better preserve the core for another future regripping!

Ciao a tutti!
View user's profile Send private message
Sean Flynt


Location: Birmingham, Alabama
Joined: 21 Aug 2003
Likes: 10 pages
Reading list: 13 books

Spotlight topics: 7
Posts: 5,981

PostPosted: Fri 27 Apr, 2012 7:40 am    Post subject:         Reply with quote

Antonio Ganarini wrote:
Big Grin Oops... Just another question:
I decided to wrap the wood core with twine and, over it, leather... Do I have to glue all the hemp to the wood core, or a small amount of glue only at top/bottom could be enough to make it to remain tight in place? So, I think, I could better preserve the core for another future regripping!


I think PJ uses superglue to tack just the ends of the cord. I tie the lower end of the cord to the cross or vise, saturate it with glue by running it through glue in my hands and then wrap the core. The glue tends to dry quickly and it can be time consuming to wrap carefully and tightly, so I work in short lengths, applying the glue to core and cord as I work toward the pommel end. I've undone at least one such grip and found it to be extremely durable, especially with the goatskin I use as a wrap. The glue impregnates the porous core, cord and leather during binding and effectively fuses them. Using wood glue allows the process to be reversed with care. You would simply peel off the wrap and unwind the cord. The glue lets go with enough inentional force, and you can help it along by moistening it from the inside (under the wrap). With the waxed leather wrap in place, this construction method should be very durable. If you mount the grip to the tang with epoxy, as I now do, you'd have to destroy the grip entirely to remove it (with a chisel).

-Sean

Author of the Little Hammer novel

https://www.amazon.com/Little-Hammer-Sean-Flynt/dp/B08XN7HZ82/ref=sr_1_1?dchild=1&keywords=little+hammer+book&qid=1627482034&sr=8-1
View user's profile Send private message Visit poster's website
Antonio Ganarini


Location: Trentino, Italia
Joined: 20 Mar 2012
Likes: 1 page
Reading list: 10 books

Posts: 76

PostPosted: Fri 27 Apr, 2012 9:32 am    Post subject:         Reply with quote

Ok! Understood!
Thanks a billion!

Ciao a tutti!
View user's profile Send private message
Antonio Ganarini


Location: Trentino, Italia
Joined: 20 Mar 2012
Likes: 1 page
Reading list: 10 books

Posts: 76

PostPosted: Tue 01 May, 2012 5:24 am    Post subject:         Reply with quote

Hi!!!
Today I've finished my regripping! Much better than I had expected!
I really thank you all, especially Sean and Joel, for your precious tutorials & articles & advices!

Some realization details:
I removed about a 30% of the wood core with a simple pocketknife to make it thinner, then I wrapped around it hemp twine (diameter ca. 1mm), filling the grooves remained after the "slimming" with more thick twine. I used polyacetovinylic glue for wood.
I put over the wrapped core chamois leather previously skived and soaked, glueing and overwrappig it gradually. For the overwrap I used the same hemp twine of the inner layer.
Once dry, I applyed brown shoe polish (I cannot find the correct natural dye!) and wax!

Thank you again, may the force be with you all! Wink


 Attachment: 155.06 KB
inner.png
The inner wrap

 Attachment: 174.11 KB
[ Download ]

 Attachment: 158.94 KB
[ Download ]

 Attachment: 57.33 KB
An overview! [ Download ]

Ciao a tutti!
View user's profile Send private message
Joel Chesser


Location: Oklahoma
Joined: 23 Oct 2003

Posts: 724

PostPosted: Tue 01 May, 2012 3:29 pm    Post subject:         Reply with quote

Congratulations! That came out very nicely, you should be very proud!
..." The person who dosen't have a sword should sell his coat and buy one."

- Luke 22:36
View user's profile Send private message
Antonio Ganarini


Location: Trentino, Italia
Joined: 20 Mar 2012
Likes: 1 page
Reading list: 10 books

Posts: 76

PostPosted: Wed 02 May, 2012 6:53 am    Post subject:         Reply with quote

Thank you Joel! I'm actually very glad of this little work! Primarly because it was very funny trying to glue everything together, clung to an home-made vise, with glue almost everywhere! But I had good masters! Laughing Out Loud
Ciao a tutti!
View user's profile Send private message
Sean Flynt


Location: Birmingham, Alabama
Joined: 21 Aug 2003
Likes: 10 pages
Reading list: 13 books

Spotlight topics: 7
Posts: 5,981

PostPosted: Wed 02 May, 2012 7:32 am    Post subject:         Reply with quote

It's a clear improvement! I've seen this sword many times and never taken a second look at it because of that awful grip, but you've proven that it has real potential as a project sword. Cool
-Sean

Author of the Little Hammer novel

https://www.amazon.com/Little-Hammer-Sean-Flynt/dp/B08XN7HZ82/ref=sr_1_1?dchild=1&keywords=little+hammer+book&qid=1627482034&sr=8-1
View user's profile Send private message Visit poster's website
Antonio Ganarini


Location: Trentino, Italia
Joined: 20 Mar 2012
Likes: 1 page
Reading list: 10 books

Posts: 76

PostPosted: Tue 20 Nov, 2012 1:02 am    Post subject:         Reply with quote

Hi everyone! Happy

Now's scabbard time! I would like to turn the classical windlass scabbard of the sword above into a more historical one (without magical spells, of course)!
The target is 1340-1360, tools, knowledge and craftsmanship are limited, so I really need your help!

I looked for sources in Oakeshott's books, and I found that the problem could be solved with a two ring hanger, one high just under the mouth of the scabbard on one side of the upper locket, another on the other side, near the lower brim of the same locket. The only concern with this solution is that the weight of the sword could be too much for this hanging system to keep it at the right angle, given the short distance between the two suspension rings.

I know this type of sword was often carried at the saddle but... I would like to make something similar to the picture from
The Sword in the Age of Chivarly below, but with a nearly correct suspension system for ~1350.

Then I could try to remove the black painting of the leather with a metal brush or sandpaper, protecting it with something else (simple grease?).

Any idea?


 Attachment: 42.33 KB
oakesh2.jpg
From Oakeshott's "The Sword in the Age of Chivarly", type XIIIa

 Attachment: 99.1 KB
[ Download ]

 Attachment: 68.92 KB
[ Download ]

Ciao a tutti!
View user's profile Send private message
John Giles


Location: Northwest Florida
Joined: 19 Aug 2011
Likes: 3 pages
Reading list: 1 book

Posts: 26

PostPosted: Tue 20 Nov, 2012 11:37 am    Post subject:         Reply with quote

Very good!! I'm going to be doing a new grip from scratch for my Hanwei/Tinker longsword soon. I hope it comes out as good as yours! It will be my first wrapped one. I've done a couple sidesword and smallsword grips in just natural wood, but this one will be my first dealing with wrapping and gluing, etc... Again, nice job Antonio!
True Courage is about knowing not when to take a life, but when to spare one.
View user's profile Send private message
Antonio Ganarini


Location: Trentino, Italia
Joined: 20 Mar 2012
Likes: 1 page
Reading list: 10 books

Posts: 76

PostPosted: Tue 20 Nov, 2012 2:14 pm    Post subject:         Reply with quote

John Giles wrote:
I hope it comes out as good as yours! It will be my first wrapped one.

It was my first too! I hope your will come out even better! Wink

(PS: use a twine thinner than mine!)

Ciao a tutti!


Last edited by Antonio Ganarini on Wed 21 Nov, 2012 7:51 am; edited 1 time in total
View user's profile Send private message
Antonio Ganarini


Location: Trentino, Italia
Joined: 20 Mar 2012
Likes: 1 page
Reading list: 10 books

Posts: 76

PostPosted: Wed 21 Nov, 2012 7:45 am    Post subject:         Reply with quote

I think that something like this could be ok... I don't know how much, from a historical point of view, and here's where I need you! Confused

Ok, I know that a windlass scabbard maybe cannot be historical, but I wish to make it resemble an historical one! Wink


 Attachment: 51.21 KB
ipotesi3.jpg


Ciao a tutti!
View user's profile Send private message
Johan Gemvik


Location: Stockholm, Sweden
Joined: 10 Nov 2009

Spotlight topics: 1
Posts: 793

PostPosted: Fri 23 Nov, 2012 11:02 am    Post subject:         Reply with quote

That belting sure looks nice!
Very similar to the older age Z-strap you see on the Sancho IV sword.

"The Dwarf sees farther than the Giant when he has the giant's shoulder to mount on" -Coleridge
View user's profile Send private message
Antonio Ganarini


Location: Trentino, Italia
Joined: 20 Mar 2012
Likes: 1 page
Reading list: 10 books

Posts: 76

PostPosted: Fri 23 Nov, 2012 2:37 pm    Post subject:         Reply with quote

Happy Really? Happy

Actually I thought to make an hybrid between the "Z" suspension system and that of the Records XII.19!

Ciao a tutti!
View user's profile Send private message
Antonio Ganarini


Location: Trentino, Italia
Joined: 20 Mar 2012
Likes: 1 page
Reading list: 10 books

Posts: 76

PostPosted: Sat 08 Dec, 2012 4:56 am    Post subject:         Reply with quote

Scabbard finished, finally! Happy

I took off the black varnish of the original scabbard with sand paper, then I repainted the scabbard with brown acrylic paint. I then removed the brown paint leaving some darker spots, without touching the sewing on the back, for a better protection. To finish it I applied some protective polish to the leather.

For the belt attachment system I used the two bands of silvered brass that were placed at the top and the bottom of the original grip, cutting the lower one in a fleur-de-lis shape (or something similar, that was the original idea anyway Wink ). The bands were too thin to be welded to the locket, so I used epoxy.

The suspension rings are zinc-plated, but I left them a couple of days in salted water, so now they look a little more authentic! I fixed the belt with leather strings.

So that's all!


 Attachment: 74.14 KB
[ Download ]

 Attachment: 102.07 KB
upper locket front [ Download ]

 Attachment: 92.99 KB
[ Download ]

 Attachment: 113.35 KB
upper locket back [ Download ]

Ciao a tutti!
View user's profile Send private message
Jack Savante


Joined: 01 Jun 2010
Likes: 1 page

Posts: 78

PostPosted: Sat 08 Dec, 2012 5:21 am    Post subject:         Reply with quote

Nice work!

A sword and scabbard I'd be proud to own!
View user's profile Send private message


Display posts from previous:   
Forum Index > Historical Arms Talk > Regripping a Windlass war swordDIY Project
Page 1 of 2 Reply to topic
Go to page 1, 2  Next All times are GMT - 8 Hours

View previous topic :: View next topic
Jump to:  
You cannot post new topics in this forum
You cannot reply to topics in this forum
You cannot edit your posts in this forum
You cannot delete your posts in this forum
You cannot vote in polls in this forum
You cannot attach files in this forum
You can download files in this forum


All contents © Copyright 2003-2024 myArmoury.com — All rights reserved
Discussion forums powered by phpBB © The phpBB Group
Switch to the Basic Low-bandwidth Version of the forum