Posts: 24 Location: East Yorkshire, England
Tue 06 Sep, 2011 12:59 pm
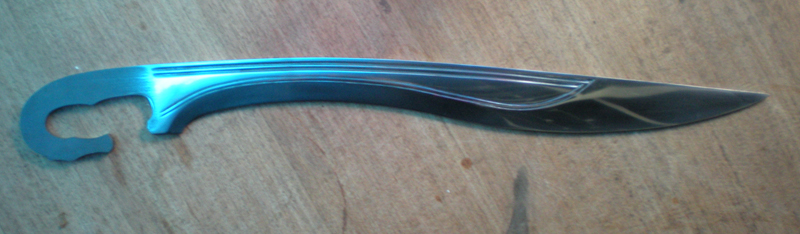
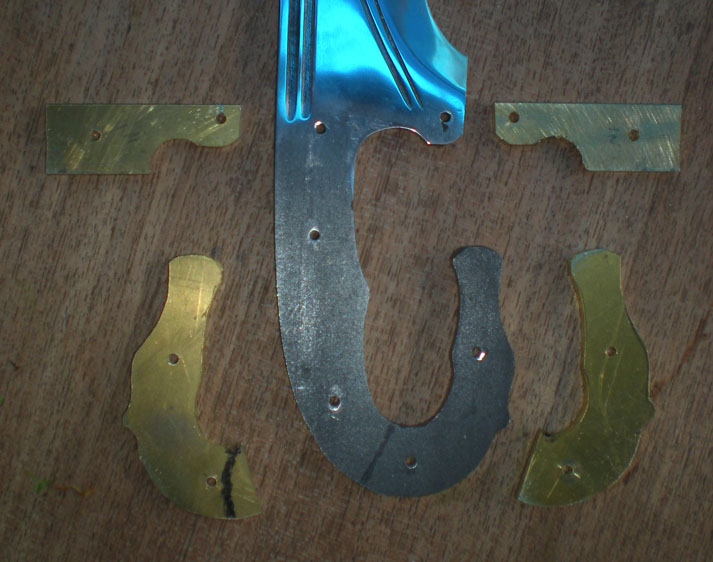
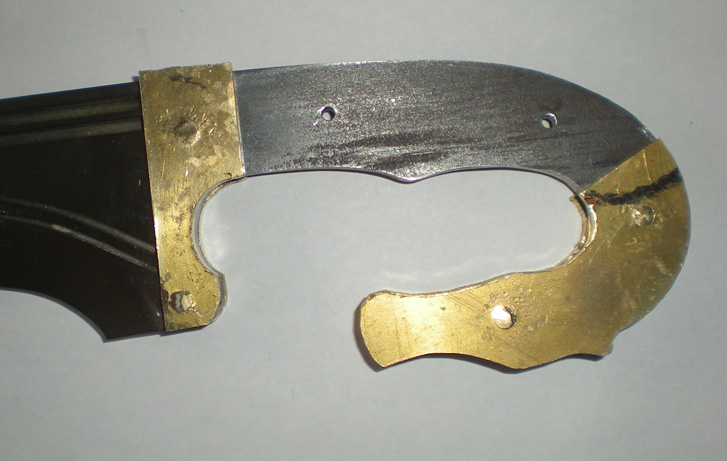
Falcata construction pics
Posts: 1,525 Location: Sydney, Australia
Sun 11 Sep, 2011 9:22 pm
my one question, how long is the blade and how heavy is it, ok thats two but meh...
Posts: 11,556 Location: San Francisco
Sun 11 Sep, 2011 11:47 pm
I had meant to respond to this topic earlier: thank you for sharing your in-progress shots of this beautiful sword. I really enjoy it when makers are kind enough to give us a glimpse of these sorts of things.
Cheers!
Posts: 132 Location: Wokingham, Berkshire, UK
Mon 12 Sep, 2011 4:15 am
| William P wrote: |
| my one question, how long is the blade and how heavy is it, ok thats two but meh... |
Hi William
the blade is 521 mm measured along the back of the blade from the brass grip plate, and it weighs just over 1kg
Phil
Posts: 180 Location: Washington, DC
Mon 12 Sep, 2011 7:11 am
Really beautiful sculptural work on the horse head Paul. It suits the blade and the whole thing has a nice flow. I like the dark incised lines against the bright brass. Can you tell us more about your brass shaping process? Do you use hand files? Power tools? Did you happen to take and progress shots of the sculpting? Very impressive and very lovely.
Posts: 24 Location: East Yorkshire, England
Sun 25 Sep, 2011 8:20 am
Hi Guys.
Thanks Nathan, I hope to share a lot more as i produce more work.
Hi Phil.
Hi jesse.
To answer your questions, sorry to say that i don't have any pics of the shaping process. I will try to describe best i can.
First i mark out the detail for the main features (mouth, eyes, nose and head to neck line) Then i use a small barrel sander in my multi tool to round out the neck to match up with the grip, not going too close to the head to neck line. This i would use a very small rotary cutter to get close to the line and then clean it up with a micro file. For the head i would use the sander again to form the shape and cut the detail in with a number of different cuters. For small sanding and shaping i find the diamond coated bits very good (esp round the eyes)
When i have marked out the patterns i want for the line work, i use a round tip cutter of around 2mm dia which i have ground down to a saucer shape so it looks like a small sprocket. I find this gives a vary sharp, light line. Then i open the lines up a little with a fine tip diamond coated tip, or if i want a very small sharp line, i use a micro file with a ground tip in the shape of a tight V. Pushing this down the lines can give a good clean sharp effect.
When done, i sand out the scratches with fine wet or dry, finish off with solvol autosol chrome polish with fine wire wool. Then use a very dark grey matt enamel in the details and clean of exess with stiff card when dry.
Hope This Helps.
Thanks Paul
Posts: 803 Location: In a van down by the river
Sun 25 Sep, 2011 12:44 pm
Beautiful work. But I still prefer your first falcata. ;)
Posts: 490 Location: UK
Sun 25 Sep, 2011 11:36 pm
Falcata
Lovely work Paul, and having seen the Vendel helm in progress all I can say is get that one finished and then you can move on to the boar crested helm we have discussed ;)
see you sometime when I arrive home
best
Dave
Posts: 24 Location: East Yorkshire, England
Sun 02 Oct, 2011 4:06 pm
Hi Dave,
Guess you would pref the first Falcata Dave. personally i pref your car!!
Posts: 24 Location: East Yorkshire, England
Sun 02 Oct, 2011 4:18 pm
Thanks Dave,
Yeah, That would be great. I have been struggling a bit with the crest for the Vendel helm, but i think ive got it now.
It would be good to get my teeth into a new project soon. Will get Bruce to bring it round so you can see how it is going.
Cheers. Paul.
Posts: 55 Location: Helena MT
Sun 02 Oct, 2011 5:47 pm
You drilled the rivet holes post heat treat? Is the tang that soft or did you use a carbide drill?
Posts: 24 Location: East Yorkshire, England
Mon 03 Oct, 2011 3:51 pm
Hi Tod,
Yep, The tang was hard to get through, I used up a few carbide bits on those holes. Best to keep the diameters small :)
Posts: 1 Location: South Africa
Mon 07 Apr, 2014 4:31 pm
Falcata
Hi. I'm new member to this site. I would like to have the beautiful Horsehead Falcata made for me. How do I go about doing it?
Regars,
Ikram.
You
cannot post new topics in this forum
You
cannot reply to topics in this forum
You
cannot edit your posts in this forum
You
cannot delete your posts in this forum
You
cannot vote in polls in this forum
You
cannot attach files in this forum
You
can download files in this forum