Hello there
Did anyone else have complaints on this item?
I ordered one from KOA for a DIY project while I have no complaint of Kult the item is a lil sub par to say the least..
While the general design is quite nice the one that I had ordered was sloppy. And I mean to the point where the welds broke while trying a lil stress test. I did happen to cut this thing apart and redo this whole thing. The walls of the head was no thicker than a dime and had craked with a lil test cutting.
I plan to redo this whole thing I got scrap here that is much thicker and will post pics of the upgraded piece. But I was just curious if I maybe got a dud or it other had this problem? I mean thier halberd head in awesome but this one is just ehh.
Any input would do. I know Sean had problems with a sloppy one as well.
But just my two cents save up and buy a quality one from arms and armor.
Thanks
Christopher
I dont want to pull too far off topic, as I have no direct experience with either the poleaxe or halbred head, but I have been trying to decide which to buy for a project of my own. In what ways is the halbred better?
It doesn't look like you're alone. I have the exact same results from mine.
When I received mine I did a quick mount on some scrap wood I had with the intent of having a bit of fun. The weld on the spike was so bad that puncturing an empty box caused it to break. My welder friend just sighed at the quality of the welds. Cleaned up and reinforced it's not bad but it's definitely a project.
When I received mine I did a quick mount on some scrap wood I had with the intent of having a bit of fun. The weld on the spike was so bad that puncturing an empty box caused it to break. My welder friend just sighed at the quality of the welds. Cleaned up and reinforced it's not bad but it's definitely a project.
No experience with these but one often gets what one pays for and they do seem very cheap in price ! Not saying that one can't be lucky and get a " good " one but maybe quality control on these is sort of hit and miss ?
The halberd might be better being made using fewer sub-units depending on a decent weld to keep them together.
( Based only on the pics ).
The halberd might be better being made using fewer sub-units depending on a decent weld to keep them together.
( Based only on the pics ).
Jean,
Truer words could not be spoken. I picked it up when I first started collecting. I'm not disappointed with the end result but it was a bit more of a project than I was expecting.
Truer words could not be spoken. I picked it up when I first started collecting. I'm not disappointed with the end result but it was a bit more of a project than I was expecting.
i have an early one and haven't had any issues with the welds. must be a quality control issue.
That might explain the extreme over-welding of my example. I had to do lots of grinding inside the langets at the socket just to be able to mount the piece. Everything else was aesthetic refinement. If anything, I'd say mine was overbuilt, but it turned out great! I got what I expected for $45 (although, technically, it was somebody else's $45). I'd have been pleased even if that came out of my own pocket.
One way to think of this is to compare the price to a finished pollaxe, decide on a reasonable hourly wage and estimate how many hours you'll need to finish the project. I think most folks will find that even at a theoretical $10 per hour their investment will exceed the price the A&A pollaxe. That's only theoretical, though. It's all sweat equity.
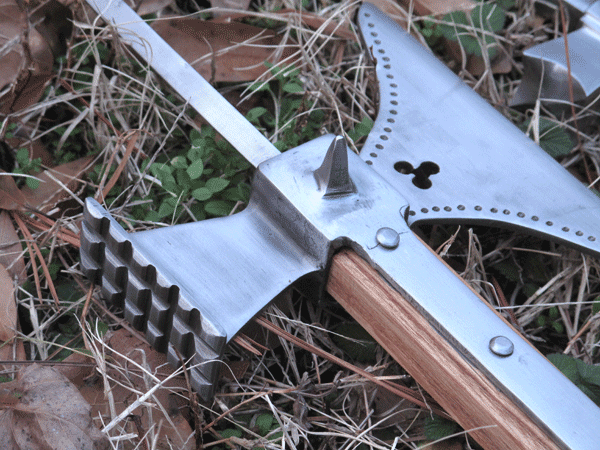
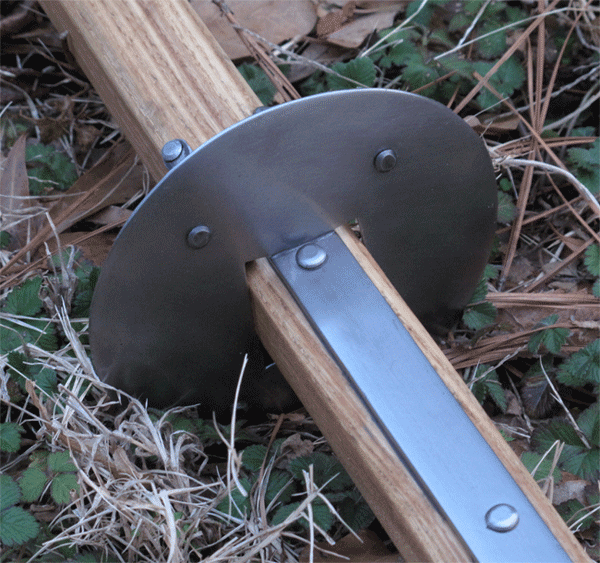
Here's the one I made:
 Attachment: 218.11 KB

 Attachment: 181.07 KB
 Attachment: 209.5 KB
One way to think of this is to compare the price to a finished pollaxe, decide on a reasonable hourly wage and estimate how many hours you'll need to finish the project. I think most folks will find that even at a theoretical $10 per hour their investment will exceed the price the A&A pollaxe. That's only theoretical, though. It's all sweat equity.
Here's the one I made:


well I looked at it and Kult of Athena neither list it as battle ready or stage combat now other sites may say otherwise (I don't know) but it could just be meant for display or something and not for actual use or I might be completely off and be flogged for my ignorance, that's my 2 cents anyway
I agree with Jean Thibodeau that you sort of get what you pay for with GDFB. Much of what I've seen of theirs online is "best case scenario" when compared to what you receive. Helmets, armor and pretty much anything else. I'm not saying it's horrible but seemingly with their products you do only get what you pay for.
KOA does do some quality control, so if the one you got looked shoddy, just think about how bad the ones were that they may have had to send back.
I'm looking to get one of the Anshelm Arms poleweapons. They look awesome for the price!
-Cian
KOA does do some quality control, so if the one you got looked shoddy, just think about how bad the ones were that they may have had to send back.
I'm looking to get one of the Anshelm Arms poleweapons. They look awesome for the price!
-Cian
Like Chuck and Sean mine (which I bought last year) seems if anything...... overbuilt. certainly the spike weld is fine on mine. sounds like a QA problem on the more recent batch?
I agree you do get what you pay for.
But 30 mins in the garage I made a so so product to a very great product. Redid the whole thing using the spikes axe and hammer welded to a different body (head) and just beefed it up. Not bad compared to what it was.
The other head they offer on the other hand is nice thick steel with excellent welds and finish. Now this one is too. GDFB does offer really great stuff I have 4 of thier helmets and am very impressed. Along with several other weapons and armor of theres. While not the best its great for what you need. If you need it.
Just probably got a bad egg out of the bunch, It looked good in the hand but closer inspection showed its flaws.
Thanks
Christopher
I just bought one of these but it is on back order. I'm sad to hear these complaints. I too saw that KofA didn't list it as "battle ready" but I just figured that it was because the thing wasn't mounted.
I have emailed the vendor about this discussion. Hopefully they will have something positive to say in their reply.
I have emailed the vendor about this discussion. Hopefully they will have something positive to say in their reply.
I got a couple early on and had no problems with them. Did have the same issue Sean Flynt did. Had to do a lot of metal removal in the socket.
Sean I must say yours came out really nice. Where did you get the square haft for the project. I had a devil of a time and ended up using and hexagonal one.
Regards
Bryan Johnson
Sean I must say yours came out really nice. Where did you get the square haft for the project. I had a devil of a time and ended up using and hexagonal one.
Regards
Bryan Johnson
| Bryan Johnson wrote: |
|
Sean I must say yours came out really nice. Where did you get the square haft for the project. I had a devil of a time and ended up using and hexagonal one. |
Thanks! I used ash wheelbarrow replacement handles for these hafts. They're cheap ($13) and readily available at DIY stores like Lowe's (check the tool handle aisle). They're 2x2 and 60" long, so you can make of them pretty much any historical haft type you want. It's hard to see in these photos, but mine are ocatgonalized with ~.25 bevels. I ripped these hafts on a table saw to almost the right dimensions and then finished with a hand plane. I was actually much too conservative with the saw and spent a HUGE amount of time with the plane. These handles are ideal for pollaxe projects.
While not strictly on-topic, maybe y'all would be interested in some comments about the rondel. I had to figure this out on my own and I might be able to save you some trouble.
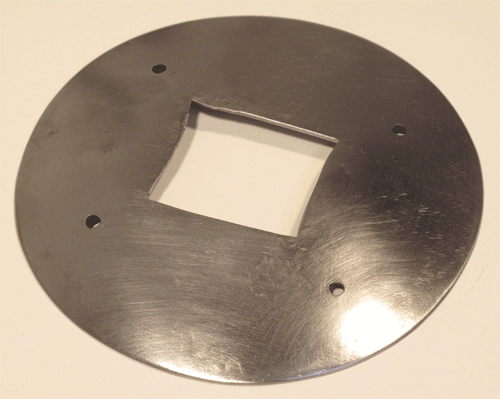
I cut the rondel out of 16 ga. mild steel, marked the center with a punch and marked off a square the same shape as the haft. Then I just held it at a slight angle on my little anvil and went around it in courses with the hammer, working in toward the center as a spiral but stopping at the marked square. In other words, it's a shallow dome with a flat top. No heat. I was striking just above the point of the steel's contact with the anvil. I was using the rounded-over "flat" face of an ancient small ball peen hammer. That left very few marks and required no planishing. I just lightly sanded the top side and underneath. I screwed up the opening. Measure twice, cut once, right? I didn't want to start over so I gambled and heated the sides of the opening I cut too deep and spread those inward with my hammer and anvil. Worked perfectly. I didn't inlet the langets, so my original plan was to to cut a channel for the langets in the rondel. But this is what I ended with due to the measuring error and it's perfectly sound.
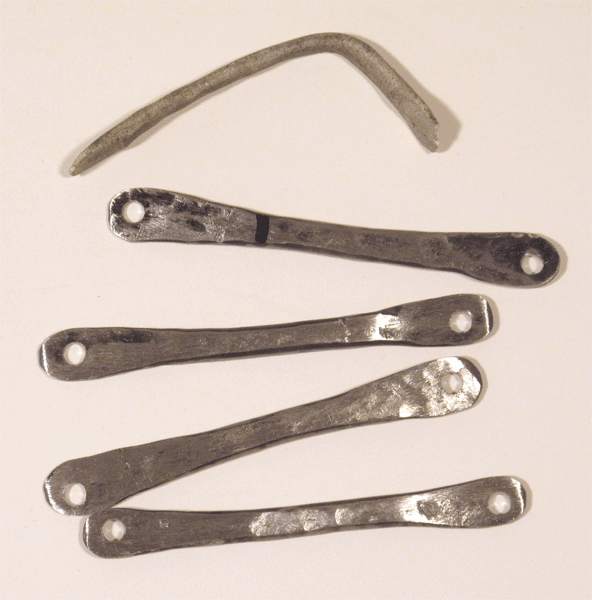
I used some cheap steel rod for the rondel supports. I modeled them in Sculpey first. Yes, that pitiful gray object at the top of the image below used to be beautiful white Sculpey. That worked perfectly. I cut the rod, heated the sections to orange and shaped them hot. Then I just drilled and riveted them to the rondel. I attached them to the haft using modified nails but didn't think that was secure enough so I added JB Weld to the nail holes. I left the supports rough but I sanded them lightly just so they weren't black from the hot work.
 Attachment: 103.2 KB
 Attachment: 178.59 KB
 Attachment: 106.02 KB
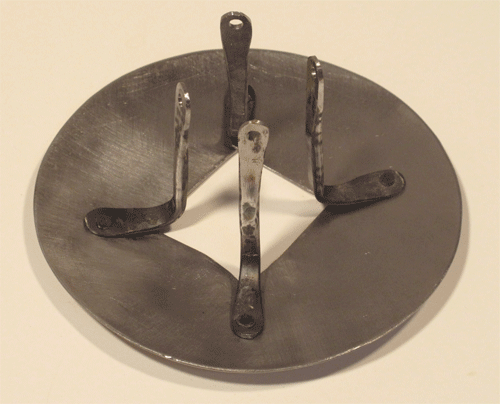
I cut the rondel out of 16 ga. mild steel, marked the center with a punch and marked off a square the same shape as the haft. Then I just held it at a slight angle on my little anvil and went around it in courses with the hammer, working in toward the center as a spiral but stopping at the marked square. In other words, it's a shallow dome with a flat top. No heat. I was striking just above the point of the steel's contact with the anvil. I was using the rounded-over "flat" face of an ancient small ball peen hammer. That left very few marks and required no planishing. I just lightly sanded the top side and underneath. I screwed up the opening. Measure twice, cut once, right? I didn't want to start over so I gambled and heated the sides of the opening I cut too deep and spread those inward with my hammer and anvil. Worked perfectly. I didn't inlet the langets, so my original plan was to to cut a channel for the langets in the rondel. But this is what I ended with due to the measuring error and it's perfectly sound.
I used some cheap steel rod for the rondel supports. I modeled them in Sculpey first. Yes, that pitiful gray object at the top of the image below used to be beautiful white Sculpey. That worked perfectly. I cut the rod, heated the sections to orange and shaped them hot. Then I just drilled and riveted them to the rondel. I attached them to the haft using modified nails but didn't think that was secure enough so I added JB Weld to the nail holes. I left the supports rough but I sanded them lightly just so they weren't black from the hot work.


Hello Sean:
I too have the GDFB poleaxe head. I was going to haft it onto a piece of red oak, but the whole project has been intimidating me. Your work has inspired me and I simply would like to now what did you use for the rivets (or nails) securing the langets? Also, how did you polish the metal.
It certainly looks much, MUCH nicer than GDFB poleaxe head. I offer my compliments Sir.
Thanks!
Sean
Thanks for the tip on the hafts I never would have thought of that. The DIY tips on the rondel are awsome as well. I am going to have to make one for mine now just as soon as I get back from an extended trip I'm taking for my Uncle Sam :-)
Thanks for the tip on the hafts I never would have thought of that. The DIY tips on the rondel are awsome as well. I am going to have to make one for mine now just as soon as I get back from an extended trip I'm taking for my Uncle Sam :-)
Good thread!
I was actually looking at buying one of these. Now at least I know what I'd be buying. DIY is no problem for me but well, I can make a better one from scratch. How about the other pollaxes being sold? Which are the most bang for the buck? I can fancy up any that's not picture perfect as long as they're solid built. I find I have to do that with practically anything I'd buy anyway.
I was actually looking at buying one of these. Now at least I know what I'd be buying. DIY is no problem for me but well, I can make a better one from scratch. How about the other pollaxes being sold? Which are the most bang for the buck? I can fancy up any that's not picture perfect as long as they're solid built. I find I have to do that with practically anything I'd buy anyway.
| Dustin Faulkner wrote: |
| Hello Sean:
I too have the GDFB poleaxe head. I was going to haft it onto a piece of red oak, but the whole project has been intimidating me. Your work has inspired me and I simply would like to now what did you use for the rivets (or nails) securing the langets? Also, how did you polish the metal. It certainly looks much, MUCH nicer than GDFB poleaxe head. I offer my compliments Sir. Thanks! |
As you see below, the langet nails are just regular, off-the-shelf bright nails (not galvanized) from Lowe's. I used to cut these off, put them in a bench vise and hammer the heads with the ball of my little hammer (second image below, before sanding the heads to knock off the edges and shine). That's still a good way to give them an authentic forged look but I thought this pollaxe needed something more refined. I cut them off and just quickly beveled the edges on the grinder. That is MUCH faster than hammering the heads, and results in a clean look that isn't too modern-looking. I use JB Weld under the langets and in the nail holes. It is historically correct, by the way, to use one nail in each langet hole (as opposed to putting a nail all the way through and riveting it on the other side). The trick to this is that if you're just cutting off modern nails they can't pass each other in the haft or clinch against the opposite langet as originals-narrow, tapered and sharp--would have done. You have to make sure you cut off the nails just short of halfway through the haft so they don't interfere with each other.
For the polish, I just used whatever I had lying around. I got one of those hard-rubber drill attachments meant for use with adhesive-backed sandpaper discs. That's very handy for these finishes but I could easily have done this entirely by hand because there were no bumps to smooth out. I probably started with 220 and moved to a sanding sponge and steel wool. I didn't invest much time in this. I'm not obsessive about finishes.
It took me a long time to figure out a good solution to the need for a que/cap/pommel. For the poleaxe, I robbed the square-section cap off of the Windlass hammer shown above. I beveled the edges of that to octagonalize it. There is a more widely available solution, though. I still wanted a cap for the hammer so I bought a threaded pipe cap and ground and filed that to an octagonal section, fitted it, drilled it, riveted it and did the final sanding in-place so I could match the bevels of the haft. I'm proud of that solution. Took me a long time to think of it. It's a secret, though. Don't tell anybody! :D
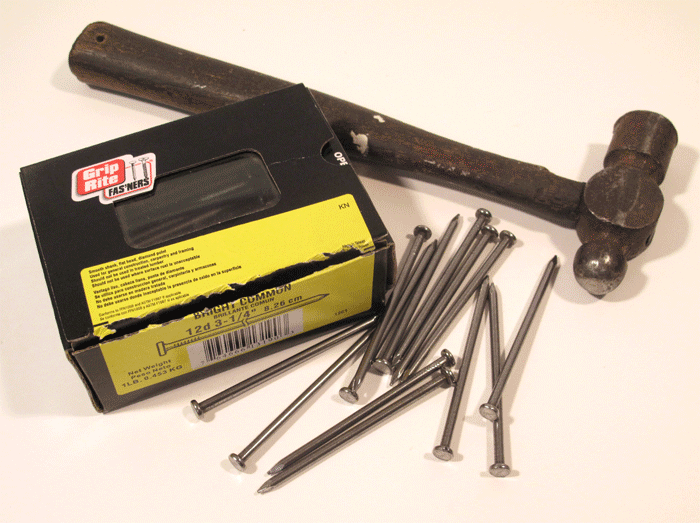
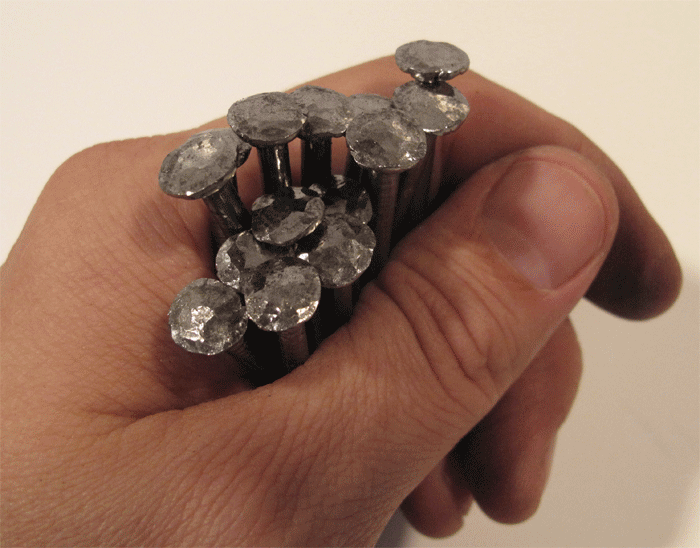
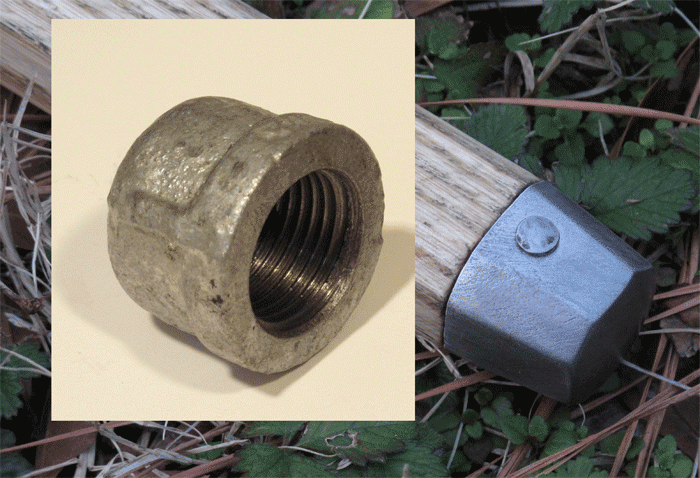
Hey Chris! I mentioned some concerns with my piece in this thread, but I still consider the value for the dollar to be very good.
Sean turned out a much better rondel than I was able to. His tips (Sculpey!) and photos in this thread are very helpful. :cool:
Sean turned out a much better rondel than I was able to. His tips (Sculpey!) and photos in this thread are very helpful. :cool:
Page 1 of 2
You cannot post new topics in this forumYou cannot reply to topics in this forum
You cannot edit your posts in this forum
You cannot delete your posts in this forum
You cannot vote in polls in this forum
You cannot attach files in this forum
You can download files in this forum
All contents © Copyright 2003-2006 myArmoury.com — All rights reserved
Discussion forums powered by phpBB © The phpBB Group
Switch to the Full-featured Version of the forum
Discussion forums powered by phpBB © The phpBB Group
Switch to the Full-featured Version of the forum