Go to page 1, 2  Next

Yet Another Type XVIII Project!
This Type XVIII bastard sword project is picking up speed now so I'll start a thread to help push me to the finish line. :D

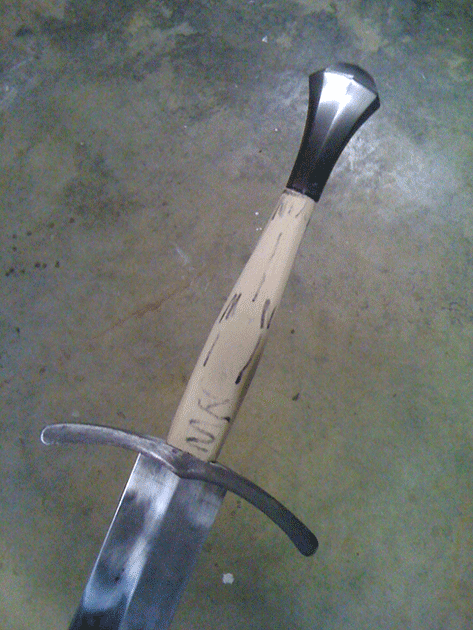
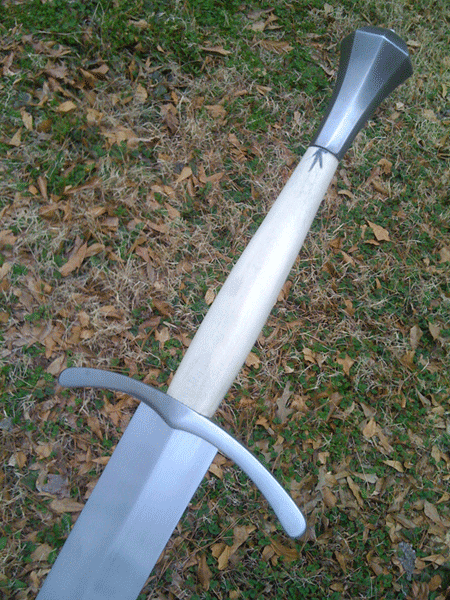
Blade is Windlass Erbach Sword. Pommel is Windlass Towton. Guard is courtesy of an Anonymous Benefactor. Took quite a while to assemble everything I needed for this one, but it's working out quite well. What you see here is the roughed-out grip marked for further refinement (I've finished that process since taking this photo). The guard is pretty much the shape it's meant to be but still very roughly finished. The pommel still needs to lose just under 25" from the base. There's a bit of distortion in this cell phone photo but you get the idea.

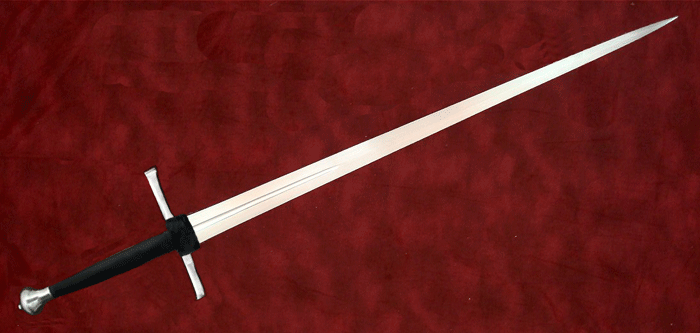
Everything is close enough to its finished state that I can get a reasonable estimate of balance--just under 3". I'd be happy if it had slightly more blade presence but the Windlass blades are pretty thin. That's not a terrible thing for a broad, late Type XVIII and it does feel good in the hand. It's not a huge sword--only about 44" overall.

Hilt furniture will be blued. I'll make an appropriate scabbard immediately after finishing the sword.

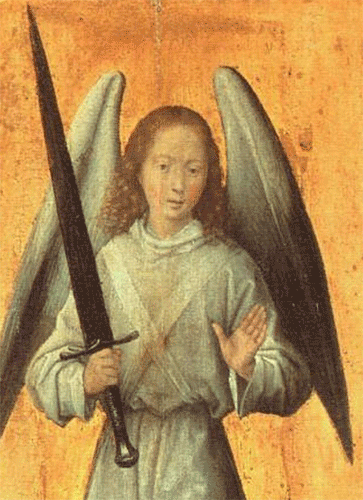
This project is inspired by two swords depicted by Hans Memling, ca. 1480. The first is in the androgynous paw of the Archangel Michael. I won't bore you with the different measures I've taken from this image in an attempt to develop a biometric guide to the sword's proportions. Suffice it to say that what looks perfectly natural on canvas can leave you scratching your head when you try to apply it in three dimensions. I have tried to get as close as possible to the Memling sword in terms of proportions, although I accept some of the discrepancies you see here--pommel shape, curvature of guard, blade type (Memling's appears to have a fuller and is more acutely pointed). I think the Memling sword would weigh significantly more, too (I estimate mine to be a bit over 2lbs.) but possibly with similar balance. My aim during this project has been to make historically / culturally / technically appropriate choices inspired by the painting--not to try and copy the weapon exactly.

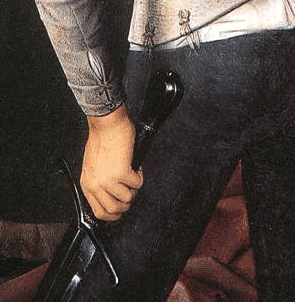
The all-black color of the Memling sword bugs me. As far as I can tell, decorative bluing of entire blades was still decades away and in any case this doesn't look decorative. Tarnished silver pigment is one possible explanation. In that case, the whole sword might originally have been bright. Another Memling sword helped me decide that bluing of the hilt is a plausible middle way. This one, from Memling's Altarpiece of St. John shows a similar long-gripped sword with relatively short blade. The blade in this case is bright while the hilt is blued. There's plenty of information to savor there, but for me the most important details are what appear to be silver or steel turk's head knots at the ends of the grips. They're silver-colored. The hilt is black. I therefore conclude that Memling did mean to depict black hilt furniture in this case, at least. This doesn't resolve the question about the color of the sword in the first example.


 Attachment: 211.97 KB
memling.gif


 Attachment: 115.11 KB
memling3.gif


 Attachment: 58.01 KB
memling2.gif

darker blades etc
Sean:

Noticed the post. Now not for sure on the black, and this may be a sidebar... but if I recall long, long time ago I read something about armour and blades that the difference in color from then to now might have been due to methodology used in grinding/buffing.

That now days...even the best use power tools. RPMs.

In that day, outside of water wheels and the like - there were no high speed buffers.

I myself have played with water wheel and water stone grinding and it imparts an entirely different sheen to the metal. Smooth as silk, but much more subdued.

Again, may be just a sidebar - but found the post most interesting.

Thank you
interesting...i started almost the same project....but with a Albion XVIII bare blade...
i wish you all the best..

Andreas
Andreas Auer wrote:
interesting...i started almost the same project....but with a Albion XVIII bare blade...
i wish you all the best..

Andreas


Are you still working on that, Andreas? I'd love to see it. Where did you find your pommel and guard?
Blue or Red Hilt??
Hey I see your project is on the right way man. And the sword looks real good.
But what you think about a rd Hilt instead of a blue one??. Ussually bue hilts are not as elegant in my opinion as red ones. What do you think??
Re: Blue or Red Hilt??
Francisco Rodriguez wrote:
Hey I see your project is on the right way man. And the sword looks real good.
But what you think about a rd Hilt instead of a blue one??. Ussually bue hilts are not as elegant in my opinion as red ones. What do you think??


Check out this earlier project, Francisco! http://www.myArmoury.com/talk/viewtopic.php?t...hlight=red

Like you, I love the red grips common in this period. I tried that on the earlier project but ran into problems with the dye. It didn't seem as durable as the black and I had problems matching the grip and chappe. There's no chappe on this project, so there's no matching problem. I still have the problem of the thin goat leather I use. It takes black well but has problems with red. It's too bad, because I'd love to add some color to my collection, especially with a matching scabbard. :cool:

I'm going to try the blued furniture first, assemble and polish it back to gray or bright if I don't like it. It might be a bit too black, overall, for my taste, especially in a black scabbard. The sword that inspired the project below (which I finally finished with a black grip) had a red grip and dark furniture, so I think that could be beautiful (especially for our ARMA friends :D ).


 Attachment: 58.26 KB
download.gif

hi Sean!

im just in the planing stage...:-)

[ Linked Image ]

just for fixing the COG (thin black line)...and judging the overall appearance...

...and i also like red or oxblood grips...:-)


greetings Andreas
Sean,

You are an interesting guy to follow. First you do the piece on the windlass german mace (which got me following in your footsteps with my Italian Windlass Mace) and now you do this type XVIII sword. This one looks almost exactly like what I wanted to do, except i was planning on using a tinker XVIIIA blade. I had started this thread on how to come by the hilt and pommel - http://www.myArmoury.com/talk/viewtopic.php?t=22390

As you will see, I was looking for the exact same pommel type that you used. Nice. Most of my swords already have a downcurved cross guard, so I was thinking about making mine more cruciform in style, like the Albion Constable. http://www.albion-swords.com/swords/albion/ne...photos.htm

Thanks for your contributions to this forum.
Andreas Auer wrote:
hi Sean!

im just in the planing stage...:-)

just for fixing the COG (thin black line)...and judging the overall appearance...

...and i also like red or oxblood grips...:-)


greetings Andreas


I love the late Type XVIIIs with recurved crosses! You'll have a nice Austrian sword there when it's done! :D My next project will use the H-T bastard sword blade, too, (or maybe the longsword) and is directly inspired by the swords typically shown with St. Catherine in Austrian artwork ca. 1500--Recurved cross, scent-stopper pommel, chappe, etc. Maybe even a red grip!


 Attachment: 116.54 KB
download.jpg


 Attachment: 141.75 KB
download-1.gif

Eric Gregersen wrote:
Sean,

You are an interesting guy to follow. First you do the piece on the windlass german mace (which got me following in your footsteps with my Italian Windlass Mace) and now you do this type XVIII sword. This one looks almost exactly like what I wanted to do, except i was planning on using a tinker XVIIIA blade. I had started this thread on how to come by the hilt and pommel - http://www.myArmoury.com/talk/viewtopic.php?t=22390

As you will see, I was looking for the exact same pommel type that you used. Nice. Most of my swords already have a downcurved cross guard, so I was thinking about making mine more cruciform in style, like the Albion Constable. http://www.albion-swords.com/swords/albion/ne...photos.htm

Thanks for your contributions to this forum.


Thanks, Eric! If you have trouble finding a pommel you could always use the large spherical pommel from Alchem, Inc (you'll have to finish drilling it through, but that's easy). You see spherical pommels--some like peeled oranges and some just plain spheres, apparently--in artwork of ca. 1500-1515. I think something like that would be fine with a variety of blades and crosses of the period. Also, don't hesitate to ask some of the large makers to sell you the part you need if you see something in their catalog that would serve. They might have damaged "seconds" or extras just gathering dust. All they can do is say, "no". :D
And here's where I am as of this morning (loose assembly for the photos)--the grip core is done and I have almost the final polish on the steel. I'll add a bit more polish to the hilt furniture before bluing, but I'll finish the grip first to reduce the risk of marring the cross and pommel. I'll get a shot of the black grip and bright furniture for reference. It's relatively easy to remove blue if I don't like it, but there's no good way to visualize the blue without actually doing it. It can change the character of the piece dramatically--not always for the best.

This will be flush-peened (and re-blued around the peen, of course). One helpful thing I've learned in this project is that a sharp wood chisel makes short work of creating a counter-sink in a mild steel pommel (yes, I abuse my cheap tools). I'd been grinding the countersinks, but that's hard to control.


 Attachment: 219.22 KB
sword.gif


 Attachment: 192.29 KB
sword2.gif


Last edited by Sean Flynt on Thu 24 Feb, 2011 1:37 pm; edited 2 times in total
By the way, my fellow sword butchers will know the pain of a round tang and round pommel hole. Strong epoxy can solve the problems that presents but the pommel can still go adrift during peening, and that's annoying. I'm going to try to prevent that in this project by drilling a small hole in foot of the pommel, parallel to the main hole. I'll drive a nail into that small hole, leaving about .25" protruding. That pin will match to a hole in the top of the grip. That will keep things in alignment during peening and until the epoxy cures. It's not an ideal solution but it should work and it will be invisible.

EDIT: I didn't need to do this after all. Got a good, tight fit between pommel and tang and just secured everything with JB Weld.


Last edited by Sean Flynt on Thu 03 Mar, 2011 7:28 am; edited 1 time in total
Hey Sean,

As usual, great job!

I really like that that pommel, which led me to buy the towton sword 5 years ago, my first purchase actually.

How have you extended the tang? Welded an extension or simply lowered the blade shoulders, taking the extra lenght from the blade?

Also how have you dealt with the blade insertion in the guard? that's always a tricky part, especially when using components from another sword.

Are you going to coutersink the pommel, cold/hot peen and then flush the peen? (edit: actually you mentionned that above...I use a carbide cutter/dremel to countersink the hole at the top of the pommel...takes about 5 minutes to do the job).

I'll say its high time to use some of your top grain veg tanned leather for the grip of this one, it deserves the royal treatment :)

Cheers,

J
ahh Sean...i love your pommwl....ähhh....sorry...your swordpommel...:-) im looking forward to see this baby finished....

Andreas
Julien M wrote:
Hey Sean,

As usual, great job!

I really like that that pommel, which led me to buy the towton sword 5 years ago, my first purchase actually.

How have you extended the tang? Welded an extension or simply lowered the blade shoulders, taking the extra lenght from the blade?

Also how have you dealt with the blade insertion in the guard? that's always a tricky part, especially when using components from another sword.

Are you going to coutersink the pommel, cold/hot peen and then flush the peen? (edit: actually you mentionned that above...I use a carbide cutter/dremel to countersink the hole at the top of the pommel...takes about 5 minutes to do the job).

I'll say its high time to use some of your top grain veg tanned leather for the grip of this one, it deserves the royal treatment :)

Cheers,

J


I took about an inch of blade to extend the tang--that after breaking my brain trying to understand the proportions of the sword in the painting. It's a long grip, though it's hard to tell in these photos. I can comfortably get two hands on the grip proper, with the entire pommel free to grip as well.

Insertion of blade in guard is more of a problem when fitting Windlass blades to non-Windlass guards because those blades are thinner than, say, Angus Trim's, Albion's, A&A's, etc. That means you either have to close the guard a bit, use shims/wedges or a combination of both. I've closed the guard slightly (there's a practical limit to how much you can do). The slot in the lower part of the guard keeps the blade centered but I'll still probably use "L"-shaped brass shims on either side of the tang, plus epoxy. This blade is wider than the blade originally intended for this guard, but it's a simple thing to extend the slot with a Dremel tool and cutoff wheel.

Another annoying thing about Windlass blades is that although they are too thin to fit perfectly in most guards (even Windlass guards!) they often have very thick, round tangs through the pommel. So, the guard is usually too loose at the shoulder but too tight at that part of the tang. You have to file out the center of the guard opening to allow the tang to pass through. You could grind the tang flat, but the pommel hole is round so that would make peening difficult. The good news is that my upcoming sword projects use Hanwei-Tinker, A&A and Albion blades! All much thicker than Windlass. :D
Blued and loosely assembled for a phone snapshot. Hoping to peen Thursday night. :D Haven't fully committed to the bluing. Might prefer the bright, and then it could share a scabbard with my earlier Erbach project. What do y'all think? I know it's impossible to get a sense of the scale here, but just imagine three hands on that grip and pommel.


 Attachment: 206.24 KB
bastard.gif

Looks great. I would definitely leave it blued.
You are truly a gifted artisan, with a keen ability to achieve a pre-planned goal. As always, you do not disappoint. It look's fantastic!
Blue...definitely... Looking good...keep em peening...:-)

Andreas
Brian K. wrote:
You are truly a gifted artisan, with a keen ability to achieve a pre-planned goal. As always, you do not disappoint. It look's fantastic!


Ahhhh...shucks! :blush: Very kind words, Brian. Many thanks!

I was able to get this thing assembled last night and it was a very interesting experience that might hold some value for other DIY folks. Discussion in another thread solved a problem I've had since I began working on swords--peening the tang cold or at least not hot enough to make much difference. Working with round tangs and pommel holes, I usually can't do things the proper way and mount the grip last. Until now, I have assembled the sword, then tried to heat the exposed tang and peen. I typically ended up on top of my workbench smashing away at a cold or marginally hot tang for a LONG time. I made it work but it made me work, too. Thanks to some of you, I now know that the pommel acts as a heat sink so the tang can't get hot enough when the pommel is in place.This time I secured the cross and pommel one day and peened the next. Before installing the pommel I wrapped the tang in a wet paper towel, leaving exposed only the area I needed to heat. I was easily able to get the tang up to orange heat with only a propane torch. Then I applied expoxy (JB Weld) to the tang just above the top of the grip, installed the pommel, seated it with a rubber mallet (in this case there's a tight fit between pommel and tang) and started peening. Another trick I used here was to peen through a piece of thick leather, with a hole cut in it just larger than my peen area. I'm pretty accurate, but it takes only one glancing blow to dent a mild steel pommel. Got a perfect peen with no stray dents.

The hot peen was shockingly easy--and that on about .25" of tang and covering a pretty large countersink. It was neat and even so cleanup with files and abrasives was a snap. I'll have to re-blue the top of the pommel of course, but that was always the plan. I should be able to finish that and get good photos this weekend.

Even as I was working on final assembly of this sword I wasn't sure how I felt about it. I knew I was meeting my project goal but I didn't feel like I was fully connecting with it or proud of it. Having it properly assembled made a huge difference in my perception of the piece. Now I love it and am quite proud of it. The grip is very slightly asymmetrical, but not enough to nag me about re-doing it (and it's a pretty low bar because I often undo such work).

I was worried that this sword might be too light even though the balance seems appropriate. A bathroom scale suggested that it might be just a hair over 2 lbs when I thought it should be just a hair under 3 lbs. I weighed it with a better scale last night after peening and discovered that it's 2.80 lbs (not 2 lbs 8 oz, but just under 3 lbs, as desired), much heavier than I would have guessed and in what seems to be a reasonable range for this type. By coincidence, the POB is at 2.80" from the cross. It could stand as much as another inch forward but even as a blunt it's definitely up to some old-school smiting. :D Very quick in one hand or two!

Detailed stats later....
Go to page 1, 2  Next

Page 1 of 2

Jump to:  
You cannot post new topics in this forum
You cannot reply to topics in this forum
You cannot edit your posts in this forum
You cannot delete your posts in this forum
You cannot vote in polls in this forum
You cannot attach files in this forum
You can download files in this forum


All contents © Copyright 2003-2006 myArmoury.com — All rights reserved
Discussion forums powered by phpBB © The phpBB Group
Switch to the Full-featured Version of the forum