Info Favorites Register Log in
myArmoury.com Discussion Forums

Forum index Memberlist Usergroups Spotlight Topics Search
Forum Index > Historical Arms Talk > Homemade Medieval KnifeDIY Project Reply to topic
This is a standard topic  
Author Message
Josh MacNeil


Location: Massachusetts, USA
Joined: 23 Jul 2008

Posts: 197

PostPosted: Fri 28 Jan, 2011 12:33 pm    Post subject: Homemade Medieval Knife         Reply with quote

Hi all. A while back I made myself a knife for my 14th Century kit. The knife itself was completed months ago, but until now it hasn't had a decent scabbard to call home. So I figured now would be a good time to share. I want to give a special thanks to Tod of Tod's Stuff, who was kind enough to give me some helpful pointers while I was working on this, and whose own work served as an inspiration.

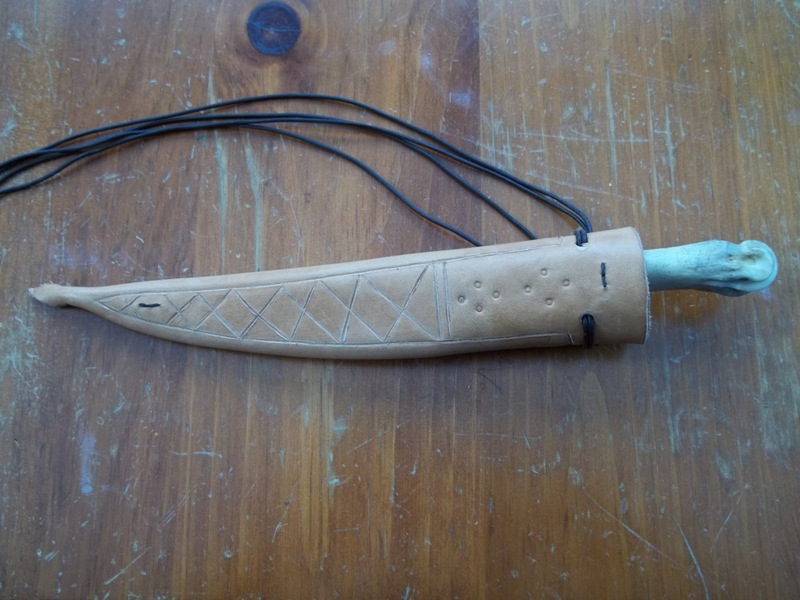
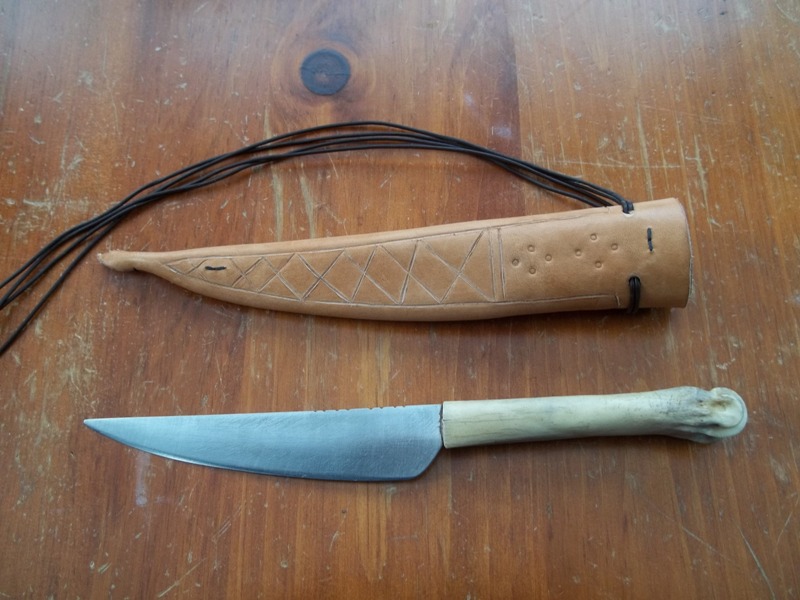
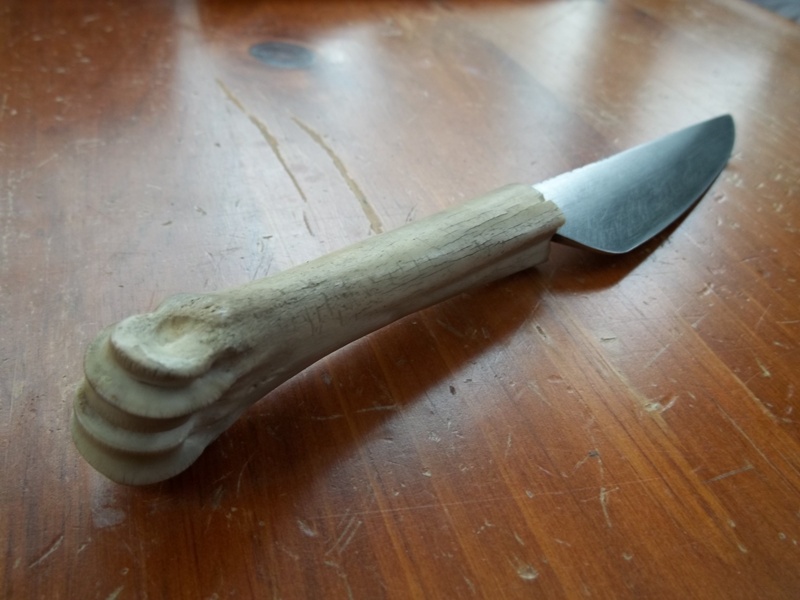
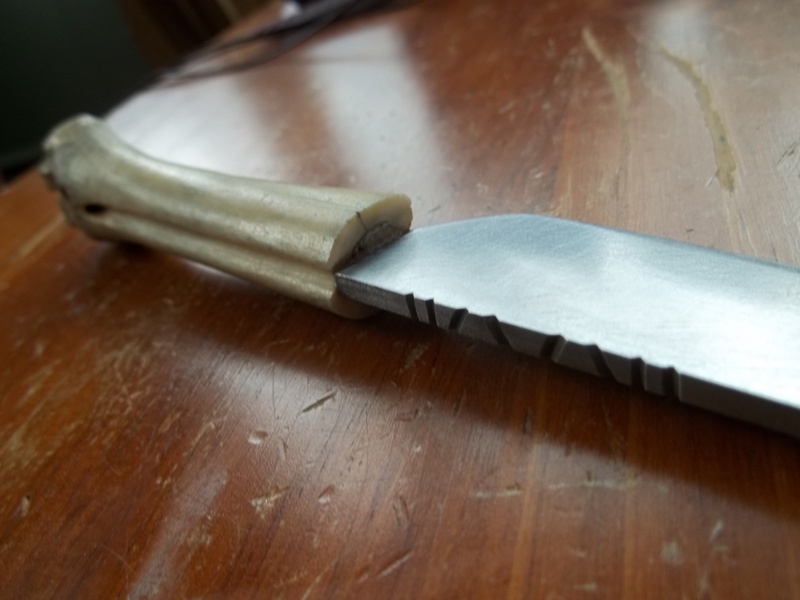
Now then, the knife. I based it on various specimens from Knives and Scabbards, mostly 14th Century pieces. The blade is an old Atlanta Cutlery bare blade I had lying around that I picked up years ago and never did anything with. After staring at it for an hour or so, I decided to rework it. After some aggressive (and slow) shaping with a file, I was able to re-profile into it's current shape. The handle is an old deer bone (which I oddly found in my basement; don't ask me how it got there WTF?! ) which I then simply cut in half and attached to the tang using wooden shims and JB weld. And yes, I did clean the bone, thoroughly, with a peroxide soak and some gentle scrubbing with a toothbrush. So the "dirty" appearance is just staining.

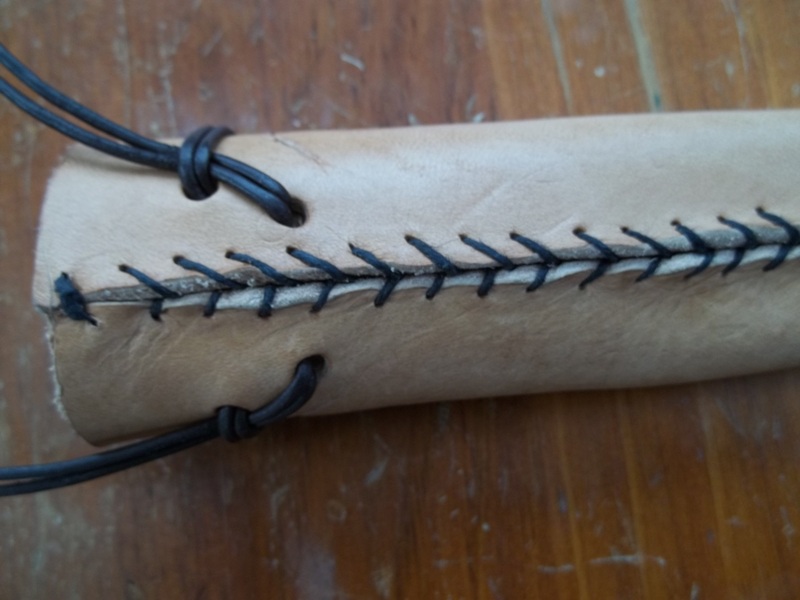
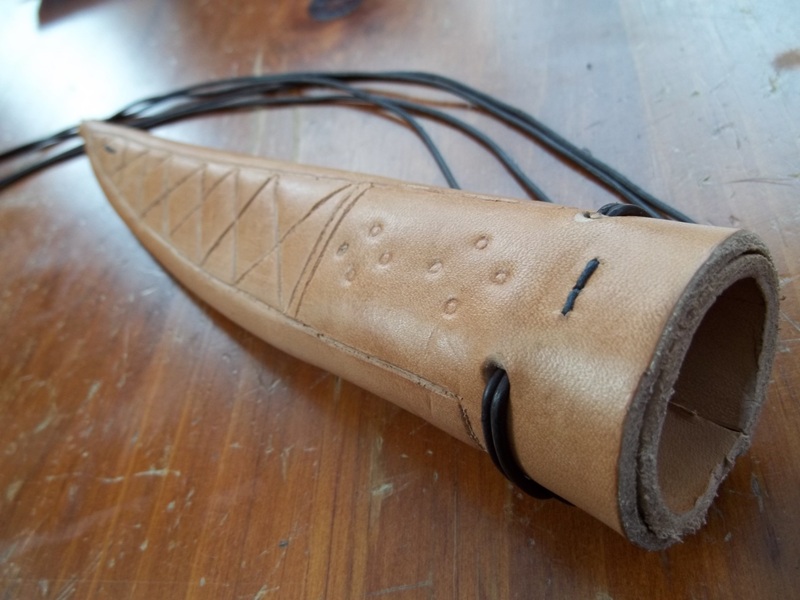
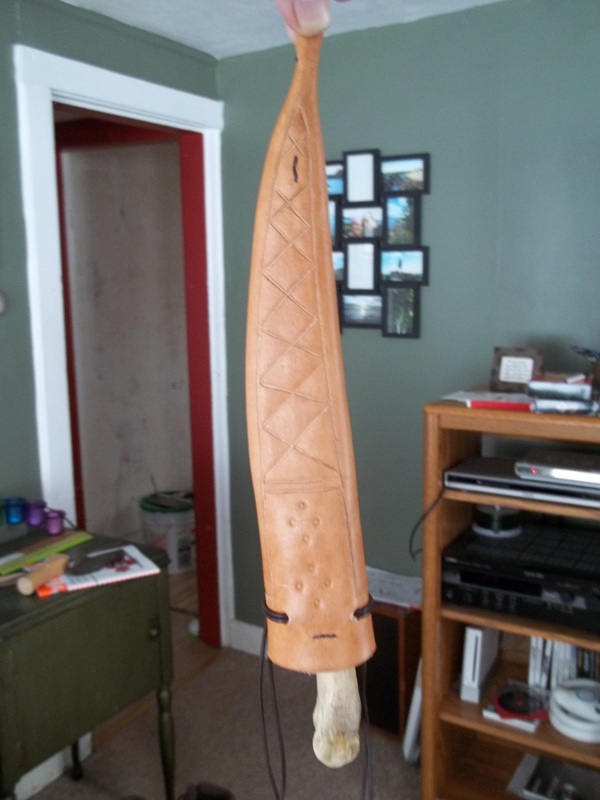
The scabbard is made of two layers of 6 oz. veg tanned cowhide, and is also based on those from Knives and Scabbards. Hand cut, stitched, and decorated. I'm leaving the leather undyed, though I may hit it with some mink oil or neatsfoot oil to protect the leather.

I'm really happy with the way the whole project turned out. I hope you all enjoy it. Thanks for looking! Cheers.

- JM


 Attachment: 132.98 KB
100_0208.JPG


 Attachment: 153.72 KB
100_0205.JPG


 Attachment: 165.69 KB
100_0204.JPG


 Attachment: 152.87 KB
100_0200.JPG

View user's profile Send private message Visit poster's website
Josh MacNeil


Location: Massachusetts, USA
Joined: 23 Jul 2008

Posts: 197

PostPosted: Fri 28 Jan, 2011 12:35 pm    Post subject:         Reply with quote

A few more shots. Happy


 Attachment: 141.38 KB
100_0213.JPG


 Attachment: 157.12 KB
100_0212.JPG


 Attachment: 140.59 KB
100_0210.JPG

View user's profile Send private message Visit poster's website
James Cunniffe


Location: chicago/ireland
Joined: 28 Jan 2008
Likes: 9 pages

Posts: 108

PostPosted: Fri 28 Jan, 2011 12:44 pm    Post subject:         Reply with quote

Great job Josh very nice work .
Though the pen is mightier than the sword,
the sword speaks louder and stronger at any given moment.
View user's profile Send private message
Jeremy V. Krause


Location: Buffalo, NY.
Joined: 20 Oct 2003
Likes: 1 page
Reading list: 1 book

Spotlight topics: 1
Posts: 1,717

PostPosted: Fri 28 Jan, 2011 1:00 pm    Post subject:         Reply with quote

Great knife Josh!

I like it! I think what I like most is that it doesn't have that "rough n' ready" look that some home projects have. Putting something like that together really takes committment, and you can show it off to folks saying "I made this". Wink

I'm just not crafty so I love to see others put together historically respectable pieces.

I see there is some "fuzziness" to the leather at the top of the throat. other forumites may be able to let you know how to remove that and seal it somewhat. You burn it in some way or other.


Last edited by Jeremy V. Krause on Fri 28 Jan, 2011 1:07 pm; edited 2 times in total
View user's profile Send private message
Sean Flynt


Location: Birmingham, Alabama
Joined: 21 Aug 2003
Likes: 10 pages
Reading list: 13 books

Spotlight topics: 7
Posts: 5,981

PostPosted: Fri 28 Jan, 2011 1:05 pm    Post subject:         Reply with quote

I just learned some critically important lessons from your photos, Josh. Many thanks!
-Sean

Author of the Little Hammer novel

https://www.amazon.com/Little-Hammer-Sean-Flynt/dp/B08XN7HZ82/ref=sr_1_1?dchild=1&keywords=little+hammer+book&qid=1627482034&sr=8-1
View user's profile Send private message Visit poster's website
Nathan Robinson
myArmoury Admin


myArmoury Admin

PostPosted: Fri 28 Jan, 2011 1:43 pm    Post subject:         Reply with quote

Jeremy V. Krause wrote:
I see there is some "fuzziness" to the leather at the top of the throat. other forumites may be able to let you know how to remove that and seal it somewhat. You burn it in some way or other.


You're thinking of burnishing not burning. There is no burning involved in the finishing of edges, but merely the compression and "polishing" of the leather fibers through burnishing. There are many methods to get a good edge, but these basic steps are a simple solution: 1) Remove edges with an edge beveler, 2) Apply some gum tragacanth to the edge, 3) Use an edge slicker tool to compress and polish the fibers (slickers made of a natural material such as wood or bone are far superior to plastic ones).

Edge burnishing ups the game on any leather project.

.:. Visit my Collection Gallery :: View my Reading List :: View my Wish List :: See Pages I Like :: Find me on Facebook .:.
View user's profile Send private message Send e-mail Visit poster's website
Jeremy V. Krause


Location: Buffalo, NY.
Joined: 20 Oct 2003
Likes: 1 page
Reading list: 1 book

Spotlight topics: 1
Posts: 1,717

PostPosted: Fri 28 Jan, 2011 3:29 pm    Post subject:         Reply with quote

Nathan Robinson wrote:
Jeremy V. Krause wrote:
I see there is some "fuzziness" to the leather at the top of the throat. other forumites may be able to let you know how to remove that and seal it somewhat. You burn it in some way or other.


You're thinking of burnishing not burning. There is no burning involved in the finishing of edges, but merely the compression and "polishing" of the leather fibers through burnishing. There are many methods to get a good edge, but these basic steps are a simple solution: 1) Remove edges with an edge beveler, 2) Apply some gum tragacanth to the edge, 3) Use an edge slicker tool to compress and polish the fibers (slickers made of a natural material such as wood or bone are far superior to plastic ones).

Edge burnishing ups the game on any leather project.


Yeah burnish that's it! Thanks Nathan! Happy

So no need to apply flame to your nice new sheath Josh! Wink
View user's profile Send private message
Josh MacNeil


Location: Massachusetts, USA
Joined: 23 Jul 2008

Posts: 197

PostPosted: Fri 28 Jan, 2011 8:43 pm    Post subject:         Reply with quote

Sean Flynt wrote:
I just learned some critically important lessons from your photos, Josh. Many thanks!


Well I'm glad I could help! Big Grin If you don't mind me asking, what lessons would those be?
View user's profile Send private message Visit poster's website
Leo Todeschini
Industry Professional


Location: Oxford, UK
Joined: 12 Nov 2006
Likes: 1 page

Spotlight topics: 1
Posts: 1,723

PostPosted: Sat 29 Jan, 2011 6:38 am    Post subject:         Reply with quote

Well Josh, I think you have done a great job.

When I think back to the first knives I was making with really nasty wooden scabbards and blades from converted Sabatier cooking knives and some frankly bizarre leatherwork I would say this a great first attempt. (none of you will ever get to see my first bollock dagger!)

The stiching is neat, the scabbard will be durable, it is nicely decorated in a manner similar to those in Knives and Scabbards and the use of the bone is great.

If I have one comment it is that I am not familiar with any knives that have left the knuckle on the end of the bone haft and a more plausible finish would be to cut the end off and fill with a bone or wooden plug and do a bit of file work on the bone. That said I like the look of the finished piece. Blade shape is very nicely proportioned by the way. IOn no way is this a criticism, merely my opinion and if looking at this stuff has taught me anything it is that just when you think something wasn't done, up it pops.

Regards

Tod

www.todsworkshop.com
www.todcutler.com
www.instagram.com/todsworkshop
https://www.facebook.com/TodsWorkshop
www.youtube.com/user/todsstuff1
View user's profile Send private message Visit poster's website
Josh MacNeil


Location: Massachusetts, USA
Joined: 23 Jul 2008

Posts: 197

PostPosted: Sat 29 Jan, 2011 11:36 am    Post subject:         Reply with quote

Jeremey - I may burning the edges, I may not. I'd want to practice a on some scrap before I attacked the scabbard itself.

Tod - Yeah I see what you're saying about the handle, and I agree with you. I've never seen it done on any artifacts either, so it was more of an artistic choice with some plausible justification. I had originally intended on going the route you had mentioned by using the other half of the bone that's on there. Unfortunately, the other piece split lengthwise and probably wouldn't have been salvageable. When I was left with the current half, I decided I liked the unusual, primal look that the knuckle end gave off, so I just mounted it that way. I figure it's at least plausible, albeit uncommon. I think it lets you appreciate the natural organic beauty of the bone. It works well with the medieval outlaw woodsman persona I've put together too; something a hardened man of the wilds would appreciate.

I thank you all very much for the kinds words. Coming from an industry pro like Tod it is especially encouraging. Thanks again everyone!!! Cheers!

- JM
View user's profile Send private message Visit poster's website
Al Muckart


Location: NZ
Joined: 27 Dec 2005

Posts: 309

PostPosted: Sat 29 Jan, 2011 2:05 pm    Post subject:         Reply with quote

That's a very nice piece of work, you've captured the aesthetic extremely well. Far better than I did the first time I made one!

Some technical hints to help make version 2 even better:

I've found slightly thinner leather gives a more refined shape. 4oz is good. It will also form well enough to avoid the 'ear' at the tip if you want to, which I've found almost unavoidable with 6oz.

You avoid an area of weakness if you make the inner layer with the seam to the front of the scabbard so the seams are opposite each other in the finished piece rather than both at the back. I think this is how the originals are made too.

If you use a stitch that comes out the edge of the leather rather than going right through grain-flesh, you can get the edges to butt right up to each other smoothly. It takes practice, and a small, sharp awl. On several examples I've seen documented the inner layer is whip-stitched in that fashion so the seam is smooth but the outer seam is stitched through an upturned lip which is trimmed and burnished down rather than being a butted seam. It's easier to explain with pictures:
http://wherearetheelves.net/knife-sheath/

Keep doing what you're doing Happy

--
Al.
http://wherearetheelves.net
View user's profile Send private message Visit poster's website
Sean Flynt


Location: Birmingham, Alabama
Joined: 21 Aug 2003
Likes: 10 pages
Reading list: 13 books

Spotlight topics: 7
Posts: 5,981

PostPosted: Mon 31 Jan, 2011 6:51 am    Post subject:         Reply with quote

Josh MacNeil wrote:
Sean Flynt wrote:
I just learned some critically important lessons from your photos, Josh. Many thanks!


Well I'm glad I could help! Big Grin If you don't mind me asking, what lessons would those be?


The suspension and the stitches that secure the inner sheath. Big Grin

-Sean

Author of the Little Hammer novel

https://www.amazon.com/Little-Hammer-Sean-Flynt/dp/B08XN7HZ82/ref=sr_1_1?dchild=1&keywords=little+hammer+book&qid=1627482034&sr=8-1
View user's profile Send private message Visit poster's website
Josh MacNeil


Location: Massachusetts, USA
Joined: 23 Jul 2008

Posts: 197

PostPosted: Mon 31 Jan, 2011 9:25 am    Post subject:         Reply with quote

Sean Flynt wrote:
Josh MacNeil wrote:
Sean Flynt wrote:
I just learned some critically important lessons from your photos, Josh. Many thanks!


Well I'm glad I could help! Big Grin If you don't mind me asking, what lessons would those be?


The suspension and the stitches that secure the inner sheath. Big Grin


Ah the suspension; the happy accident. The truth is that was a bit of a screw up. I had stitched the seam up a little more than half way when I realized I forgot to punch the suspension holes and lace it through. So I had to go back an un-stitch and install it. The way it's set up was kind of a spur of the moment idea that ended up working out pretty well. It hangs from a belt very nicely; stays secure and doesn't wobble around.

I learned how to stitch the outer and inner sheaths from Tod. If you look closely at some of the pictures of his work you can see the same stitch. I also picked up one of his English Cutler ballock dagger kits which comes with the instructions and include scabbard making. I'd highly recommend the EC ballock kits. They're a lot of fun, inexpensive, and you can learn a lot from them.

- JM
View user's profile Send private message Visit poster's website


Display posts from previous:   
Forum Index > Historical Arms Talk > Homemade Medieval KnifeDIY Project
Page 1 of 1 Reply to topic
All times are GMT - 8 Hours

View previous topic :: View next topic
Jump to:  
You cannot post new topics in this forum
You cannot reply to topics in this forum
You cannot edit your posts in this forum
You cannot delete your posts in this forum
You cannot vote in polls in this forum
You cannot attach files in this forum
You can download files in this forum


All contents © Copyright 2003-2024 myArmoury.com — All rights reserved
Discussion forums powered by phpBB © The phpBB Group
Switch to the Basic Low-bandwidth Version of the forum