Info Favorites Register Log in
myArmoury.com Discussion Forums

Forum index Memberlist Usergroups Spotlight Topics Search
Forum Index > Off-topic Talk > Making a transportable and swiveling banner poleDIY Project Reply to topic
This is a standard topic  
Author Message
Sander Marechal


Location: The Netherlands
Joined: 04 Dec 2009
Reading list: 17 books

Spotlight topics: 1
Posts: 671

PostPosted: Mon 02 Aug, 2010 3:05 pm    Post subject: Making a transportable and swiveling banner pole         Reply with quote

Hi all. I am looking for advice on making a banner pole. Someone in our Hospitaller reenactment group has created a banner, but it's still lacking a pole. Our banner closely resembles the one drawn by Matthew Paris in Historica Angolorum, see the attached image (pics of the actual banner fill follow later). The banner itself is about a meter (3 ft) tall. It has loops on the left and on the top for the pole. It's quite heavy so it really needs the top pole as well. We want to place next to out tent/shelter during events and carry it around during parades (for reenactment combat and drills we have a smaller standard tied to a spear).

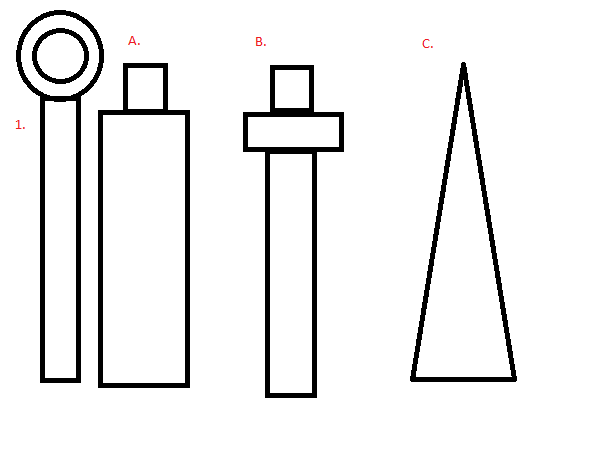
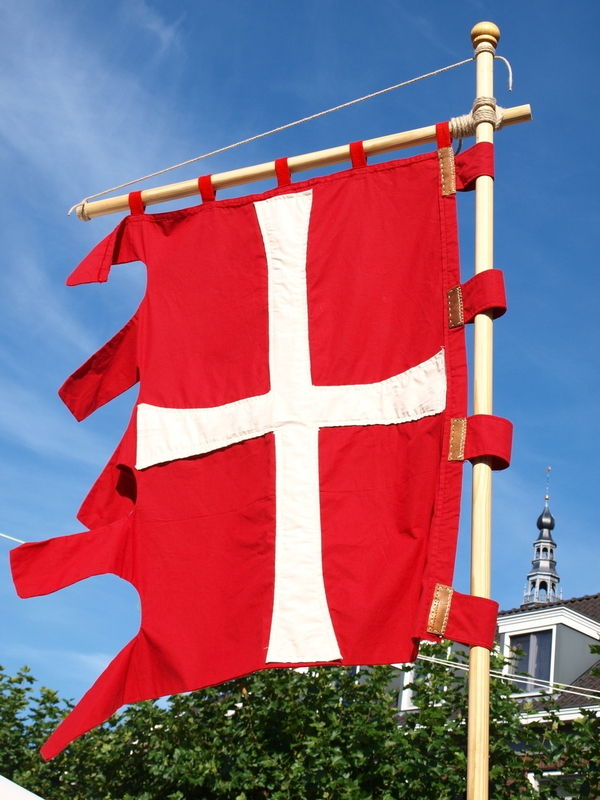
I need some advice for creating the pole. Virtually all of the SCA banner pole articles I found so far use materials like EMT tubing and other incorrect materials. I found a few that tell me how to create nice wooden poles but none that tell me how to make a swiveling top. I only found a few articles that deal with T shaped tops. I need an inverted L shaped top.

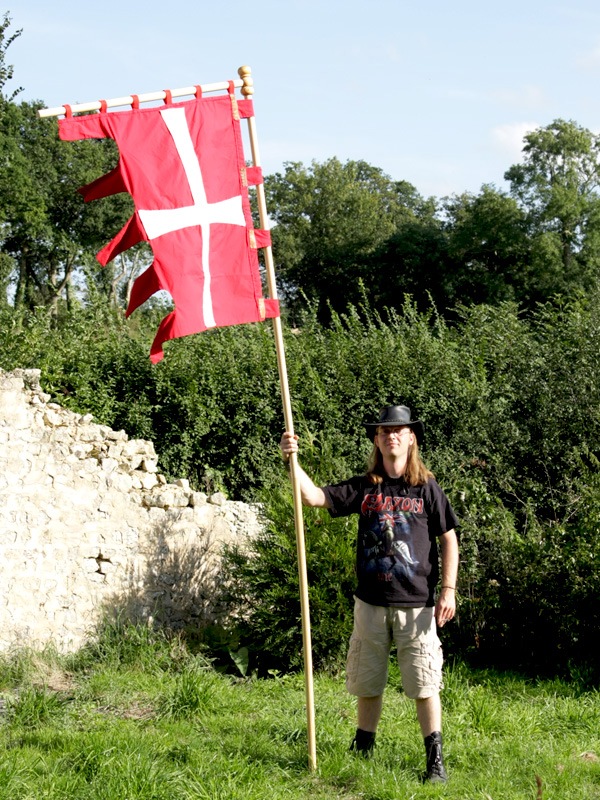
I am guessing that, with a one meter high banner, the pole itself should be at least three meters (9 ft) tall. That won't fit in my car, so it needs to be dividable in some way. Also, three meters is a bit too tall I think for parades. I'll be carrying it with the pole butt in a leather pouch on my belt. That would raise the top of the banner to four meters (12 ft) off the ground. That going to be hell to carry around. So, it makes sense to me if I can take the bottom meter off the pole to carry it around and fit it in my car.

More over, I probably don't want the pole to rotate in my hands or in the belt when I am carrying it, so the top cross section will need to be able to swivel in some way.

Has anyone ever made a banner pole like this? Any ideas on how I could make one that looks correct and functions well?

Thanks in advance!


 Attachment: 29.2 KB
hospitaller-flag-1240.jpg
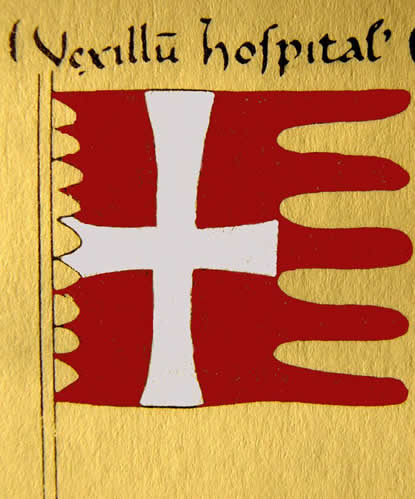
Matthew Paris' Hospitaller banner
View user's profile Send private message Send e-mail Visit poster's website
Sam Gordon Campbell


Location: Australia.
Joined: 16 Nov 2008

Posts: 678

PostPosted: Mon 02 Aug, 2010 11:01 pm    Post subject:         Reply with quote

Well here's how I think it could be done.
1.: This is the 'swivel' part of the flag, it simply slips through the top of the banner, and with its pivot simply slipped over either A.: Shaft with narrowed top, B.: A slightly leaner pole upon which you somehow afix a disc to stop 1. from slidding down. Or C.: taper the pole to a point and pop it over.
Not sure if this is how it was done (or is), not even sure it it would work. Worried
But those are a few thoughts I had.

Edit: Oh, and if you need it to be longer (the main pole that is), just get some metal tube that is the right diametre, drill a hole in one bit, put nail through that and lower section of pole, then just put extensions on. It's like how balsa-lances are made. And best of all you can cover this metal tube by simply gripping it with your hand. No one shall be none the wiser.


 Attachment: 11.41 KB
Howtoattach.png
A crappy diagram... Thank you Paint.

Member of Australia's Stoccata School of Defence since 2008.
Host of Crash Course HEMA.
Founder of The Van Dieman's Land Stage Gladiators.
View user's profile Send private message
M. Oroszlany


Location: Czech Republic / Slovakia / Hungary
Joined: 12 Jan 2009

Posts: 34

PostPosted: Tue 03 Aug, 2010 5:28 am    Post subject:         Reply with quote

I've made something similar a while back, I'll attach a drawing of it.

The moving part is basically a metal rod and an hole in the middle of the shaft (in my case about 10cm into each part, holds really good). This should work where you want to separate the shaft as well. Maybe use 2 rods if you don't want it to turn.

The L shape joint in this case is pretty much just a T shape where one end is very short. The joint itself is made out of tin, cut out using a shear and a hole punch. In case you have the tools, it could benefit from being made of a somewhat stronger material. I think I'd use a 0.6-1mm thick sheet steel, were I to remake the pole. The metal joint is wrapped around the longer pole, nailed to it, then the excess material (dotted line) shaped with a hammer to conform to the shape of the wood.

All in all it makes for a pretty solid joint, with only a small protrusion upwards. For a more refined look the two flaps on each side of the horizontal pole could be riveted together, maybe a steel rod, similar to the one in the "bearing" could be addedto the core to improve strength.


 Attachment: 46.77 KB
[ Download ]
View user's profile Send private message
Sander Marechal


Location: The Netherlands
Joined: 04 Dec 2009
Reading list: 17 books

Spotlight topics: 1
Posts: 671

PostPosted: Tue 03 Aug, 2010 7:30 am    Post subject:         Reply with quote

Thanks for the ideas so far.

@Sam: I don't think a tapering pole would work, but the other two designs seem practical.

@M. Oroszlany: I never would have thought about making the entire top portion swivel instead of just the cross rod. Great idea. How wide is your pole approximately? And how wide is the steel rod that sits in the swiveling point?
View user's profile Send private message Send e-mail Visit poster's website
M. Oroszlany


Location: Czech Republic / Slovakia / Hungary
Joined: 12 Jan 2009

Posts: 34

PostPosted: Tue 03 Aug, 2010 8:51 am    Post subject:         Reply with quote

The pole is pretty thick actually, I'd say about 6 or 7 cm in diameter, but it's static (lower end dug into ground), I think this should work pretty well with anything that's at least as thick as a shovel handle. The rod I used is an old drill bit, about as thick as a pencil.
View user's profile Send private message
Sam Gordon Campbell


Location: Australia.
Joined: 16 Nov 2008

Posts: 678

PostPosted: Fri 06 Aug, 2010 6:03 am    Post subject:         Reply with quote

M. Oroszlany, that design of yours, I like the looks of it, I might have to use it at some point.
Oh, and Sander, love your work, keep it up! Big Grin

Member of Australia's Stoccata School of Defence since 2008.
Host of Crash Course HEMA.
Founder of The Van Dieman's Land Stage Gladiators.
View user's profile Send private message
Sander Marechal


Location: The Netherlands
Joined: 04 Dec 2009
Reading list: 17 books

Spotlight topics: 1
Posts: 671

PostPosted: Sun 19 Sep, 2010 1:36 pm    Post subject:         Reply with quote

I finished my banner pole during my vacation! I set out to create a pole according to the design that M. Oroszlany suggested, where the horizontal beam is permanently attached to the main pole and the entire top of the main pole swivels. But, when I went shopping for wood in France I ran across something I had totally forgotten about: wooden parts for curtain rails. They have thick and sturdy wooden poles up to 3 meters and all kinds of wooden eyelets, knobs and other accessories that go along with it.

So, the design I ended up using is different. The horizontal beam is 1.10m long and had a wooden eye attached to one end. The pole itself has a similar wooden eye slit over it and attached to it about 8cm from the top. The eye of the side beam slits over the main pole and rests on that eye below. Everything is secured by screwing the wooden top knob on the pole.

The pole itself is 1.90m long for carrying around during parades. It can be extended with an extra pole of 1.50m at the bottom, making for a total 2.90m in length. The extension piece has a 40cm hardened steel pin on it that goes into a hole drilled in the bottom of the main pole (salient detail: the pin is from a 150 year old steel wall anchor used to hold 1m thick stone walls in place).

Pics below!


 Attachment: 237.21 KB
banner-pole-1.jpg
The main 1.90m pole for parades.

 Attachment: 238.7 KB
banner-pole-2.jpg
Pole with extension.
View user's profile Send private message Send e-mail Visit poster's website
Sam Gordon Campbell


Location: Australia.
Joined: 16 Nov 2008

Posts: 678

PostPosted: Sun 19 Sep, 2010 9:22 pm    Post subject:         Reply with quote

Not only do I like the banner (It's looks a tad glossy for my tastes though), but I like that t-shirt.
Looks like yet another thing I'll have to make Laughing Out Loud
Rock on.

Member of Australia's Stoccata School of Defence since 2008.
Host of Crash Course HEMA.
Founder of The Van Dieman's Land Stage Gladiators.
View user's profile Send private message
Thomas R.


Location: Germany
Joined: 10 May 2010
Likes: 4 pages
Reading list: 17 books

Posts: 396

PostPosted: Tue 21 Sep, 2010 3:32 pm    Post subject:         Reply with quote

Hmmm... no, no I can't convince myselt to like this bannerpole. :o( These curtain rail parts do look like... well curtain rail parts. Not the period look I prefer. And I don't like, that the banners highest pointy flapping piece is tied to the pole. The banner itself looks quite good.

Regards Thomas

http://maerenundlobebaeren.tumblr.com/
View user's profile Send private message Visit poster's website
Sander Marechal


Location: The Netherlands
Joined: 04 Dec 2009
Reading list: 17 books

Spotlight topics: 1
Posts: 671

PostPosted: Tue 21 Sep, 2010 3:55 pm    Post subject:         Reply with quote

Thomas R. wrote:
And I don't like, that the banners highest pointy flapping piece is tied to the pole.


Me neither, and I'll probably change that. I didn't make the banner itself, just the pole. The banner itself was made by someone else in our group. It came with the loops attached so I made the pole to match. But looking at it I think it would look better with the last loop removed and the top tongue flowing freely like the other tongues.
View user's profile Send private message Send e-mail Visit poster's website
Sander Marechal


Location: The Netherlands
Joined: 04 Dec 2009
Reading list: 17 books

Spotlight topics: 1
Posts: 671

PostPosted: Tue 28 Sep, 2010 5:00 am    Post subject:         Reply with quote

Well, scratch this and time for a new plan. During training, the horizontal beam broke off at the eye, fell down and hit one of our members on the head. Unfortunately, while that guy has a nice collection of helmets, he wasn't wearing one that day. He's fine though, but the banner pole needs to be redesigned.

I'm under a bit of time pressure to get it fixed for next weekend so I have been experimenting with lashing. I got a good book about knots and lashings, got a length of old fashioned hemp rope and I have been experimenting. I can lash the cross beam to the pole with a square lashing, but on itself it is not strong enough to keep it at a straight angle (it's a heavy banner). So, I will need to lash the cross beam to the mast a bit lower, and run a rope between the top of the pole and the end of the cross beam.

I haven't figured out yet which knots are best for running that top rope. A clove hitch at each end seems to work nice but doesn't look too good. It's also a little hard to pull the rope taught. But that could also be because the rope I have is a bit thick (8mm). I have placed an order for thinner hemp rope (4mm and 6mm). I expect this to be delivered tomorrow.

As a side effect, the pole will look nicer. The rings at the top of the pole will be gone, though I will probably keep the top ball. Also, because the cross beam will be lashed, it will be shorter. Too short to attach the top toungue of the banner. So, that one will flow freely with the other tongues, as suggested by Thomas R.
View user's profile Send private message Send e-mail Visit poster's website
Jeff Del Vecchio


Joined: 18 Nov 2008

Posts: 12

PostPosted: Tue 28 Sep, 2010 5:49 am    Post subject:         Reply with quote

Just a suggestion...rather than try to tie a line from the top of the pole to the end of the arm, try tying the other (short) end of the arm to the lower portion of the pole. Bowline (possibly) at the end of the arm, and rolling hitch (or trucker's hitch) down on the pole. That makes it easier to adjust the angle of the arm, and gives you access to the rope without lowering the banner. Beautiful banner, by the way. And really a cool idea to replicate this...
View user's profile Send private message
Sander Marechal


Location: The Netherlands
Joined: 04 Dec 2009
Reading list: 17 books

Spotlight topics: 1
Posts: 671

PostPosted: Wed 29 Sep, 2010 4:16 pm    Post subject:         Reply with quote

Thanks for the suggestions Jeff. The new rope arrived today and I tried it out. Somehow tying a rope from the short arm of the horizontal beam down the pole doesn't seem to work as well. My math says it shouldn't matter much since it's basically the same shape only 90 degrees transposed. But in practice the cross beam moves up and down much more than when I tie a rope from the top of the pole to the end of the long arm of the cross beam. I'm too lazy at the moment to do the math to calculate all the torque and forces involved to see why it matters.

Your suggestion for a rolling hitch is excellent though. Just what I needed (that knot wasn't in my book). The bowline doesn't work though. I can't tighten it around the pole so it slides when it's not pulled at a straight angle. Do you perhaps have another suggestion for a knot? Ideally I am looking for something adjustable that doesn't slide on the pole when the force isn't exactly perpendicular and which I can tie when the other end is already attached and the rope is under tension.

I'll make some pictures tomorrow when I've cut the wooden rings off the poles.
View user's profile Send private message Send e-mail Visit poster's website
Sander Marechal


Location: The Netherlands
Joined: 04 Dec 2009
Reading list: 17 books

Spotlight topics: 1
Posts: 671

PostPosted: Mon 04 Oct, 2010 3:52 pm    Post subject:         Reply with quote

Here's the new version of the banner pole, as used during our event last Sunday. It's all lashes and hemp rope now. Much better in my opinion.


 Attachment: 103.44 KB
PA030026.JPG

View user's profile Send private message Send e-mail Visit poster's website
Sam Gordon Campbell


Location: Australia.
Joined: 16 Nov 2008

Posts: 678

PostPosted: Mon 04 Oct, 2010 7:12 pm    Post subject:         Reply with quote

I agree, it looks much better!
Member of Australia's Stoccata School of Defence since 2008.
Host of Crash Course HEMA.
Founder of The Van Dieman's Land Stage Gladiators.
View user's profile Send private message
Nathan Robinson
myArmoury Admin


myArmoury Admin

PostPosted: Mon 04 Oct, 2010 7:17 pm    Post subject:         Reply with quote

Sam Gordon Campbell wrote:
I agree, it looks much better!


I second that opinion.

Nice work, Sander.

.:. Visit my Collection Gallery :: View my Reading List :: View my Wish List :: See Pages I Like :: Find me on Facebook .:.
View user's profile Send private message Send e-mail Visit poster's website
Thomas R.


Location: Germany
Joined: 10 May 2010
Likes: 4 pages
Reading list: 17 books

Posts: 396

PostPosted: Tue 05 Oct, 2010 12:06 am    Post subject:         Reply with quote

Yeah, much, much better now.

Happy

http://maerenundlobebaeren.tumblr.com/
View user's profile Send private message Visit poster's website


Display posts from previous:   
Forum Index > Off-topic Talk > Making a transportable and swiveling banner poleDIY Project
Page 1 of 1 Reply to topic
All times are GMT - 8 Hours

View previous topic :: View next topic
Jump to:  
You cannot post new topics in this forum
You cannot reply to topics in this forum
You cannot edit your posts in this forum
You cannot delete your posts in this forum
You cannot vote in polls in this forum
You cannot attach files in this forum
You can download files in this forum


All contents © Copyright 2003-2024 myArmoury.com — All rights reserved
Discussion forums powered by phpBB © The phpBB Group
Switch to the Basic Low-bandwidth Version of the forum