Info Favorites Register Log in
myArmoury.com Discussion Forums

Forum index Memberlist Usergroups Spotlight Topics Search


myArmoury.com is now completely member-supported. Please contribute to our efforts with a donation. Your donations will go towards updating our site, modernizing it, and keeping it viable long-term.
Last 10 Donors: Anonymous, Daniel Sullivan, Chad Arnow, Jonathan Dean, M. Oroszlany, Sam Arwas, Barry C. Hutchins, Dan Kary, Oskar Gessler, Dave Tonge (View All Donors)

Forum Index > Historical Arms Talk > Hafting my Poleaxe HeadDIY Project Reply to topic
This is a standard topic Go to page 1, 2  Next 
Author Message
Scott Hrouda


Location: Minnesota, USA
Joined: 17 Nov 2006
Likes: 15 pages
Reading list: 87 books

Posts: 643

PostPosted: Fri 20 Aug, 2010 8:48 am    Post subject: Hafting my Poleaxe Head         Reply with quote

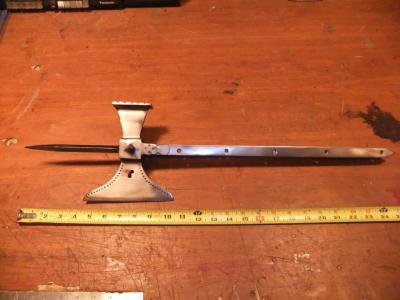
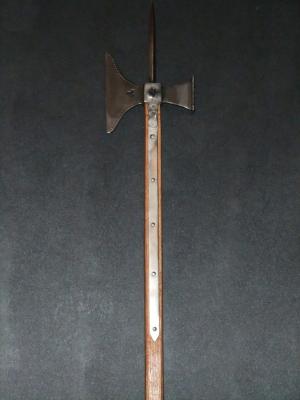
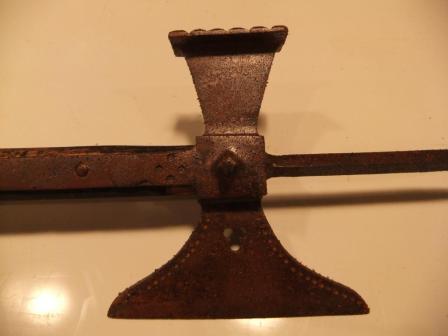
Recently I was inspired by this thread to get off my duff and do something with my poleaxe head lying about the shop collecting dust.

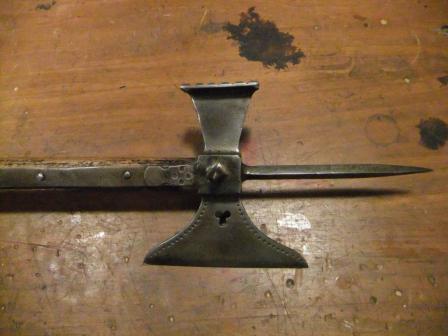
The GDFB Poleaxe, Head Only (XB0099) is a nice piece for the money, although some minor file work was required.

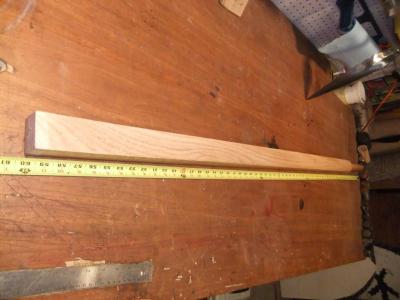
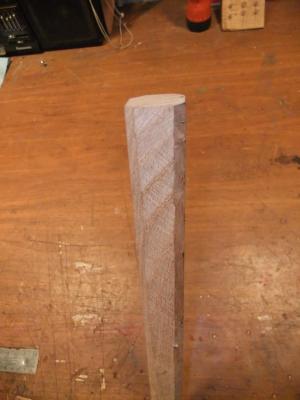
An ash wheelbarrow handle from the local hardware store was used for the haft. I ripped it down to 1.25 inches square on my table saw, then used a spoke shave and hand plane to give it a moderately octagonal shape below the langets.

I decided to not inset the langets into the haft as I had been told “this is a special kind of hell”. Maybe next time. I did sand it lightly while leaving some "flaws" as I will be distressing the piece. The haft was liberally rubbed with boiled linseed oil several times.

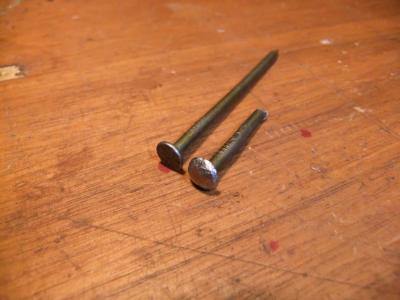
As Sean Flynt mentioned, “There's a shocking lack of proper langet nails these days.” I resorted to peening standard 8 penny nail heads, which gave a less manufactured look, then cut the nails to length. I cut them so that they would just barely poke through the other side of the haft. As this piece will be for decoration only, I did not cut them long enough to protrude from the haft in order to peen them over. I did cheat a little and added epoxy into the head mount just to be safe.

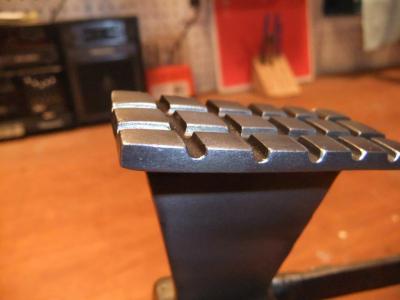
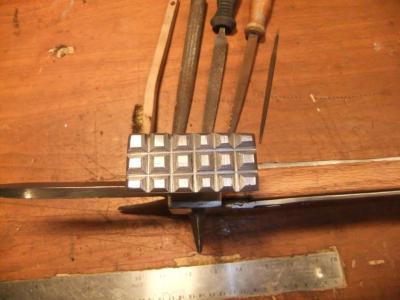
The hammer head has a simple waffle pattern. Wanting little pyramid shaped nubs instead of little square ones, I spent a quality evening with my trusty files.

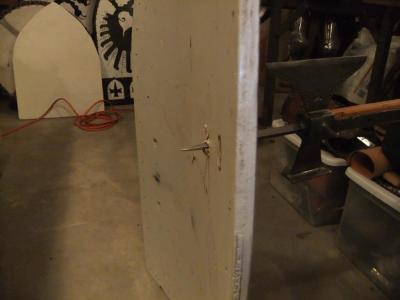
Attached below is a progress shot taken a few days ago. It should be obvious that I am no photographer. Blush I decided to have a little fun and took a moderate strength stab at an old shield leaning against my work bench. This half-hearted stab with an unsharpened point protruded 2 inches through 0.5 inches of laminated plywood! Eek!

Currently the poleaxe is undergoing “forced aging” using techniques in the The Instant Antique feature article. I will post photos of the distressed poleaxe when the process is complete. Happy


 Attachment: 17.21 KB
1.jpg


 Attachment: 16.85 KB
2.jpg


 Attachment: 14.47 KB
3.jpg


 Attachment: 16.39 KB
4.jpg


 Attachment: 13.32 KB
5.jpg


 Attachment: 18.29 KB
6.jpg


 Attachment: 11.79 KB
7.jpg


 Attachment: 12.32 KB
8.jpg


...and that, my liege, is how we know the Earth to be banana shaped. - Sir Bedevere
View user's profile Send private message
Scott Hrouda


Location: Minnesota, USA
Joined: 17 Nov 2006
Likes: 15 pages
Reading list: 87 books

Posts: 643

PostPosted: Fri 20 Aug, 2010 9:34 am    Post subject:         Reply with quote

I've managed to correct the picture issue. Happy

A special thanks goes to Sean Flynt for advice, inspiration, as well as many well written articles and posts. Cool

Thank You,

-Scott

...and that, my liege, is how we know the Earth to be banana shaped. - Sir Bedevere
View user's profile Send private message
Sean Flynt


Location: Birmingham, Alabama
Joined: 21 Aug 2003
Likes: 10 pages
Reading list: 13 books

Spotlight topics: 7
Posts: 5,981

PostPosted: Fri 20 Aug, 2010 10:44 am    Post subject:         Reply with quote

That looks outstanding, Scott! So you have, what, $50 invested? Big Grin I'm especially impressed by your work on the hammer face. I wish I had your langets! Mine are rather thin.
-Sean

Author of the Little Hammer novel

https://www.amazon.com/Little-Hammer-Sean-Flynt/dp/B08XN7HZ82/ref=sr_1_1?dchild=1&keywords=little+hammer+book&qid=1627482034&sr=8-1
View user's profile Send private message Visit poster's website
Scott Hrouda


Location: Minnesota, USA
Joined: 17 Nov 2006
Likes: 15 pages
Reading list: 87 books

Posts: 643

PostPosted: Fri 20 Aug, 2010 11:49 am    Post subject:         Reply with quote

I have a total investment of $63 USD and several hours in this project. Happy

Thank you for the filing compliment. I wish the hammer face had more "meat" to it as there wasn't enough to get the pyramid heads to a sharp point. I had to settle for a Mayan-like flat topped pyramid as a Snefru shape would have looked rather silly.

You are correct, the langets are very hefty. Because I didn't inset the langets into the haft, some minor filing was required at the ends to prevent injury to my hands when changing guards. It is worth noting the langet-to-head welds are very suspect. I was liberal with epoxy in this area because it scared me a little.

I dished a stop-guard last night and rolled the edge. Mounting will have to wait until next week.

Your aging tip regarding salt and vinegar in a spray bottle was spot on. There’s been some serious corrosion after just one night!

...and that, my liege, is how we know the Earth to be banana shaped. - Sir Bedevere
View user's profile Send private message
Sean Flynt


Location: Birmingham, Alabama
Joined: 21 Aug 2003
Likes: 10 pages
Reading list: 13 books

Spotlight topics: 7
Posts: 5,981

PostPosted: Fri 20 Aug, 2010 12:11 pm    Post subject:         Reply with quote

Yeah, I slightly beveled the edges of my langets with the file, too. I hope I didn't forever turn you off insetting langets Laughing Out Loud I inset langets for a couteau de breche many years ago. The result was nice but not necessary or even appropriate for many polearm forms. Mainly, with a long, broad and thick pair of langets, by the time you get them marked, chiseled out so cleanly that the langets lie flush and bevel the haft accordingly you have almost as much time invested as you'd need for an historical scabbard core. To me, it just ain't worth it for an inexpensive head. Those with better shop skills, sharper chisels and more time would offer a different perpsective, I'm sure. But if I could buy an unmounted Arms & Armor pollaxe head and langets, you bet I'd invest the time.

I'm eager to see your rondel!

-Sean

Author of the Little Hammer novel

https://www.amazon.com/Little-Hammer-Sean-Flynt/dp/B08XN7HZ82/ref=sr_1_1?dchild=1&keywords=little+hammer+book&qid=1627482034&sr=8-1
View user's profile Send private message Visit poster's website
JG Elmslie
Industry Professional


Location: Scotland
Joined: 18 Jun 2009
Reading list: 28 books

Posts: 272

PostPosted: Fri 20 Aug, 2010 12:24 pm    Post subject: Re: Hafting my Poleaxe Head         Reply with quote

Scott Hrouda wrote:
I decided to have a little fun and took a moderate strength stab at an old shield leaning against my work bench. This half-hearted stab with an unsharpened point protruded 2 inches through 0.5 inches of laminated plywood!


this rather does raise a question I've been pondering for a little while - does anyone know of good pollaxes suitable for WMA/Reenactment fighting, with rebated edges and a blunt spike?

I've been thinking over them for a while now, and struggling to think of solutions... I could probably make one, but not easily, so would love to know of any reccommendations
View user's profile Send private message Visit poster's website
Scott Hrouda


Location: Minnesota, USA
Joined: 17 Nov 2006
Likes: 15 pages
Reading list: 87 books

Posts: 643

PostPosted: Fri 20 Aug, 2010 3:19 pm    Post subject: Re: Hafting my Poleaxe Head         Reply with quote

JG Elmslie wrote:
this rather does raise a question I've been pondering for a little while - does anyone know of good pollaxes suitable for WMA/Reenactment fighting, with rebated edges and a blunt spike?


The first option that springs to mind is the Arms & Armor Knightly Pole Axe. This is arguably the finest recreation on the market today. I'm sure you could ask them to produce one with rebated edges and a blunted spike.

Another option is the Complete Talhoffer Poleaxe.

...and that, my liege, is how we know the Earth to be banana shaped. - Sir Bedevere
View user's profile Send private message
Hanns Wiechman


Location: Minneapolis, MN
Joined: 17 Jun 2007

Posts: 21

PostPosted: Fri 20 Aug, 2010 3:46 pm    Post subject:         Reply with quote

Hey, I recognize that shop and the shield in the background? Nice work on the poleaxe! You could always bore through the head and langets and put in a larger pyramidal rivet to hold them better together in case the poleaxe is used on a ham or turkey at our next gathering.
View user's profile Send private message
Scott Hrouda


Location: Minnesota, USA
Joined: 17 Nov 2006
Likes: 15 pages
Reading list: 87 books

Posts: 643

PostPosted: Mon 23 Aug, 2010 6:08 am    Post subject:         Reply with quote

Hanns, thank you for the compliment. We'll have another group feast around Thanksgiving. Let's roast a turkey on the spike and tenderize the steaks with the hammer. Wink
...and that, my liege, is how we know the Earth to be banana shaped. - Sir Bedevere
View user's profile Send private message
Scott Hrouda


Location: Minnesota, USA
Joined: 17 Nov 2006
Likes: 15 pages
Reading list: 87 books

Posts: 643

PostPosted: Wed 25 Aug, 2010 10:13 pm    Post subject:         Reply with quote

Progress has been made. 5 days after applying the "aging spray" the poleaxe was well oxidized. An initial cleaning with 0000 steel wool revealed some nice results. There's still work to be done...


 Attachment: 21.39 KB
DSCF1367-copy.jpg


 Attachment: 28.89 KB
DSCF1369-copy.jpg


...and that, my liege, is how we know the Earth to be banana shaped. - Sir Bedevere
View user's profile Send private message
Bill Grandy
myArmoury Team


myArmoury Team

Location: Northern VA,USA
Joined: 25 Aug 2003
Reading list: 43 books

Spotlight topics: 2
Posts: 4,194

PostPosted: Wed 25 Aug, 2010 11:04 pm    Post subject: Re: Hafting my Poleaxe Head         Reply with quote

JG Elmslie wrote:
this rather does raise a question I've been pondering for a little while - does anyone know of good pollaxes suitable for WMA/Reenactment fighting, with rebated edges and a blunt spike?


Keep in mind that a blunt poleaxe is still a poleaxe. Quite frankly, a rubber poleaxe hits pretty damn hard, too.

I use the Revival.us "Talhoffer" ones that Scott linked to above. There is also the Historic Enterprises one, but I haven't actually seen these in person, so I don't know if they are worthwhile or not.

http://historicenterprises.com/pollaxe-simula...th=101_207

HistoricalHandcrafts.com
-Inspired by History, Crafted by Hand


"For practice is better than artfulness. Your exercise can do well without artfulness, but artfulness is not much good without the exercise.” -anonymous 15th century fencing master, MS 3227a
View user's profile Send private message Visit poster's website
Blaz Berlec


Location: Podgorje, Kamnik, Slovenia, Europe
Joined: 26 Aug 2003
Reading list: 1 book

Spotlight topics: 4
Posts: 420

PostPosted: Thu 26 Aug, 2010 8:59 am    Post subject:         Reply with quote

Scott Hrouda wrote:
Progress has been made. 5 days after applying the "aging spray" the poleaxe was well oxidized. An initial cleaning with 0000 steel wool revealed some nice results. There's still work to be done...


Nice!

I have the same GDFB polaxe head, but mine is a bit uglier - hammer head is not quite aligned with the central axis. But I can live with it, all the welds seem OK. I'll reshape the hammer face as you did, and I've already made the haft - 1,5 meter ash, rectangular at top and octagonal at bottom. I made it from 33 x 33 mm piece, which tapers slightly to the bottom. I also chiselled grooves for the top part of the langets, and since the haft tapers, it does't bend them too badly - I don't want to chisel the whole langets into the haft.

I'm not really impressed with the surface finish of the polaxe head - some parts are almost mirror finish, and other (welds) are pretty rough. This "instant ageing" process looks like it could give it a more uniform appearance, I might just try it. Before I nail the head to the haft.


Extant 15th Century German Gothic Armour
Extant 15th century Milanese armour
Arming doublet of the 15th century
View user's profile Send private message Visit poster's website
Brad Lilly


Location: Nova Scotia
Joined: 11 Jul 2010

Posts: 2

PostPosted: Thu 26 Aug, 2010 10:56 am    Post subject:         Reply with quote

Being a new guy around here.... Are the heads of warhammers and poleaxes inlet for the handle or are the langets all that hold it on?

Looks great by the way.
View user's profile Send private message Send e-mail
Scott Hrouda


Location: Minnesota, USA
Joined: 17 Nov 2006
Likes: 15 pages
Reading list: 87 books

Posts: 643

PostPosted: Mon 30 Aug, 2010 6:33 am    Post subject:         Reply with quote

Sean Flynt wrote:
I'm eager to see your rondel!


I'm having rondel/stop-guard issues. Sad

Currently, it's 4.5 inches in diameter which just feels too large. Does anyone have a good idea what diameter they are supposed to be?
I would have no problem trimming it as I'm totally dissatisfied with my edge rolling. I hurried the job and did not roll the edge over wire.

...and that, my liege, is how we know the Earth to be banana shaped. - Sir Bedevere
View user's profile Send private message
Sean Flynt


Location: Birmingham, Alabama
Joined: 21 Aug 2003
Likes: 10 pages
Reading list: 13 books

Spotlight topics: 7
Posts: 5,981

PostPosted: Mon 30 Aug, 2010 7:32 am    Post subject:         Reply with quote

I think you could reduce it to 4" if it bothers you. It seems to me that it's meant only to prevent a blade from sliding down the haft and cutting the forefinger and thumb. I don't think it's meant to offer much protection to the rest of the hand. These seem too small for that.
-Sean

Author of the Little Hammer novel

https://www.amazon.com/Little-Hammer-Sean-Flynt/dp/B08XN7HZ82/ref=sr_1_1?dchild=1&keywords=little+hammer+book&qid=1627482034&sr=8-1
View user's profile Send private message Visit poster's website
Scott Hrouda


Location: Minnesota, USA
Joined: 17 Nov 2006
Likes: 15 pages
Reading list: 87 books

Posts: 643

PostPosted: Tue 31 Aug, 2010 6:49 am    Post subject:         Reply with quote

Brad Lilly wrote:
Being a new guy around here.... Are the heads of warhammers and poleaxes inlet for the handle or are the langets all that hold it on? Looks great by the way.

Welcome Brad!

Poleaxe hafts typically fit up into the head and may be affixed with nails or rivets depending on the period and type of pole weapon. Langets may also be used to secure the head and/or provide some protection for the wooden haft. There's really quite a variety and I am by no means an expert. I simply like to read, dabble, have fun making cool things then hit inanimate objects with them.

There are more knowledgeable people on this forum that may provide a better or clearer answer for you. The book Hafted Weapons in Medieval and Renaissance Europe: The Evolution of European Staff Weapons between 1200 and 1650 (History of Warfare 31) has been recommended as a very important read, but I have yet to pick up a copy.

...and that, my liege, is how we know the Earth to be banana shaped. - Sir Bedevere
View user's profile Send private message
Gabriele A. Pini


Location: Olgiate Comasco, Como
Joined: 02 Sep 2008

Posts: 239

PostPosted: Tue 31 Aug, 2010 9:39 am    Post subject:         Reply with quote

Good work Scott.
You confirm my theory that you don't have to spend huge sums to make a good kit to parade, and not even a great deal of work. Now if only I could convince the rest of my company...
View user's profile Send private message Visit poster's website
Scott Hrouda


Location: Minnesota, USA
Joined: 17 Nov 2006
Likes: 15 pages
Reading list: 87 books

Posts: 643

PostPosted: Thu 02 Sep, 2010 7:06 am    Post subject:         Reply with quote

Sean Flynt wrote:
I think you could reduce it to 4" if it bothers you. It seems to me that it's meant only to prevent a blade from sliding down the haft and cutting the forefinger and thumb. I don't think it's meant to offer much protection to the rest of the hand. These seem too small for that.


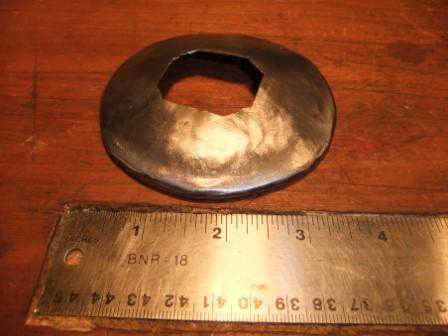
I carefully cut off the poorly executed rolled edge and took my time re-rolling the edge over wire. I'm very pleased with the results. The diameter is now 3.75 inches which both looks and feels ALOT better. Happy

Some issues have arisen while mounting the rondel with custom made brackets. I chewed that fat a little bit last night with my buddy and sparing partner Hanns Wiechman and I think a solution is at hand. Pictures will follow after the holiday weekend.

...and that, my liege, is how we know the Earth to be banana shaped. - Sir Bedevere
View user's profile Send private message
Chris Arrington


Joined: 06 Apr 2007

Posts: 115

PostPosted: Fri 03 Sep, 2010 8:51 am    Post subject:         Reply with quote

Nice thread ! I've been considering this very same project.

Has anyone tried the ash shafts that Kult of Athena sells? My metal working skills are adequate, but my wood working totally stinks.
View user's profile Send private message
Scott Hrouda


Location: Minnesota, USA
Joined: 17 Nov 2006
Likes: 15 pages
Reading list: 87 books

Posts: 643

PostPosted: Tue 07 Sep, 2010 8:36 pm    Post subject:         Reply with quote

Chris Arrington wrote:
Nice thread ! I've been considering this very same project. Has anyone tried the ash shafts that Kult of Athena sells? My metal working skills are adequate, but my wood working totally stinks.


Thank you Chris! You probably want to use octagonal shafts / hafts whereas the KOA shaft is round in cross section.

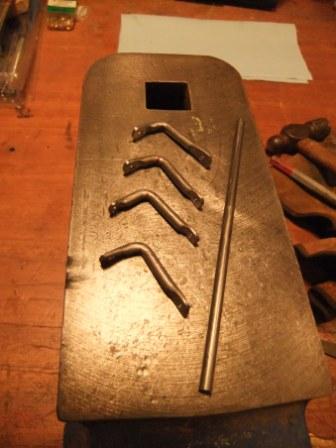
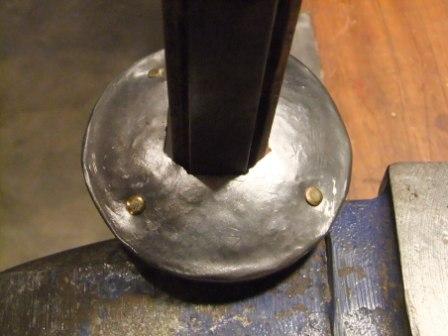
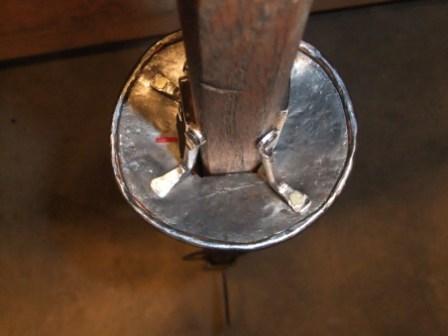
Here are some more progress pictures. I managed to make four mounting brackets out of 1/8" round stock. The rondel is 3.75 inches in diameter and the center has been filed out to match the profile of the haft, including langets. I mounted the brackets to the rondel using little brass rivets for some contrast in color. The brackets were then nailed to the haft with some more homemade arming nails.

The last part was the trickiest. A lot of time was spent bending the brackets "this way and that" to get everything to line up just right.

The last photo clearly shows one of the dents I made by whacking the haft with all manner of tools in the shop. That was a FUN evening of "antiquing"! Big Grin

Everything has been sprayed and is "aging" again, just sitting there getting rusty...


 Attachment: 30.94 KB
DSCF1383-copy.jpg
Mounting brackets

 Attachment: 28.45 KB
DSCF1380-copy.jpg
Rondel

 Attachment: 30.68 KB
DSCF1385-copy.jpg
Brackets attached

 Attachment: 22.85 KB
DSCF1388-copy.jpg
Rondel finished

...and that, my liege, is how we know the Earth to be banana shaped. - Sir Bedevere
View user's profile Send private message


Display posts from previous:   
Forum Index > Historical Arms Talk > Hafting my Poleaxe HeadDIY Project
Page 1 of 2 Reply to topic
Go to page 1, 2  Next All times are GMT - 8 Hours

View previous topic :: View next topic
Jump to:  
You cannot post new topics in this forum
You cannot reply to topics in this forum
You cannot edit your posts in this forum
You cannot delete your posts in this forum
You cannot vote in polls in this forum
You cannot attach files in this forum
You can download files in this forum


All contents © Copyright 2003-2024 myArmoury.com — All rights reserved
Discussion forums powered by phpBB © The phpBB Group
Switch to the Basic Low-bandwidth Version of the forum