| Author |
Message |
|
Dustin R. Reagan
|
 Posted: Wed 14 Jul, 2010 12:37 pm Post subject: Messer Hilt Advice Posted: Wed 14 Jul, 2010 12:37 pm Post subject: Messer Hilt Advice |
 |
|
Greetings,
I am working on a messer (pics below), and had a total and complete brain fart (probably too much carbon monoxide -- was forge welding wrought iron this morning!). I forge welded on the messer's pommel (which i've read was a historically correct method of messer pommel attachment), BEFORE i put on the hilt!!
Messer blade:
1.25" x 0.25" - 1084
Pommel:
Laminated 0.25" strips of wrought iron
Hilt:
Laminated 0.25" strips of wrought iron
I had to forge weld together several pieces of my wrought iron, to get thick enough pieces for the hilt & pommel.
Anyhow, this morning i forge welded the pieces for the hilt, and did a rough forging pass on it (mostly to consolidate the wrought, and ensure the welds stuck). Then, i was going to forge weld each slab of the pommel, however, i took it a step too far and ended up forge welding the slabs onto the blade's tang! Gah! as soon as i stuck the welds, i realized what i had just done...
These are my options as i see it:
-Simply grind off my welded on pommel (which i am proud of, by the way...first successful wrought iron to carbon steel weld!) and start over.
or
-Cut, drill, and chisel out a slot in the hilt which the tang/blade will fit into, cut and fit a slab of wrought to fit over this and sandwich the tang/blade, then use the nagel to peen the hilt, tang, and slab together (essentially making the hilt a cross between a bolster and a crosshilt?). If this isn't clear what i mean, i can draw up a quick illustration...
How were messer hilted historically? I have read (can't recall where) that the pommel was often forge welded on...if so, how was the guard attached?
Thanks for any advice,
Dustin
Where to go from here?
 Attachment: 171.36 KB Attachment: 171.36 KB
The messer is roughed out, with some very preliminary profile grinding. [ Download ]
Attachment: 158.85 KB
I'm closely following my Albion Soldat for my first messer: [ Download ]
Attachment: 189.98 KB
closeup of hilt [ Download ]
Last edited by Dustin R. Reagan on Wed 14 Jul, 2010 3:23 pm; edited 1 time in total
|
|
  |
 |
Sean Flynt

|
| Posted: Wed 14 Jul, 2010 12:56 pm Post subject: |
|
|
This looks great! Messers seem to be very hard to get right, and I see more than a few DIY failures (in terms of historical proportion/construction/aesthetic). Anyway, FWIW, here's my own process, in chronological order, when hitting problems like this one:
• 
• I can live with it.
• I can't live with it, but I can work around it.
• I'll back up and do it the right way.
Repeat as needed. I took apart one scabbard core more times than I care to recall.
So far, I haven't regretted undoing something and having another go at it, but even the odd minor thing I didn't fix is now the only thing I can see on some of my projects.
Ever heard about the Tibetan Buddhist sand mandala?
http://en.wikipedia.org/wiki/Sand_mandala
That's what I think about when I have to back up. Makes me feel much better. 
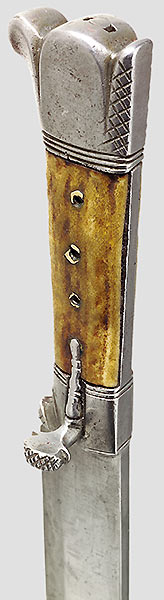
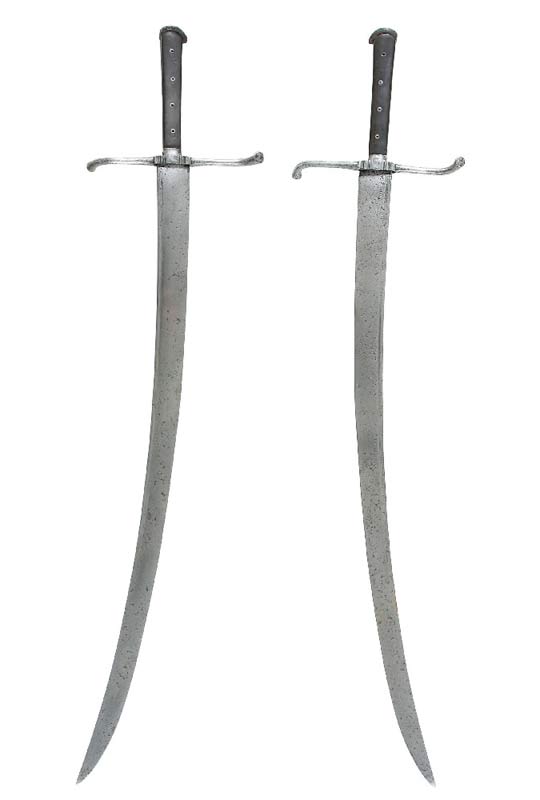
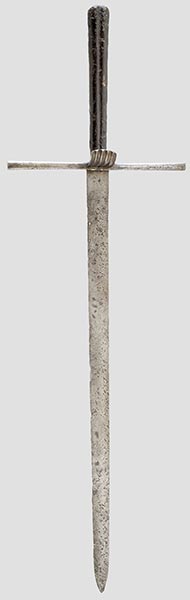
As for construction: I think I've seen two-piece pommels (making a tang sandwich) with evidence of flush riveting. Some messer pommels appear to have been made just like sword pommels (pierced-through and peened). Of course, even some kreigsmessers have a simple plate rather than a proper pommel, so you could always adjust your design (blade and tang) that way and not have to create a new pommel after you've had the pleasure of grinding away your previous work. Here are the few images I have that are close to hand. The first is a bauernwehr rather than the larger messers, but I think I've seen all of these techniques on knives of all sizes. If I find others in my files I'll pass them along.
Attachment: 24.85 KB
Attachment: 15 KB
Attachment: 7.16 KB
-Sean
Author of the Little Hammer novel
https://www.amazon.com/Little-Hammer-Sean-Flynt/dp/B08XN7HZ82/ref=sr_1_1?dchild=1&keywords=little+hammer+book&qid=1627482034&sr=8-1
|
|
 |
|
|
Dustin R. Reagan
|
| Posted: Thu 15 Jul, 2010 7:25 am Post subject: |
|
|
Thanks for the advice, Sean.
| Sean Flynt wrote: |
As for construction: I think I've seen two-piece pommels (making a tang sandwich) with evidence of flush riveting. Some messer pommels appear to have been made just like sword pommels (pierced-through and peened). Of course, even some kreigsmessers have a simple plate rather than a proper pommel, so you could always adjust your design (blade and tang) that way and not have to create a new pommel after you've had the pleasure of grinding away your previous work. Here are the few images I have that are close to hand. The first is a bauernwehr rather than the larger messers, but I think I've seen all of these techniques on knives of all sizes. If I find others in my files I'll pass them along. |
I'm definitely going to have a forge-welded pommel on this one (to get the right balance, it'll need a pommel). Most likely i'll take your advice and just grind off the current pommel. I should have been more specific in my question about hilt construction...I was asking more specifically about guard construction. What are the various ways that messer guards were built? Are there historical examples of multi-part guards on messer? If a pommel *was* forge welded on, and the guard *was* slit and fitted (like a "typical" cruciform sword's guard), what was the "order of operations", as it were?
I'm thinking something like:
-slit and fit the guard, but don't rivet it to the blade with the nagel, yet.
-take the guard off and do the majority of the finish work on the guard.
-put the guard back on the blade, but again, don't rivet it with the nagel. (so basically the guard is free to move up and down the tang at this point).
-forge weld on the pommel.
-heat treat the blade.
-do the finish-work on the blade.
-do any cleanup finish work on the hilt/pommel.
-rivet the guard to the blade with the nagel.
This was my original plan, it just got short circuited in the heat of things...
Thoughts?
|
|
|
|
|
Sean Flynt
|
|
|
|
|
|
|
You cannot post new topics in this forum
You cannot reply to topics in this forum
You cannot edit your posts in this forum
You cannot delete your posts in this forum
You cannot vote in polls in this forum
You cannot attach files in this forum
You can download files in this forum
|
All contents © Copyright 2003-2026 myArmoury.com — All rights reserved
Discussion forums powered by phpBB © The phpBB Group
Switch to the Basic Low-bandwidth Version of the forum
|

