Does anyone know of someone who will make and install a padded linen liner in an open faced sallet? I don't want to attempt it myself.
Thanks,
Rick
Contact Jiri Klepac. He can do perfect liners, in case you can send him your helmet.
I do not want to sound pushy or mean in any way at all but you really should learn how to put it in and out as the helmet will need repair and cleaning if used. That said if you have the money for it you can simply disregard my comment.
Here is a liner for a sallet in the RA for reference
RPM
 Attachment: 19.93 KB
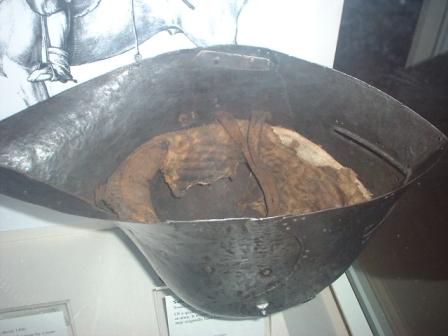
Here is a liner for a sallet in the RA for reference
RPM

I can probably sew it into the helmet, but I wouldn't know where to start to make one from scratch. I'll probably get the liner from Steel Mastery even though it's not quilted and doesn't look historically correct to me.
Thanks for the replies,
Rick
Thanks for the replies,
Rick
That works but if you want a place to start....
I can tell you how to make it from scratch if you like.
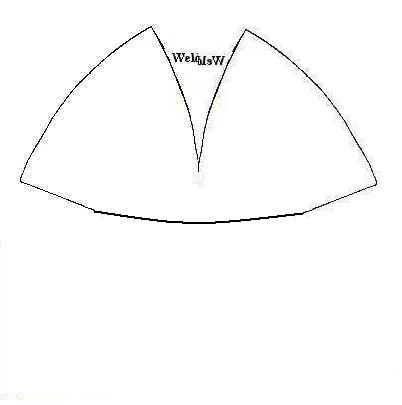
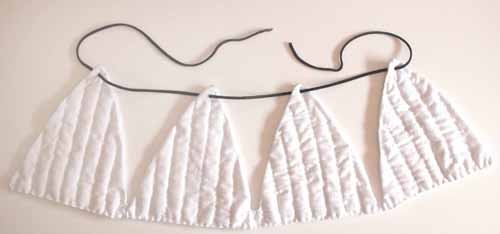
Here is a basic pattern I just made up. You will need to make 4 of them made of a heavy cotton of linen. You will have to adjust them for your own head and helmet. Make sure to add 1/2 to and inch for seams. You will also need either a leather or heavy canvas strip. If using a canvas strip you will need to double the width to avoid the ends fraying, the double ends will be inside the liner itself. You will also need to find rolled cotton. They usually are found in big medical supplies stores.
First you will line up the strip will be lined up with the inside of the liner material along the bottom so all open ends are the same. Once you have done sew up the outer sides of the liner as well. Leave the inside open for the moment.
Now flip it right side up. Cut out the cotton roll to the shape of the liner w/out the strap. You may need to cut a few out depending on the thickness required. Now put them inside. Once everything is set right you can fold the inner (open) edges inside and sew them closed. Now sew some support lines up and down on the liner body to keep the padding in place. Now make some heavy eyelets or grommets at the top of the four corners (a cm and a half or more from the edges) for the draw string. Lastly make sure to place it inside your helmet with the liner facing down and the strip facing up. Rivet or sew it and then flip it inside the helmet skull.
If you have any questions let me know.
RPM
 Attachment: 9.62 KB
I can tell you how to make it from scratch if you like.
Here is a basic pattern I just made up. You will need to make 4 of them made of a heavy cotton of linen. You will have to adjust them for your own head and helmet. Make sure to add 1/2 to and inch for seams. You will also need either a leather or heavy canvas strip. If using a canvas strip you will need to double the width to avoid the ends fraying, the double ends will be inside the liner itself. You will also need to find rolled cotton. They usually are found in big medical supplies stores.
First you will line up the strip will be lined up with the inside of the liner material along the bottom so all open ends are the same. Once you have done sew up the outer sides of the liner as well. Leave the inside open for the moment.
Now flip it right side up. Cut out the cotton roll to the shape of the liner w/out the strap. You may need to cut a few out depending on the thickness required. Now put them inside. Once everything is set right you can fold the inner (open) edges inside and sew them closed. Now sew some support lines up and down on the liner body to keep the padding in place. Now make some heavy eyelets or grommets at the top of the four corners (a cm and a half or more from the edges) for the draw string. Lastly make sure to place it inside your helmet with the liner facing down and the strip facing up. Rivet or sew it and then flip it inside the helmet skull.
If you have any questions let me know.
RPM

Randall,
Thanks for the help. I'm not sure if I'll try it as I've never sewn anything but a button back on in my life. I do have a couple questions.
Why do I need to make four of them? How do I know how large to make it? Also, the helmet already has a leather band inside so I guess I wouldn't have to sew a band onto the edge.
Rick
Rick,
Not a problem. The liner must fit directly on your head so the distance around your brow line /should be/is the length of the bottom of the liner. This is normally how I make them for helmets I have made thought. I'd measure the inside of the helmet and see the distance where your brow line would go. If the number is vastly different then it is better to make it fit closer the helmet numbers than your head but will need some modifications. You will likely need a neck strap anyways so that will help either way. If it is loose you could always increase the padding as well. This will keep it on your head and make it better for comfort. Keep in mind the padding needed will increase the size of your head by 2-3" or more depending on how much you wish. So if you have a 23" inch head it will be 25 or 26" helmet.
Why four 'fingers' on it? I do not know. Several medieval examples are four and it seems to work well. A note on something I forgot to put in is that the fingers should not follow all the way to the top of the helmet. You need them to be short enought to tighten and rest on your head to make sure you can see out the visor slit or face opening!
You can use the leather strap already inside I suspect. Might be easier to punch wholes in the leather before sewing!
I hope that helps answer your questions!
RPM
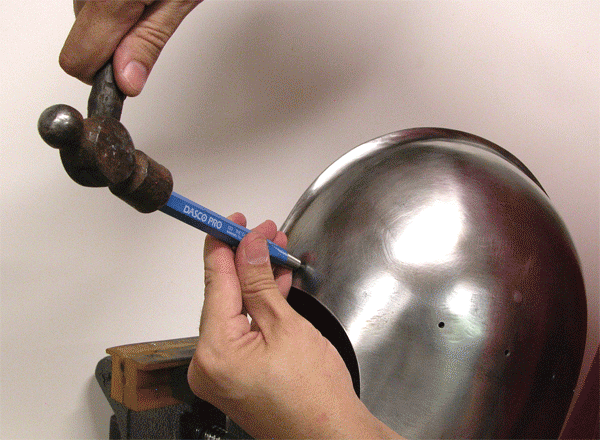
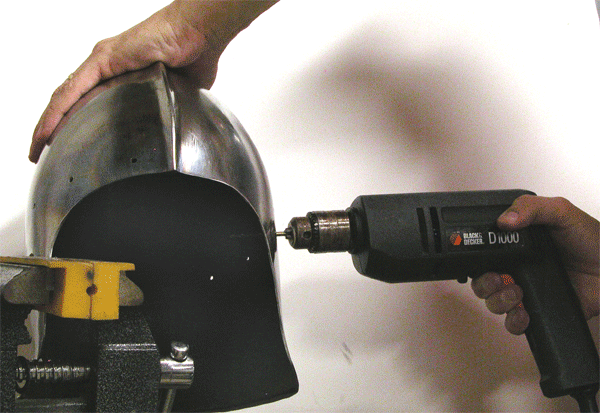
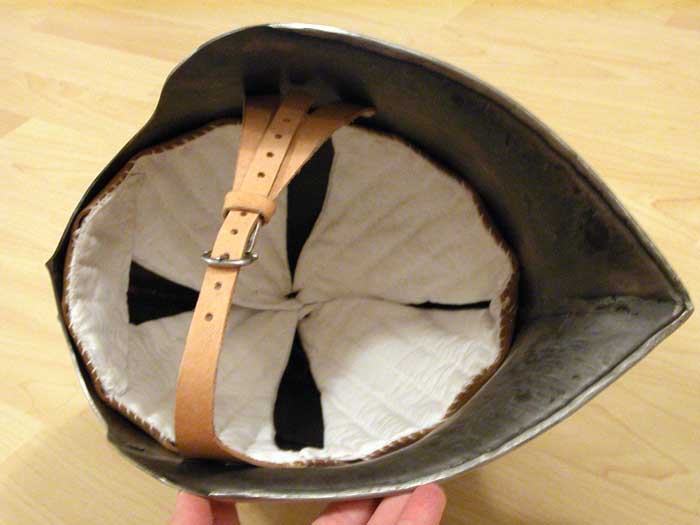
Some shots from my first adventure in sallet lining (in step-by-step order, starting with using a center punch to mark the bowl for drilling). I'd do a few things differently now and everyone has to work according to their materials and aesthetic. Among other things, I'd use more padding. Cotton batting gets significantly compressed during the quilting. I'd use shorter peaks, too, and figure the seam allowances more carefully. A first attempt. Don't hesitate to ask questions. But this is the basic progression from bucket to helmet. :D
 Attachment: 142.93 KB
 Attachment: 125.68 KB
 Attachment: 154.39 KB
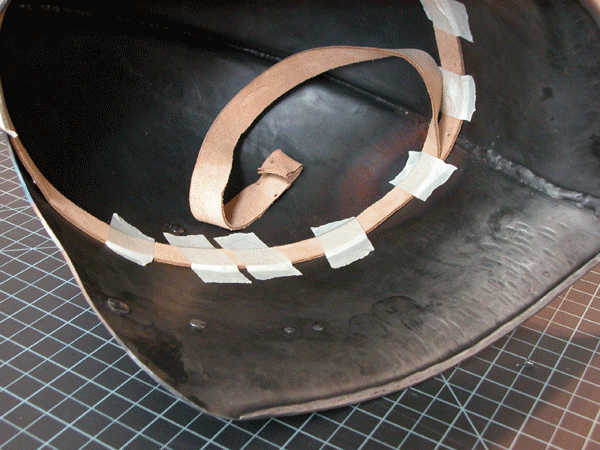
 Attachment: 128.27 KB
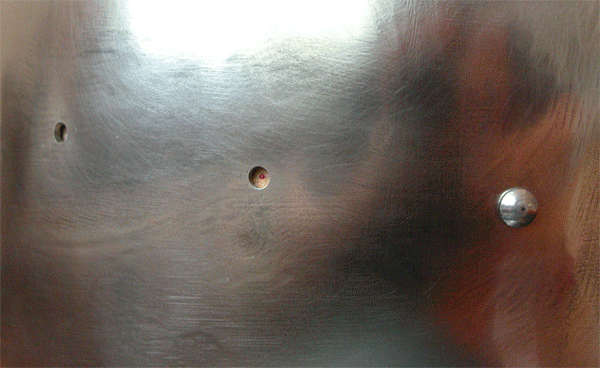
 Attachment: 47.1 KB
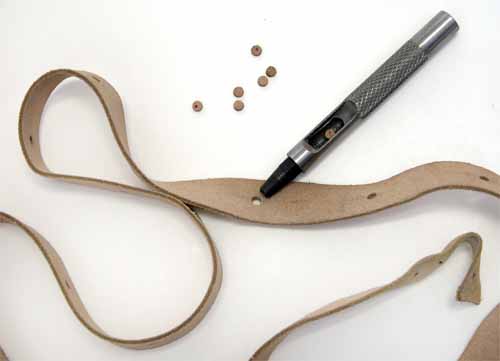
 Attachment: 45.08 KB
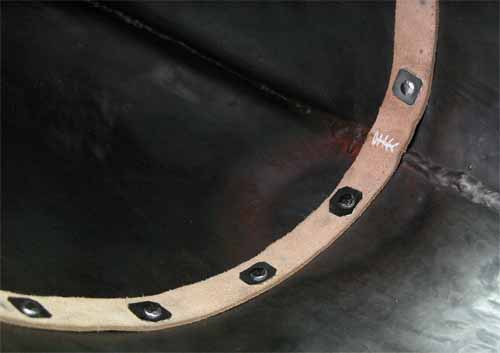
 Attachment: 43.18 KB
 Attachment: 69.48 KB


Last edited by Sean Flynt on Mon 03 May, 2010 10:27 am; edited 1 time in total
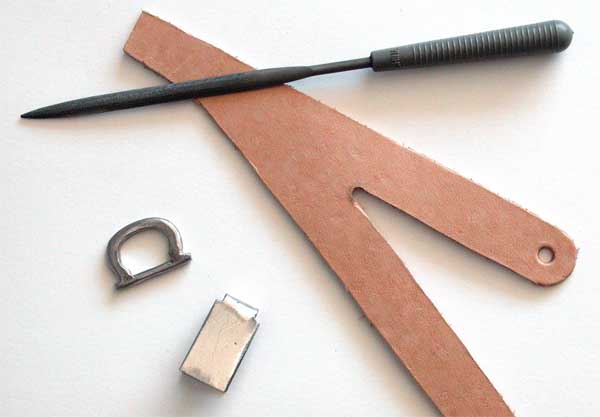
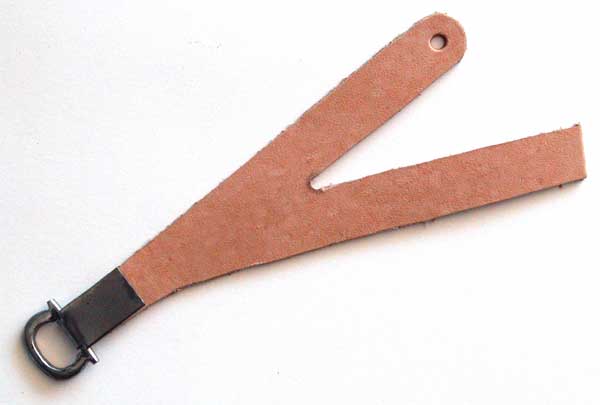
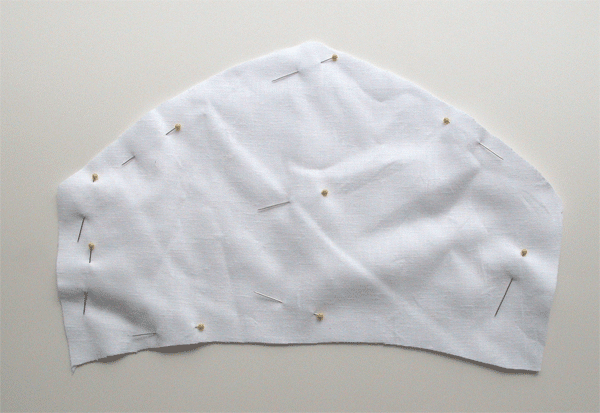
Forgot the washers and straps! Also, here's a shot of the bevor liner under construction--two layers pinned together. I sewed together three edges, turned the piece, inserted the cotton batting and folded in and and stitched the lower edge. Then I pinned through the piece in several places to hold the batting in place for quilting. I made the sallet liner the same way. See, it really isn't hard. :D
On the straps--note that one arm of the "Y" is left unfinished at this early stage. That's so I could temporarily install the straps, buckle under my chin and mark the correct position for the rear arm of the "Y". If you just install the straps without careful fitting they'll probably be uncomfortable and might not work properly.
 Attachment: 51.47 KB
 Attachment: 44.96 KB
 Attachment: 176.06 KB
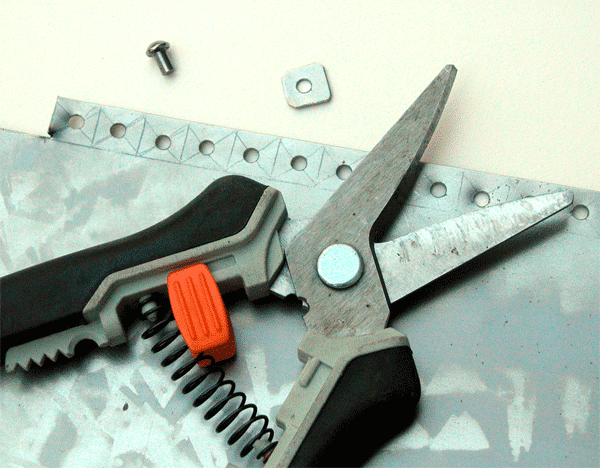
 Attachment: 152.9 KB
 Attachment: 85.99 KB
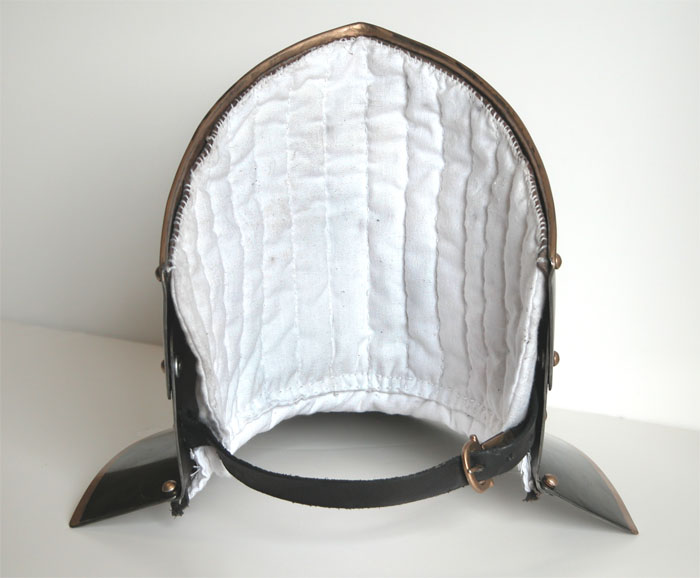
On the straps--note that one arm of the "Y" is left unfinished at this early stage. That's so I could temporarily install the straps, buckle under my chin and mark the correct position for the rear arm of the "Y". If you just install the straps without careful fitting they'll probably be uncomfortable and might not work properly.


Thanks for the pictures Sean. They're a tremendous help. I have a few questions if I may.
My helmet is being made by Francois L'Archeveque, and has a leather band already installed and pierced for sewing in the liner, so that is one task out of the way.
My first question is how thick should I make the cotton batting? Secondly, when measuring for the points, am I correct in thinking that I should measure from just above my ear to the center of my head and subtract a little so that the points don't quite meet? How do I make the round holes for the thong? And lastly, what material should I use for the thong?
Thanks for your help and patience,
Rick
| Rick M. wrote: |
| Thanks for the pictures Sean. They're a tremendous help. I have a few questions if I may.
My helmet is being made by Francois L'Archeveque, and has a leather band already installed and pierced for sewing in the liner, so that is one task out of the way. My first question is how thick should I make the cotton batting? Secondly, when measuring for the points, am I correct in thinking that I should measure from just above my ear to the center of my head and subtract a little so that the points don't quite meet? How do I make the round holes for the thong? And lastly, what material should I use for the thong? Thanks for your help and patience, Rick |
A sallet by Francois L'Archeveque deserves the best! With the lining band installed and pierced for stitching, all of the hard work is done :D I bought some good natural-colored linen for about $11 for a yard last week. I use "organic cotton batting" from the fabric store, too. That seems to be pretty close to what was used, historically. See this thread for discussion:
http://www.wolfeargent.com/cgi-bin/ultimatebb...p;t=000157
Note that Jeffrey Hedgecock recommends starting with 1" thickness of stuffing/batting to compress to .5" when quilted. Note, also, the discussion of extant liners in the Wallace Collection, with indirect testimony by curator David Edge.
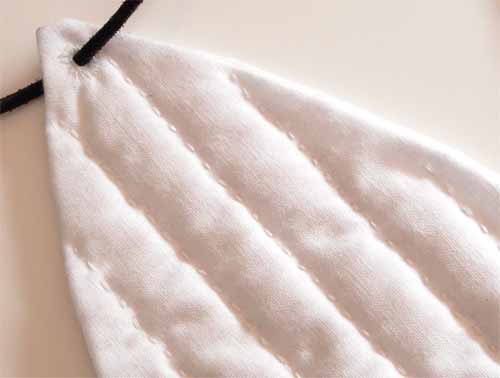
As for measuring--I did what you're describing--measuring from above the ear to top of head. I allowed too much material, though, so my peaks were too long. If that happens to you, just fold over the peaks to the outside and stitch the tips in place to create a channel through which you can run a thong. That's an historically correct option. I used eyelets made by pushing a pencil through the peaks and reinforcing the edges with stitching (see image below). I used a square-section leather thong but some surviving liners appear to have something more like a thin leather lace.
Well, you've convinced me to try it. The sallet should arrive by the end of June. I'll post how it goes. Wish me luck!
Thanks again,
Rick
Thanks again,
Rick
| Rick M. wrote: |
| Well, you've convinced me to try it. The sallet should arrive by the end of June. I'll post how it goes. Wish me luck!
Thanks again, Rick |
The worst that can happen is that you end up having to buy a liner. This way, you'll get some new skills and maybe save some money, too.
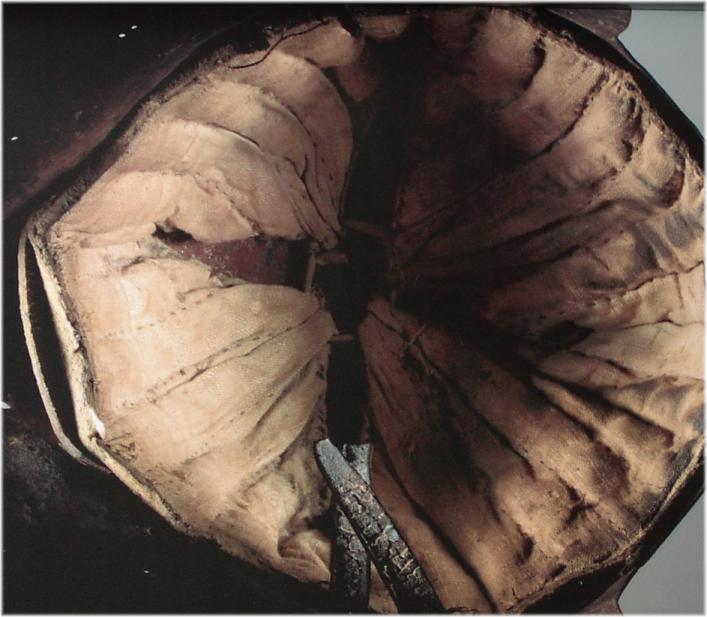
By the way, my stitched rows are too neat and close. I used tape as a guide and fell into a pattern of close stitches. Most of what you see on extant liners is "looser". Here's one from Churburg:
| Sean Flynt wrote: |
| Some shots from my first adventure in sallet lining (in step-by-step order, starting with using a center punch to mark the bowl for drilling). I'd do a few things differently now and everyone has to work according to their materials and aesthetic. Among other things, I'd use more padding. Cotton batting gets significantly compressed during the quilting. I'd use shorter peaks, too, and figure the seam allowances more carefully. A first attempt. Don't hesitate to ask questions. But this is the basic progression from bucket to helmet. :D |
Sean,
Will that type of liner work for a Spangen Helm and be SCA legal?.. I added so pictures of my helm.
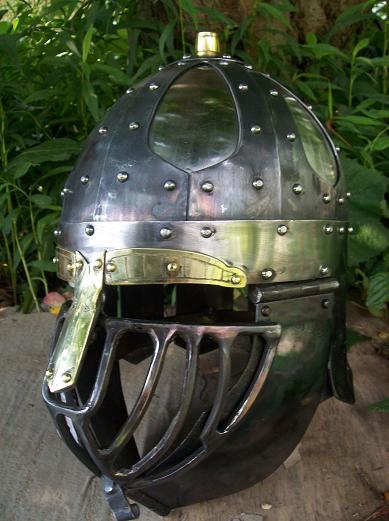
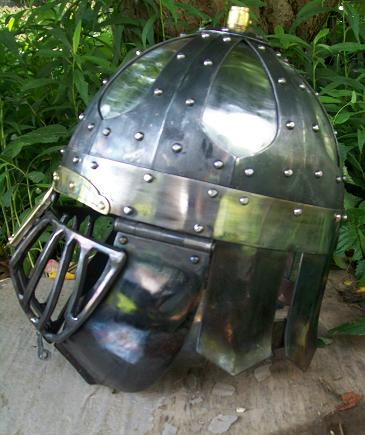
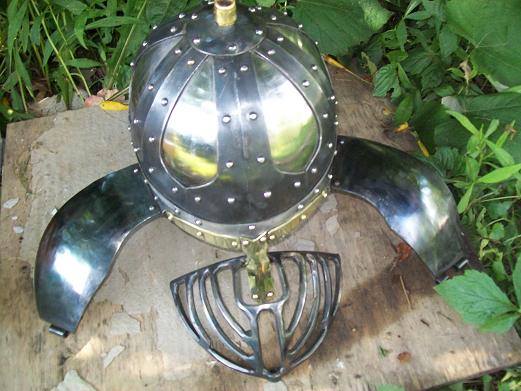
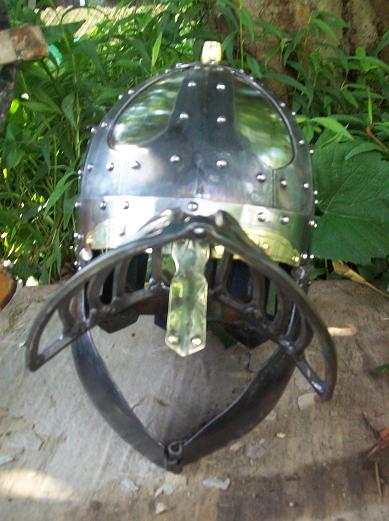
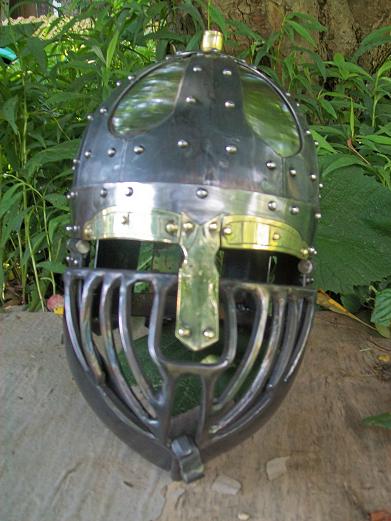
I am not a marshal so you might ask your first but I know loads of people in the SCA with a set up like this. Just need to meet the minimum thickness requirements.
RPM
RPM
Just follow Sean's instructions and make sure it's 0.5 inches thick. You may have to re-stuff after the padding compacts over time. Marshals in my region has been checking for this recently.
http://www.sca.org/officers/marshal/docs/marshal_handbook.pdf
| Quote: |
| 8. All parts of the helm that might cause injurious contact with the wearer’s head shall be padded with a minimum of ½ inch (12.7mm) of closed-cell foam or equivalent padding, or shall be suspended in such a way as to prevent contact with the wearer during combat. Similarly, parts of the inside of the helm that might come in contact with the wearer’s neck or body should be padded.
9. All helms shall be equipped with a chinstrap or equivalent means to prevent the helm from being dislodged or metal contacting the wearer’s face during combat. An equivalent might be, for example, a bevor or a chin-cup suspension system. A “snug fit” is NOT an equivalent. The chinstrap shall be at a minimum a ½ inch (12.7mm) in width and shall not be placed in the helm in a manner that could strangle the wearer. |
http://www.sca.org/officers/marshal/docs/marshal_handbook.pdf
I defer to the folks who know the SCA system. I will observe, though, that the method described above was tested and used in actual medieval combat, so I'm confident it could protect the wearer as well, IF other historical criteria are met--hardened steel bowl, proper fit, correct chinstrap placement, etc.
One aspect of helmet suspension is often overlooked and should be mentioned here: Historically, a soldier wearing a sallet and suspension as fancy as mine (and many of the classic German/North Italian sallets of ca.1475-1510) would most likely have shoulder-length hair gathered on top of his head in a decorative net, which to modern eyes makes him look like the Short-Order Cook From Hell. How much extra padding/protection does that hair provide? Is the helmet lined in accordance with the wearer's hairstyle? In theory, one could have a perfect reproduction of a fully-intact helmet and suspension and still not be quite up to spec for combat ca. 1500.
This effect is better understood, I think, where body armour is concerned. Most of us by now understand that a fine plate harness was supported by purpose-built undergarments that almost never survived. Historic Enterprises and others are doing wonderful work to understand and reconstruct the relationship between armour and clothing, but even they don't offer the cover which seems to have been ubiquitous on the heads of armoured Germans and Austrians. HE is in a unique position to research and create both an historical version and, perhaps, a version pre-padded with the equivalent of long hair so the stitch-counters in the living history community can get a better sense for how that garment and hair fashion influence the fit and function of helmets.
Dear Gentlemen,
Please correct me if I am being off topic, but I would like to ask your help about a question of my.
Great helms and bascinets are often seen together on effigies from the 14th century, the later on the knight or emperor, the previous lying next to Him. As I red, these helmets, the bascinet and the great helm on top of it were used together. I am planning to make a bascinet (Since there is plenty of room in my great helm :D ), but I don't know, what is going to stop the great helm from behaving like a bell, and waggling on the bascinet (and my head). Recently I found a picture of the effigy of Sir Reginald Cobham (please note the link), where the lining of the great helm was presented. It seems similar to the ones found in the sallets, and in other helmets.
There was somekind of chinstrap in the great helm to prevent the waggling? On earlier illustrations some kind of thin chord or lace could be observed. This might be the key?
Thank you for your time!
www.themcs.org/armour/knights/2006%20MCS%20Li...1%2006.jpg
Ps.: Sorry, just a nother question! The little additional plate with rivets on the bottom of the helmet form the Royal Armouries... That is the locking mechanism with the spring? Thank you again! :)
John
| Sean Flynt wrote: |
| One aspect of helmet suspension is often overlooked and should be mentioned here: Historically, a soldier wearing a sallet and suspension as fancy as mine (and many of the classic German/North Italian sallets of ca.1475-1510) would most likely have shoulder-length hair gathered on top of his head in a decorative net, which to modern eyes makes him look like the Short-Order Cook From Hell. How much extra padding/protection does that hair provide? Is the helmet lined in accordance with the wearer's hairstyle? |
Speaking from experience: I have waist-length hair, and it does make some difference under my sallet/s. However, hair compresses a lot - next time you see someone with long hair, fold it on top of their head and press down to their skull - the added protection is only a couple of mm. If anything, the benefit to me feels like the hair finds a natural place to settle (even when semi-constrained under one of Gwen/HE's 'German' scarves), and so fills out some irregularities in the fit of liners, etc., thus improving the helmet's fit marginally - rather than providing much extra padding.
At least, this is my experience with straight hair. Lots of the young men in Das Mittelalterlische Hausbuch seem to have long curly locks, which presumably would provide more 'bounce'.
| Sean Flynt wrote: |
| Historic Enterprises and others are doing wonderful work to understand and reconstruct the relationship between armour and clothing, but even they don't offer the cover which seems to have been ubiquitous on the heads of armoured Germans and Austrians. |
I was only just recently reviewing some of the few images showing these hair nets and wondering if anyone produced them today ... but then figured that, if they did, we'd probably already know about it! Perhaps it's time to give Gwen a curveball email! And, perhaps, Sean, you and I can start another thread capturing these images, so Gwen and others might have something to work from.
In the meantime, I wonder if I can experiment with a commercial hairnet with some braid sewn around the edge. Might not placate your 'thread counters', but would be interesting to experiment with in terms of 'performance' ...
(Edited to add: I've started a separate thread about hair nets here: http://www.myArmoury.com/talk/viewtopic.php?p=222373#222373)
Last edited by Mark T on Sat 21 May, 2011 11:12 pm; edited 2 times in total
Page 1 of 2
You cannot post new topics in this forumYou cannot reply to topics in this forum
You cannot edit your posts in this forum
You cannot delete your posts in this forum
You cannot vote in polls in this forum
You cannot attach files in this forum
You can download files in this forum
All contents © Copyright 2003-2006 myArmoury.com — All rights reserved
Discussion forums powered by phpBB © The phpBB Group
Switch to the Full-featured Version of the forum
Discussion forums powered by phpBB © The phpBB Group
Switch to the Full-featured Version of the forum