Info Favorites Register Log in
myArmoury.com Discussion Forums

Forum index Memberlist Usergroups Spotlight Topics Search
Forum Index > Historical Arms Talk > Hilting My MindelheimDIY Project Reply to topic
This is a standard topic Go to page 1, 2, 3  Next 
Author Message
Kirk Lee Spencer


Location: Texas
Joined: 24 Oct 2003

Spotlight topics: 6
Posts: 820

PostPosted: Tue 09 Mar, 2010 3:33 pm    Post subject: Hilting My Mindelheim         Reply with quote

Hi all...

I have a beautiful Mindelheim blade cast by Neil Burridge.


http://www.bronze-age-swords.com/


I have finally found enough time to write up some in progress pics. It is not an exacting recreation. I tried my best to make it look as authentic as possible on the surface, but beneath the surface I took a few short cuts. Also the wood I used is native to Texas but not Europe... but I really liked the figure.

Minor Blade Reshaping
Neil Burridge’s Mindelheim is a recreation of a particular Mindelheim type sword called the Kennemathen sword. It is a real beauty. However, I did make a few minor changes to the shoulders and tip profile.

The first image shows a picture of the Kennemathen sword with Neil's recreation next to it. The second image shows the changes I made to the hilt shape.

ks


 Attachment: 124.39 KB
07.KennemathenAndNeilsMindelhi.jpg


 Attachment: 132.66 KB
09.HiltChanges.jpg


Two swords
Lit in Eden’s flame
One of iron and one of ink
To place within a bloody hand
One of God or one of man
Our souls to one of
Two eternities
View user's profile Send private message
Kirk Lee Spencer


Location: Texas
Joined: 24 Oct 2003

Spotlight topics: 6
Posts: 820

PostPosted: Tue 09 Mar, 2010 3:43 pm    Post subject:         Reply with quote

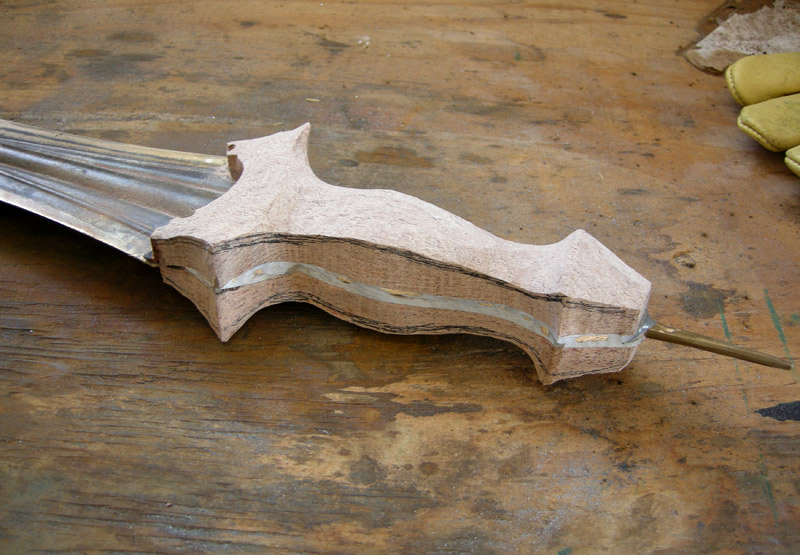
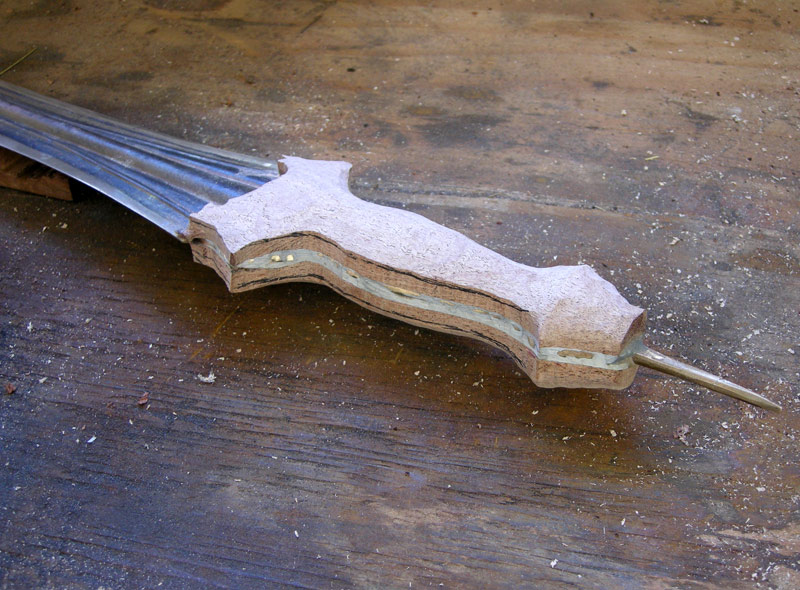
Roughing Out Grip Plates & Pommel
For the wood of the hilt, I decided to use a block of figured black mesquite that I have had for awhile. One side of the block was burl, the other side a tight figured “fiddle back” curl. At first I planned on using the burl side. I even cut out slabs and traced the shape of the grip. However, I knew I wanted to put a high polish on the wood and I kept thinking that the swirl pattern of the burl would look to much like my bowling ball. I might use these burled slabs later on a project where I can distress the wood by burning or sandblasting to create a topographic effect.

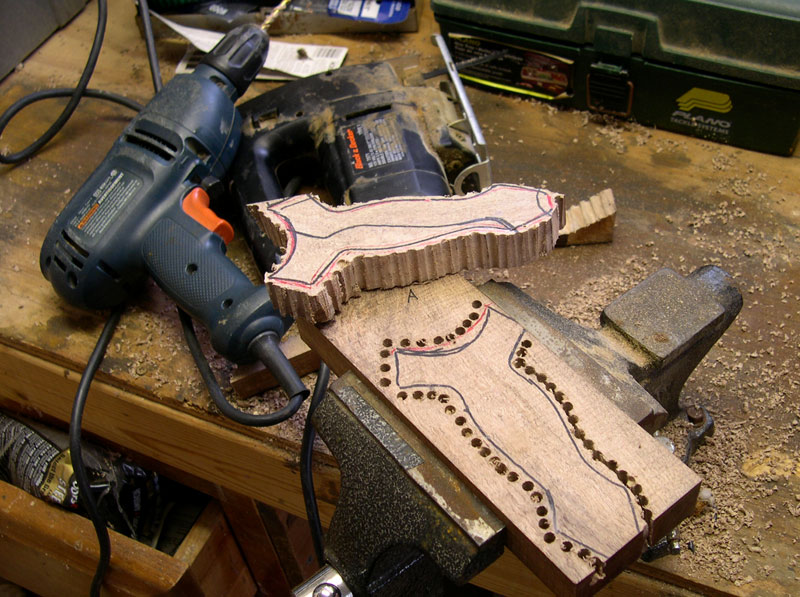
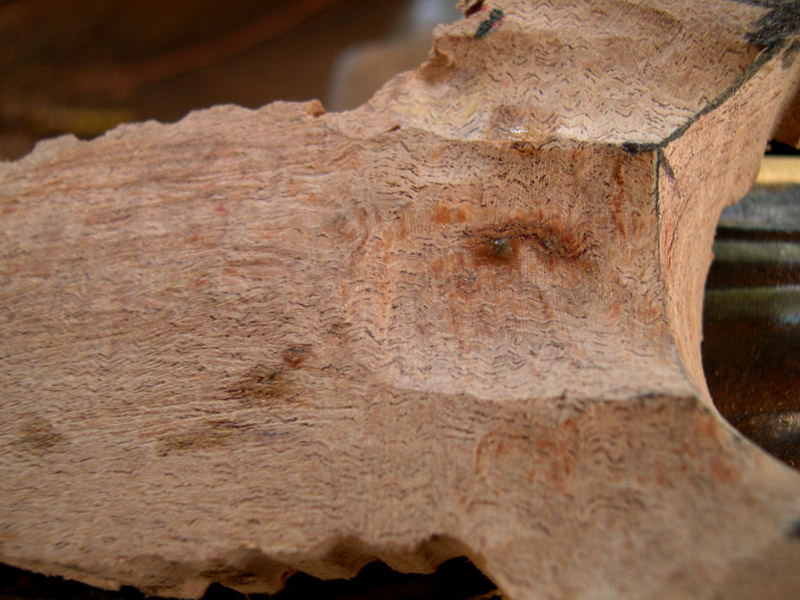
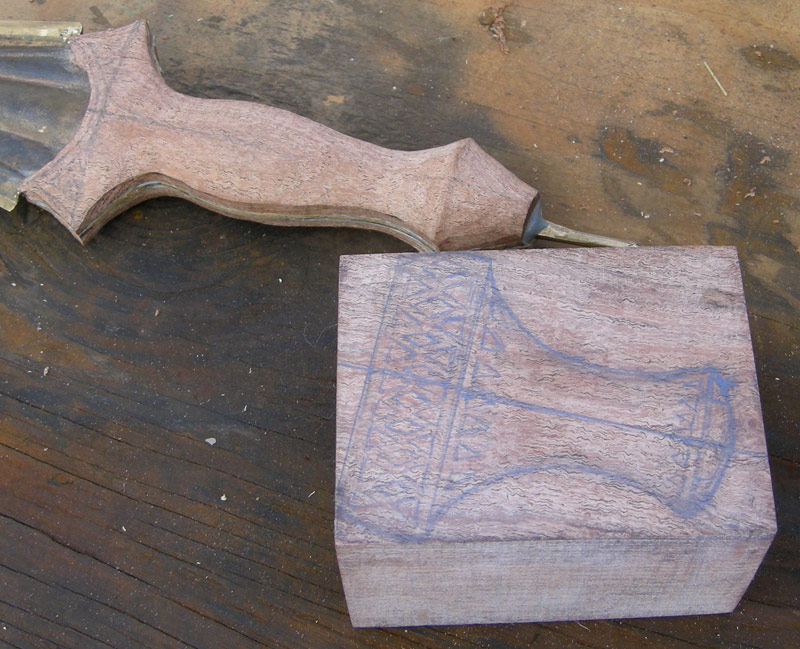
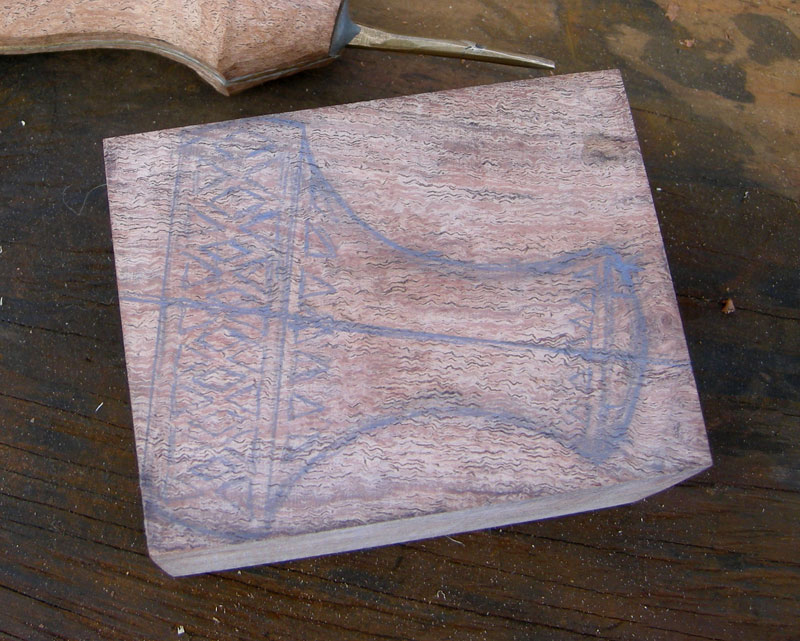
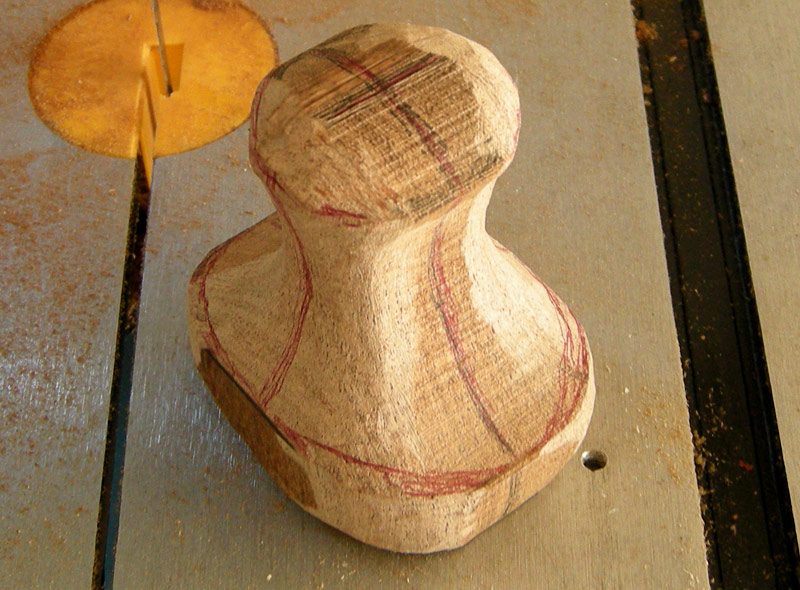
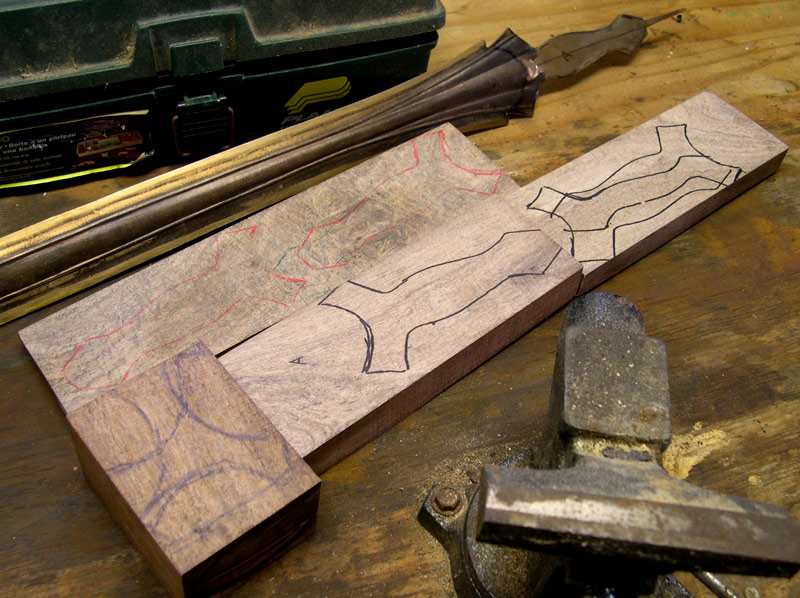
Looking closely at the figure of the Mesquite wood, I tried to determine which parts of the figure would look best for different parts of the hilt. I wanted to try and put the block in such a way that I could have the lines of the curl in the wood circle around the hilt, and especially the distinctive “Mexican Hat” pommels of this type of sword. At first I did not think it was going to be possible but with some minor adjustments to the width of the pommel (just about 2mm more narrow than the smallest pommel I could find measurements for) and allowing for some of the burl to appear on one of the grip plates, I could get what I wanted out of the block. I drew the shape of the grip plates and pommel on the outside of the block. I then drilled holes around the perimeter of the grip plates and took my jig saw and cut through the holes. (My wife bought me a bandsaw for Christmas about two months after this and so cutting out the pommel was a joy… hurrah for bandsaws.)

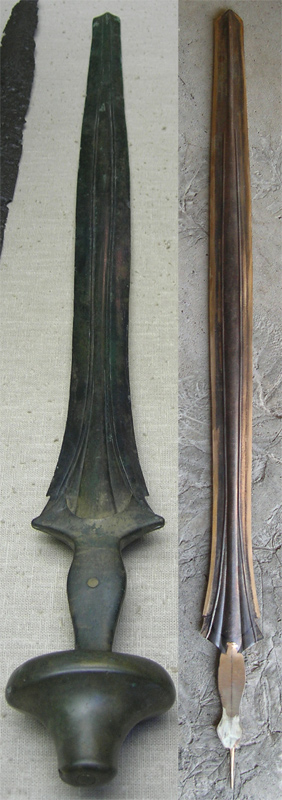
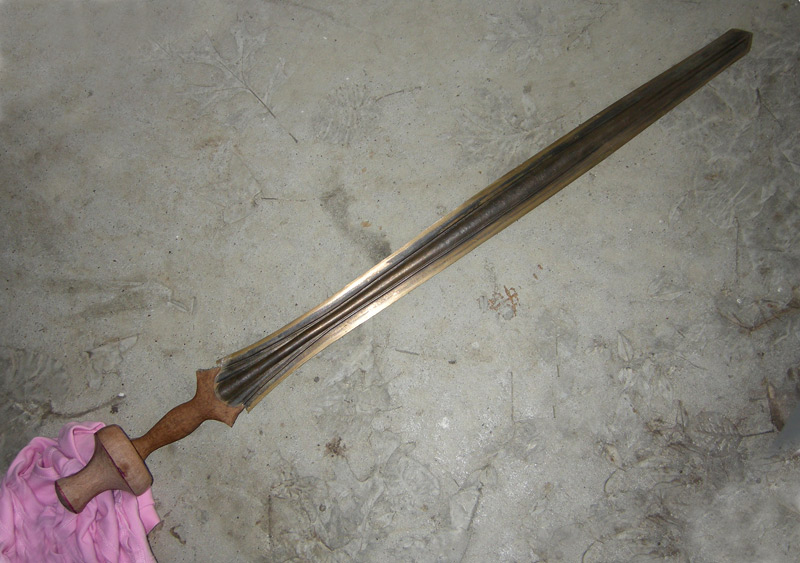
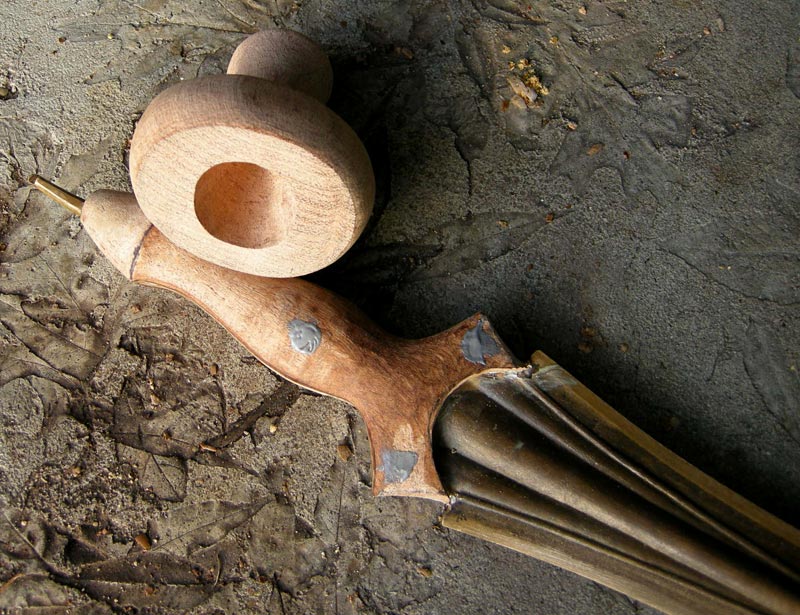
[Just a note: I wanted to add that Neil was kind enough to agree to send me the Mindelhiem as cast with no finishing on the blade. This will show you the quality of his casting, but I did not want anyone to think that the blade as you see it here is the way Neil sends them out. No. I have a Limehouse blade that Neil sent to me finished and it is simply fantastic... much better than I could do myself.]


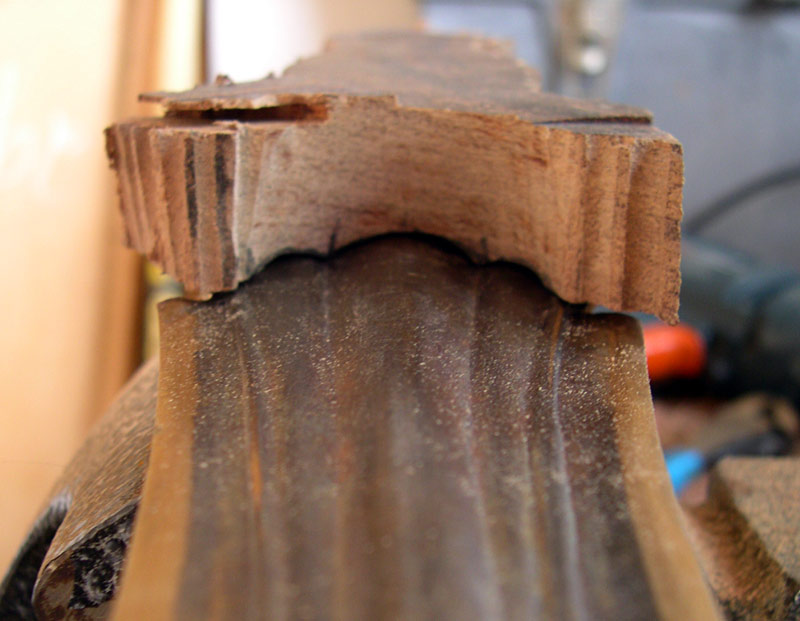
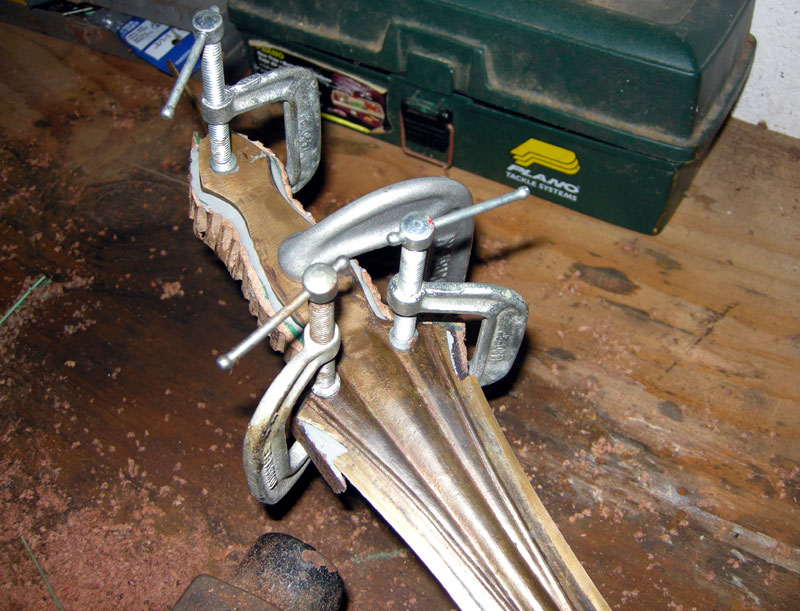
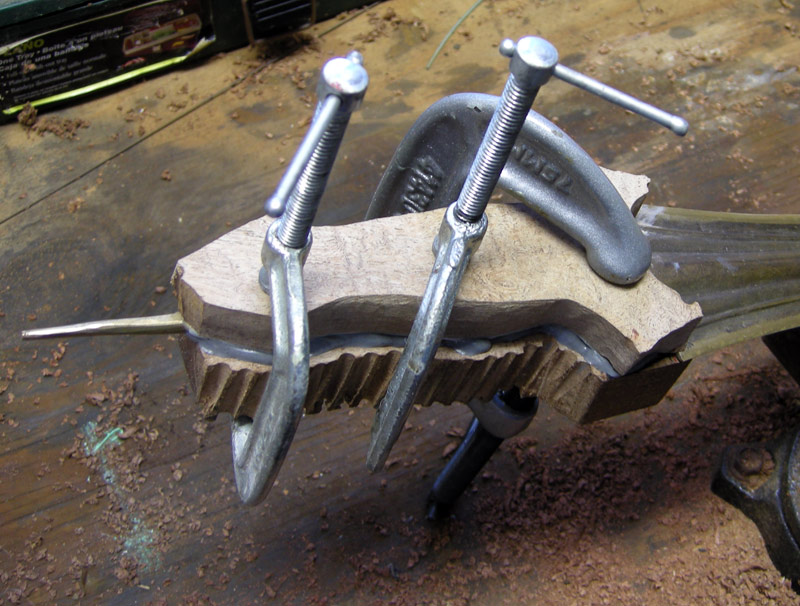
The image is of the cut outs of the block of black mesquite on my miter saw... what I used BBS (before the bandsaw).

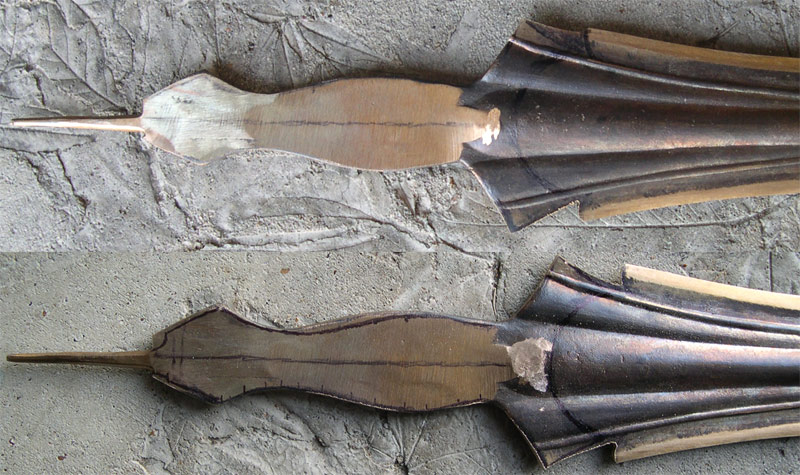
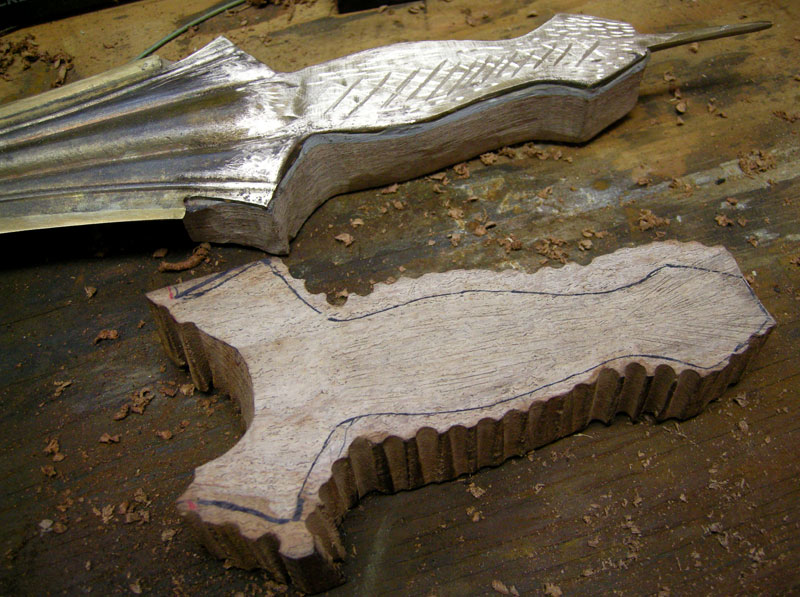
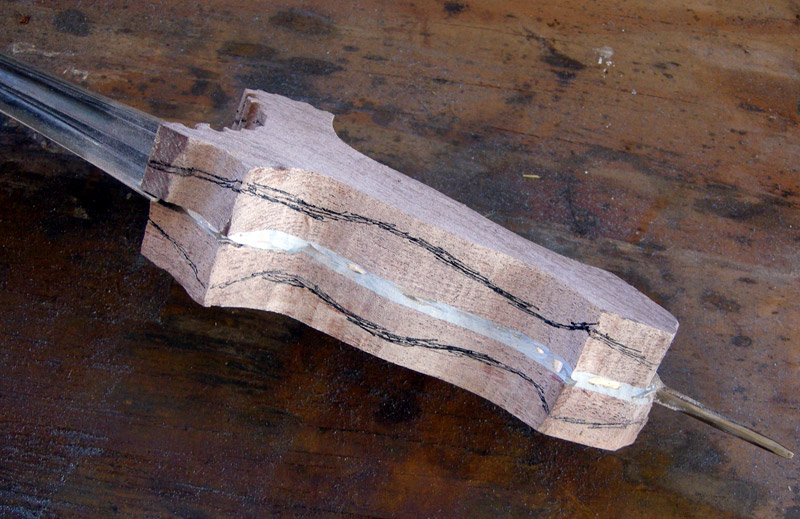
The second image shows the tracing of the grip shape to try and align the figure with the shape of the hilt as best I could.

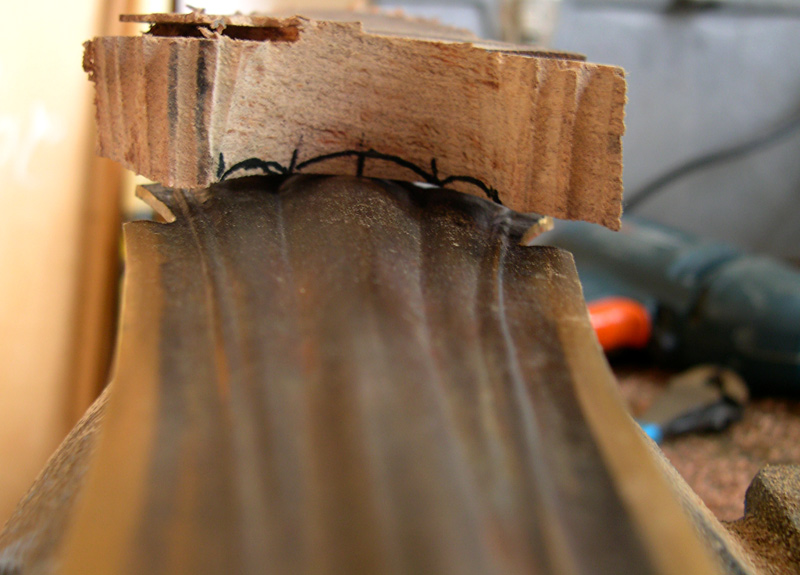
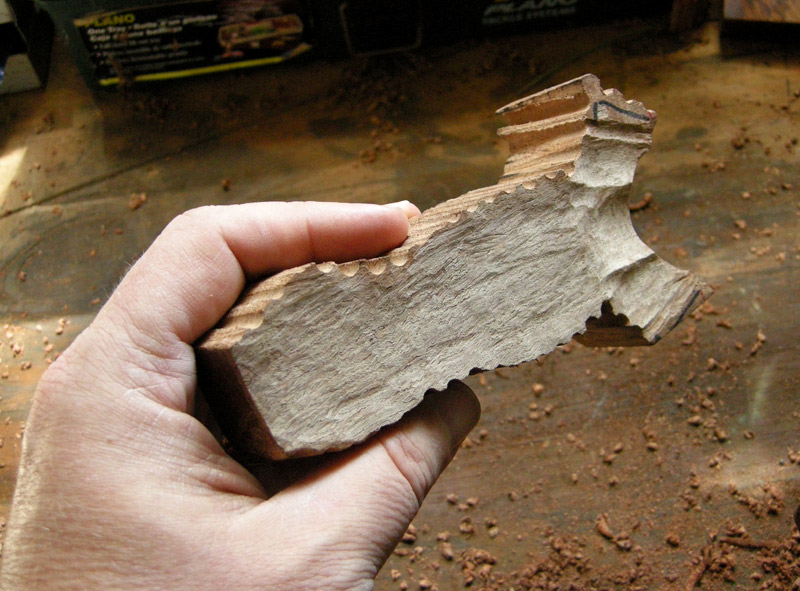
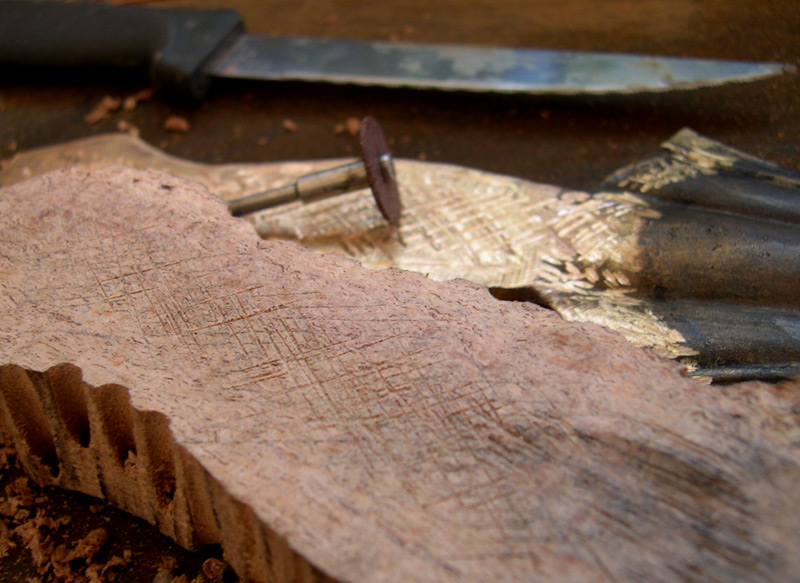
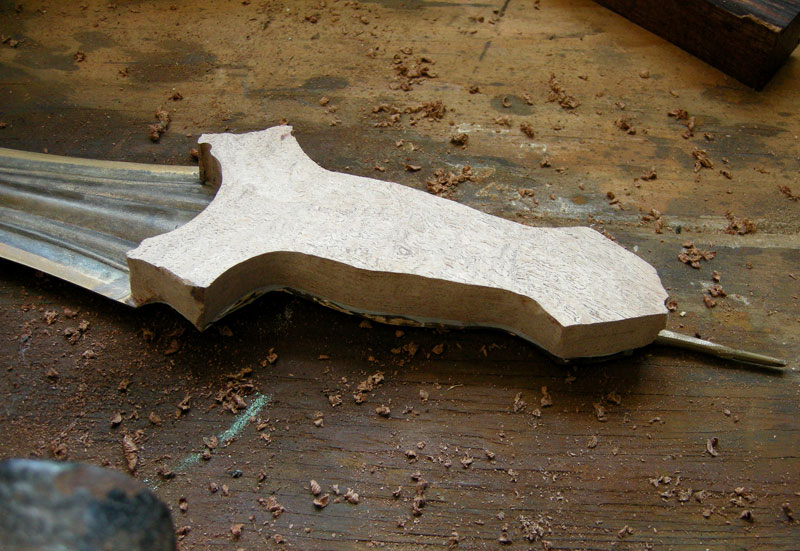
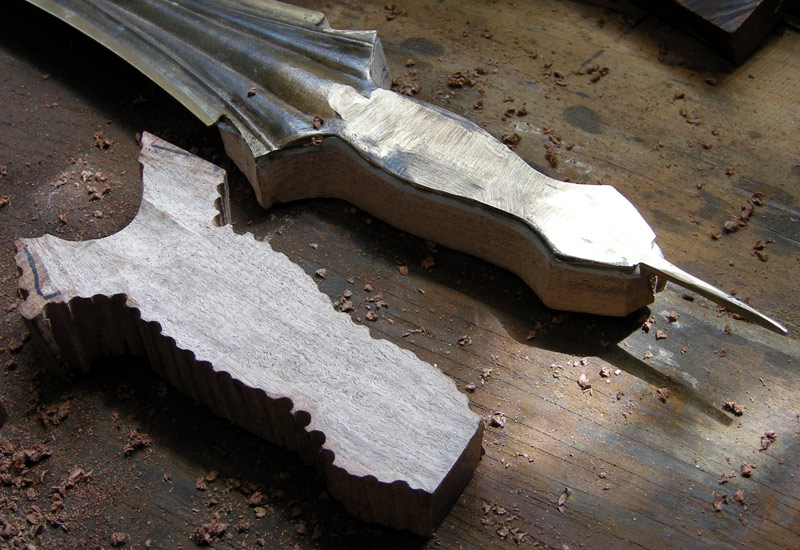
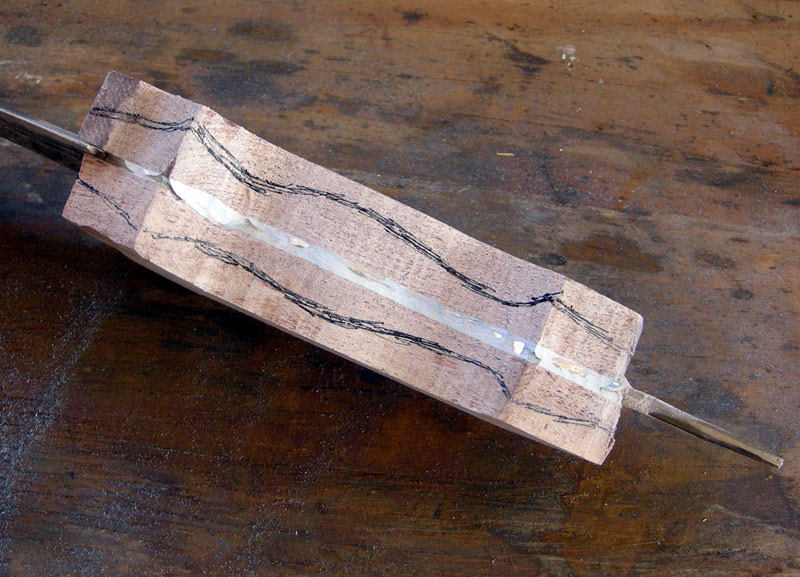
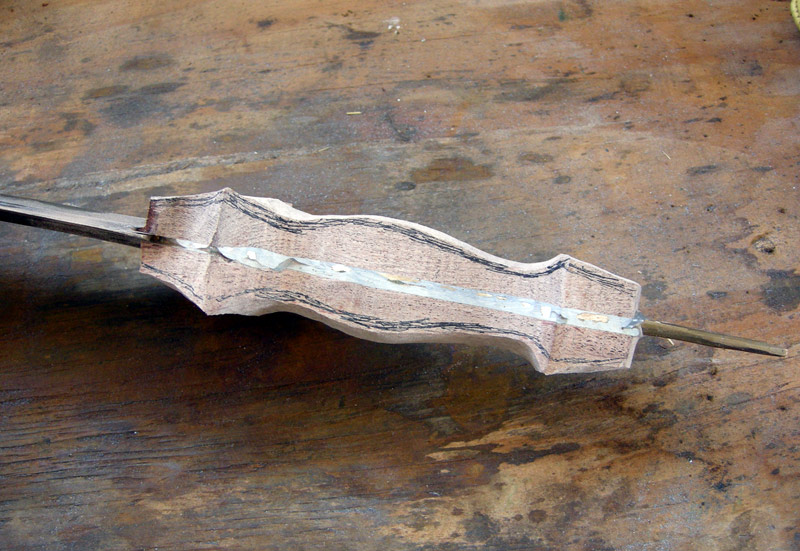
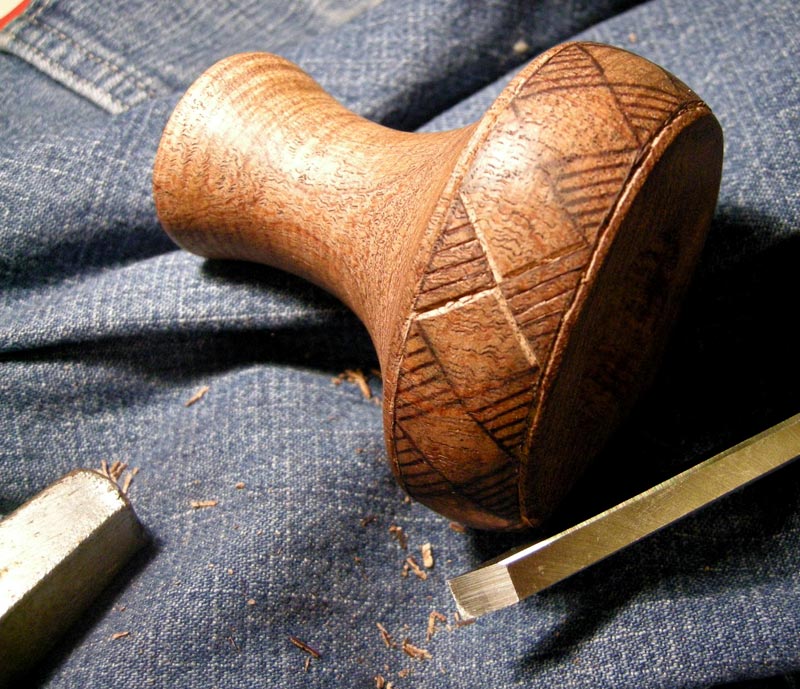
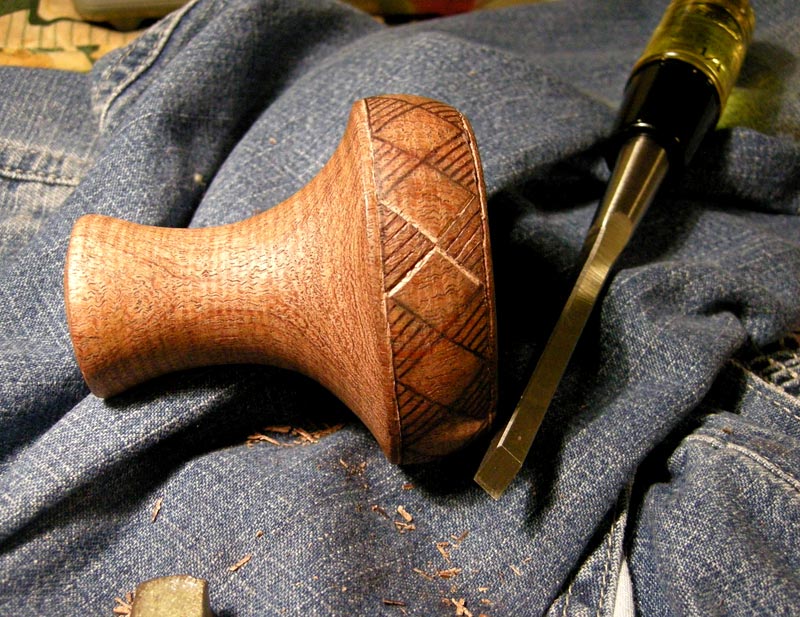
The third image shows how I roughed out the grip plates BBS.


ks


 Attachment: 146.27 KB
15.CuttingBlockOfBlackMesqu.jpg


 Attachment: 139.8 KB
19.BlackMesquiteSlabsWithGr.jpg


 Attachment: 141.9 KB
22.CuttingOutGripScalesBefo.jpg


Two swords
Lit in Eden’s flame
One of iron and one of ink
To place within a bloody hand
One of God or one of man
Our souls to one of
Two eternities
View user's profile Send private message
Gregory J. Liebau


Location: Dinuba, CA
Joined: 27 Nov 2004

Posts: 669

PostPosted: Tue 09 Mar, 2010 6:50 pm    Post subject:         Reply with quote

Lookin' good, Kirk. One question... Why on earth haven't you ever registered over at the Bronze Age Center? Your work would be very appreciated on display to the community over there, I'm sure!

-Gregory

My Flickr Galleries - Travel, Nature & Things
View user's profile Send private message
Ken Speed


Joined: 09 Oct 2006

Posts: 656

PostPosted: Wed 10 Mar, 2010 4:12 am    Post subject:         Reply with quote

Nice work Kirk! It will be interesting to see your progress on this project.
View user's profile Send private message
Kirk Lee Spencer


Location: Texas
Joined: 24 Oct 2003

Spotlight topics: 6
Posts: 820

PostPosted: Wed 10 Mar, 2010 7:06 am    Post subject:         Reply with quote

Hey Gregory...

I stop by the Bronze Age Center from time to time. The reason I don't interact, is simply lack of time. I really wish I had more time to post my stuff. I know many of the members there from other fora and it is a good group of bronze age researchers and lots of great information.

Ken... Thanks.

I have some more pictures to show how I shaped the hilt plates fit onto such a complex blade.

Fitting the Hilt Plates
Mindelheim blades often have beading and groves along the blade which is really beautiful, however where it connects to the hilt or grip plates requires a little carving work to get a tight fit. As you can see from the pictures, the grip plate material was left extremely rough on the outsides. All this material would be cut away when the grip was shaped after these blocks of wood were epoxied to the grip tang. The part of the grip plate touching the grip tang was sanded smooth and flat. I traced out the grip shape on the grip plate to use to orient the wood with the lines of curl in the figure flowing directly across the grip. I labeled the grip and the block used for that side with and “A” on one side and “B” on the other. This help me keep track of which block went with which side. With the grip plate held in place within the sharpie tracings I marked where each of the channels in the blade beading connected with the front of the grip plate. Using these marks as a guide I then traced out the shape of the beading to use as a guide as I carved the grip plate to fit over the contours in the blade forte.

ks


 Attachment: 144.07 KB
31.MarkingBeadingOnGripPlat.jpg


 Attachment: 80.94 KB
33.GripPlateCutForBeading.jpg


Two swords
Lit in Eden’s flame
One of iron and one of ink
To place within a bloody hand
One of God or one of man
Our souls to one of
Two eternities
View user's profile Send private message
Kirk Lee Spencer


Location: Texas
Joined: 24 Oct 2003

Spotlight topics: 6
Posts: 820

PostPosted: Wed 10 Mar, 2010 7:17 am    Post subject:         Reply with quote

Fitting Grip Plates to Grip Tang
I wanted to make sure that the grip plates of wood fit closely to the bronze grip tang. The problem is that it was difficult to tell where contact was being made and where wood needed to be removed. At first I used saliva (yuck) on the grip tang which would show the high areas by getting the wood “slimmed” where it touched when the grip plate was placed on the grip tang. I could then grind out the wet areas. Ironic that archeologists call this type of sword a grip “tongue” sword. I discovered that bronze taste horrible… So I just got a wet cloth to wet the tang. This alternative was adequate to help me find the high points and get a tighter fit. I used the course sanding drum on my drummel to shape the grip plates.

ks


 Attachment: 139.77 KB
35.SalivaMarking.jpg


Two swords
Lit in Eden’s flame
One of iron and one of ink
To place within a bloody hand
One of God or one of man
Our souls to one of
Two eternities
View user's profile Send private message
Kirk Lee Spencer


Location: Texas
Joined: 24 Oct 2003

Spotlight topics: 6
Posts: 820

PostPosted: Wed 10 Mar, 2010 8:24 am    Post subject:         Reply with quote

Attaching the Grip Plates
Much Bronze Age brain power was spent on how to keep the grip plates and pommel secured to the hilt. They used rivets in the blade base, then grip tangs with rivets, then grip tangs with flanges and rivets, then grip tangs, rivets and pommel tangs, then grip tangs, with rivets and pommel tangs with rivets… and finally the Mindelheim with a grip tang with rivets, a pommel tang with rivet and a pommel spike through the pommel and peened over a bronze block on top of the pommel (a possible precursor to the through the grip rod tangs peened over the pommel which would dominate the history of the sword.
I don’t have to worry about this because I have J.B. Weld. It is my modern day cutler’s resin. If done right it will give me a really tight and shock resistant bond. My main concern was that the JB Weld epoxy would be too thin between the wood and bronze and with not have enough surface area to get a good bind. So the part of the grip plate that would be in the center of the grip was hollowed out (to increase the epoxy thickness) and a serrated knife was used to make deep hatch marks across the surface (for more surface area). To increase the surface area of the grip tang, a cutoff wheel on my Dremmel tool was used to make shallow hatching in the bronze. To help in aligning the grip tang to the grip plates, I retraced the grip tang on to the wooden grip plate with a sharpie and then another line about a quarter inch outside of this one incase the epoxy obscured the line. Then the epoxy is applied generously and forced down into the hatching, using a toothpick to rake out air bubbles and make sure the epoxy settles into the hatching. Then the tough part of getting the clamps on and in the right place making sure the grip tang lines up with the sharpie lines on the grip plate. This was made a little easier because of the work of carving the grip plate to fit the grooves in the blade forte. These grooves pulled the plates into rough alignment. Once everything was in place and clamped, I set it all assign to set up and cure for a few days.

ks


 Attachment: 147.37 KB
36.GripPlateCarvedToFitWith.jpg


 Attachment: 143.19 KB
40.RoughedGripPlateForBette.jpg


 Attachment: 134.45 KB
42.GripPlateEpoxied&Clamped.jpg


Two swords
Lit in Eden’s flame
One of iron and one of ink
To place within a bloody hand
One of God or one of man
Our souls to one of
Two eternities
View user's profile Send private message
Kirk Lee Spencer


Location: Texas
Joined: 24 Oct 2003

Spotlight topics: 6
Posts: 820

PostPosted: Wed 10 Mar, 2010 8:29 am    Post subject:         Reply with quote

Doing the Other Side
Once the clamps are removed, I took the coarse sanding drum on my drummel and cut away all the wood along the edges until the bronze of the edge of the grip tang began to show through the epoxy squeeze-out along the edges. The other grip plate was then hatched and attached to the other side of the grip tang using the same procedure.

ks


 Attachment: 127.63 KB
43.GripPlateCutToEdgeOfGrip.jpg


 Attachment: 137.99 KB
45.SecondGripPlate...jpg


 Attachment: 136.56 KB
47.SecondGripPlateShaped.jpg


 Attachment: 133.36 KB
50.GripPlatesClampedTogethe.jpg


Two swords
Lit in Eden’s flame
One of iron and one of ink
To place within a bloody hand
One of God or one of man
Our souls to one of
Two eternities
View user's profile Send private message
Maurizio D'Angelo


Location: Italy
Joined: 09 Feb 2009
Likes: 3 pages
Reading list: 3 books

Posts: 649

PostPosted: Wed 10 Mar, 2010 10:50 am    Post subject:         Reply with quote

Ciao Kirk,
yesterday I gave my opinion, then I deleted the post.
I thought the blade was made of wood. Then I read better. Cool

But what I see is excellent. I am pleasantly surprised. Eek!
I think epoxy glue will be strong for the grip, I do not think problems.
Few hand tools, great project.
I ask in the central width and length of the blade, do not need much precision, just an idea. possible?

Ciao
Maurizio
View user's profile Send private message Send e-mail
Kirk Lee Spencer


Location: Texas
Joined: 24 Oct 2003

Spotlight topics: 6
Posts: 820

PostPosted: Thu 11 Mar, 2010 6:37 am    Post subject:         Reply with quote

Shaping the Grip
After a couple of days of setting up, the grip plates are secure. At this point the grip can be shaped as if it was one solid piece. In shaping the grip, I first used the coarse sanding drum on the dremmel to grind away the wood and epoxy on each side of the grip squaring it up until the bronze of the edge of the grip tang began to show. Once I had this flat plane on either side, the rough profile of the grip shape (the grip viewed from the side) was drawn onto this flat surface to use as a guide. Using the coarse drum sanding bit on the dremmel the wood on the surface of the grip plates was ground down to the guide line. I made sure to leave the grip “overbuilt” so that I could make adjustments once I saw how the volumes were working and how the grip felt in hand. It is interesting to me that the shape of sword grips on original finds really begin to make sense once you feel how they feel in your hand. After the profile was ground to shape, I took the sharpie and drew a line parallel to the edge of the tang. I wanted the grip to have the sculptural quality of another line on the edge of the grip rather than just curving the grip shape into the tang sides.

ks


 Attachment: 146.86 KB
52.GuideLinesForProfileShap.jpg


 Attachment: 138.99 KB
53.ProfileGuideLinesOnSideO.jpg


 Attachment: 146.93 KB
54.CarvedToGripProfileLines.jpg


 Attachment: 147.26 KB
55.CarvedToProfileLines.jpg


 Attachment: 147.08 KB
56.CarveToSculptureLine.jpg


 Attachment: 146.14 KB
57.GripRough..jpg


Two swords
Lit in Eden’s flame
One of iron and one of ink
To place within a bloody hand
One of God or one of man
Our souls to one of
Two eternities


Last edited by Kirk Lee Spencer on Sun 14 Mar, 2010 12:29 pm; edited 1 time in total
View user's profile Send private message
Kirk Lee Spencer


Location: Texas
Joined: 24 Oct 2003

Spotlight topics: 6
Posts: 820

PostPosted: Fri 12 Mar, 2010 7:20 am    Post subject:         Reply with quote

The Pommel
When working with the original block of black mesquite I tried to find the part with the best curl for the pommel. I wanted to get the curl aligned across the pommel, hoping to produce concentric rings of figure circling the pommel—to do this I would have to cut the pommel out at an angle. The pommel shape was drawn onto the surface of the block. I also drew the type of decoration I was considering to make sure that the proportions would work and look natural. I used my new band saw to cut out the pommel outline drawn on the block of Mesquite. Once it was roughed out, center lines were drawn on the front and sides to try and keep all the shaping straight and symmetrical. Also the circle shape at the top and bottom of the pommel were drawn on the cutout to make sure that I knew where to stop when grinding to get a nice rounded edge. Much of the wood along the corners and edges was cut down with a belt sander I have. Then shaping was done with coarse sanding drums on the dremmel, redrawing the guidelines when necessary. Eventually I achieved the shape that I wanted for the “Mexican-Hat” like pommel.

ks


 Attachment: 145.43 KB
58.PommelDrawn..jpg


 Attachment: 143.03 KB
59.PommelDrawnClose.jpg


 Attachment: 132.51 KB
60.PommelCarving.jpg


 Attachment: 143.41 KB
62.Medelheim.WithPom.jpg


Two swords
Lit in Eden’s flame
One of iron and one of ink
To place within a bloody hand
One of God or one of man
Our souls to one of
Two eternities
View user's profile Send private message
Jeroen Zuiderwijk
Industry Professional


Location: Netherlands
Joined: 11 Mar 2005

Spotlight topics: 2
Posts: 740

PostPosted: Fri 12 Mar, 2010 1:40 pm    Post subject:         Reply with quote

Looking great Kirk! You've got the shape down pretty good. Just one comment, I see you've made the lower sides of the shoulders follow the metal on the side. In original grips, these lines are more inwards then the metal, which places the tips of the angle at the first rib or even more inwards. A bit difficult explain in words, but you can see it in these examples:


Most noticable on the Kemmathen sword:


Jeroen Zuiderwijk
- Bronze age living history in the Netherlands
- Barbarian metalworking
- Museum photos
- Zip-file with information about saxes
View user's profile Send private message Visit poster's website
Kirk Lee Spencer


Location: Texas
Joined: 24 Oct 2003

Spotlight topics: 6
Posts: 820

PostPosted: Sat 13 Mar, 2010 1:44 pm    Post subject:         Reply with quote

Hi Jeroen...

I know what you mean. Almost every Mindelheim I have seen which shows where the hilt plates extend to the shoulders shows this feature--The bronze edge of the forte of the blade is exposed in the shoulders.

This is where the artist in me begins to override the historian. To me it just does not look right. I have reached a compromise which is not visible in the last picture. I have created a sculpural line in the top of the grip plate that follows what would be the edge of the grip plate and then cut the sides of the grip plate in a concave down to the forte edge. While this is not completely acurate for the majority of the Mindelhiem finds, it is not beyond reason . I have posted pictures which show the grip plates coming very close, if not to, the edge of the forte. Even the picture of the Oss sword, before it was conserved seems to show the grip plate coming very close to the edge of the forte. I have posted pictures of these swords and a picture of my Mindelheim showing the compromise.

take care

ks


 Attachment: 143.29 KB
MindelheimGripToShoulder.jpg


 Attachment: 148.02 KB
Shoulders..jpg


Two swords
Lit in Eden’s flame
One of iron and one of ink
To place within a bloody hand
One of God or one of man
Our souls to one of
Two eternities
View user's profile Send private message
Kirk Lee Spencer


Location: Texas
Joined: 24 Oct 2003

Spotlight topics: 6
Posts: 820

PostPosted: Sun 14 Mar, 2010 12:00 pm    Post subject:         Reply with quote

Maurizio D'Angelo wrote:
Ciao Kirk,
yesterday I gave my opinion, then I deleted the post.
I thought the blade was made of wood. Then I read better. Cool

But what I see is excellent. I am pleasantly surprised. Eek!
I think epoxy glue will be strong for the grip, I do not think problems.
Few hand tools, great project.
I ask in the central width and length of the blade, do not need much precision, just an idea. possible?


Hi Maurizio,

Somehow I missed seeing your post. Sorry Worried

The blade at the shoulders is 62mm. The widest part of the leaf section of the blade is 45mm (at the cop).

Total total length of the blade with pommel is 85cm (33.5 inches.)

take care

ks

Two swords
Lit in Eden’s flame
One of iron and one of ink
To place within a bloody hand
One of God or one of man
Our souls to one of
Two eternities
View user's profile Send private message
Gregory J. Liebau


Location: Dinuba, CA
Joined: 27 Nov 2004

Posts: 669

PostPosted: Sun 14 Mar, 2010 12:24 pm    Post subject:         Reply with quote

Judging from the last picture you posted, Kirk, the pommel carving looks pretty detailed already and the hilt is finished! Where are the progress pics!?
My Flickr Galleries - Travel, Nature & Things
View user's profile Send private message
Kirk Lee Spencer


Location: Texas
Joined: 24 Oct 2003

Spotlight topics: 6
Posts: 820

PostPosted: Sun 14 Mar, 2010 12:42 pm    Post subject:         Reply with quote

Yeah... I've been working on it off and on for over a year now and it has been finished for about four months now. I took pictures during the process and wanted to write it all up and post it at one time as usual. However I have been so busy that I have not had time... and it looks like it was going to be even longer. So I thought I would go ahead and get some of the pictures up and this would force me to go ahead and get the others done.

Sorry for the suspense... Happy

ks

Two swords
Lit in Eden’s flame
One of iron and one of ink
To place within a bloody hand
One of God or one of man
Our souls to one of
Two eternities
View user's profile Send private message
Kirk Lee Spencer


Location: Texas
Joined: 24 Oct 2003

Spotlight topics: 6
Posts: 820

PostPosted: Sun 14 Mar, 2010 12:50 pm    Post subject:         Reply with quote

Rivet Pins and Pommel Hole
Although the grip plates were epoxied to the tang and were not going anywhere (I have tried to remove wooden plates from tangs before once epoxied and I had to grind them off.) But just to be sure the grip plates would not come off if they broke loose from the grip tang at the exact same time as the pommel came loose so that the sword would fly out of my hand, I pinned the grip to the tang. There was something below the surface akin to a rivet. I marked the surface of the grip where the rivets are on most Mindelheim swords. At these locations, I drilled holes through the finished grip plates on one side and through the bronze of the grip tang and a little ways into the wood of the grip plate on the other side. I then took a finishing nail and roughed up the sides to increase the surface area. Epoxy was then put into the hole and around the nail and pushed it all the way to the bottom of the hole. I made sure that the nail pin was short enough that the top of the pin was about 3-4 mm below the surface of the grip. This is to make room for the fake bronze rivet heads I would put in later. The epoxy pushed out onto the grip. I left it because it was all going to be ground off anyway. The expoxied pins were allowed to set and provide cross-binding through the tang for added security.

I also began cutting the hole in the bottom of the pommel so that it would attach securely to the grip. To do this, I measured from all sides of the bottom of the pommel to find the exact middle of the pommel bottom. Then on my drill press I drilled a pilot hole and then used successively larger bits with each one I drilled more and more shallow to produce a rough cone shape. Then using a wood cutting bit on the dremmel, the inside of this cone was shaped to match the pommel tab extension at the end of the grip. Again I used water on the pommel tab extension of the grip to find the high areas inside the pommel hole. Wetting the pommel tang area of the grip and sliding it gently into the pommel. Where it touched became wet. I then took a sharpie and drew a circle around the wet areas. I did this because the wet areas would dry quickly also the saw dust from grinding covered the wet areas. These sharpie circles were ground away and the wetting process repeated. Bit by bit I was able to get a nice secure fit (all wasted time as we will find out later.)

ks


 Attachment: 134.34 KB
64.Hilt&Pommel.WithPinHolesDrilled.jpg


Two swords
Lit in Eden’s flame
One of iron and one of ink
To place within a bloody hand
One of God or one of man
Our souls to one of
Two eternities
View user's profile Send private message
Gregory J. Liebau


Location: Dinuba, CA
Joined: 27 Nov 2004

Posts: 669

PostPosted: Sun 14 Mar, 2010 1:03 pm    Post subject:         Reply with quote

Quote:
Yeah... I've been working on it off and on for over a year now and it has been finished for about four months now... Sorry for the suspense...


Ah, you evil man! Well, can't wait to see the pictures of the finished product, then. Hope you've been enjoying it. Big Grin

My Flickr Galleries - Travel, Nature & Things
View user's profile Send private message
Kirk Lee Spencer


Location: Texas
Joined: 24 Oct 2003

Spotlight topics: 6
Posts: 820

PostPosted: Sun 14 Mar, 2010 1:08 pm    Post subject:         Reply with quote

Amber Inlays?
Off and on I toyed with the idea of doing amber inlays in the pommel. There are some magnificent examples of ivory pommels covered with diamond shaped amber inlays. Whenever I checked the price of amber, even when you can find good pieces, I quickly lost all desire for amber inlay. For awhile I considered using some of the synthetic amber, but , in the end, did not feel like using synthetics. Most of the bronze pommels that survive, at least the ones I have seen, have diamond shaped designs on the outer perimeter of the pommel. So I settled for trying my hand at carving these into the wood. Interestingly, when I was finishing the black mesquite wood at the end of this project and applied the boiled linseed oil the wood turned to a beautiful “amber” color.

ks


 Attachment: 24.53 KB
65.HaC.HatPomIvoryGrip&PomAmberIronBlade7th.jpg


Two swords
Lit in Eden’s flame
One of iron and one of ink
To place within a bloody hand
One of God or one of man
Our souls to one of
Two eternities
View user's profile Send private message
Kirk Lee Spencer


Location: Texas
Joined: 24 Oct 2003

Spotlight topics: 6
Posts: 820

PostPosted: Sun 14 Mar, 2010 1:32 pm    Post subject:         Reply with quote

Carving Diamonds On The Pommel
In carving the pommel, I began by drawing the design in pencil on the pommel. The design was based upon several patterns preserved on Mindelheim finds with metal pommels which still show the design clearly. As usual I drew the pattern free-hand without measuring, just “eyeballed” it, as they say. And as usual, when I finished, I did not like the slight asymmetries and decided to grind it all off and start over. Then, as usual, I chickened out and just left it as is. To cut the lines in the pommel I placed the chisel on the drawn lines and tapped three times with a small tack hammer I have. Once the lines were cut in I widened the lines by putting the chisels along the edge of the line and sliced off a sliver just using pressure. To keep the chisel sharp, every few cuts I would drag the flat of the chisel over the surface of a sheet of fine sandpaper on the table top, and then drag the edge over a piece of leather.

ks


 Attachment: 98.66 KB
66..HaC1b.730-660.TypMindelheim.L89w73Pom79.HallstattAustria.Gr607.NatHistMusWien.SGAS.jpg


 Attachment: 98.92 KB
66.HaC1b.730-660.TypMindelheim.L83w64.MindelheimBayernGermany.Tum2.MusMindelheim.SGAS.jpg


 Attachment: 133.97 KB
67..PommelCarved.jpg


 Attachment: 137.65 KB
67.PommelCarving.jpg


Two swords
Lit in Eden’s flame
One of iron and one of ink
To place within a bloody hand
One of God or one of man
Our souls to one of
Two eternities
View user's profile Send private message


Display posts from previous:   
Forum Index > Historical Arms Talk > Hilting My MindelheimDIY Project
Page 1 of 3 Reply to topic
Go to page 1, 2, 3  Next All times are GMT - 8 Hours

View previous topic :: View next topic
Jump to:  
You cannot post new topics in this forum
You cannot reply to topics in this forum
You cannot edit your posts in this forum
You cannot delete your posts in this forum
You cannot vote in polls in this forum
You cannot attach files in this forum
You can download files in this forum


All contents © Copyright 2003-2024 myArmoury.com — All rights reserved
Discussion forums powered by phpBB © The phpBB Group
Switch to the Basic Low-bandwidth Version of the forum