Info Favorites Register Log in
myArmoury.com Discussion Forums

Forum index Memberlist Usergroups Spotlight Topics Search
Forum Index > Historical Arms Talk > Custom Castillon sword by M Vickers Reply to topic
This is a standard topic  
Author Message
Julien M


Location: Austin TX
Joined: 14 Sep 2005

Spotlight topics: 1
Posts: 1,086

PostPosted: Fri 04 Dec, 2009 4:15 am    Post subject: Custom Castillon sword by M Vickers         Reply with quote

Hi all,

Some of you might remember me inquiring about "broad type XVIII" swords on this forum a while ago.

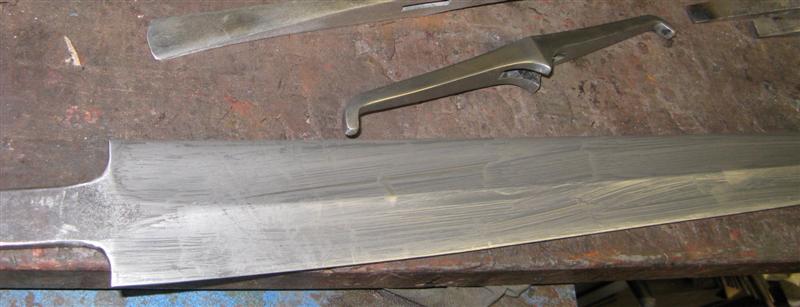
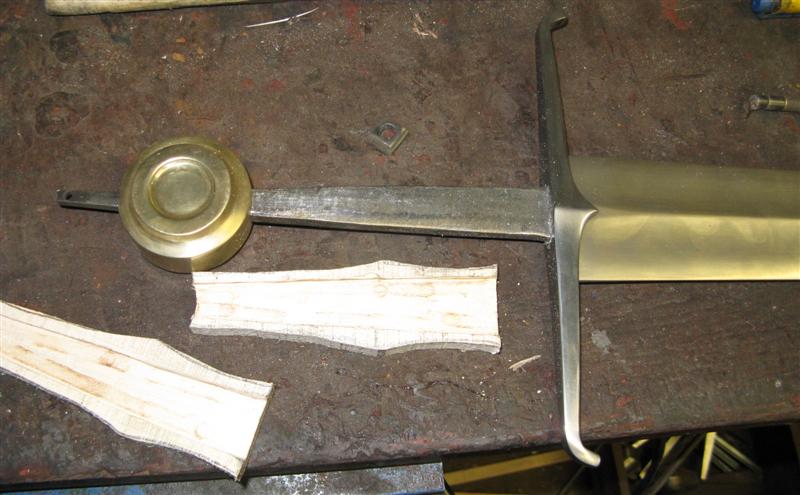
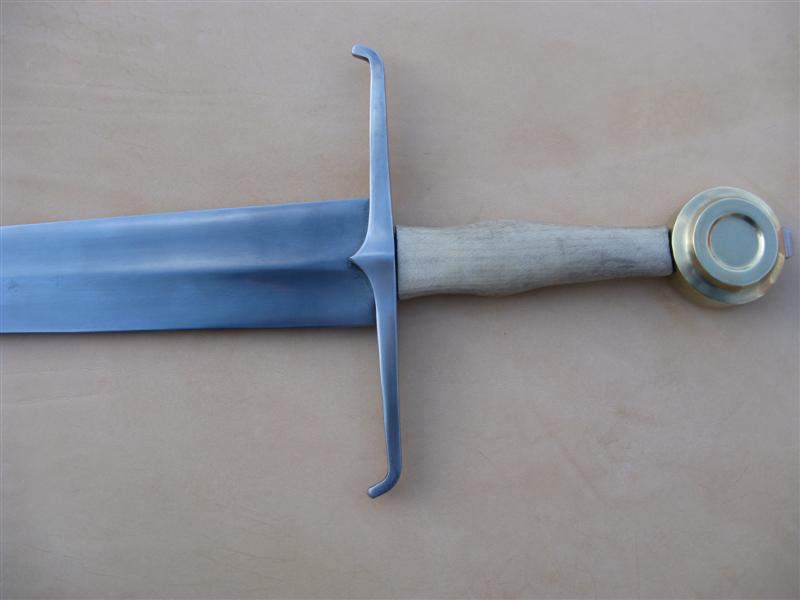
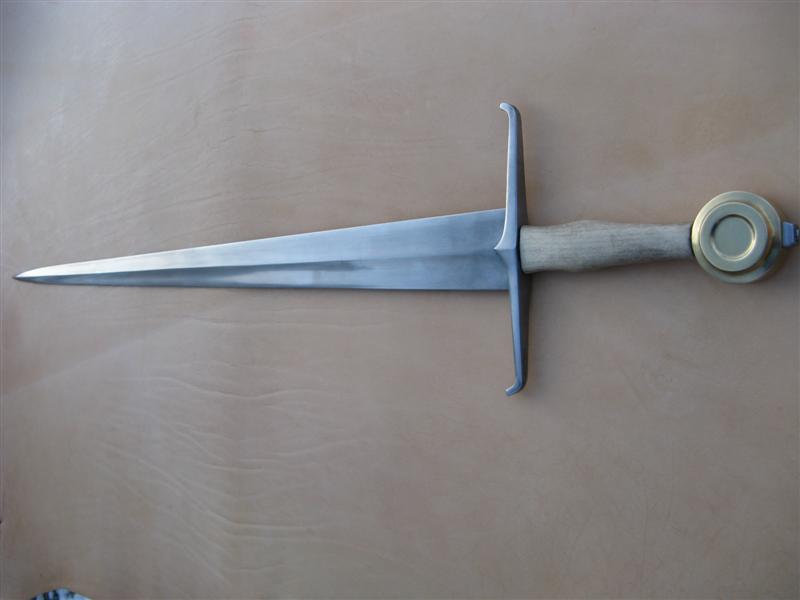
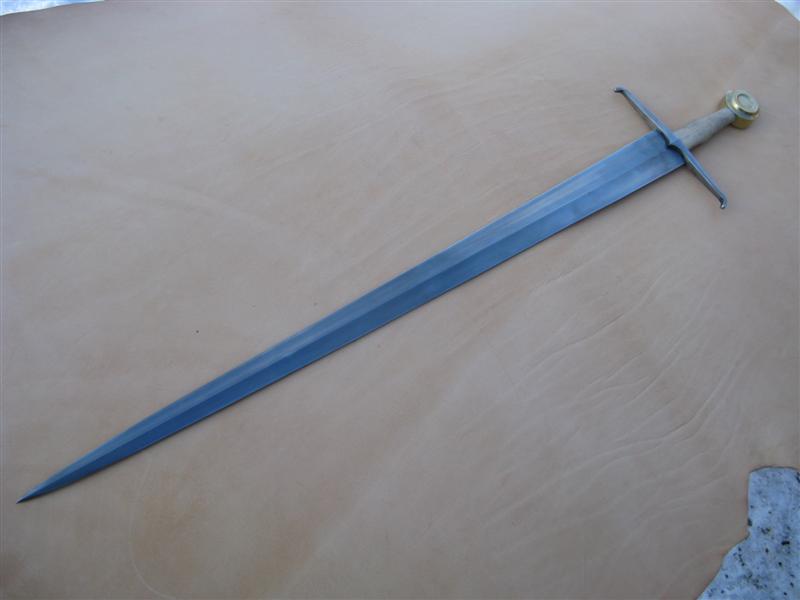
I finally chose to have a sword made in the fashion of the Castillon swords...(a loose interpretation of the one kept in The Royal Armouries to be precise). I didn't ask for a carbon copy though, and I find that the sword below exhibits features from several of the Castillon swords (the blade is certainly more slender than the one kept in Leeds). The main characteristics I was after was a broad type XVIII blade, with a clear hollow ground, and a bronze/brass pommel.
Also, I've requested a slightly longuer blade than the original.

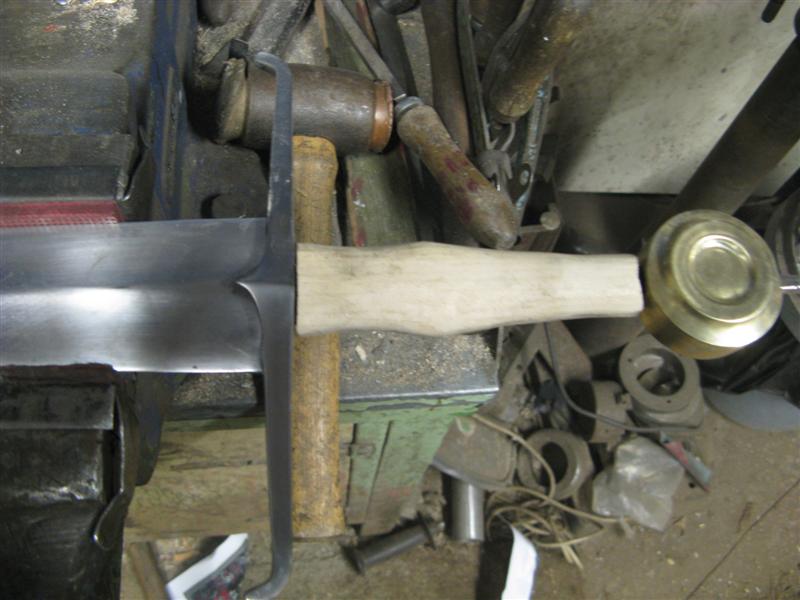
M vickers, who is well known here in the uk for his custom swords, was the obvious choice for the job, not to mention that he has handled some of the original swords in the past. He recently sent me a bunch of pictures on his progress, and I wanted to share my excitement with you (first custom job I've ever ordered!).

I must say I'm very pleased with what I can see on those shots...I love the way Mark dealt with the hilt (especially his interpretation of the guard/quillons). I have no doubt this will be a great sword to hold and behold Happy I plan on doing the grip leather work and scabbard as soon as I get it.

stats as given by Mark:

1.35k
balance 4inch
COP 12inch from the tip

Hope you like these pictures as much as I do Happy

cheers,

J


 Attachment: 26.84 KB
IMG_2615 (Medium).JPG


 Attachment: 42.1 KB
IMG_2616 (Medium).JPG


 Attachment: 64.02 KB
IMG_2617 (Medium).JPG


 Attachment: 62.67 KB
IMG_2625 (Medium).JPG

View user's profile Send private message
Lee O'Hagan


Location: Northamptonshire,England
Joined: 30 Sep 2003
Likes: 6 pages

Posts: 529

PostPosted: Fri 04 Dec, 2009 12:22 pm    Post subject:         Reply with quote

Hi Julien,
Looks a fine sword,
whats the width at the guard ?and what are your plans on the leather work?
i recently had one from mark,its the gothic hilt on the swords part of the shop page under the 18 carat full package sword he pictured,mine is hollow ground and about 62.5mm wide at the guard,you might like it, Wink
if yours comes in similer,handles like a dream single handed,super nice with two hands,
now the only problem you haveis comparisons on future swords, Big Grin
do you know hwen its headed your way?
and i see from the pic he still hasnt tidied up,lol.
View user's profile Send private message
David Sutton


Location: Bolton, UK
Joined: 06 Mar 2007
Likes: 15 pages
Reading list: 39 books

Posts: 230

PostPosted: Fri 04 Dec, 2009 1:44 pm    Post subject:         Reply with quote

Hi Julien,

Beautiful sword, you know I'm a sucker for broad pointy look too! Big Grin

I like the turned down ends of the guard and the hollow grind looks well done, coming to a re-enforced appleseed at the edge?

Really looking forward to seeing the finished sword.

'Reserve your right to think, for even to think wrongly is better than not to think at all'

'To teach superstitions as truth is a most terrible thing'

Hypatia of Alexandria, c400AD
View user's profile Send private message
David Etienne


Location: Ittre, Belgium
Joined: 17 Jan 2005
Likes: 2 pages
Reading list: 8 books

Posts: 154

PostPosted: Sat 05 Dec, 2009 1:32 am    Post subject:         Reply with quote

Hi Julien,

Thanks for sharing this with us ! I've always liked such swords and I've always been interested by the work of Mark Vickers too.
I'm impatient to see it finished and to see the scabbard you intend to make for it.

Cheers,

David
View user's profile Send private message
Julien M


Location: Austin TX
Joined: 14 Sep 2005

Spotlight topics: 1
Posts: 1,086

PostPosted: Thu 07 Jan, 2010 9:51 am    Post subject:         Reply with quote

Hi all,

Mark is almost done with the sword, save for the final peening/assembly. I really like what I see here and I can't wait to get the sword in my hands to begin working on grip and scabbard. Once I'll be done with the core, I'll send it back to mark for a 2 piece locket and shape set.

Let me know what you think of those shots below.

Best,

J


 Attachment: 31.89 KB
IMG_2732 (Medium).JPG


 Attachment: 29.42 KB
IMG_2733 (Medium).JPG


 Attachment: 29.59 KB
IMG_2734 (Medium).JPG

View user's profile Send private message
Etienne Hamel


Location: Granby (QC) canada
Joined: 09 Sep 2006

Posts: 443

PostPosted: Thu 07 Jan, 2010 10:08 am    Post subject:         Reply with quote

looks beautiful and well balanced i can't wait to see how it turns out!
View user's profile Send private message
Matthew Stagmer
Industry Professional


Location: Maryland, USA
Joined: 23 Jan 2008

Posts: 493

PostPosted: Thu 07 Jan, 2010 10:38 am    Post subject:         Reply with quote

This is one of my favorite types. This is well done so far. Cant wait to see it done.
Matthew Stagmer
Maker of custom and production weaponry
Youtube.com/ThatWorks
View user's profile Send private message Visit poster's website
Thom R.


Location: Tucson
Joined: 26 Jul 2007
Reading list: 30 books

Posts: 630

PostPosted: Thu 07 Jan, 2010 12:02 pm    Post subject:         Reply with quote

Love the type 8 cross and the period and style of your sword. making a well faceted and correctly shaped type 8 cross with ecusson de-novo is no easy feat. that looks great. tr
View user's profile Send private message
Bradley Starkey


Location: Sacramento, CA, USA
Joined: 01 Oct 2007

Posts: 18

PostPosted: Thu 07 Jan, 2010 9:35 pm    Post subject:         Reply with quote

Looks like a really outstanding blade, I really love these broad bladed types.
View user's profile Send private message
Julien M


Location: Austin TX
Joined: 14 Sep 2005

Spotlight topics: 1
Posts: 1,086

PostPosted: Sun 14 Mar, 2010 7:56 am    Post subject:         Reply with quote

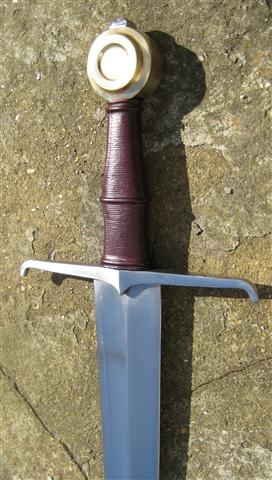
Hi all, I finally managed to free some time to wrap the grip of my Vickers Castillon sword ...so now I can show it off Happy

A few words on the sword I received a couple of month ago (I'll probably do a proper review in the coming months).
In short, it is a superb, slender and elegant blade. The hollow ground is very deep, well centered and the spine is straight.

The blade is VERY Sharp, resulting from edge geometry without much of a noticeable bevel (no bevel at all would be closer to the truth). Temper, distal taper and weight distribution are top notch...resulting in a blade that is very true to its type, cutting and trusting with frightening ease, with just the right amount of flex.

The blade, very much like my Albion Crecy, "sings" when you give it a nudge, holding the note for several seconds like a tuning fork.

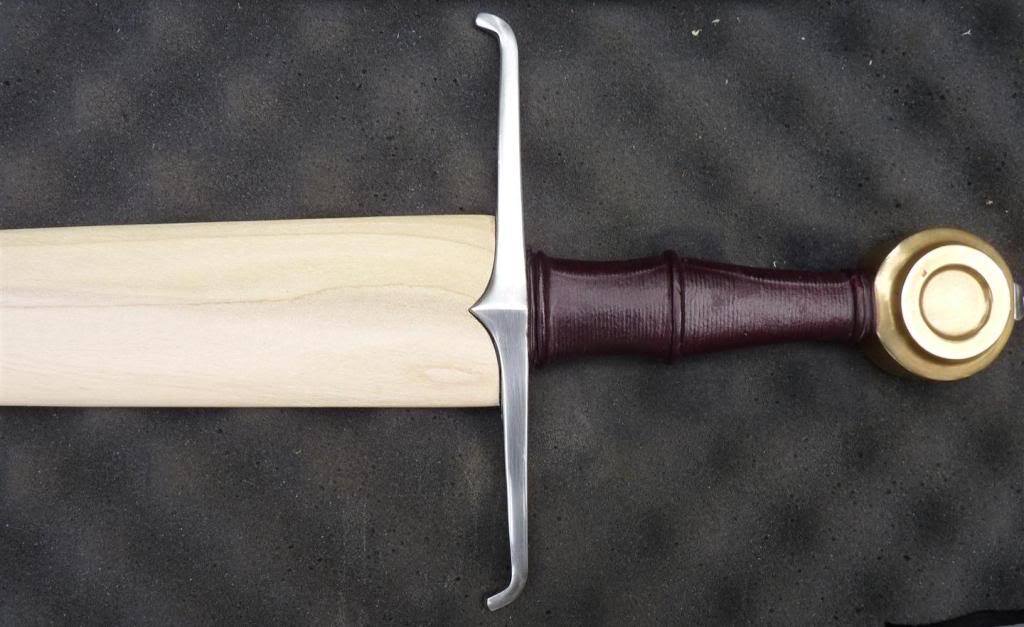
The guard is very true to the original: a plain and beautiful design, with crisp lines. It is not obvious from all angles, but the quillons are very slightly asymmetrical. This was a bit of a concern at first...but I got over it as this is after all a handmade custom sword not a production or semi production sword involving CAT or cast hilt parts in the making... it does adds a bit of character to the sword. The brass pommel is very even and well made.

the polish: I requested a satin finish on both blade and hilt parts, which was beautifully executed by Mark.

Assembly: that's the only thing where improvements could be made in my opinion. I would have loved the blade to be recessed in the guard. It's not the case and there is a very slight gap on each side of the tang (less than half a millimeter but still Happy...where the blade and guard meets. Also the peen block has been crushed a bit during the peening.

Handling: the sword balance is great. Even with a bare wood grip, the handling was superb....with the leather wrap and carefully placed risers, it's even better...it is right at the top of my modest collection along with my A Crecy.

Conclusion: I am more than pleased with Mark's work on this sword. It is the pinnacle of my collection, along with a couple of Albion blade. Considering the price point, it is also amazing value for money (slightly under 500$, for a hand forged custom...). I'm surprised Mark Vickers didn't get more attention here on this forum, as he is very well established in the field in the uk and most likely in the rest of Europe. As far as I'm concerned, he's by far the best option around (a windlass will cost you almost as much in the uk!) and I will definitely order more blades from Mark Vickers in the future.

Cheers,

J


 Attachment: 39.97 KB
IMG_2728 (Small).JPG


 Attachment: 39.59 KB
IMG_2729 (Small).JPG


 Attachment: 40.01 KB
IMG_2731 (Small).JPG


Last edited by Julien M on Sun 14 Mar, 2010 11:00 am; edited 1 time in total
View user's profile Send private message
David Sutton


Location: Bolton, UK
Joined: 06 Mar 2007
Likes: 15 pages
Reading list: 39 books

Posts: 230

PostPosted: Sun 14 Mar, 2010 9:01 am    Post subject:         Reply with quote

Julien,

The finished sword looks fantastic, a very elegant looking weapon. Cool

Your grip work is top notch (as always Happy ) and really suits the brass pommel.

I can't wait to see what you do with the scabbard and suspension.

Congratulations on a really fine piece!

'Reserve your right to think, for even to think wrongly is better than not to think at all'

'To teach superstitions as truth is a most terrible thing'

Hypatia of Alexandria, c400AD
View user's profile Send private message
Julien M


Location: Austin TX
Joined: 14 Sep 2005

Spotlight topics: 1
Posts: 1,086

PostPosted: Mon 15 Mar, 2010 2:15 am    Post subject:         Reply with quote

Thanks David!

I'm not sure what direction I'll be taking for the scabbard yet, but the plan is to use brass lockets to echo the brass pommel. Plain XV century wood over leather core, and brass fixation for the suspension...a "posh" package so to speak Happy

Cheers,

J
View user's profile Send private message
Julien M


Location: Austin TX
Joined: 14 Sep 2005

Spotlight topics: 1
Posts: 1,086

PostPosted: Sun 15 May, 2011 4:19 am    Post subject:         Reply with quote

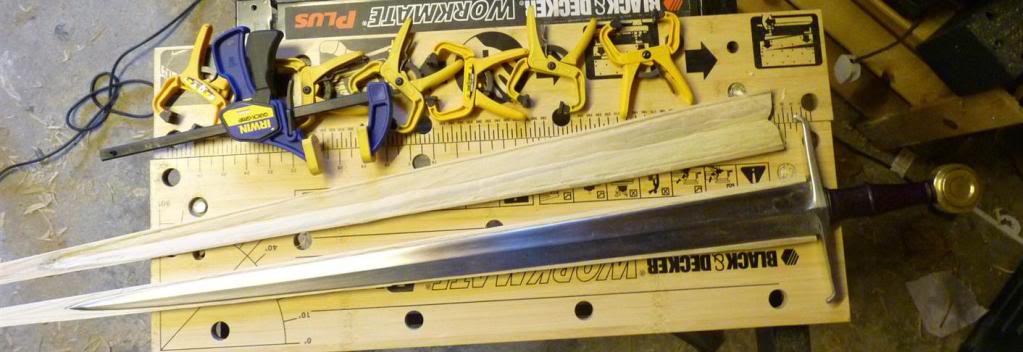
And another sword on the workbench!

I'd never been satisfied with the quick grip wrap above. That sword is still one of my favorite by far, and it deserves better! So I'm planning something a little bit more ambitious for it:

a leather tooled grip, stitched on the side.

a leather over woodcore tooled scabbard, with metal lockets and shape.

In case you are wondering why I have so many projects on at the same time, it's simply because I go as far as I can doing stuff at home, but when a project reaches a point were I need either forge or belt grinder, I just leave it to rest until I can go to Owen Bush's workshop.

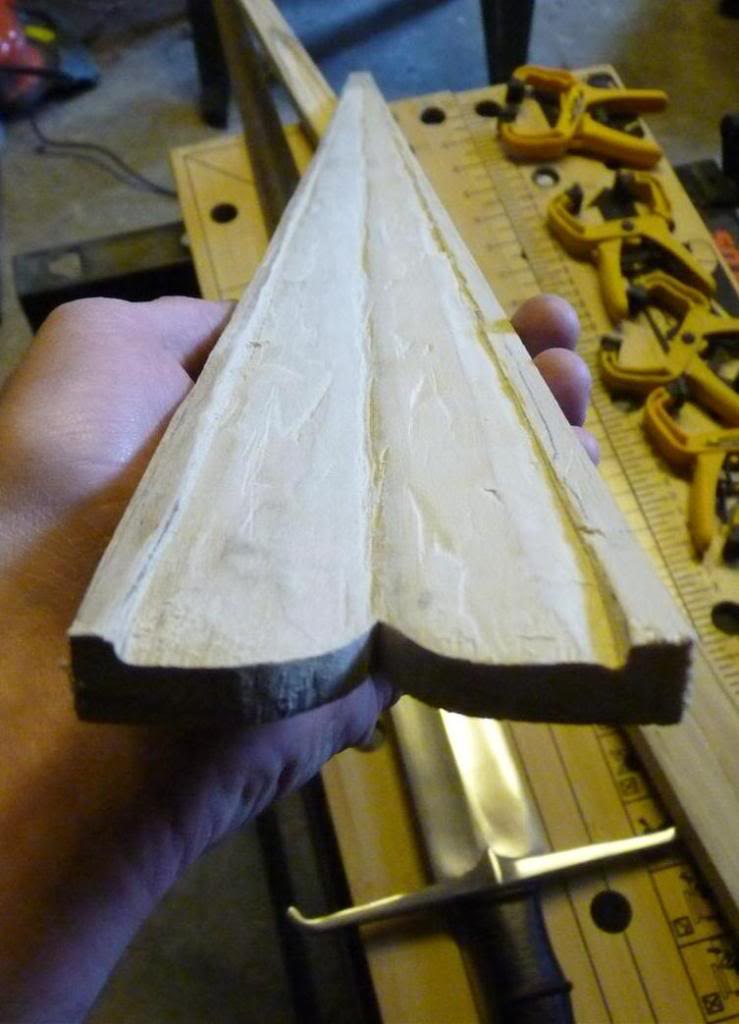
So I'm almost done with another scabbard core, the 4th to date, and by far the best (the fit to the blade is quiet precise). The first I had done (for the crecy) was made entirely by hand, with a single chisel (flat) and a single wood rasp....something I'm not about to do again, ever.

Since then I've refined my methods, trying a combination of different tools to ease or speed thigns up. Reaching that point (finishing the inside, gluing the slats and insuring a precise fit of the blade in the scabbard) must have taken me 4 hours.
Whatever you use, it remains backbreaking work, and fairly booring too...

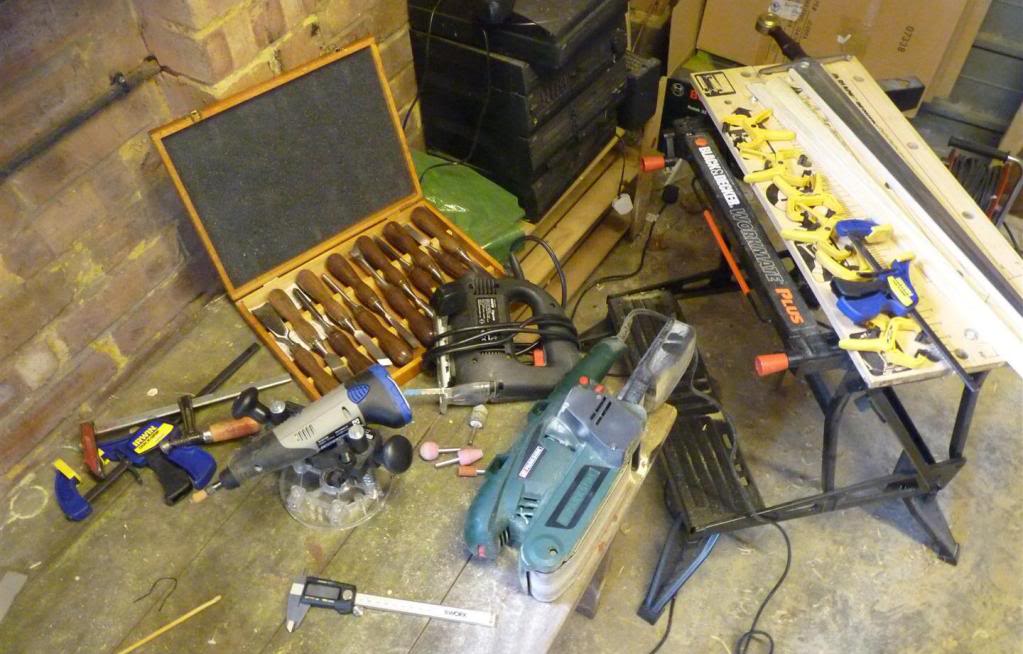
In terms of power tool, you can see below a dremel plunge router, a drill with sanding bits, various chisels, an electric saw, and a 20£ belt sander which I use to chape the outside of the core (best 20£ I've spent!).

Now you must remember that if used properly, any of these power tools can help, but it's always down to chisels (or spokeshaves if you have some) in the end. This is precise work, so power tools can easily ruin your efforts in no time. So I use the plunge router with a pointed bit to trace the central recess (for the spine of the blade), and a flat one to trace the oustide profile. These are very shallow lines just to serve as a guide for chisel work.

The drill bits were usefull to fine tune the inside of the core, but honestly sandpaper does just as well.

What you really want is a bunch of these one handed clamps, they really help speeding things up.

Once the glue has set I will form the outside profile.

J


View user's profile Send private message
Julian Reynolds


Location: United Kingdom
Joined: 30 Mar 2008

Posts: 271

PostPosted: Sun 15 May, 2011 8:44 am    Post subject:         Reply with quote

Julien,

For shaping the outside of wooden scabbard cores, I do the rough shaping with a stanley knife or a spokeshave then do the profiling with a Japanese Saw Rasp (£15 from Axminster Tools). Same goes for any long tapered wooden object that needs 'rounding'. I rest one end of the piece on my shoulder and the other on the workbench and push the rasp down the wood varying the angle of the rasp and the force of the push according to how much material I want to remove, flipping it over from the coarse cut to fine cut as needed. You can even do it sitting down, with the piece in your lap! Long even strokes mean you don't get any 'dips' as you may with a power tool (sander, powerfile etc.) where it bites a little deeper than you wanted. You have all the control (and visibility) of a 'manual' hand tool, but with all the extra ease and effectiveness that comes with a tool made by those clever Japanese!

Perfect job for a sunny day!

Julian
View user's profile Send private message
Julien M


Location: Austin TX
Joined: 14 Sep 2005

Spotlight topics: 1
Posts: 1,086

PostPosted: Sun 15 May, 2011 10:06 am    Post subject:         Reply with quote

Julian Reynolds wrote:
For shaping the outside of wooden scabbard cores, I do the rough shaping with a stanley knife or a spokeshave then do the profiling with a Japanese Saw Rasp (£15 from Axminster Tools).


Hi Julian. Thanks for the tip about japanese saw rasp. Another method to try some day. Actually I find the shaping of the outside core very easy and pleasant, the painfull part being the hollowing of the inside. That dirt cheap belt grinder from Lidl with a 60 grit belt does the job in no time. I tend to consider a scabbard almost finished when I'm done with the inside.

I'll make a couple of custom scrapers for hollowing scabbards at some point, Tod pictured one on his ear dagger repro thread and I've been thinking to do that since. Should make things a lot more pleasant.

Cheers and nice job on those hunting daggers you've posted a while ago.

J
View user's profile Send private message
Julien M


Location: Austin TX
Joined: 14 Sep 2005

Spotlight topics: 1
Posts: 1,086

PostPosted: Mon 16 May, 2011 11:24 am    Post subject:         Reply with quote

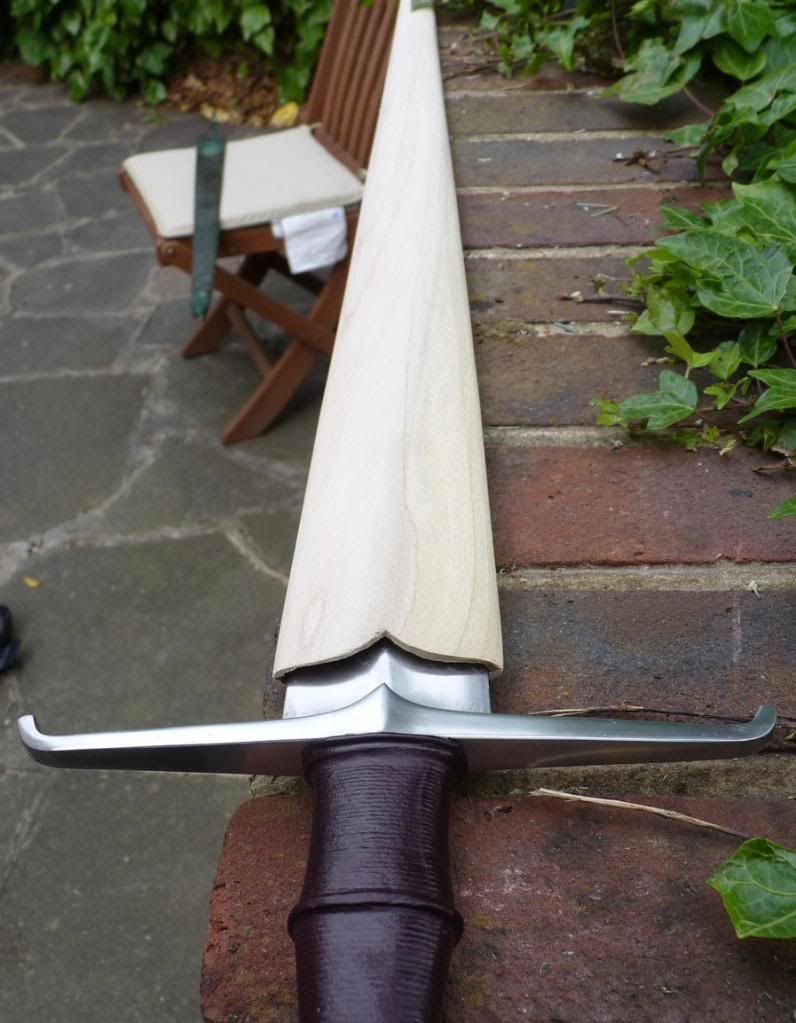
Job done. That little belt sander did great though the dust collector was full in no time and I did emerge of my garage absolutely covered in sanding dust from head to toes. The rest was down to woodrasp and 60 grit sandpaper. Poplar is very pleasant to work with (at this stage). I have a few refinements to do and I might thin it down further depending on the leather I'll use. I have not finished the tip because I need to think about fitting a shape and decide on an overall design .


View user's profile Send private message
Julien M


Location: Austin TX
Joined: 14 Sep 2005

Spotlight topics: 1
Posts: 1,086

PostPosted: Mon 04 Feb, 2019 5:24 pm    Post subject:         Reply with quote

Holy c...8 years since I last worked on this - I'm determined to finish it off in the coming month.
Here is where I am now - scabbard brackets - rolled up a sheet of brass and soldered at the back.
Design below and still lots to do...


View user's profile Send private message
Nathan Robinson
myArmoury Admin


myArmoury Admin

PostPosted: Mon 04 Feb, 2019 6:44 pm    Post subject:         Reply with quote

Good to see some more progress on this one. I'm liking that locket.
.:. Visit my Collection Gallery :: View my Reading List :: View my Wish List :: See Pages I Like :: Find me on Facebook .:.
View user's profile Send private message Send e-mail Visit poster's website
Chris Dayton


Location: Austin, TX
Joined: 29 Oct 2017

Posts: 67

PostPosted: Tue 05 Feb, 2019 5:22 pm    Post subject:         Reply with quote

Julien-

Great project, thanks for presenting.
View user's profile Send private message


Display posts from previous:   
Forum Index > Historical Arms Talk > Custom Castillon sword by M Vickers
Page 1 of 1 Reply to topic
All times are GMT - 8 Hours

View previous topic :: View next topic
Jump to:  
You cannot post new topics in this forum
You cannot reply to topics in this forum
You cannot edit your posts in this forum
You cannot delete your posts in this forum
You cannot vote in polls in this forum
You cannot attach files in this forum
You can download files in this forum


All contents © Copyright 2003-2024 myArmoury.com — All rights reserved
Discussion forums powered by phpBB © The phpBB Group
Switch to the Basic Low-bandwidth Version of the forum