Info Favorites Register Log in
myArmoury.com Discussion Forums

Forum index Memberlist Usergroups Spotlight Topics Search
Forum Index > Off-topic Talk > Tales from the shopDIY Project Reply to topic
This is a standard topic Go to page 1, 2  Next 
Author Message
Thom R.


Location: Tucson
Joined: 26 Jul 2007
Reading list: 30 books

Posts: 630

PostPosted: Wed 18 Nov, 2009 11:54 am    Post subject: Tales from the shop         Reply with quote

Eek!

I am starting a thread to share my various noodling around in the shop projects that have anything to do with arms and armor. my intent is not necessarily to show "hey look at the monster I have created" but rather to get feedback of a more critical nature such as "stop stop what you are doing and get yourself the proper tool before you hurt yourself" or "go to the store and get this wiz bang product and all of your troubles will be gone" or "Thom, why are you doing it the hard way - just do this instead you fool!"

although positive feedback is always welcome too Big Grin

I have already shown a few of these projects like the rehafting of the cold steel poleaxe and the scabbards I have done and the ATrim sword re-hilts.

Lately I have been fooling around with butted mail. I bought a couple of pounds of "shop sweepings" from the Ring Lord on the cheap and have been having fun with these rings. The shop sweepings came in a variety of sizes so the first job was to sort out the various rings and put them into individual bags:
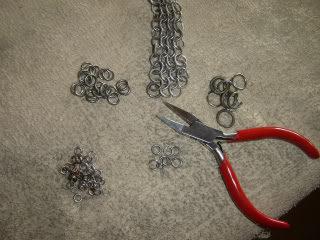


Its a mixed bag of ring sizes and type. But there was a fair amount of mild steel 16 gauge/5/16" and 14 gauge/1/4". Some bigger stuff and some smaller stuff. I started weaving some 4:1 with both and then mastered a 6:1 weave using a combination of steel and copper+bronze rings. I thought about a couple of ideas of what I could make with this stuff and then it dawned on me that a mail standard would be a fun project. So I have been making a butted mail standard with the rings. So far I have made a couple of long 6:1 strands with the 5/16th rings and am knitting them together with the smaller 1/4 inch rings in a 4:1 pattern. I am thinking that I have enough rings for 3 or 4 strands 22-24 inches long. the 6:1 weave is actually pretty tuff stuff despite being butted (If I have some left over I think I will lay some out on a straw bale in the back and shoot at it with my compound bow with a target point just to see what happens). since a standard's function around the neck is mostly to protect against glancing cuts I think rings woven at 6:1 will produce a rather functional piece of armor even though its butted. you can see the difference between the classic 4:1 (above) and the strands of 6:1 (below) - I wonder if this isn't what you sometimes see referred to as "double mail" in some historic commentary. its a much denser weave
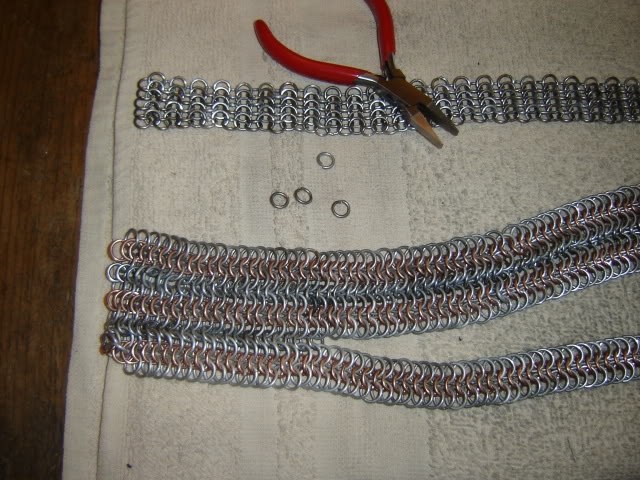


The learning curve has included a number of gashes on my bare hands from slip ups while closing rings as some of these rings are pretty tuff - not all of it is mild steel. But certainly the spring loaded pliers are a big help when doing butted mail. I find it best to work in small batches - opening up 20-30 rings at a time and laying them out carefully in my immediate work area such that they don't entangle with each other. That allows me to to pick up them up efficiently with pliers for weaving such that I don't constantly have to put the pliers down. Any comments on the size of mail standards is certainly welcome and I am interested in weaving techniques other people are using as I am finding this to be a rather addicting fun, at least in 20-40 minute long work periods. beyond that it starts getting tedious, for me anyway..........
View user's profile Send private message
Sam Gordon Campbell


Location: Australia.
Joined: 16 Nov 2008

Posts: 678

PostPosted: Wed 18 Nov, 2009 7:23 pm    Post subject:         Reply with quote

Looking good there!
The steel/copper/bronze combo reminds me of a roman mail shirt I saw a re-enactor wear once. I sure looked sweet.
I tried making some ye oldde butted-maille myself once... Took me and my three mates 4 days to get a sheet big enoigh to cover my torso... Then we threw it on the forge to see what'd happen (before realising galinised metal has lead in it)... Then we hit it with an axe a couple of time.
'Twas much fun Laughing Out Loud
But yeah, 20 - 40 minute sessions are about my limit too.
Keep us posted on your other projects.

Member of Australia's Stoccata School of Defence since 2008.
Host of Crash Course HEMA.
Founder of The Van Dieman's Land Stage Gladiators.
View user's profile Send private message
Gabriele A. Pini


Location: Olgiate Comasco, Como
Joined: 02 Sep 2008

Posts: 239

PostPosted: Thu 19 Nov, 2009 2:29 am    Post subject:         Reply with quote

If you like I can post my tools here, I have even a mandrel to make springs...

For the ring size I use 1,5mm galvanized wire for all my works, with an ID of 8mm, but for some tailoring I had to use an ID of 10mm (not so resistant: it would be better with a 1,7-1,8mm wire), but I recently bought 25 kilos of 1,5mm wire.

When I search for extreme durability (and weight) nothing can match a 6-1 European weave with 2mm wire and 10mm ID

More than that and you have to considering riveting.

One fact I have discovered is that it's not necessary to do a complete suit of mail by yourself: recently I have bought a good shirt (long to my knees and my wrists, and I am 187cm tall for 115 kilos) of good 1,7x10mm galvanized steel for only 50€ (shipping included) from ebay. The one who sold it didn't have a clue of the actual valor of the thing....
Tailoring it (tightening the arms and widening the torso with the same rings) took me a day, and three more to attach two mail gauntlets with split wrists.

Completely make it from wire would have take much more time...

Go ahead and make you own!
View user's profile Send private message Visit poster's website
Thom R.


Location: Tucson
Joined: 26 Jul 2007
Reading list: 30 books

Posts: 630

PostPosted: Wed 09 Dec, 2009 3:17 pm    Post subject:         Reply with quote

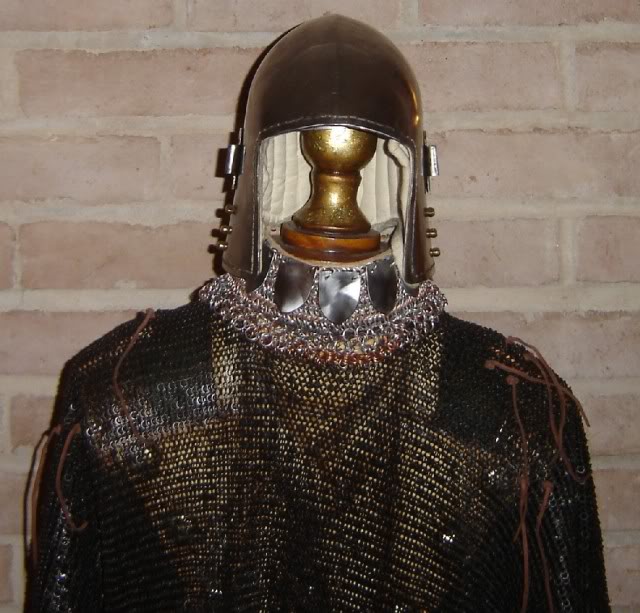
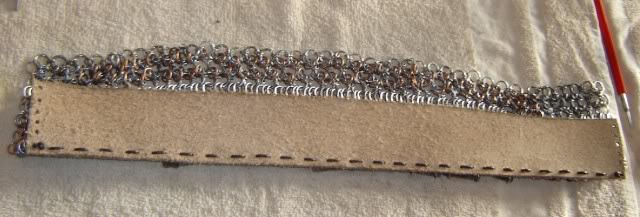
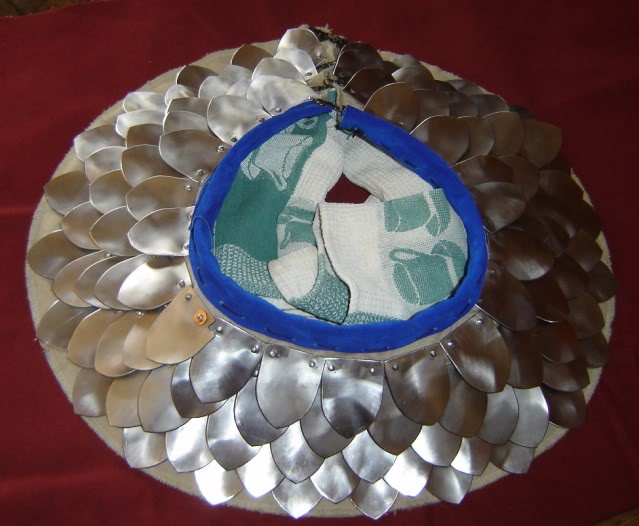
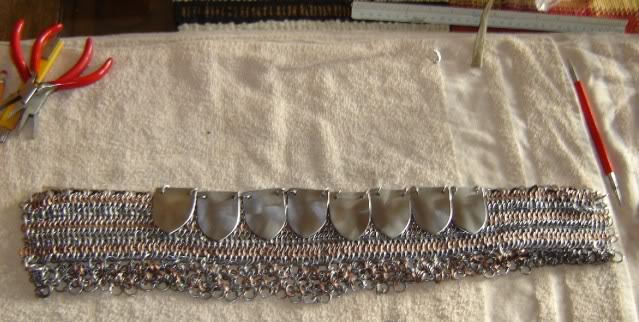
Here is the finished product on the mail collar. In the end I sewed the mail to a leather backing and then added some 16 gauge steel scales over the mail. The collar laces together tight around the neck and then that lacing junction is swung to the back. the aventail or hauberk can then be laced to the larger rings on the drape of the mail to haul up the mail tight against the neck. My basinet then fits nicely over the collar......


Initially I sewed on some red silk to the leather but realized how dumb that was as the cloth catches my whiskers worse than the leather. So I removed it and am staying with the leather backing although I need to treat it some if I don't want it ruined by sweat absorption. I may also paint heraldry on the shield scales.


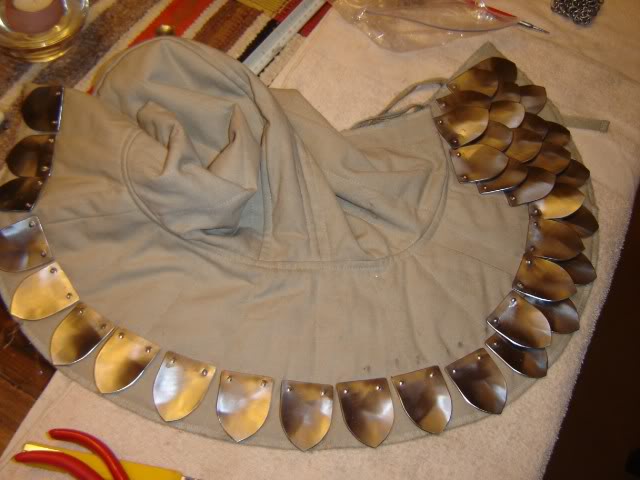
Next up - a scale aventail backed with cloth
View user's profile Send private message
Thom R.


Location: Tucson
Joined: 26 Jul 2007
Reading list: 30 books

Posts: 630

PostPosted: Tue 29 Dec, 2009 5:35 pm    Post subject: POLEARMS!         Reply with quote

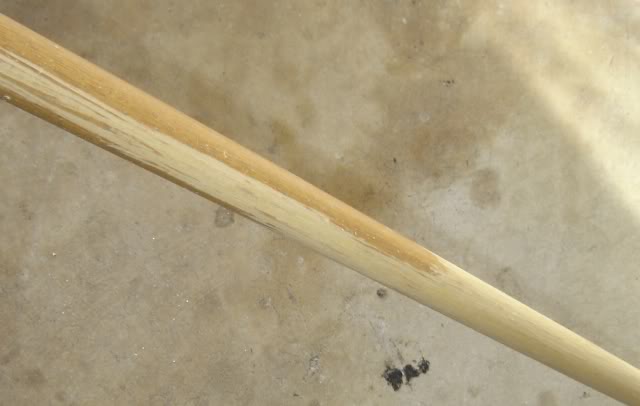
Happy Holidays! Even here its a bit chilly in the shop these days. I am still working on my 14th c armour but I took a detour and worked on pole arms the past few days. The key with these poelarms was to find good hafts. Not an easy thing! Once I finally had some staffs/hafts that I liked I got to work shaving off the funky modern varnish/finish. Hand shavers come in handy for that. I would rather take it down that way than mess with chemicals. The varnish on this stuff doesn't go deep. Also, using shavers has another advantage imo - the final product is not machine perfect - and the shaving leaves some texture for gripping. I would prefer some texture on my hafts for a better grip. don't want these things slipping out of hand. so I used the shavers and then sanded back to remove any possibility of splinters. seemed to work well, and fast.


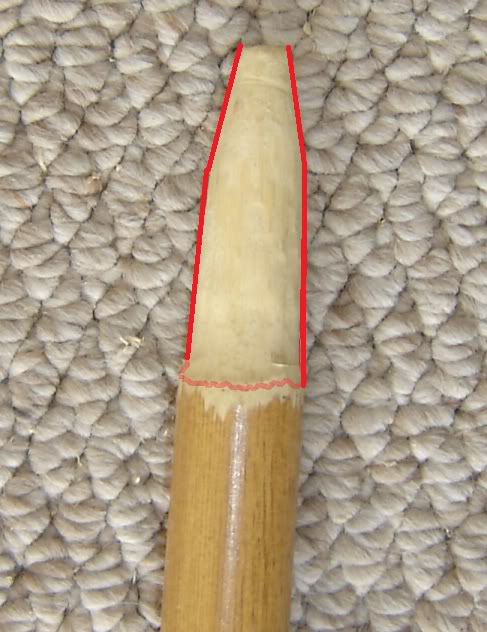
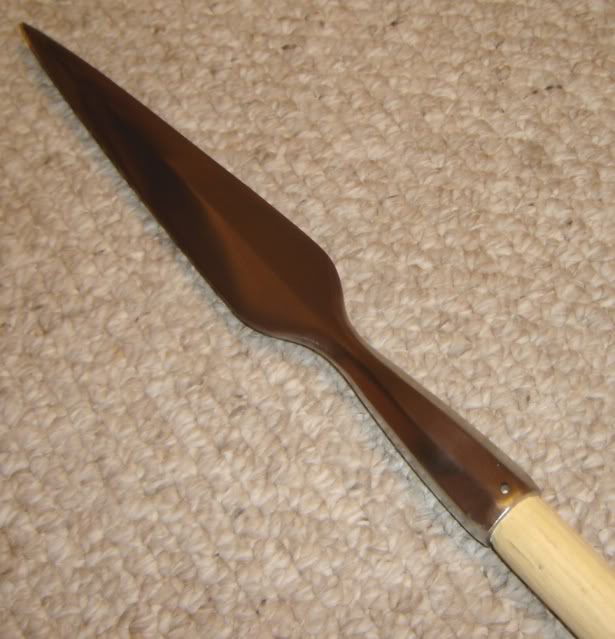
First up - I bought a spearhead from Volund Forge (Michael Pikula) early this year and recently I finally found a good 6 foot piece of ash of the right size to mount it with. The spear is socketed, so I had to carve the end of the staff with my microplane shavers (one of the handiest tools for working with wood imho) to get it to fit just right. the inside of the socket is a complex shape - not exactly a linear taper to the end of the socket, more of a compound angle:


Michael had pre-drilled a hole in the socket and i happened to have a brass rod that fit the hole perfectly. so, once I got the taper on the staff end just right for a good tight fit, I coated the staff end with a bit of JB Weld (two part epoxy), banged it on tight, wiped off the teeny bit of excess epoxy squeezing out the end, then after a few hours I drilled the wood out, tapped the brass rod through, trimmed with a dremel, then layed it on the anvil with a rivet cup underneath, then pounded it with a round riveting punch. its a beautiful spearhead! The outside of the socket is faceted. the edges have no secondary bevel and are sharp! the final product is 85 inches long, weighs 1370g, and has a POB at 54 inches (63%)


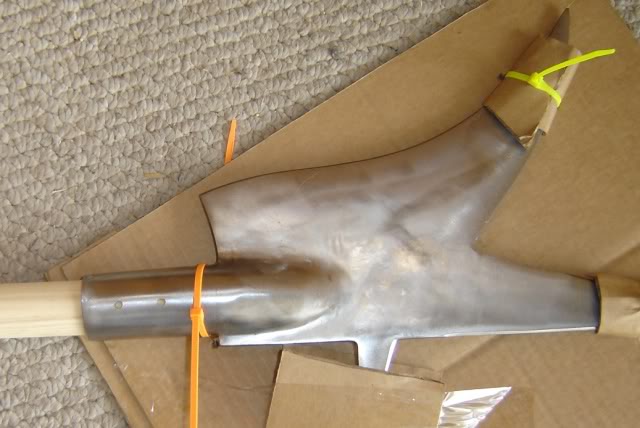
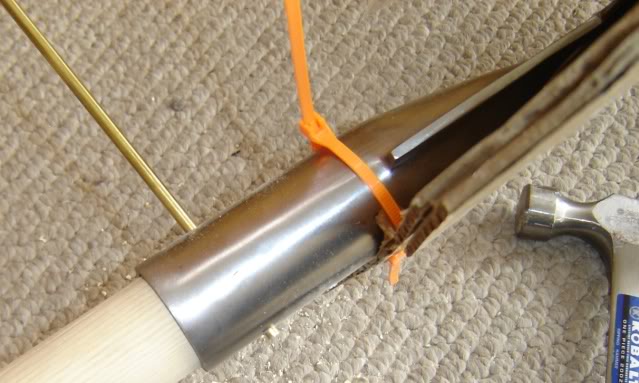
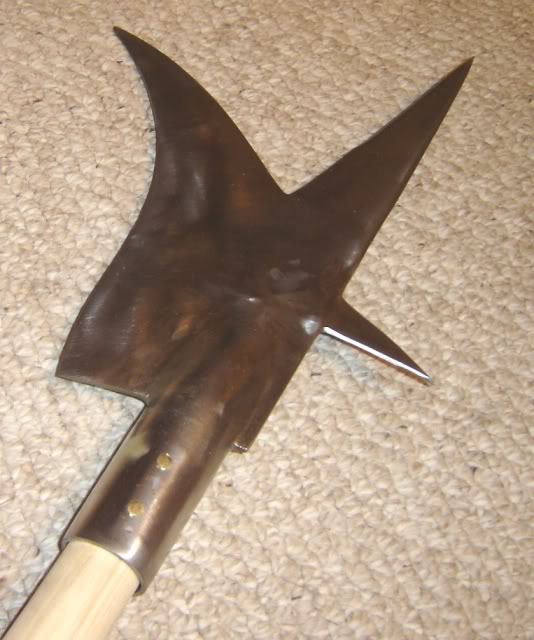
Next up was an English bill from Arms and Armour. A year or two back when Cold steel had a closeout on its poleaxe I bought a few and did various things with them (there is an old thread here on the CS poleaxe somewhere). one of the nice things about that poleaxe kit by Cold Steel was the staff itself. They were (are) very nice 6 footers, 1.5 inches wide - round for half of the length and the lower half was trimmed with two flats. A real beefy staff - bigger than anything I have been able to find at any lumber store. I had one left over and called A&A and they agreed to make me a special socketed Bill that would fit my staff. The English Bill is a beast of a polearm so I thought it best to drill the socket with a pair of holes for through going rivets. To get the holes to line up correctly on either side I had to clamp the whole thing using a variety of items, to the drill press. Was a bit tricky as the socket is round. Rube Goldberg would have been proud. Wouldn't have wanted to do it with a hand held drill - don't think I could have done it accurately enough although as an alternative I guess you could forego through-going and go for nails through predrilled holes. I just prefer to use through going rivets


Again I used JB Weld and a brass rod for riveting:


Voila! Big nasty weapon! Big ugly nasty - no wonder the English chewed up the Scots at Flodden! The total length is 87 inches top spike to bottom of haft. 2690 grams, with POB at 61 inches (70%). WIth such a heavy blade, and a POB at 61 inches, it doesn't recover fast but still is quite manueverable. thrust, chop, cut, parry, hook, it pretty much can do it all if you get skilled in its use. Terrifying weapon really. Watch out pumpkins! Eek!


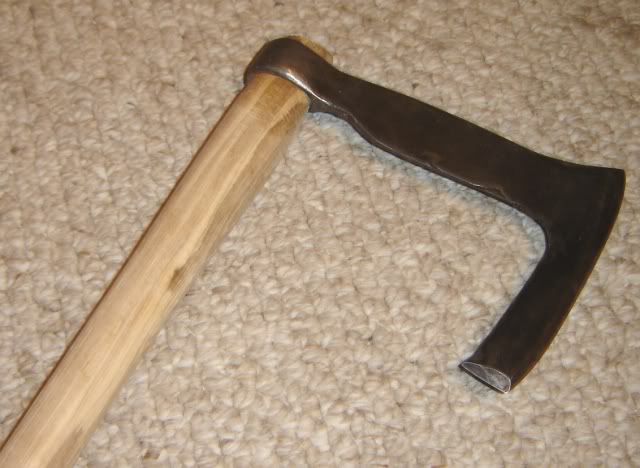
Now that I was on a roll I decided to work on a long bearded axe head I bought earlier this year. It was hand forged by Bill Johnson of Chardon, Ohio. Bill had it mounted on a short handle as a tomahawk but the axe head is rather large and the balance on such a short stick just didn't feel right........ otoh on a larger staff....... so I looked around and just before Christmas at Ace Hardware I found this really nice 5 foot maul/sledge/axe handle. Perfect! Its a nice straight piece of hickory with a bulbous end for mounting. which was key because the axe is hand forged and is wrapped at the end thereby leaving a tear drop shaped hole, and given the potential for moment forces when striking with an axe like this, I wanted to be able sit the axe head onto the wood (unlike the spear and bill above where the sockets slip down over the wood). So first thing I ran a circumferential groove using a coping saw then I carved the end to meet that groove and get the axehead to fit down snug and tight. I used some nails and metal wedges to tighten it all up well. I really like the way it came out. it is a great fighting axe. nimble, quick, easy to handle. 60 inches long, weighs only 1050 grams, and has a POB at 40 inches (66%). POB on a polearm is funny thing, but this turned out just perfect by pure dumb luck. everyone who has handled it the past week has offered to buy it! ha, as if. Laughing Out Loud this thing would come in handy in a shield wall........


Group shot:


Now what I need help with is ideas on finishing the hafts. I would be very interested in what would work well, and would be reasonably historically accurate. I have boiled linseed oil. Also I was wondering if any experts out there on polearms would tell me if polearms - for example the Bill - were painted or not. I have been contemplating some paint. Maybe thats crazy though, so I am soliciting ideas on how to finish the hafts. Thanks for looking! tr
View user's profile Send private message
Scott Kowalski


Location: Oak Lawn, IL USA
Joined: 24 Nov 2006

Posts: 818

PostPosted: Tue 29 Dec, 2009 5:48 pm    Post subject:         Reply with quote

Wow Thom, all three of those look great! I have one of those Cold Steel poleaxes floating around here somewhere that I want to give a similar treatment to like you did. I have to get my garage cleaned out this spring and get back to some wood working projects. I look forward to seeing what else you come up with "in the shop"!

Scott

Chris Landwehr 10/10/49-1/1/09 My Mom
View user's profile Send private message
Addison C. de Lisle


Location: South Carolina
Joined: 05 Nov 2005
Likes: 27 pages

Posts: 614

PostPosted: Tue 29 Dec, 2009 6:15 pm    Post subject:         Reply with quote

I also have one of the spearheads from Michael and I just finished making a haft for it - finding ash was not easy but I managed to find a local hardwood dealer who milled me a 1.5" square piece of stock. I just took down the corners with a hand-plane and a draw-knife, but realized that I had forgotten to make room for the socket to be flush with the haft, and was thinking of redoing it. Seeing that your pollarm heads aren't flush either has made me feel a little better about it. Thanks for sharing!

Also, this may be off-topic, but do you know if it would it be appropriate to put some sort of knot work around the base of the spearhead (like a Turk's head knot)?

www.addisondelisle.com
View user's profile Send private message Visit poster's website
Thom R.


Location: Tucson
Joined: 26 Jul 2007
Reading list: 30 books

Posts: 630

PostPosted: Tue 29 Dec, 2009 9:55 pm    Post subject:         Reply with quote

don't know about the turks head knot....

on flush mounting, its a mixed bag. the bearded axe is flush the spear partially so, and the bill is not. from what I can tell talking to the guys at A&A the bills are not always mounted flush, can go either way. I have the old langets for the poleaxe that could still be mounted to the haft of the bill but I think I am going to leave it plain because the weight is already pretty high and the POB a bit far down the haft. as you know the OD of the socket on the VF spear is rather large and I looked around quite a lot for many months for something that would work. in the end either the haft was big enough to mount flush but was not of good wood or not long enough or, the haft was nice ash or alder, and long enough but not quite big enough to be fully flush mounted (as in this case). in the end I decided that it didn't really matter too much to me. but.... now I am more aware I am going to be keeping an eye out in the future for good staff/haft material. tr
View user's profile Send private message
Jean Thibodeau


Location: Montreal,Quebec,Canada
Joined: 15 Mar 2004
Likes: 50 pages
Reading list: 1 book

Spotlight topics: 5
Posts: 8,310

PostPosted: Wed 30 Dec, 2009 1:55 am    Post subject:         Reply with quote

Thom R. wrote:
in the end I decided that it didn't really matter too much to me. but.... now I am more aware I am going to be keeping an eye out in the future for good staff/haft material. tr


I used red oak or white oak bought as BO staves from a martial arts supplies company: If these hold up to sparring when used as a BO or quarterstaff I assume they are fairly robust and splinter resistant.

I take Staff and pollarm classes and use these and they hold up real good against the other lumber yard poles used in class.

By the way even the cheap lumber yard staffs used by the school are still in good shape after years of use but my white oak one doesn't even show impact marks from heavy blows.

I use boiled linseed oil initially and Danish teak oil to maintain a nice finish: Brings out the wood grain and keeps the wood from drying out.

Oh, maybe a bit more impressions about the English Bill would be nice as I'm curious about it: How thick is the main steel body ? How hard or soft is the steel ? I think A&A and in period these where not heat treated so they might be a bit soft and might bend if enough force is used. ( would be easy to bend back strait ).

In the past I have had A&A do an edge hardening on spears and on the axe part of a poleaxe, so I think the carbon content is high enough for some hardening.

I don't think the pics on the A&A site do justice to the English Bill or show what the bevels are like as it" looks " like thin steel plate just cut out ....... In the pics looks flimsy ( assuming the plate was thin ), I emphasize that this flimsiness seems because we don't have good pics showing the thickness of the main body of the head or any subtleties of geometry.

You can easily give up your freedom. You have to fight hard to get it back!
View user's profile Send private message
Thom R.


Location: Tucson
Joined: 26 Jul 2007
Reading list: 30 books

Posts: 630

PostPosted: Thu 07 Jan, 2010 1:17 pm    Post subject:         Reply with quote

Jean, thanks for feedback! English bill is definitely not flimsy LOL I'll try to get some more pics posted.

Meanwhile I attempted my first cuir boulli this week. Was an interesting project to say the least. .... and I did not burn down the house in the process!

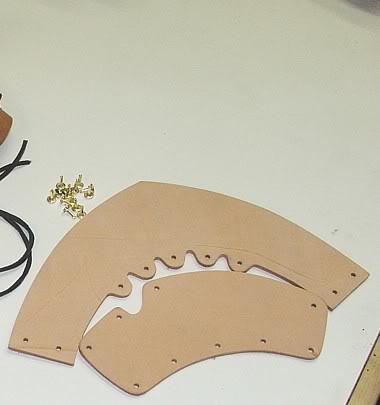
I decided to make hardened leather half gaunts using veg tan leather kit from Windrose Armory (which is just up the road from me). I bought a cheap, deep pot, and a bunch of wax. In the end I used canning wax mixed with some beeswax. I was nervous about all beeswax - besides beeswax is 6 times more expensive than canning wax. There is lots of advice for cuir boulli on the internet but in the end I went with a system much like what is outlined over on Armour Archive. I annealed and added a band of brass to the cuff junction and also modified the hand guard piece to be slot riveted to the cuff.


After riveting up and shaping the gaunts, I dried them well for a few days. Then while the wax was melting outside on a campstove on low heat I heated the gaunts up in my kitchen oven set at 190 degrees. I gather that you do this so the leather is not shocked by the dip into the hot wax. I took the leather out of the oven with tongs that you might get for bbq took them outside and dipped straight down into the pot of melted wax. Given the depth of the pot and the size of the gaunts, it was a "flip and dip" process, doing half at a time. I went back and forth about 4-5 minutes per side for about 35-40 minutes until the air stopped coming out of the leather. Here is what I found out.

- do not do inside!
- Make sure you have leather gloves on when you do this as melted wax is a bitch to get on your hand/skin
- Keep a lid handy. watch the temp carefully! the stuff will ignite if too hot. using a fire extinguisher is dangerous as it will blow the ignited wax all over the place which is great if you want to burn your house down but otherwise...........
- use tongs as mentioned
- probably is dependent on the leather and its thickness but i found that the wax needed to be in the 185 - 190 degree Fahrenheit region to work well. too cool and it doesn't heat the leather up enough to release the air, too hot and you burn the leather. I kept the pot "just right" by moving back and forth over the heat source. note the bubbling here - this is not because the wax is boiling - that would be way too hot Eek! , but rather the air is coming out of the leather.


its fun to do actually but you do have to be fussy about the wax temp and be patient and attentive. after a day of hardening I couldn't believe the end result - it was hard yet still slightly flexible almost like an engineered plastic. cool stuff. I already have used them to spar with and you can see some scuff marks as we tested them a bit. I felt nothing.

however, I found out the hard way that the leather shrinks quite a bit during this process. that was the big oops. so I had to cut the cuff at the wrist, bridge with a piece of leather and re-rivet afterwards Cry I am going to do a second pair and give myself a bit more room on the cuff so that they shrink just right. I am also thinking about shaping for the knuckles on the next try and maybe doing some finger plates or go for more of a mitten gauntlet using all cuir boulli

View user's profile Send private message
Rod S.


Joined: 22 Feb 2008
Reading list: 2 books

Posts: 22

PostPosted: Thu 07 Jan, 2010 8:26 pm    Post subject: Re: POLEARMS!         Reply with quote

Thom R. wrote:

Now what I need help with is ideas on finishing the hafts. I would be very interested in what would work well, and would be reasonably historically accurate. I have boiled linseed oil. Also I was wondering if any experts out there on polearms would tell me if polearms - for example the Bill - were painted or not. I have been contemplating some paint. Maybe thats crazy though, so I am soliciting ideas on how to finish the hafts. Thanks for looking! tr


To preserve grip in sweaty hands it's important to not bury all the wood's tooth in finish. I've experience finishing staffs, for which I've used boiled linseed oil and turpentine mixed 1:1. Four or five hand-rubbed (and I mean rubbed) coats, with a wipe-off and day's drying time for each, will do. If you do many more, you'll get furniture.

I've also used Kramer's Best with success on raw wood. It's not cheap, though. Another option is to swab the haft well with Danish oil.

There are nice varnishes like Le Tonkinois (a non-synthetic Chinese varnish made in France), but they're designed to bring wood up to a gloss or semi-gloss finish in five or six coats. Very weatherproof, but you'd have to apply one or two coats and scuff them - or experiment with diluting the varnish with turpentine - to get a sealing but still grippy finish.

Anyway. please let us know what you wind up doing, and how it fares.

Rod
View user's profile Send private message
Thom R.


Location: Tucson
Joined: 26 Jul 2007
Reading list: 30 books

Posts: 630

PostPosted: Fri 19 Feb, 2010 9:26 am    Post subject:         Reply with quote

Have the camera working today so time for an update. Thanks for all the advice on finishing the wood hafts. I am slowly doing a thin coat at a time using the turp and linseed oil mix. very thin coat rubbed on. takes a while to dry each time.

finished the scale aventail using scales from the Mercs Tailor and wore it to Estrella for fun. I may add some dyed duck cloth to the lower edge both to protect it and add some more color. although not strictly historical its in the plausible category I suppose. Looks good and I would rather take a hard hit on the scales than a mail aventail. The only problem I noticed was that while blows on mail tend to "bite" blows tend to glance off the scales so you need good neck protection! Still, I took some hard hits on this and didn't feel much of anything.


I decided after experimenting with the scales, that as far as alternatives to plate and mail, lamellar is still the better way to go for protecting the main core of the body. Still, I like these scales and have a bunch more so I am mulling ideas of what to do with them next.
View user's profile Send private message
Thom R.


Location: Tucson
Joined: 26 Jul 2007
Reading list: 30 books

Posts: 630

PostPosted: Fri 19 Feb, 2010 9:41 am    Post subject:         Reply with quote

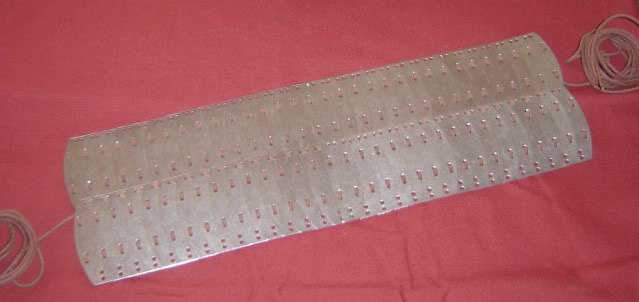
here is the start of my lamellar. I am using steel plates and macrame cord. I just bought a Whitney Punch so I can alter or make a few plates on my own. If anyone has done lamellar before and has tips I would love to hear them. Its a time burner for sure, but a nice project to work on while watching the olympics. the ladies can laugh, but its kind of like, knitting for guys. these two plates below cover half of the circumference of my core and took me about an hour each to lace, so I am two hours in. its probably going to take about 20 hours or so when all is said and done I am thinking. I am trying to keep each row tight and the lacing between the rows a little looser.

View user's profile Send private message
Allan Senefelder
Industry Professional


Location: Upstate NY
Joined: 18 Oct 2003

Posts: 1,563

PostPosted: Fri 19 Feb, 2010 10:46 am    Post subject:         Reply with quote

Thom, thanks for the pics of the scale standard. I've never actually seen anyones finished project with them so its neat to get the chance.
View user's profile Send private message Visit poster's website
Thom R.


Location: Tucson
Joined: 26 Jul 2007
Reading list: 30 books

Posts: 630

PostPosted: Fri 19 Feb, 2010 11:59 am    Post subject:         Reply with quote

No thank you! It looks much better when I am wearing it over my arming coat than on the armour stand like that. I'll try to get a pic to you of me wearing it. fun stuff!! tr
View user's profile Send private message
Thom R.


Location: Tucson
Joined: 26 Jul 2007
Reading list: 30 books

Posts: 630

PostPosted: Sat 10 Apr, 2010 4:49 pm    Post subject:         Reply with quote

OK back to weapons this month

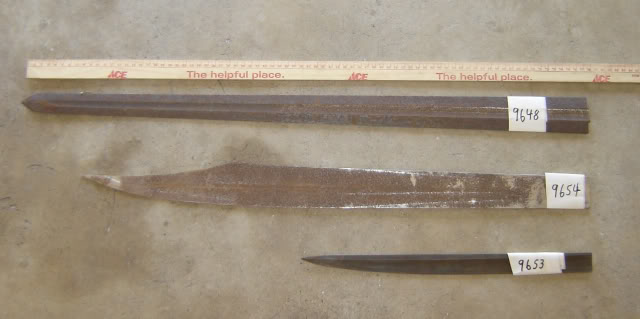
first up I rec'd a few of those moat sale swords - three of which were heat treated but broken


I will make the top one into a short type X arming sword, actually that one I am giving to my son and he is going to work on it for himself after I cut the hilt down. The bottom one looks like it will make a nice knife or single edged dagger. The middle one - which appears to have been a blank started for a vassal - I am not so sure. Maybe a messer or I am thinking of mounting it as a glaive on a pole. ideas welcome........
View user's profile Send private message
Jason Dingledine


Location: Aurora, Ohio
Joined: 18 Aug 2003

Posts: 219

PostPosted: Sat 10 Apr, 2010 6:13 pm    Post subject:         Reply with quote

Thom R. wrote:
OK back to weapons this month

first up I rec'd a few of those moat sale swords - three of which were heat treated but broken


I will make the top one into a short type X arming sword, actually that one I am giving to my son and he is going to work on it for himself after I cut the hilt down. The bottom one looks like it will make a nice knife or single edged dagger. The middle one - which appears to have been a blank started for a vassal - I am not so sure. Maybe a messer or I am thinking of mounting it as a glaive on a pole. ideas welcome........


Bottom one is a broken tip off of a Lady Vivamus. I probably broke that blade myself years ago when I still worked for Albion and we were prototyping that blade. Top blade is a First Gen blade that was on the Hastings and I think one or two others (this was nearly 10 years ago), and you are correct about the middle blade. Good luck with the projects.

Jason Dingledine
View user's profile Send private message
Thom R.


Location: Tucson
Joined: 26 Jul 2007
Reading list: 30 books

Posts: 630

PostPosted: Sat 17 Apr, 2010 4:07 pm    Post subject:         Reply with quote

Thanks for the info Jason!

Pole mounted glaive it will be. Removed the active rust, cut the tang end of the blade down. Will mount on a 1.25 inch ash pole but I am not sure if I am going to add a rondel at the base or a cross. May also add a collar or langets. Need to do some research. Again, ideas always welcome


Last edited by Thom R. on Sat 17 Apr, 2010 4:36 pm; edited 1 time in total
View user's profile Send private message
Thom R.


Location: Tucson
Joined: 26 Jul 2007
Reading list: 30 books

Posts: 630

PostPosted: Sat 17 Apr, 2010 4:30 pm    Post subject: Mr Fugly         Reply with quote

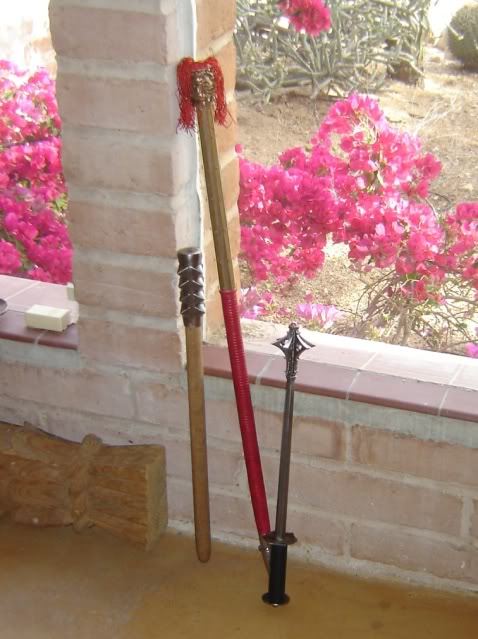
This was a fun project. I bought one of the Mr Ugly mace heads from Tod and decided to mount it on a longer one inch staff, sort of baton length, long enough to double as a walking stick. I mounted a spear like buttcap, again because I wanted this to double as a walking staff. The buttcap helps balance the mace given its length, and can also be used as a weapon, its blunt enough to be used as butt end of a walking stick yet still pointy enough to be a threat if used in a thrust. The mace I wedged and drilled for a through going brass rod/rivet, so it is quite solid. I added 1/8th inch brass plates to the business end below the mace head, again with through going copper rivets. Then I did a long baseball bat style leather wrap, dyed red, and gave Magog a little wild hair. The final product weighs 950 g, and is 36 inches long overall with a POB about 25 inches (11 inches below the top of mace head). I have ordered twice now from Tod via his new website and it works great. Shipping is always really quick to the States.The detail on Tod's casting is really really nice.

Would not want to get hit by this though....................

Magog in comparison to my other maces from A&A


Up close


The other interesting thing about this mace now that it is finished is that it has this really odd sound when in motion, like a very strong tachigaze, I guess it is the effect of the brass plates which act like baffles and create the sound. tr
View user's profile Send private message
Thom R.


Location: Tucson
Joined: 26 Jul 2007
Reading list: 30 books

Posts: 630

PostPosted: Sun 02 May, 2010 2:26 pm    Post subject:         Reply with quote

New WIP - brigandine/lamellar/coat of plates

My goal was to create the cheapest most functional coat of plates I could. So far I have: 20 bucks for a wool shirt from KOA, steel is basically free scrap strip from Ring Lord 35 bucks for shipping, leather bits from tandy leather scrap bin 12 bucks, and the most expensive portion so far is the rivets - 45 bucks. So about 115 bucks so far. I should have enough materials to finish under 150 I am thinking.

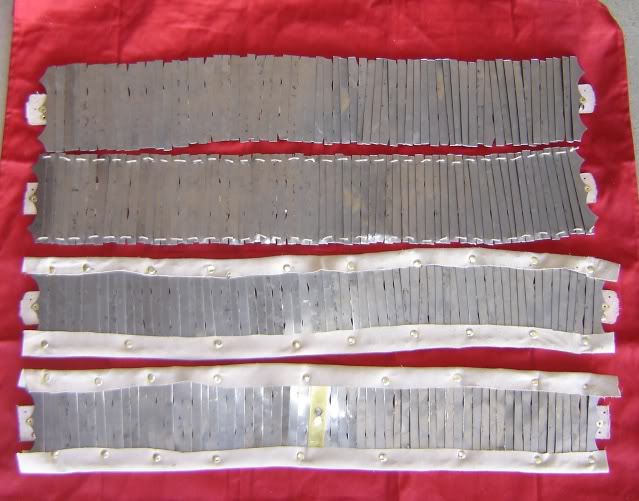
Construction is a hybrid concept because of the materials I am working with. Plates are aligned vertically in a strip like lamellar but riveted together to a leather strip. The finished plates are then riveted to the wool like brigandine.

The tradeoff in cost is time. Its a time burner for sure, for just one lame,

1. cut plates from scrap strip 20 minutes
2. punch with whitney punch, two sizes of holes 45 minutes
3. hammer them flat again 30 minutes
3. grind off sharp edges with dremel 30 minutes
4. cut and punch /prepare leather strip 15 minutes
5. rivet to leather strip 45 minutes
6. sew up top and bottom along pre-punche holes to straighten/stiffen 20 minutes
7. grind the plates on belt sander to be more even on top and bottom 20 minutes
8. rivet doe skin top and bottom to prevent cutting / chafing 30 minutes
9. wire brush the rust and whatever on the plates, clean 'em up and rub a little wax into them 20 minutes

so more than 4 hours of work for just one lame. and that doesn't include the time to mark and rivet to the wool. or slurp down some refreshment or make some lunch or play with the dog.

I am happy with this though, its very flexible, yet nicely overlapped. not too heavy, not too light. will strap around my back like the Visby #1. more details to follow

different stages of construction


four horizontal groups riveted to wool so far
View user's profile Send private message


Display posts from previous:   
Forum Index > Off-topic Talk > Tales from the shopDIY Project
Page 1 of 2 Reply to topic
Go to page 1, 2  Next All times are GMT - 8 Hours

View previous topic :: View next topic
Jump to:  
You cannot post new topics in this forum
You cannot reply to topics in this forum
You cannot edit your posts in this forum
You cannot delete your posts in this forum
You cannot vote in polls in this forum
You cannot attach files in this forum
You can download files in this forum


All contents © Copyright 2003-2024 myArmoury.com — All rights reserved
Discussion forums powered by phpBB © The phpBB Group
Switch to the Basic Low-bandwidth Version of the forum