Brand new guy here, but I have some experience with construction. I've decided to try my hand at a viking shield and I've acquired almost everything I need to make it work. One of the things I picked up was a pack of white rawhide dog bones for the edging material. I've been letting the rawhide soak in water for three days now, and the material hasn't become stretchy yet. How long does one have to wait before they can start cutting the rawhide and tacking it onto their shield?
Usually about 2-3 hours of soaking.
| Justin Thompson wrote: |
| Brand new guy here, but I have some experience with construction. I've decided to try my hand at a viking shield and I've acquired almost everything I need to make it work. One of the things I picked up was a pack of white rawhide dog bones for the edging material. I've been letting the rawhide soak in water for three days now, and the material hasn't become stretchy yet. How long does one have to wait before they can start cutting the rawhide and tacking it onto their shield? |
| Jim Adelsen wrote: |
| Usually about 2-3 hours of soaking. |
2-3 hours? Just what qualifies as "stretchy" when the discussion is about soaked rawhide? The stuff is soft enough to be unraveled, but the bends still haven't come out yet and I can only get it stretched an inch or so past its present length.
I don't know that it ever gets that stretchy. It expands and loosens up when soaked, and will tighten up as it dries.
| Justin Thompson wrote: | ||
2-3 hours? Just what qualifies as "stretchy" when the discussion is about soaked rawhide? The stuff is soft enough to be unraveled, but the bends still haven't come out yet and I can only get it stretched an inch or so past its present length. |
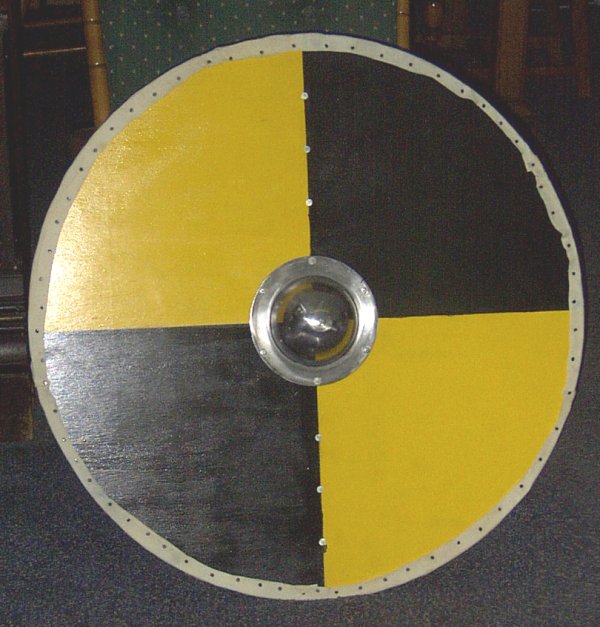
This is the current state of my viking shield.
As you can see the handle has split, and the rawhide edging is gnarly in certain places. I'm gonna retry attaching it, starting from the front this time, and hope for better results.
 Attachment: 72.13 KB
Attachment: 47.85 KB
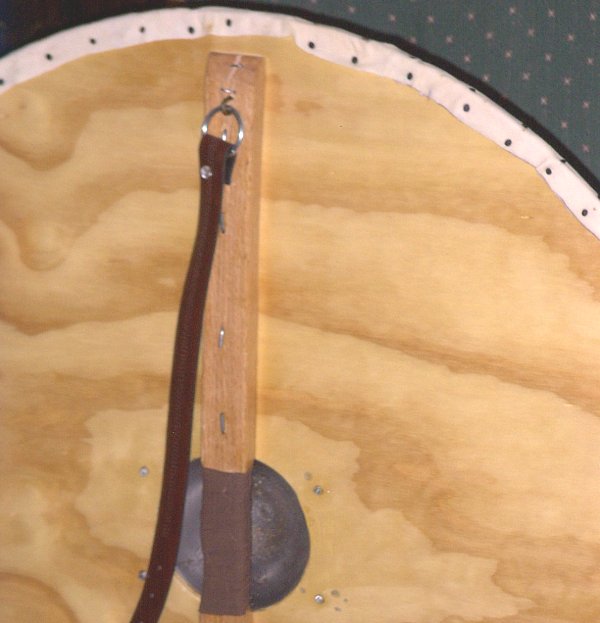
As you can see the handle has split, and the rawhide edging is gnarly in certain places. I'm gonna retry attaching it, starting from the front this time, and hope for better results.
looks as though you may have put too many nails or rivets in the handle wood,it might be worth getting a frankish splayed metal grip,and when that shield dies a death-you can re-use the handle :)
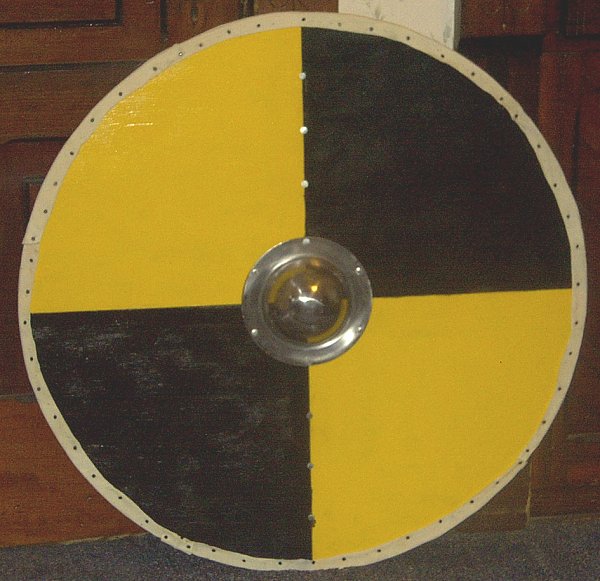
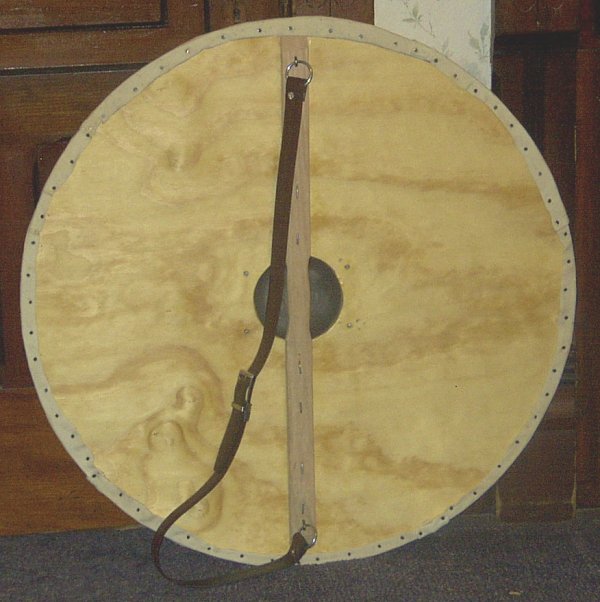
Well after much work I've finally finished the shield and have it to the quality I'm happy with. The edging has been straightened out, and the handle replaced with a piece of oak that is still intact and hasn't split.
Attachment: 67.09 KB
Attachment: 60.37 KB
One thing I would suggest for future projects - when making the shield, use angle grinder or other method to draw the lines where "boards" would contact on it - makes it look more like it would have been made from planks. Also, I tend to make handle in such way that it tapers towards the outside of the shield - makes for more aestetically pleasing look.
As example, this is a shield I made some years ago:

As example, this is a shield I made some years ago:
Artis do you have a view from the front?


looks very good can't wait to make one :D .
Scoring lines in the plywood to give the impression of a planked construction is, in my opinion, only really worth it if you're not going to paint the shield. If you paint it, the paint would obscure the joins between the planks anyway.
Johan Schubert Moen
Johan Schubert Moen
How exactly do you use an angle grinder for scoring the plywood surface?
| Justin Thompson wrote: |
| How exactly do you use an angle grinder for scoring the plywood surface? |
Put a metal cuting disc on it, mark the lines on surface then do about 1 mm deep cut along the lines. takes some practice but really ads to the looks of a plywood shield.
Alternately, cover the face of the shield in textile. this HUGELY strengthens the shield. We generally use 6mm ply and two layers of canvas.
Simply cover the shield face in a layer of wood glue (for outdoor use), and stretch/stroke the cloth evenly over it. Wait until the first layer is dry enough not to skid about, and repeat.
The resulting shield will be very ligth, and strong enough to withstand reenactment combat.
Simply cover the shield face in a layer of wood glue (for outdoor use), and stretch/stroke the cloth evenly over it. Wait until the first layer is dry enough not to skid about, and repeat.
The resulting shield will be very ligth, and strong enough to withstand reenactment combat.
I picked up some white canvas from Wal-Mart in the fabric department. It feels a lot stiffer than any other canvas I used before. How easy is it to paint this stuff?
Regarding the Wal-Mart canvas, if it is cotton canvas it will take paint without a problem, in fact it can take too much paint if it is a heavy oz. canvas. Once you have it glued down and it has dried completely use a glue size (thinned glue) and paint it. After it has dried paint as you normally would.
The scored line application to a plywood shield is bothersome, it seems to me this is a "re-enactorism" that has slipped in unquestioned. It reminds me of routered lines in a modern mass produced door to give the effect of a glued up panel. As I understand traditional woodworking techniques there should not be a seam that can be felt at the boards junction. It would be most likely that a difference in grain orientation would be visible and make the planks obvious but they should fit together smoothly. The planks would be make by splitting billets of the selected wood, most likely with a froe and then they would be planed to the desired thickness, placed face to face and edge jointed so that they matched exactly. The prepared planks would then be glued together, most likely with a hide or casein glue. This is also a very important point, until the development of the (IIRC) urea glues no glue was waterproof. If an item was made of glued up wood and was expected to be in the weather it was covered in sized canvas, pine pitch, paint, or some other form of (mostly) waterproof coating. It seems to me that a more accurate way of making a shield would be to cover the face in fabric and paint the back.
The scored line application to a plywood shield is bothersome, it seems to me this is a "re-enactorism" that has slipped in unquestioned. It reminds me of routered lines in a modern mass produced door to give the effect of a glued up panel. As I understand traditional woodworking techniques there should not be a seam that can be felt at the boards junction. It would be most likely that a difference in grain orientation would be visible and make the planks obvious but they should fit together smoothly. The planks would be make by splitting billets of the selected wood, most likely with a froe and then they would be planed to the desired thickness, placed face to face and edge jointed so that they matched exactly. The prepared planks would then be glued together, most likely with a hide or casein glue. This is also a very important point, until the development of the (IIRC) urea glues no glue was waterproof. If an item was made of glued up wood and was expected to be in the weather it was covered in sized canvas, pine pitch, paint, or some other form of (mostly) waterproof coating. It seems to me that a more accurate way of making a shield would be to cover the face in fabric and paint the back.
| Jason Daub wrote: |
| Regarding the Wal-Mart canvas, if it is cotton canvas it will take paint without a problem, in fact it can take too much paint if it is a heavy oz. canvas. Once you have it glued down and it has dried completely use a glue size (thinned glue) and paint it. After it has dried paint as you normally would. |
I'm not understanding what you said. I glue the face of the canvas, the side that's seen in the pictures, and then paint it?
Exactly, what you are doing by sizing the canvas is similar to using a primer on bare wood. It actually acts to seal the fabric so the base layer of paint (called the ground) will not damage the fabric and also allows it to go on evenly, the method has been used by artists ever since canvas started being used for painting. In fact this method dates back much farther in the art world, most paintings before the 16th century were completed on wooden panels and it was a common method into the 18th century. A wooden panel, usually oak or linden was sized with glue (usually rabbit skin) and a layer of linen glued on and sized and then prepared with gesso or a ground (white paint) before the painting was started.
As for shield construction, I am more familiar with Roman shield construction and their "laminated wood" construction aka "plywood", but they were invariably covered in leather and textile or just textile. I would surmise that the extra effort involved in covering the back side as well as the face indicated that there were considerations other than just appearance in play.
As for shield construction, I am more familiar with Roman shield construction and their "laminated wood" construction aka "plywood", but they were invariably covered in leather and textile or just textile. I would surmise that the extra effort involved in covering the back side as well as the face indicated that there were considerations other than just appearance in play.
Alright then. I can't get any gesso around here, trust me I've looked. What kind of glue would I put on the canvas in this case?
Page 1 of 2
You cannot post new topics in this forumYou cannot reply to topics in this forum
You cannot edit your posts in this forum
You cannot delete your posts in this forum
You cannot vote in polls in this forum
You cannot attach files in this forum
You can download files in this forum
All contents © Copyright 2003-2006 myArmoury.com — All rights reserved
Discussion forums powered by phpBB © The phpBB Group
Switch to the Full-featured Version of the forum
Discussion forums powered by phpBB © The phpBB Group
Switch to the Full-featured Version of the forum