Folks,
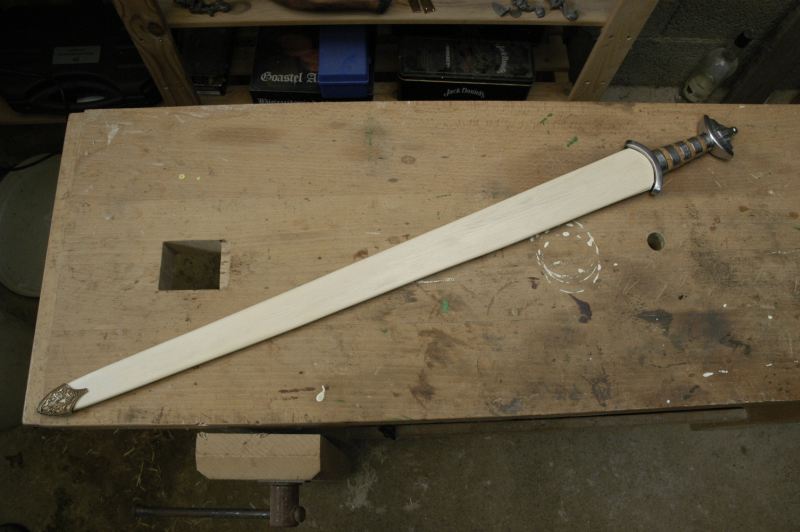
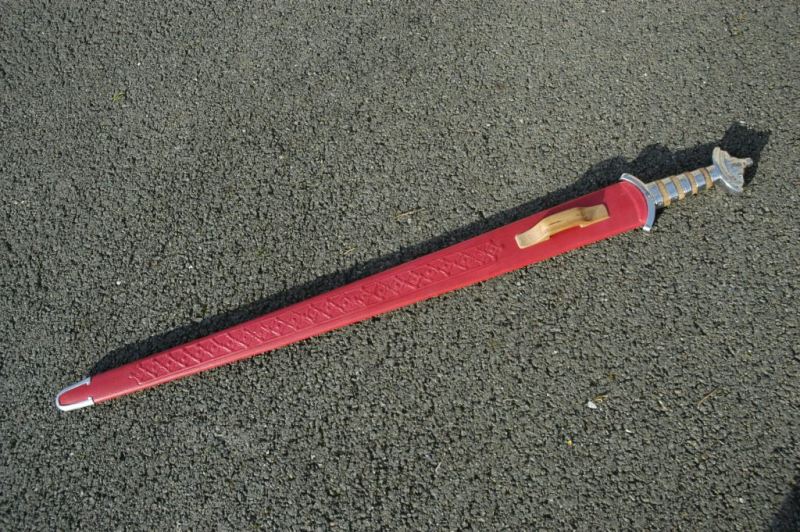
I have recently tried my hand at creating some laced scabbards and I have created a web page with my instructions and steps. This is a pretty graphic intensive page. Most of the methods I use in this construction are based on the laced scabbard instructions created by Peter Johnsson, and are used with his permission.
[ Linked Image ]
I also have other projects on my web site that you are welcome to check out. I understand that not all my methods of construction are as historic as what is typical of this site, but they may be a good start for those wishing to learn the basics.
http://www.yeoldegaffers.com/project_scabbard.asp
Thank you,
Ron Reuter
Amazing. Thanks for all the work putting this together.
Very nice!
M.
M.
Very informative site, thanks for posting :D
Brilliant...
I am very glad someone posted this. I am always asked by people when I show them my scabbards
"Do you know a website that shows how to make a scabbard like that?"
and I have never had a very good answer. Thanks.
The only thing I would advise adding, is more detail on how to carve out the middle. That is where most people I know run into problems. I am interested to hear how yours are done? I carve out any I do with a hand plane, and define the edges with a triangular tipped x-acto router knife.
 Attachment: 32.54 KB
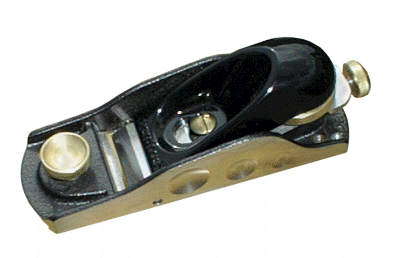
hand-plane
Attachment: 10.48 KB
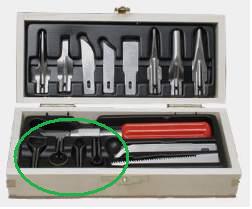
knife tips
I am very glad someone posted this. I am always asked by people when I show them my scabbards
"Do you know a website that shows how to make a scabbard like that?"
and I have never had a very good answer. Thanks.
The only thing I would advise adding, is more detail on how to carve out the middle. That is where most people I know run into problems. I am interested to hear how yours are done? I carve out any I do with a hand plane, and define the edges with a triangular tipped x-acto router knife.
hand-plane
knife tips
I also appreciate it. The first "historic" method is the one I prefer since it is easily done with a scrap wood sanding block and no fancy tools. I suspect that historically, thin wood slats were more likely molded to the contour of the sword while gluing. With modern sandpaper materials and a scrap sanding block, one can do as described on your site in the same amount of time.
I would love to see chape fabrication added to this site or a similar one.
I would love to see chape fabrication added to this site or a similar one.
Thanks for posting this...its very nicely put together.
Excellent how-to! Kudos to the author. The site is image-intensive and well written. Exactly what everyone looking to make a wood-core, leather-wrapped scabbard needs...including myself.
Thank you.
Murphy :cool:
Thank you.
Murphy :cool:
I'm echoing the Brilliant statement. The was so very informative. Thanks you very much. It answered several questions that I have always had. I'm sure I will be using this information in the future.
| Quote: |
| With modern sandpaper materials and a scrap sanding block |
I have always heard, and would advise against using any sandpaper for the core. While sanding, grains of sand fall off the paper and may get lodged in the wood. It is almost impossible to see, but when you sheath the sword you will get a nice long scratch in the blade, on top of that, if the scabbard is finished it will be impossible to remove the grain of sand without tearing apart the whole scabbard.
That's why I use the plane.
Just my thoughts,
Best,
Hadrian :)
| Hadrian Coffin wrote: |
|
I would advise against using any sandpaper for the core. While sanding, grains of sand fall off the paper and may get lodged in the wood. It is almost impossible to see, but when you sheath the sword you will get a nice long scratch in the blade, on top of that, if the scabbard is finished it will be impossible to remove the grain of sand without tearing apart the whole scabbard. That's why I use the plane. Just my thoughts, Best, Hadrian :) |
I have yet to experience this. But then again, I use a shop brush after, and only medium hard woods such as poplar that don't tent to retain the grit.
| Jared Smith wrote: |
| I suspect that historically, thin wood slats were more likely molded to the contour of the sword while gluing. |
I always had the same idea. This is a time (and money as well) saving method that I used several times. Here is an example.
The wood core is just two poplar slats that I got from a crate maker.
BTW The sword is an anglo-saxon by Armour Class.
Poplar slats
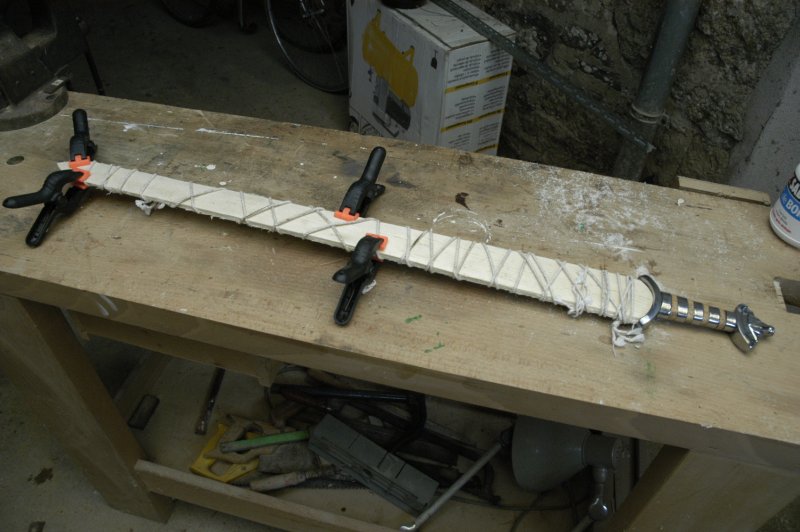
Molding the slats

Ron,
Good work on the scabbard. And the fine step by step explanation. With your photos the process is clearly illustrated: thank you for taking the time to document it. It will be a valuable guide for all those who want to try their hand at scabbard making.
It is also good to see alternative ways to shape/ construct the core, posted in this thread.
Thin slats of wood that are formed over the blade (either formed by steaming/soaking or by cutting), or layers of veneer glued in layers on each side can be seen on surviving examples.
The craft of the scabbard is an art in itself. Nice to see different examples!
I also applaud the slat method tutorial.
With this method, the idea of a "historical plane" (modern style block planes are not really known in medieval era, although the same might be said of their tools in general) or sharp cutting tool for fabrication makes much sense as the edges of the slats need to be beveled to have a good joint. This is quickly done with a fairly crude plane if you know the approximate angle.
As an alternative to modern clamps, I have read another person's project description where they bound the core together with wire around an oiled sword (period available materials again) and glued a composite of cloth and hide glue around it. This has some resemblance to katana/ saya scabbard construction with paper lamination, and can be treated with waxes or lacquers to give water and humidity resistance to the hide glue. (Also multiplies final strength to weight by around 2X to 4X depending upon number and quality of laminations based on some destructive scabbard core tests I did a few years ago.) I doubt vestiges of a thin paper or silk layer would have been noticed in many archeological examinations since so few demonstrate interest in the material science (glue type, layers, joint methods, etc.) part of the scabbard artifact fabrication.
First of all, thanks for all of the nice and supporting Comments!!
Man.. you guys are good! I am always impressed with the level of
of expertise which can be found here. More importantly, your desire to
share it. Thank you!
*******************************************************
Ok, let me summarize so I make sure I get it right.
A. Historic Method seems to include 2 major types of core construction:
1. Carve out two half’s and glue together (like I show on my web page) (Yes/no ???)
2. Curve two pieces of thin slats around the blade, by either steaming/soaking them,
or with layers of veneer glued on each side.
*******************************************************
B. I should at least mention the sanding/grit issue on my site (scratching sword).
C. Show more details of carving out the scabbards (sorry, but I will probably be using modern tools :>)
(on my website)
D. Show a thin slat method (steam/soak/veneer) of core creation.
(on my website)
*******************************************************
I agree, the Thin slat method is awesome.. Jean Le-Palud, thank you so much for sharing your method and pictures!
Ron
Page 1 of 1
You cannot post new topics in this forumYou cannot reply to topics in this forum
You cannot edit your posts in this forum
You cannot delete your posts in this forum
You cannot vote in polls in this forum
You cannot attach files in this forum
You can download files in this forum
All contents © Copyright 2003-2006 myArmoury.com — All rights reserved
Discussion forums powered by phpBB © The phpBB Group
Switch to the Full-featured Version of the forum
Discussion forums powered by phpBB © The phpBB Group
Switch to the Full-featured Version of the forum