| Author |
Message |
|
J. Pav
|
 Posted: Tue 10 Jun, 2008 9:33 am Post subject: Helmet project. Posted: Tue 10 Jun, 2008 9:33 am Post subject: Helmet project. |
 |
|
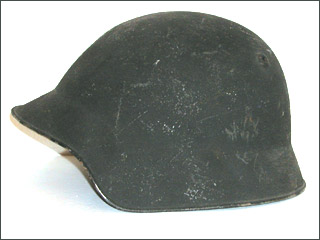
Inspired by an SFI thread about a conversion of a Swiss military helmet into a surprisingly nice Kabuto, I've decided to take an old, Vietnam era, US military pot-helm and turn it into a basic sallet.

I've gotten a sheet of 16ga steel, and I'm figuring out the pieces with oaktag paper, and marking them out on the steel. An order of brass rivets is on its way from Ebay. I still need to anneal the edges to I can trim some of the flare and eventually drill for the rivets.

I'm debating going in a semi-fantasy route, using whatever steel is left over to make some form of simple wings or crest. I don't demand historical perfection, so arc-welding may or may not be involved at some point. If I do wings, I'd probably want them as part of the faceplate, extending from the top of the hinge-piece. And before you ask, yes, part of my inspiration of the design comes from Nightmare, a character from the Soul Calibur series... 
Thoughts? Criticisms? Advice? Musings?
|
|
   |
 |
Bruno Giordan

|
| Posted: Wed 11 Jun, 2008 11:00 am Post subject: |
|
|
hm, for me you are going to work as much as to make a new one from scratch.
Shape is pretty far from a sallet and modern steel helmets are tough steel.
I would perhaps try a swiss 1918 helmet, whose shape already reminds of a XV century sallet, after which it was inspired.
But the shape of the swiss doesn't suit me too.
Last edited by Bruno Giordan on Wed 11 Jun, 2008 11:03 am; edited 1 time in total
|
|
|
|
|
Russ Thomas
Industry Professional

|
| Posted: Wed 11 Jun, 2008 11:46 am Post subject: sallet project............ |
|
|
Hi,
I have to agree with Bruno here, it is never going to make a particularly nice shaped sallet, and with all the work involved in cutting, drilling, polishing etc. personally I do not think it is worth it. However, if you can find a paratroopers helmet, that can be made into a form of sallet, again not too convincing, but passable.
The steel of these helmets is very hard, even with annealing. In fact the last time I tried it some thirty years ago, the only way to 'drill' the holes effectively and easily was to blast them through with an arc welder! 
The Swiss, and even better still, the American helmet would lend themselves much better to the Japanese kabuto, especially the overall shape of the san mai bachi, than the sallet (BTW. san mai bachi literally means three plate (helmet) bowl, but the overall shape is similar to the American helmet, especially at the peak ).
If you can find a paratropopers helmet ( NOTE: not a German or British WW II example, as both of these are worth a small fortune  ), you will get a better overall shape, but it is still a lot of work. ), you will get a better overall shape, but it is still a lot of work.
Why not try hammering one out from scratch, you will learn a lot and have a lot of fun on the way !
One final thing, for a sallet, the bottom edge of the visor is best cut slightly concave, not convex down to a point as you have in the photograph. I hope that you don't mind my saying that, just that over the years , I have made quite a lot of sallets !!
Good luck whatever you decide 
Regards,
Russ
Carpe diem, quam minimum credula postero !
http://www.living-history.no
|
|
 |
|
|
J. Pav
|
| Posted: Wed 11 Jun, 2008 2:15 pm Post subject: |
|
|
Thankyou, both.
True, I'd much rather use a closer helmet style. One of the Swiss helms would be fantastic. Alas, this helmet was free and my budget is limited, myself being a broke college student.
I know it won't be perfect, but I think it will atleast look good. I don't have the tools, skill, or free time needed to dish out a whole new helmet, but I think I should be able to form a few pieces and make a few additions. The look doesn't have to be perfect, and I'm not really basing it off anything historic(sallet is just the basic idea, I might borrow from other designs as it continues), so I'm not holding myself to any strict rules. Overall, I'm basing a lot of my current work on this little guide I found:

One thing I'm thinking about right now is the lining/suspension. I've seen padded liners, and I was wondering if anyone has ever tried using pieces of memory-foam? I have some substantial scraps from an old mattress, and it absorbs shock really well and is also quite comfortable and form-fitting. I'm thinking cutting it into stripe, and sewing it into a linen cover, then using a decent adhesive to set the whole thing into the helmet.
|
|
|
|
|
|
J. Pav
|
| Posted: Sun 07 Sep, 2008 6:33 pm Post subject: |
|
|
With a 60-hour-a-week job for the remainder of my summer, this project was temporarily scrapped. Back at school, it found new life as a project for my intermediate sculpture class. The idea has also evolved into something more along the lines of a fantasy, grotesque, parade helmet than a serious sallet.
The helmet itself has has the lip cut down with a torch. Only took 20 minutes, so I don't see what the big deal is about using one of these as a base(unless one lacks access to an oxy-acetylene setup...). The edge was ground down to smooth it out.
The visor is roughed out, still planning the aventail(probably will be segmented, since I have enough brass rivets).
Just purchased African hartebeest(Hartebeast?) horns off Ebay to be mounted on the sides. I originally wanted steel-sheet ram's horns, but after an experiment, I figure it would take FAR too long to do(properly) with my limited skills and resources.
Original mock-ups:

Current status:


|
|
|
|
|
Nathan Keysor

|
| Posted: Sun 07 Sep, 2008 7:16 pm Post subject: |
|
|
I tried to make a sallet once many moons ago from an East German army helmet. That thing was made out of the hardest steel I have ever had the displeasure to beat a hammer against! If you are able to get it to work it will be tough that is for sure. Good luck.
"Democracy is two wolves and a lamb voting on what to have for dinner.
Liberty is a well-armed lamb contesting the vote!"
|
|
|
|
|
|
Lawrence Parramore
|
| Posted: Mon 08 Sep, 2008 12:47 am Post subject: |
|
|
Just a note, be careful, you have already cut of the main strength of this helmet the 'rim', do not be surprised if you find cracks appearing around the rim and even on the bowl itself. Even medieval helmets had a rolled or wire edge because the metal was apt to split.
Military helmets are a pig to work with as has been pointed out already, I don't know whether this will work but try welding an edge wire on or maybe at college you have a swager and can fold the edge over or put a wired edge on.
Even welding on these things can cause them to crack, maybe some kinds of welders work better than others?
In my experience working cold at the edge is a no no, working hot will work but the metal is so thin that you have to be quick!
Best to leave the edges on and apply your other plates in such a way as they aren't seen.
Best of luck with it.
|
|
|
|
|
James Arlen Gillaspie
Industry Professional

Location: upstate NY Joined: 10 Nov 2005
Posts: 587
|
| Posted: Mon 08 Sep, 2008 10:07 am Post subject: |
|
|
I would say no welding. This alloy is an odd one, and the heat treat very unusual.
jamesarlen.com
|
|
|
|
|
|
Lawrence Parramore
|
| Posted: Mon 08 Sep, 2008 11:01 am Post subject: |
|
|
I'd agree with James, I wondered if anyone knew if there was a way?
I have some of this metal in sheet form that was a store tobacco safe, it is just not user friendly but has been great at keeping burglars out of my workshop 
|
|
|
|
|
|
J. Pav
|
| Posted: Mon 08 Sep, 2008 7:35 pm Post subject: |
|
|
The only welding I plan on doing is for some form of simple crest atop the helmet. The best way I can think of is grinding a slot, then TIG welding the piece from the inside.
Hopefully, everything else will be attached with only the brass rivets. The visor's pivot will be steel rivets I'm going to have to make from thicker rod.
One thing I've been meaning to ask: I've seen (somewhere) that it's a good idea to have a leather washer in between the visor and helm at the pivot. How is this even done? Heating up the rivet would surely begin burning up the leather, and heating up the rivet seperately would end up with a too-large rivet(or a sloppy fit).
Also, I've searched for a decent picture showing the innards of a helm with a simple suspension(I beleive the one I saw awhile ago was 4 leather flaps ties at the top?) and chin-strap. The picture I'm looking for was a Normal helm, IIRC. I'll keep searching, but if anyone remembers where it is offhand, I'd appreciate it.
|
|
|
|
|
|
Lawrence Parramore
|
| Posted: Tue 09 Sep, 2008 12:14 am Post subject: |
|
|
I do my rivets cold on armour and hot on larger work, don't know if others do it hot on armour, I did have some rivets once that needed to be done hot but I never got that type again, maybe others do them hot though but the leather would be out in that case and you would need to use a piece of sheet with a slot in it so you could withdraw it after riveting.
This is illustrated in TOMAR maybe someone can post a picture.
But as this is decorative why not clip some nails down and use them cold instead, I have never used a leather washer myself so cannot comment on that, but paper or cardboard can also allow for the necessary space .
|
|
|
|
|
|
J. Pav
|
| Posted: Thu 11 Sep, 2008 4:21 pm Post subject: |
|
|
Though the primary function is as a piece of art, I still like to keep this in a somewhat historically-functional state. Thus, my professor is constantly asking me why I chose such thick(16ga) steel for the faceplate.
I have small brass rivets for the neck-tail and other details. I've roughed out two rivets, out of 1/2" diameter steel rod, for the visor-hinge.

The visor itself is slowly taking shape.


I initially wanted ram's hornes shaped from sheetmetal. After an experiment, I've decided it'll take too long to get it to an acceptable level. Thus, I've abandoned this:


For these:

[/img]
|
|
|
|
|
|
Lawrence Parramore
|
| Posted: Thu 11 Sep, 2008 11:56 pm Post subject: |
|
|
Why not use the real horns?
I like your experimentation, you'll learn a lot from that.
If you like welding why don't you cut the spirals in sheet, open them out then weld another strip to the spiral to make the horn then beat it into submission as the form you want?
|
|
|
|
|
|
J. Pav
|
| Posted: Fri 12 Sep, 2008 4:47 am Post subject: |
|
|
| Lawrence Parramore wrote: | Why not use the real horns?
I like your experimentation, you'll learn a lot from that.
If you like welding why don't you cut the spirals in sheet, open them out then weld another strip to the spiral to make the horn then beat it into submission as the form you want? |
The cutting and basic shaping isn't too much of an issue. I did that for the experiment. The problem is hammering them to to the point where they are clean enough and shaped exactly the way I want them. Since my due-date is now Sept. 22, I n longer have time to develope the skill with a hammer to do it how I initially invisioned it.
Besides, the real horns are got are so much more dynamic. I'm definately using them, though now I just need to find a good way to mount them. I'll be removing the horns from the skull-plate today, so I'll see what I have to work with.
|
|
|
|
|
|
J. Pav
|
| Posted: Fri 19 Sep, 2008 12:43 pm Post subject: |
|
|
All done.


|
|
|
|
|
|
Thomas Jason
Location: New Joisey Joined: 28 Jul 2004
Posts: 230
|
| Posted: Fri 19 Sep, 2008 12:49 pm Post subject: |
|
|
|
You're going to have trouble walking through doors.
|
|
 |
|
Torsten F.H. Wilke

Location: Irvine Spectrum, CA Joined: 01 Jul 2006
Posts: 250
|
| Posted: Fri 19 Sep, 2008 5:14 pm Post subject: |
|
|
|
That looks like a very fun fantasy piece... nice job!
|
|
|
|
|
|
Stu C
Location: Western Australia Joined: 10 May 2008
Posts: 46
|
| Posted: Sat 20 Sep, 2008 1:05 am Post subject: |
|
|
I like it - Nice work!
Stu
|
|
|
|
|
|
Lawrence Parramore
|
| Posted: Sat 20 Sep, 2008 1:18 am Post subject: |
|
|
I didn't notice the fin at the back of the skull the first time I looked
It will definitely get you noticed.
Will you continue to make more?
Good luck
Horns for future reference; http://collections.royalarmouries.org/index.p...&pg=38
|
|
|
|
|
|
S Oughton
Location: Australia Joined: 20 Sep 2008
Posts: 2
|
| Posted: Sat 20 Sep, 2008 5:39 am Post subject: |
|
|
He looks happy But seriously, that looks good.
The man who smiles when things go wrong has thought of someone to blame it on. - Robert Bloch
|
|
|
|
|
|
|

