Info Favorites Register Log in
myArmoury.com Discussion Forums

Forum index Memberlist Usergroups Spotlight Topics Search
Forum Index > Historical Arms Talk > New scabbard completed.....comments and suggestions welcome Reply to topic
This is a standard topic Go to page 1, 2  Next 
Author Message
Dan Dickinson
Industry Professional


Location: Michigan
Joined: 03 Oct 2004

Posts: 967

PostPosted: Fri 11 Jan, 2008 4:21 pm    Post subject: New scabbard completed.....comments and suggestions welcome         Reply with quote

I have just completed a new Poitiers scabbard for forum member Andrew Babbini. Andrew wanted a fairly simple scabbard, so i tried to follow that in the simple decoration of the mounts and chape.
The body of the scabbard is a poplar core covered in chocolate brown leather. The suspension is oxblood leather with hand forged buckles/belt-mounts. Comments and suggestions are welcome.
Dan

P.S. Sorry for the poor quality pics, photography is apparently not one of my talents.


 Attachment: 20.37 KB
Chape.JPG


 Attachment: 30.05 KB
[ Download ]

 Attachment: 42.65 KB
[ Download ]
View user's profile Send private message
Dan Dickinson
Industry Professional


Location: Michigan
Joined: 03 Oct 2004

Posts: 967

PostPosted: Fri 11 Jan, 2008 4:40 pm    Post subject:         Reply with quote

A shot of the back.


 Attachment: 46.68 KB
[ Download ]
View user's profile Send private message
Allen W


Joined: 02 Mar 2004

Posts: 285

PostPosted: Fri 11 Jan, 2008 6:55 pm    Post subject:         Reply with quote

Looks good. How did you make the chape?
View user's profile Send private message
Dan Dickinson
Industry Professional


Location: Michigan
Joined: 03 Oct 2004

Posts: 967

PostPosted: Fri 11 Jan, 2008 7:21 pm    Post subject:         Reply with quote

I made it out of sheet metal with the seam up the back and the finial on the end welded on. I then removed the material from the cut-out decoration.
View user's profile Send private message
Allen Andrews


Location: Maine USA
Joined: 17 Oct 2006
Reading list: 5 books

Posts: 305

PostPosted: Sat 12 Jan, 2008 5:46 am    Post subject:         Reply with quote

That's nice, I really like how the chape turned out.
" I would not snare even an orc with a falsehood. "

Faramir son of Denethor

Words to live by. (Yes, I know he's not a real person)
View user's profile Send private message
Jared Smith


Location: Tennessee
Joined: 10 Feb 2005
Likes: 1 page

Spotlight topics: 3
Posts: 1,532

PostPosted: Sat 12 Jan, 2008 8:06 am    Post subject:         Reply with quote

I'd like to see a close up of the chape construction. It looks very good. Is it a one piece with welded seam up the back, or is only the finial welded on? Also, how did you make the finial?
Absence of evidence is not necessarily evidence of absence!
View user's profile Send private message
Dan Dickinson
Industry Professional


Location: Michigan
Joined: 03 Oct 2004

Posts: 967

PostPosted: Sat 12 Jan, 2008 8:36 am    Post subject:         Reply with quote

I formed the chape out of sheet into a flattened cone with the ends meeting at the back, then inserted the finial into the small end. I then welded the seam at the back and around the end. The finial is a piece of steel rod that has been decoratively turned.
Hope this explanation helps,
Dan
View user's profile Send private message
Thomas Parsons


Location: Strasbourg (France)
Joined: 10 Dec 2007
Reading list: 23 books

Posts: 13

PostPosted: Sat 12 Jan, 2008 9:05 am    Post subject:         Reply with quote

Really nice! Just one question: why no matching hardware at the "hilt" end of the scabbard?
View user's profile Send private message
Antal László


Location: Lymington, Hampshire, UK
Joined: 16 Sep 2006
Reading list: 1 book

Posts: 118

PostPosted: Sat 12 Jan, 2008 9:06 am    Post subject:         Reply with quote

Looks great! How did You fix the chape?
View user's profile Send private message MSN Messenger
Chad Arnow
myArmoury Team


myArmoury Team

PostPosted: Sat 12 Jan, 2008 9:37 am    Post subject:         Reply with quote

Thomas Parsons wrote:
Really nice! Just one question: why no matching hardware at the "hilt" end of the scabbard?


While there are a number of examples of metal fittings at both ends of the scabbard (and often in between), it was not always done. In fact, there are many examples of scabbards in art with metal only on the point end of the scabbard.

Happy

ChadA

http://chadarnow.com/
View user's profile Send private message Send e-mail Visit poster's website
Allen W


Joined: 02 Mar 2004

Posts: 285

PostPosted: Sat 12 Jan, 2008 10:21 am    Post subject:         Reply with quote

I apologize if this is getting little old. I have made one scabbard in my life. The carving went well but inefficiently and I used too hard a wood. however I had to recycle a chape from a windlass scabbard as I had no idea mow to form one from commonly available hardware supplies. This is the main piece of information I look for in every scabbard thread. I read people talking of forming them on mandrel but what do you use for a mandrel? I also hear of using bee's wax when fitting leather wraps to both grips and scabbards but don't understand why or how? I don't want to badger you about the chape but the forming process has me stymied. Do you do your own welding and with what?
View user's profile Send private message
Chad Arnow
myArmoury Team


myArmoury Team

PostPosted: Sat 12 Jan, 2008 11:05 am    Post subject:         Reply with quote

Allen W wrote:
This is the main piece of information I look for in every scabbard thread. I read people talking of forming them on mandrel but what do you use for a mandrel?


Some scabbard makers have built there own mandrels, I believe. Some have pieces of wood/metal with channels in them that they use to get the U-shape, then they bend it around the scabbard tip.

Others, depending on thickness of the wood and workability of the metal chape material, use the scabbarded sword as a mandrel. What better mandrel than the actual item the chape is ending up on? Happy

Happy

ChadA

http://chadarnow.com/
View user's profile Send private message Send e-mail Visit poster's website
Thomas Parsons


Location: Strasbourg (France)
Joined: 10 Dec 2007
Reading list: 23 books

Posts: 13

PostPosted: Sat 12 Jan, 2008 2:16 pm    Post subject:         Reply with quote

Thomas Parsons wrote:
Really nice! Just one question: why no matching hardware at the "hilt" end of the scabbard?


While there are a number of examples of metal fittings at both ends of the scabbard (and often in between), it was not always done. In fact, there are many examples of scabbards in art with metal only on the point end of the scabbard.


- I was just wondering if there was any particular reason for having opted for this layout...
View user's profile Send private message
Dan Dickinson
Industry Professional


Location: Michigan
Joined: 03 Oct 2004

Posts: 967

PostPosted: Sat 12 Jan, 2008 4:13 pm    Post subject:         Reply with quote

Ok, let's see if i can keep the questions straight. First, the chape is fitted to the scabbard using a friction fit...i.e. shaped to fit quite closely placed as far as hand pressure will allow and then tapped into place the rest of the way with a rubber mallet.
Secondly, I didn't use a mandil for most of the shaping, but instead slowly bent it a little at a time, using a vice and rubber mallet and finishing with an armourer's stake towards the end. I'm afraid I don't do my own welding yet, but had a friend who own a body shop weld it with a MIG welder. After it was welded together I used the scabbard as a reference as I adjusted the fit. As far as beeswax.....I'm assuming that the reference you're referring to is using it as a sealant/reconditioner once the leather is in place.....not as a glue. For glue I used a commercially available leather cement.

Finally, as to why there is no locket at the mouth end of the scabbard:
Althoughs cabbards that often accompany many lower-end swords have lockets at the mouth, very few medieval scabbards (at least that i am aware of) had metal bands around the mouth just to have them there. Rather, most metal mounts found on the upper portions of scabbards seem to have served as attachment points for suspension rings .....since this scabbard uses knotted leather straps to attach it to the belt, metal mounts did not seem to fit/seem authentic.

I hope this helps,
Dan
View user's profile Send private message
Aaron Schnatterly


Location: New Glarus, WI
Joined: 16 Feb 2005
Reading list: 67 books

Spotlight topics: 1
Posts: 1,244

PostPosted: Sat 12 Jan, 2008 6:20 pm    Post subject:         Reply with quote

Chad Arnow wrote:
Allen W wrote:
This is the main piece of information I look for in every scabbard thread. I read people talking of forming them on mandrel but what do you use for a mandrel?


Some scabbard makers have built there own mandrels, I believe. Some have pieces of wood/metal with channels in them that they use to get the U-shape, then they bend it around the scabbard tip.

Others, depending on thickness of the wood and workability of the metal chape material, use the scabbarded sword as a mandrel. What better mandrel than the actual item the chape is ending up on? Happy


I do both, sometimes.

Aside from my anvil, 2 pairs of tongs, and my primary forging hammers, every other tool I use that is related to forging, dishing, raising, creasing, etc. was made by me.

The mandrels I use are steel, welded on to a hardy shank. I have a dozen different shapes, and will be making new ones often for new projects, armour work, etc. Most of my special-purpose hammers don't look like they did when I got them... I work some things hot, some cold, often a combination of both.

Nearly all of the tweaking I do uses mandrels or the anvil face. Once in a while, if I don't get quite the fit I want, I might use the scabbard itself as a mandrel, but that is exceptionally rare, and only to compress the sides in order to secure the piece. I don't do this often, as I don't want to wreck the piece in the final touches.


Allen W wrote:
Do you do your own welding and with what?


As for joining, I generally gas weld, braze, or solder, depending on material and application. I also have MIG and TIG at my disposal.


The process of forming chapes (and other scabbard fittings) is not a simple discussion, nor a simple process. The better and more available the proper tools are (and they can change for nearly every different scabbard done), the better your chances for success. It also takes a lot of time and practice to develop the forging skills (forging, bouging, planishing, creasing...) and welding skill, plus the techniques used to add decorative elements such as the cutout window and finial that Dan added to his chape above.
View user's profile Send private message Visit poster's website
Sean Flynt


Location: Birmingham, Alabama
Joined: 21 Aug 2003
Likes: 10 pages
Reading list: 13 books

Spotlight topics: 7
Posts: 5,981

PostPosted: Mon 14 Jan, 2008 7:10 am    Post subject:         Reply with quote

Allen:
Here's the chape I made for a dagger scabbard. See this thread for details about the project:

http://www.myArmoury.com/talk/viewtopic.php?t...ght=rondel

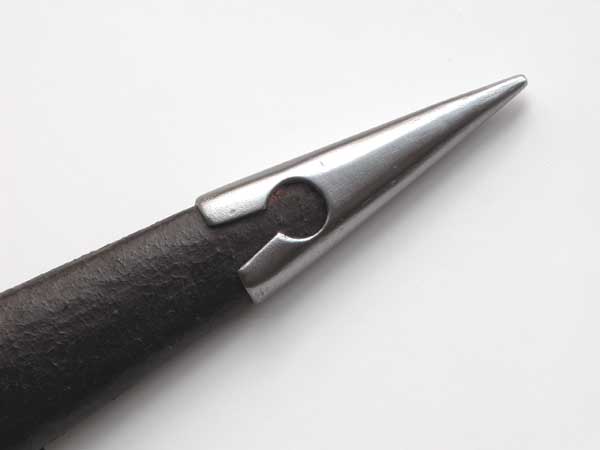
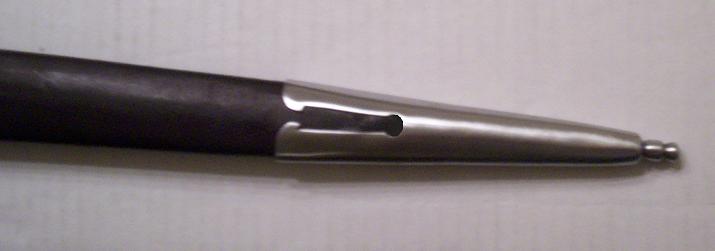
I cut a dummy chape from flexible foam sheet (look in the scrapbooking supplies at Hobby Lobby, Michaels, etc.) This stuff is the same thickness as the 16 gauge steel I used for the final product. It's easy to trim the foam to shape and experiment, then use it as a template to cut the steel. I should have used thinner steel, but the good news is that this thickness was very forgiving of my trial-and-error forming. I used a bench vise for the majority of the forming, positioning the steel just-so and carefully tightening the vise, bending the steel the way I wanted. I see that Dan did the same thing, so that's two recommendations for a cheap bench vise. I'd recommend a $30 anvil, too. I used a pair of needle-nose pliers, inserted into the rough chape, as an internal support/mandrel while I hammered the piece lightly on an anvil to refine the form. Then I filed it, ground it, drilled and cut it, sanded and polished it, etc. I screwed up my original plans for the decorative cutout ( a trefoil pattern) because I had the wrong bit size and tried to improvise. To fix the resulting ugliness I just drilled one big hole and cut a "v" shape down to it. I actually like the finished cutout better than my original plan. The chape worked out O.K. in the end, but I'll do it differently next time, using a lighter gauge steel and forming it a bit more gently so I don't have to file out vise marks, etc.

I jokingly wrote at the time that the only way this could have been harder would be if had carved it from a single block of steel. That's an exaggeration, of course, but the point is that this would have been much easier with a lighter gauge steel. There's not welding here--just a tight seam up the back. Fits tight with friction alone, but I added a drop of JB Weld just to be safe.


 Attachment: 46.19 KB
DSCN0015.JPG


-Sean

Author of the Little Hammer novel

https://www.amazon.com/Little-Hammer-Sean-Flynt/dp/B08XN7HZ82/ref=sr_1_1?dchild=1&keywords=little+hammer+book&qid=1627482034&sr=8-1
View user's profile Send private message Visit poster's website
Sean Flynt


Location: Birmingham, Alabama
Joined: 21 Aug 2003
Likes: 10 pages
Reading list: 13 books

Spotlight topics: 7
Posts: 5,981

PostPosted: Mon 14 Jan, 2008 9:58 am    Post subject:         Reply with quote

Did you make the buckles, too, Dan? I need to make some, and although I have some idea how to do it, I'm not sure how to make the main part of the buckle (the male part of this hinge). I could use brass and forge weld the ends of it using propane, but that won't work with steel. I wonder if it would be safe to leave the loose ends of that piece (concealed by the female part of the hinge) unjoined.
-Sean

Author of the Little Hammer novel

https://www.amazon.com/Little-Hammer-Sean-Flynt/dp/B08XN7HZ82/ref=sr_1_1?dchild=1&keywords=little+hammer+book&qid=1627482034&sr=8-1
View user's profile Send private message Visit poster's website
Dan Dickinson
Industry Professional


Location: Michigan
Joined: 03 Oct 2004

Posts: 967

PostPosted: Mon 14 Jan, 2008 11:28 am    Post subject:         Reply with quote

I did make the buckles (they took and awfully long time for as small as they are). They should be a fairly simple forge weld (though not with propane). MAPP and oxy-acetelyn would probably work. Alternatively silver-soldering or brazing should to a good job. You could probably leave the ends butted if you use heavy enough material, though I'd worry about the ends interfering with the free movement of the tounge. Personally I used a piece of bar stock that I placed a hole in the center of and expanded outward to its present shape (thus avoiding the need to weld).
Hope this helps,
Dan
View user's profile Send private message
Johan S. Moen


Location: Kristiansand, Norway
Joined: 26 Jan 2004

Posts: 259

PostPosted: Mon 14 Jan, 2008 12:53 pm    Post subject:         Reply with quote

Sean:

You could also buy some solid steel/brass/etc. plate, and saw/drill/file a buckle from that. It's a tedious process, it wastes a good deal of material, but it works.

Johan Schubert Moen
View user's profile Send private message
Sean Flynt


Location: Birmingham, Alabama
Joined: 21 Aug 2003
Likes: 10 pages
Reading list: 13 books

Spotlight topics: 7
Posts: 5,981

PostPosted: Mon 14 Jan, 2008 12:54 pm    Post subject:         Reply with quote

Dan Dickinson wrote:
Personally I used a piece of bar stock that I placed a hole in the center of and expanded outward to its present shape (thus avoiding the need to weld).
Hope this helps,
Dan


Oooh! Brilliant solution! So I'll get some narrow flat stock, draw the shape on one end, drill it first then use files/Dremel to expand the hole to shape and finish the outside. Then I sand the piece and cut it from the bar (I figure the cut is the next-to-last task in order to have a more secure work platform/something to clamp in the vise). Finally, I round over the bar at the back of the buckle. Does that sound about right?

Mine will be for a chin strap, so it's not going to get as much stress as a sword belt. I can't wait to try this! Cool

Thanks, guys!

-Sean

Author of the Little Hammer novel

https://www.amazon.com/Little-Hammer-Sean-Flynt/dp/B08XN7HZ82/ref=sr_1_1?dchild=1&keywords=little+hammer+book&qid=1627482034&sr=8-1
View user's profile Send private message Visit poster's website


Display posts from previous:   
Forum Index > Historical Arms Talk > New scabbard completed.....comments and suggestions welcome
Page 1 of 2 Reply to topic
Go to page 1, 2  Next All times are GMT - 8 Hours

View previous topic :: View next topic
Jump to:  
You cannot post new topics in this forum
You cannot reply to topics in this forum
You cannot edit your posts in this forum
You cannot delete your posts in this forum
You cannot vote in polls in this forum
You cannot attach files in this forum
You can download files in this forum


All contents © Copyright 2003-2024 myArmoury.com — All rights reserved
Discussion forums powered by phpBB © The phpBB Group
Switch to the Basic Low-bandwidth Version of the forum