Posts: 5,981 Location: Birmingham, Alabama
Fri 28 May, 2004 10:39 am
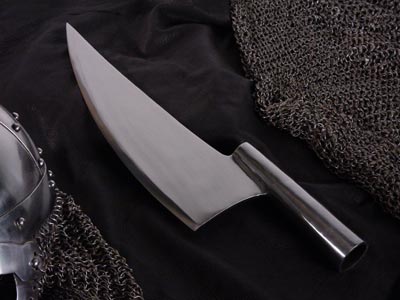
This is a home-finished Albion Kern Axe, which looks something like a cross between a Dane Axe and Lochaber Axe, and may, in fact, be related to both. Like Albions other axes, this one is designed by Steven Peffley and executed by International Steelcrafts (India) to Albions specifications.
Replica Origins
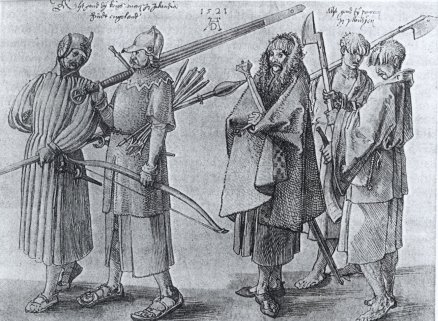
Albions replica is a very interesting weapon inspired by a 1521 Dürer sketch of Gallowglass mercenaries and their
Irish peasant retainers or Kern. (read these articles for more information about these professional warriors:
http://www.myArmoury.com/feature_armies_irish.html
http://www.geocities.com/na_degadmedieval_ire...-Equipment
The Dürer sketch is ambiguous because the Gallowglass were famed for their use of the long axe, but in this image the Kern holds the axe. But we know from contemporary accounts that the Kern bore armour and weapons for the Gallowglass. That fact, the strange, almost ceremonial, posture of the Kern in the Dürer print, and the Kerns more typical association with darts and the short bow, suggest that the weapon shown may actually be one of the famed Gallowglass axes. The author of the myArmoury.com article cited above puts the Dürer axe form in the hands of a Gallowglass. Still, its compactness and presumed shock value seem to make this weapon a good match for the Kern, who were reputed to be elusive guerilla fighters and fierce chargers. Most likely, the axe could just as easily represent both warrior classes.
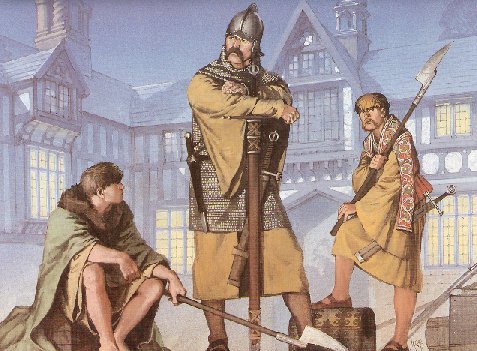
The Dürer image informs the basic design of Albions axe head, which seems to be a bit longer than the original (and thus a better thrusting weapon). Its certainly a reasonable variation of the basic design, and is identical to the axe illustrated byAngus McBride in Celtic Warriors. Both the Durer axe and the McBride version are shown to have overall lengths of around shoulder height of the Kern holding them (it's difficult to tell because the axe is held aloft in both images). Albion sells its Kern Axe either as head-only with an undrilled socket ($75) or mounted on an elegant, simple ash pole for an overall weapon length of approximately 7(judging from Albions photos). The mounted version appeared to be longer than I wanted, not to mention $125 more than the head alone. My personal challenge was to acquire a simple, good quality, historically documented polearm for under $100. Thanks to Albion, this isnt just wishful thinking for folks with more DIY spirit than cash. Ordering the unmounted head also forced me to learn something new because I had little idea how to rivet the head to a haft. Now I know how because I had no choice but to learn.
Sharpening and Hafting the Axe Head
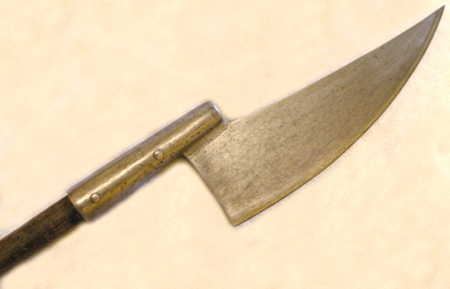
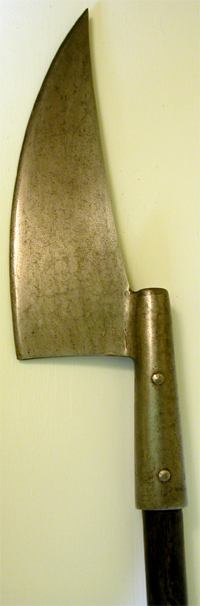
As expected (and desired), the axe head arrived well-finished and polished but not pristine, with a few minor grind marks at the bottom of the blade where it meets the socket . I liked that roughness and added to it by not cleaning up my file marks from sharpening or the stray dents left by my DIY riveting. I would describe the factory edge as unfinished somewhat irregular and flat-edge blunt in places, perhaps because some living history groups prefer blunt axes. I wanted my axe to be sharp, and a file quickly provided the desired edge.
Since I wont be charging any English cavalry, and dont intend to do much heavy test cutting or training with this weapon, I compromised on the haft. Id prefer ash, but settled for poplar because Lowes had a nice 1.25x6 poplar dowel for under $7. Poplar is a hardwood, and I didnt think any extra weight/durability to be gained from more durable ash or oak offset the added search time and expense, especially given the short length of the finished haft.
I shaped the socket end of the haft with a cheap, open-face wood shaping file and left the fit tight enough that the haft required some light tapping to be firmly seated in the socket. Then I simply drilled two holes straight through the socket and haft, inserted two ordinary bright steel nails, cut off the point ends and peened the remaining .25 (I found that a sledgehammer head makes a decent anvil for this sort of work). I struck the factory finish heads a few times as well to round over their edges a bit and make them match their peened ends. I love the results of this very simple technique. This was my first experience with riveting and Im amazed at both how easy it is and how much more stable it makes the weapon feel. There are good peening instructions here:
http://www.forth-armoury.com/research/peen_ri..._rivet.htm
The Dürer print does not show the butt of the axe in question, so its finishing is open to speculation. McBride depicts an un-shod, rounded butt. I think thats a reasonable choice for a relatively simple axe, and thats the way Ive finished my own weapon. I suppose an iron cone or other simple reinforcement also would be as appropriate.
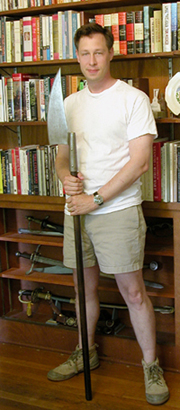
After fitting the head and before finishing the butt, I tried the weapon at several different lengths, starting at the documented 6 upper-limit length of the Gallowglas axes and cutting off 1 pieces from the butt as I worked down to the size that felt best to me. Im a light-framed 61, and the weapons final overall length of 53 seems just right to me.
Handling
Most of the weight of the finished weapon is in the thick, 3lb axe head, as it should be, but the haft is short enough that the weight is very manageable. Leading with the butt of the weapon, ready to strike with the head, the haft seems long enough to parry and thrust with. But the haft is short enough to allow good control with the head up front for thrusting and slashing. Even light thrusts into boxes, letting the weight of the weapon do all the work, suggest the terrible things it would do to flesh and bone. I just weighed the weapon on a postal scale-it's 4.25 lbs and is very comfortable in the hands.
Finish
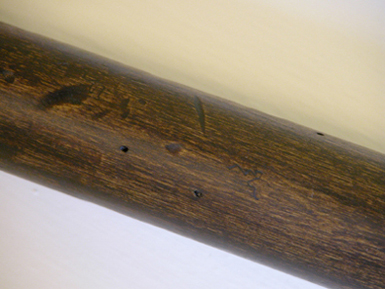
To antique the haft I beat it with a variety of tools, then sanded it to make all the scars and nicks look worn. As an afterthought, I added some woodworm holes and tracks (small nail/locking pliers) . I gave the haft about five coats of dark walnut stain to get the color close to the brown-black of many preserved pole arm hafts, then used steel wool to remove the shine of the finish and lighten the areas that would see the most hand-rubbing in use.
To antique the head, I used the usual treatment of vinegar and salt in a spray bottle, followed by cleaning with steel wool once the rust had a chance to stain and etch the steel. I find that a fine mist and repeated treatments/cleanings give the most satisfying results. After cleaning and
polishing the head back up to the desired finish, I treated it with Renaissance Wax (GREAT stuff!).
Length of Edge: 14
Length of Head: 18
OA Weapon Length: 53
Weight: 4.25 lbs
POB: Approximately .25 above socket opening
Total Cost: Approximately $95 (including head, shipping and haft, but not including woodworking tools and nails)