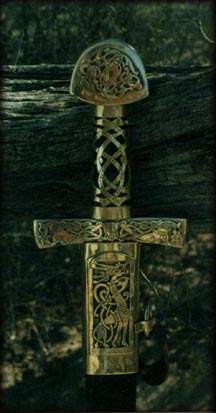
I first saw this in the 1992 "From Viking to Crusader" multi national museum exhibtion book/catalogue when it first came out and fell in love with it's artwork/hiltdesign That and being found in a woman's grave is lends it's own intriguing possibilities. There are older tales of women warriors who did take up the sword (Saxo) and actually lead warrior bands ("Battle of Bravoll") Then there are tales of "Swand Maidens" and the "Valkyria". But that's another subject.
I wanted my own personal sword made using this artwork on a similar hilt and eventually it was made. Only wedded to an earlier broader Viking style blade shape that I liked instead (blade length 30 inches. width about 2 1/2"` at guard tapering slightly to rounded point. Has a wide fuller extending nearly two thirds the way down from guard). As no scabbard was found with this piece, I designed new artwork for both the mounts and for tooling the scabbard with. All in Urnes Viking Art style.
The design is quite intricate in such a confined space and can only imagine the work involved making the original initial design and then carving the wax. Although this may be simplier nowadays, like Peter mentioned in his "Valkyria" thread....carving the wax to get it "right" to the artist can be a pain. While designing artwork for later decoration weaponry, some pieces just come fullblown in my mind to do....while others take their own good time, kicking and screaming to boot.. (The overlay can be a frustrating difficult process too until it settles down.) Yet to be able to carve in wax and then cast is an art, I never developed. When I first started making jewelry for my SCA costume and then decorating Kirby's pieces, we lived on a Placer Gold mine and did not have the facilities. But engraving, inlay and piercework was done. By the time we moved to Bouse, my particular artform was well established. So my particular version of the Suontaka Women's sword hilt is all piercework and overlay onto a brass veneered steel pommel and guard. With a pierceworked sleeve over a hardwood grip.
This meant redrawing the design to fit the confines of my pommel/guard without a border. The hardwood grip is sleeved with a pierceworked brass sheet that is formed to fit. (I believe the original grip is cast bronze too.)
Doing all the initial designwork poses it's own set of "bleery eyedness" during the drawing to fit the areas and I wanted to keep the intricacies of the original. Then the transfer to the brass sheet and making sure all the lines were there or going over any faint spots before drilling and piercing.. Then piercework all the itty, bitty spaces before engraving all those itty, bitty lines...which have to be checked for any missed places. (ARGH) Then the overlay process and making sure all the edges stick (much easier to do this with a border) With the result a "slightly raised, low relief" effect.
Yeah, I know it sounds all so complicated for something so simple.
Casting is so much nicer if you have the talent but it also has it's own problems. What I have developed as an artform works quite well with what we do. It also affords me, as an artist, a certain freedom to make any changes during any part of the process that I would not have with casting. (although I wish I had taken casting classes in college instead of business courses before marrying Kirby in 1972)
After my sword was done, a good friend of ours fell in love with it and so made a variation of it for him. This is the attachment shown and up on our website. As his guard is straighter, I redrew the design to fit. Lengthend the grip sleeve pattern (mine is 4 inches, his hand was bigger) and changed the sleeve design. Same piercework/overlay process and application with a slightly longer, later Viking blade style. This was his pride and joy while participating in the SCA until he died a couple of years ago. His wife keeps it now.
Otto's Sword