My full review of this replica is reproduced below. I posted this in another thread and inadvertently knocked it out of contention for formal publication in the reviews section. That's my mistake, and a dumb one, but I did want to make sure that a copy of the review is included with this thread so folks interested in this replica will find it easily.
---------
Review of a Windlass Steelcrafts Hanger
by Sean Flynt
Introduction
I recently convinced myself that 18th century infantry hangers should be good candidates for modern replication because they tended to be relatively simple, inexpensive, mass-produced weapons. With that reassurance in mind, I decided to experiment with a Windlass Steelcrafts hanger based on a Prussian weapon of ca. 1750.
Overview
The classic 18th century infantry hanger has a short (~25"), broad cutting blade and a hilt of iron or cast brass consisting of a knucklebow and protective plate between grip and ricasso. Those of the type reviewed here typically weighed between one and two pounds.
Although this basic form was widely adopted, infantry hangers of this era exhibit surprising variety in their details. Some have thumb rings. Some have spirally fluted brass grips while others have wooden, wire-wrapped grips. Some are of sloppy finish and detail while others are very finely finished. Their blades may be fullered or flat, slightly curved and single-edged or straight and double-edged. Whatever their unique national characteristics, these were utilitarian weapons typically produced in the manner described in George Neumann's classic Swords and Blades of the American Revolution (lovers of finely-crafted swords might want to skip this passage):
"Contemporary manufacture normally began with a cast steel bar which was cut into two lengths, each of which would make two blades. After being fed through waterpowered rolling mills which pressed them to the desired shape and size, they were ground by large stone wheels, tempered by warm oil or water, and struck by hardwood blocks for testing. Before being finished by a polisher, the blade had a soft iron tang welded to its upper end. For assembly of the hilt, the components had hollow centers and were simply compiled one above the other on the thin tang. When complete, the tang's end was hammered down like a rivet head, or threaded for a screw-on cap (52). "
With the ascendance of the socket bayonet, the infantry sword was relegated to the third line of defense and finally removed from general issue. By the time of the American Revolution, hangers were issued primarily to noncomissioned officers. As late as the mid 18th century, however, the hanger was still a staple of Old-World infantry kit.
One of Britain's hanger variants, in modern times designated the Model 1742, was manufactured in the Germanies and issued to infantry there as well as in Hanoverian Britain. The differences between the home-issue and export weapons are slight and of little practical significance. Both feature heart-shaped guards, stubby, downturned forward quillons and either globular or urn-shaped pommels with capstans. Originals in good condition can be purchased for less than $1,000 USD.
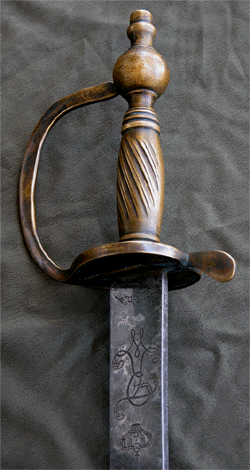
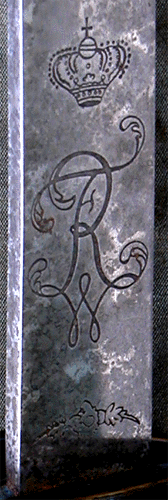
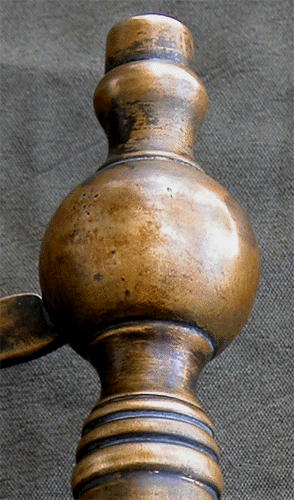
Windlass Steelcrafts offers two replica versions of the Model 1742, both selling for under $100. One of these features an urn-shaped pommel and spiral grip. The other, reviewed here, replicates a Prussian-issue sword and features a globular pommel and distinctively German details such as almost vertical spiral fluting of its grip, a brass-furnished scabbard with leather extending down over its tip, and the monogram of Frederick William (Frederick the Great) of Prussia deeply and crisply etched on both sides of the blade along with crown and floral motifs. The replica hanger's vital statistics follow:
Weight .99kg (2.2 lbs)
POB 105mm (4.1") below guard
Overall Length 790mm (31.1")
Blade length 637mm (25")
Fuller Start 150mm (5.9") below guard
Fuller Length 320mm (12.6")
Fuller Width 2mm (.07")
Blade Width at Guard 31mm (1.2")
Blade Thickness at Guard 7mm (.3")
Blade Thickness Before 3mm (.1")
Tapering to False Edge
Length of False Edge 100mm (3.9")
In Prussian service, this hanger would have been carried on a buff leather waist belt along with a socket bayonet (Neumann 27). The hanger's scabbard would have had a throatless design with a brass clip protruding through the leather to secure the weapon in its belt frog. The scabbard's brass tip, finished with a ball finial, would have been partially covered by the leather of the scabbard (Neumann 60).
Handling Characteristics
The weight of the Windlass hanger is slightly above the weight range typical for this type, but isn't egregiously inaccurate. The weapon has the blade presence one would expect of a short sword designed exclusively for cutting and expected to survive the abuse of a general issue sidearm, but feels wonderful in the hand because the
point of balance is so near the hilt.
Fit & Finish
The fit and finish of this replica are very fine. Starting at the top:
* Overall, the hilt is neatly finished and very tight, with no play at all in the furniture or blade. The hilt assembly is secured by a brass capstan nut.
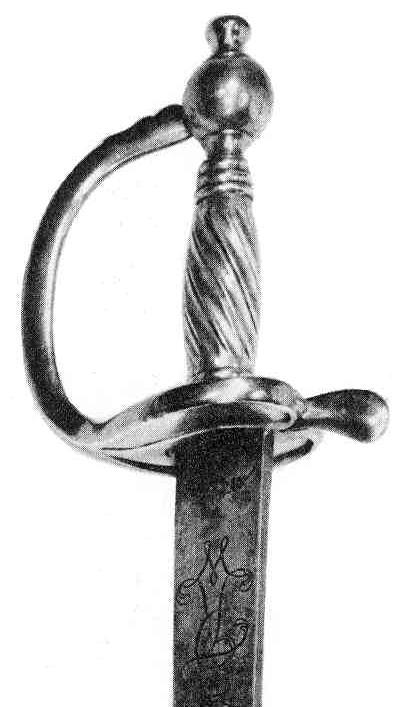
*Original 18th century hangers typically have a hole near the base of the pommel that corresponds to a pin on the terminus of the knucklebow. I assumed Windlass would eliminate this detail because it requires precise alignment and the time-intensive work of drilling and machining small parts. I was pleasantly surprised to find that the replica does include this feature, perfectly executed and aligned. In fact, with one exception, all hilt components are perfectly cast and aligned with one another and with the blade. The only exception was the quillon, which had been bent about 10 degrees away from a slight ding in the guard. This clearly was the result of some accident between factory floor and purchaser, and not the result of sloppy casting. The quillon was easily realigned with padded pliers. Many original hangers of this type are missing their quillons, so this may represent a weakness in the historic design. "Historically accurate" doesn't necessarily mean "good".
* Unlike most published examples of this weapon type, only the outboard side of the replica’s grip is fluted. I can't tell from published examples whether this is true to the type on which this particular replica is based, but it would seem strange for Windlass to overlook the accuracy of the cast grip when they've given so much attention to less obvious details of their replica. In any case, the grip of the Windlass hanger closely matches at least the outboard side of the grip of the original shown here(#E-69 in Warren Moore's Weapons of the American Revolution), and is very comfortable in the hand.
* The etching of the blade is exceptionally well executed for such an inexpensive replica, and appears to exactly match the engravings of the original shown here.
* Windlass has paid great attention to the distinctively German details of the weapon's scabbard, which features an internal brass throat, brass clip extending through the front of the scabbard, and leather extending down to cover the entire tip up to its ball finial. I don't know if any original German hanger scabbards are so complete in their coverage of the tip, but the example shown by Neumann covers only half its tip. I chose to modify the replica scabbard to match that example. I found that the tip of the blade tends to catch the edge of the internal scabbard tip. I solved the problem by bending the scabbard a bit in the direction of the blade's curvature. In retrospect, when I modified the scabbard I should have slit the leather at the tip end and inserted the tip between the two resulting layers. That would keep the leather covering of the tip and prevent the blade catching the inside edge of the tip. I'd like to know how German craftsmen solved that problem.
* The blade is perfectly finished, and oiled rather than lacquered. The flawless brass hilt does have a light coat of lacquer, and I recommend stripping the lacquer even if you don't plan to abuse and antique the hilt as I have. The lacquered finish looks cheap to me while the brass is beautiful-almost silver- if cleaned and polished with military thoroughness.
* A faux antique finish, including abuse of the hilt to produce a few pits and scratches, is satisfying because it creates a weapon that looks antique. If the antiquing is done with conscientious reference to originals, it also provides an education about those weapons, the processes of decay, and techniques of modern replication and forgery. An 18th c. British infantry sergeant might not stand for the battered finish I favor, but I much prefer its richness and depth to the look of lacquered brass. Follow this link for a discussion of the antiquing process:
http://www.myArmoury.com/talk/viewtopic.php?t=1278
Conclusion
Overall, this is the most historically accurate and detailed Windlass Steelcrafts sword I've owned. At $100, including shipping, it's also the least expensive Windlass sword I've owned, and that makes it all the more appealing.
References:
Moore, Warren. Weapons of the American Revolution...and Accoutrements. Promontory Press, NY, 1967.
Neumann, George C. Swords and Blades of the American Revolution. Promontory Press. NY, 1973.
Sean Flynt is a writer and editor living in Birmingham, Alabama. His edged-weapon interests are focused on Western swords of all periods, but especially the 16th, 17th and 18th centuries.


