I'll attach the photo at the end of the post. So go take a look now at the pic...
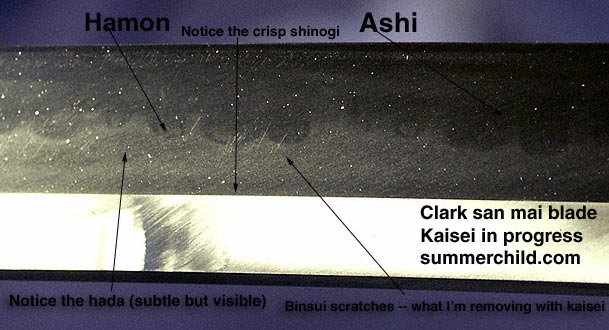
What you'll notice first is that the hamon is quite visible That's probably the most common hamon Howard will do on his folded steel. It is *very* distinctive of Howard's style on that type of steel. As a polisher I know this one is going to be very visible, very nice, and likely a joy to finish. It is very visible now which means the effects are deep and rich.
Other things to notice. Part of polishing is defining the various lines on the sword. Notice the ridge line in the bottom of the sword in the photo. That line should feel crisp. That is almost impossible to do at all on a belt, certainly impossible to do to the level of traditional polishing. That is attained by extremely precise polishing on a solid stone. Blade on stone. No rolling, no angle changes. Just working right up to but not on the line. With extremely precise angle control. Otherwise it gets rounded and loses the crispness. That has to be maintained throughout the polish and can be destroyed at any time with one careless stroke.
You'll notice the small more perpendicular scratches in the steel "under" the more diagonal, finer scratches. The finer scratch pattern is from my kaisei stone. We change angles on each stone to ensure that we can see that we've removed all scratches from the blade. And you don't just work until the scratches are gone. If you had poor form on earlier stones and put deeper scratches in one area the entire blade much be polished on each stone similarly so you don't develop dips or wobbles. The finish of a Japanese sword is so refined that reflective light will show wobbles instantly. On a roughly finish surface the light reflects differently and hides poor foundation work. The area pictures is where I was working on the stone when I called it a night last night. I'll finish the area and move down the blade a few inches and start up again in a little while. Hopefully by the end of the day today I'll have the entire sword finished on this stone. And I'm about 1/3rd done now. If that give you any idea as to the time it takes.
Other things... Ashi are visible (sorta) in this finish. Ashi are soft lines the smith inserts towards the edge. The idea was to create areas to absorb shock and to prevent the propogation of chips. Now Howard's stuff really don't need ashi because they're so bloody tough. But what most don't realize is that adding the ashi "affects" the hamon formation. It pushes and pulls the hamon around making it more interesting, more organic, more fun to study.
Finally, if you look *closely* you can somewhat make out the hada. Look where I added the arrow to point it out. It is subtle but starting to show up.
This is just a stone finish. No etching to bring it out. That's what it looks like with proper surface preparation and with really good lighting...
Hope you guys like it. :D When I finish the blade I'll post a few more pics.