Hi all,
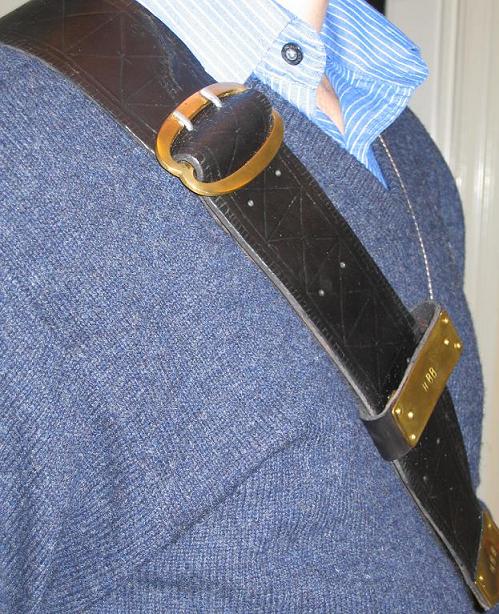
A couple of days ago I finished a baldric for my Ribbon-hilted broadsword by Donnie Shearer. I made this baldric using a pattern that Donnie gave me, and decorated it with symbols, lines etc that I tooled into the leather. As you can see from the pictures I added a little latin text on the frog; "NEMO ME IMPUNE LACESSIT", which is the National Moto of Scotland. I made the tip and keeper using brass sheets, and stamped these with my initials: HBB, just to give a simple decoration to the rather plain brass pieces, and of course to sign the work.
It's really late and I have to get to bed, so I'll just post pictures now, and tell more about the method etc later...
Cheers,
Henrik
Attachment: 77.56 KB
Attachment: 90.4 KB
Buckle, keeper and tip.
Attachment: 98.56 KB
How it looks from the back. [ Download ]
Attachment: 115.23 KB
The frog. Notice the text. [ Download ]
Attachment: 53.76 KB
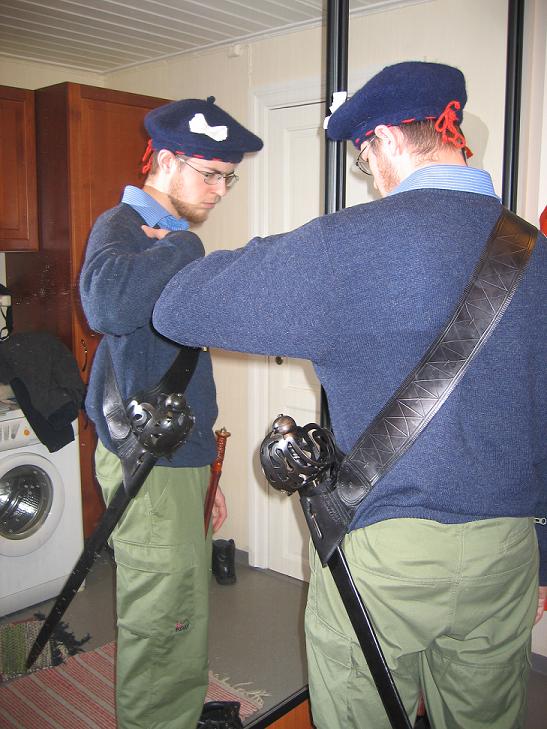
and a picture of it from the front. (Aye, I'm in the picture and am sorry to say I've not dressed up in my plaid!) [ Download ]
Henrik...
You did a very nice job on your baldric. It goes well with the sword.
I know Donnie Shearer. In fact, he helped me with my recent book on Scottish firearms with photos from his collection of pistols. He also does excellent work as a hammerman. As you are aware, he has an extensive collection of Scottish blades. Very interesting fellow.
Lin
Looks good.
Thats very nice Henrik! Great work!
-James
-James
Thank you very much, gents! :)
Lin,
Donnie is a very nice guy, and sits on a wealth of information about basket hilts and other Scottish weaponry! And his humor and high spirit made ordering from him a very pleasing experience. :D
Cheers,
Henrik
Lin,
Donnie is a very nice guy, and sits on a wealth of information about basket hilts and other Scottish weaponry! And his humor and high spirit made ordering from him a very pleasing experience. :D
Cheers,
Henrik
Henrik, your baldric looks excellent! I look forward to seeing more details on how you made it.
Your ribbon hilt sword looks good, also. Please share some details with us. I've not seen much in the way of reviews on Donnie Shearer's swords.
Thank you, Steve!
I will get more info about my sword to you, but you'll have to be patient ;)
I had some 2mm thick brown coloured cow/ox leather that was leftovers from some other small projects that I've had. It's been laying about for a few years, and when I got the broadsword from Donnie I knew I needed a new baldric for the sword. Donnie sent me a fine baldric pattern with good instructions and I decided to try making it. I got some different double-D buckles from Jas Townsend and chose one of these for the project.
First I cut out the pieces of leather and left them in water to make them easier to work with. I then made holes for the seams with a thin leather-awl. I used a waxed linen thread and did a pitch seam. I sow the main parts together (not the keeper), fitted the buckle and secured it with a pitch seam. I made holes in the belt to fit it with the tongues on the buckle and tried wearing the baldric. I then made the hole in the frog for the froghook on the scabbard.
After this was done, I started cutting out the brass pieces and filed the edges. I then made similar pieces to these to be placed on the backside of the leather. I drilled through the brass front- and backpieces and and made holes through the leather so that I could drive brass nails through. I then cut the nails shorter and bent them on the backside of the belt, so that they were firmly in place. I punched the "HBB" into the brass as decoration. The same process was applied on the keeper-part, but with a few differences... I then did some polishing of the brass, and finished the polishing with some 0000-steelwool.
I then sow the keeper on...
I put the entire baldric into the bathtub (save the brass-pieces, these were held above water). I used normal cold water. I left it there for about ten or fifteen minutes, I think. The idea was to get the leather wet, but not straight through. I placed the baldric on a working bence and used a special tool to draw the lines etc. into the leather. When I was done decorating it I dyed it with a black leather dye. This leather dye is works best when the leather is wet, so it was ideal to start it as soon as the tooling was complete. To get a satisfying colour, I had to apply the dye some 6 to 8 times. I hung the baldric to dry after the dye had sunk into the leather and left it over night.
I treated the baldric with leather oil till it was softer and tougher than before the treatment. I used black shoeshining in a thick layer and left it to set for about half an hour. I polished it off and covered it with waterproofing wax and let it set for about as long as the shoeshining. Then I polioshed it with a soft cloth, and voilą! Done! :)
I think I've summoned it up without leaving anything out... :)
Cheers,
Henrik
Page 1 of 1
You cannot post new topics in this forumYou cannot reply to topics in this forum
You cannot edit your posts in this forum
You cannot delete your posts in this forum
You cannot vote in polls in this forum
You cannot attach files in this forum
You can download files in this forum
All contents © Copyright 2003-2006 myArmoury.com All rights reserved
Discussion forums powered by phpBB © The phpBB Group
Switch to the Full-featured Version of the forum
Discussion forums powered by phpBB © The phpBB Group
Switch to the Full-featured Version of the forum