Go to page Previous  1, 2, 3, 4  Next

Jesse Frank wrote:
Yeah, I've never worked with hide glue, so I don't know... But pitch ain't that bad... if you get the mix right, you gotta get it pretty hot (150f+) for it to really get soft.... 'course, it all depends on the sap, how long you cooked it, ect.....


While I have no idea what the stuff was made of, I have looked at different recipes for cutler's pitch and they all seem to be made of tree resin with different components added: saw dust, bees wax etc. In any event, the stuff hardened enough to hold the top portion onto the sword.
So, possibly, you could fill the pommel up with pitch, slot it into place, turn the sword point down, and let it dry?
That way, you would get a perfect fit.
And, if it should become loose, you could heat it up, and do the same thing again... Without having to use the hammer on your precious...
Could be a very elaborate solution to the problem of very expensive and elaborate pommels coming loose.
Eric McHugh wrote:

While I have no idea what the stuff was made of, I have looked at different recipes for cutler's pitch and they all seem to be made of tree resin with different components added: saw dust, bees wax etc. In any event, the stuff hardened enough to hold the top portion onto the sword.

Do you have some complete recipes? I've been experimenting with general wood-tar, but so far without good result. Beeswax didn't seem to want to mix, and it's difficult to get it hard when dry but not brittle. Perhaps I'm just not using the right tar for it.
Jean Thibodeau wrote:
Maybe something from the Viking age could be a good adhesive to hold those space shuttle tiles from falling off: Only half joking here because sometimes old technology can do things better than current stuff.

Well, I've got the answer for that in my bronze age furnace: composite ceramic heat shielding. Or in more common terms: clay with horse dung :) You can heat it up rapidly or beat the heck out of it, and it stays together!
When I use cutlers resin, I use 5 parts rosin to 1ish part beeswax and enough binder(usually wood or bone filings from the project I'm working on) to make it good and thick while it's hot. The Beeswax and the binder is the key. Pitch from different species can play a large part as well. Just gotta find one that works, and ya gotta cook the pitch for a little while to get most of the moisture out.

Some rosin just don't work well.
Jeroen;

Wouldn't it be just TOO funny if the clay and horse dung made better tiles for the shuttle than the high tech stuff. :eek:

Sort of makes one hope that someone at NASA reads this post and does a few tests: One of the problems with the tiles used by NASA is that they are very fragile.

Maybe a mix of clay, carbon fibre and the horse dung would be worth trying ?

Any engineers out there with contacts at NASA or in the development of materials field who might take this seriously and forward it to the right place ?

Anyway, stranger things have happened. :p :lol:
Jean Thibodeau wrote:
Jeroen;

Wouldn't it be just TOO funny if the clay and horse dung made better tiles for the shuttle than the high tech stuff. :eek:

Sort of makes one hope that someone at NASA reads this post and does a few tests: One of the problems with the tiles used by NASA is that they are very fragile.

Maybe a mix of clay, carbon fibre and the horse dung would be worth trying ?

That's what I was thinking. Carbon fibre is used as heat shield as well, but it burns away. Mixed with ceramic, and you've got the best of both combined.

Jean Thibodeau wrote:
Any engineers out there with contacts at NASA or in the development of materials field who might take this seriously and forward it to the right place ?

Well, I do work in the space industry, but so far not on re-entry vehicles. If I'll ever be placed on such a project, I'd definately like to investigate the possibilities :)
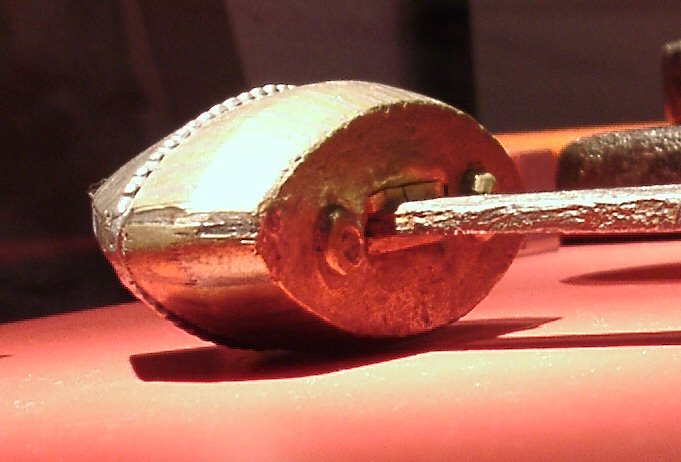
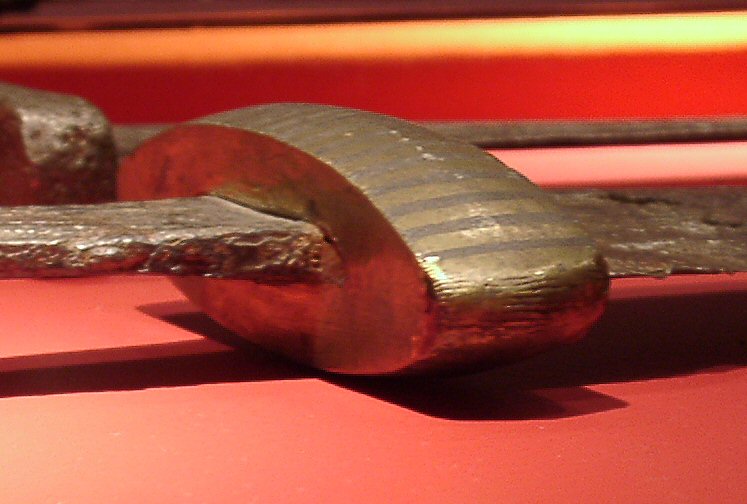
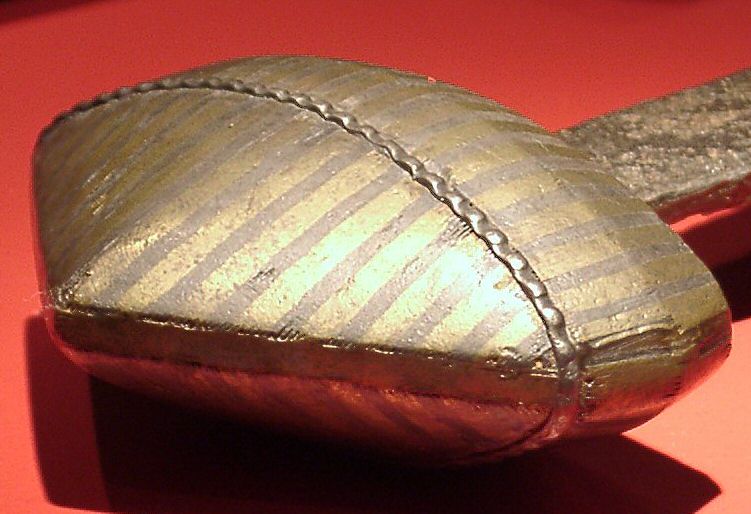
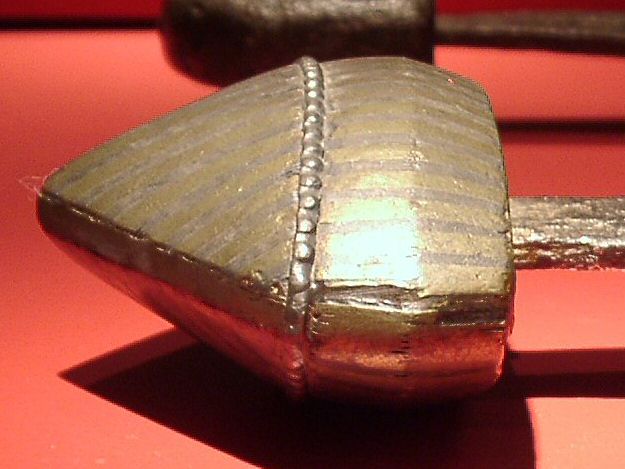
I've taken a few more close ups of the sword in Leiden, so here they are:


 Attachment: 113.72 KB
12030115.JPG

Number 2:


 Attachment: 103.18 KB
12030116.JPG

Number 3:


 Attachment: 86.58 KB
[ Download ]
Number 4:


 Attachment: 105.23 KB
12030118.JPG

And last one:


 Attachment: 111.54 KB
12030119.JPG

Thanks a million for the photos!
The transitions between surfaces are the hardest things to figure out on these hilts, it's great to see the inlay switching direction along the top of the pommel.
Jeff
Jeroen,
Thanks for the pics. Please keep in mind that, unlike some other forums, we allow more than one attachment per post. Attach your first file as always, but you can keep attaching more after that, putting them all in one post and saving some unnecessary scrolling for other readers. Thanks!
Jeroen Zuiderwijk wrote:
I've taken a few more close ups of the sword in Leiden, so here they are:

It may be just the lighting, but, in these photos, the hilt appears to have some sort of coating on it, almost like a thin paint.
??? Does anyone else see this?
I've just received some articles on Viking swords, including "Einige wikingerzeitliche Schwerter aus den Niederlanden" by J. Ypey (which is available here: http://www.halos.nl/books.php?srchfrm=1&b...amp;Serie= ). In it was also featured the sword currently on display in the Army Museum in Delft. It also includes a cross-sectional drawing of the hilt, and apparently I was wrong about the U-rivet. Instead, it appears that two rivets are used to hold the pommel cap onto the lower guard. They are inserted through holes in the pommel cap, but hammered or ground flush, so no trace can be seen from the outside. I will place some scans of the drawings later on.
Please do post the scan when you get a chance!
You might be able to make out a circular trace of the rivet end in the fourth brass strip, noticeable in one of the above photos.
Aren't those ROB offprints cool?
And here are the promised scans. The first image contains the sword from the Army Museum in Delft (left sword), including a cross-section of the hilt. I've also attached some of the other examples of Viking swords in the same article, which include some very interesting pattern welded, inlayed and engraved examples.

[ Linked Image ]

[ Linked Image ]

[ Linked Image ]
Thx for the scans! :)
So the pommel cap was somehow attached to the rest of the hilt. Another Ulfberth sword, man that guy must have been busy ;)
I'm having some problems to figure out what it says on the other swords. "INGERIHFECIT" ???? "SIGBPHANI" ?
Maybe these names include some abbreviations.
The inlays and pattern-weldings look great.

P.S.: Just a minor hint. None of these swords is a real viking-sword. They're just from the same time. All of them were found in the Netherlands, some of them where the Rhine used to flow. That's what the text says at least.
Maybe the Vikings left them there or did they have a settlement there? Trade-connections? Or was that just a very common style in northern Europe at the time?

However, when I look at this thread ( http://www.myArmoury.com/talk/viewtopic.php?t...t=bavarian ) I'm not surprised to see this style everywhere north of the alps.
My knowledge regarding Vikings in the Netherlands is rather limited, but from what I understand is that there were Vikings settled here. At some point they were even protecting the Franks from raids of other Vikings. So whether these swords are to be considered Frankish or Viking swords I don't know. At least the Ulfberth blade are not of Viking origin, but I don't know in how far the Franks used the same hilts as the Vikings did. Does anyone have more information on this?
Go to page Previous  1, 2, 3, 4  Next

Page 3 of 4

Jump to:  
You cannot post new topics in this forum
You cannot reply to topics in this forum
You cannot edit your posts in this forum
You cannot delete your posts in this forum
You cannot vote in polls in this forum
You cannot attach files in this forum
You can download files in this forum


All contents © Copyright 2003-2006 myArmoury.com — All rights reserved
Discussion forums powered by phpBB © The phpBB Group
Switch to the Full-featured Version of the forum