Wow Eric, that upper guard is really hollowed out on that sucker. Did that seem pretty common on the ones you had a chance to see?
I would say the differences between the beaded band and plate are pretty small, and I would bet that there probably isn't a clear cut line between the two. Probably more dependant on how much things were hollowed out than anything else really.
As far as the inlays on this particular sword I don't think they are all of just the wire type, it just doesn't look that way to me. Assuming that the yellow material isn't the base metal, you can see that ends of the guards are covered in a solid sheet of the copper alloy material. The Ballinderry bog sword is probably about the most famous one done this way, where the chisel lines were carved and sheet was hammered over the top locking it in place. The inlays on the side seem to be more ribbon style inlays since you can't see seams but where the material changes. When you just hammer the wire inlays over, there is always that seam between the two wires because it is just a mechanical joint. From my little experience with this type of inlay, it would be very hard to get the straight defined lines because the wires don't seem to mushroom over evenly. It is only when you take it take it down to the base metal that you get that clear defined line from you chiseled. Of course it is hard to tell just form pictures always, so I very well might be wrong.
Shane
| Jeroen Zuiderwijk wrote: |
| Thanks Eric! I had heard about the U-shaped rivet, but I didn't understand how it worked. So as I understand it, the pommel is all open on the bottom and the pitch is the only thing holding the pommel onto the U-rivet and upper guard? |
I believe so...but I hesitate to say that this is always the way they did it. They used many different techniques to build these swords. Whose to say that they didn't use a pressure fit on some of these swords. In other words, they could have some how wedged the pommel top onto the "U" rivet...I don't know. But the pitch/resin was one solution for this type of construction, and it would also account for all of those swords that are lacking an upper pommel piece and only have the "U" rivet showing.
Last edited by Eric McHugh on Tue 22 Nov, 2005 6:34 pm; edited 1 time in total
Wow, more pictures as I was typing... Thanks Jeroen
Now I'm not so sure those are ribbon inlays...
Shane
Now I'm not so sure those are ribbon inlays...
Shane
Shane, I saw quite a few that were hollowed out like that, but then there were others that were not...so it just depended on their mood.
That brings me to another point, and why it is important to never say, "this is how the Vikings always did it." After seeing all of these swords in Stockholm, Uppsala, Copenhagen, and UK, Peter and I have concluded that we have a vague idea of what the typical Viking swords was like. There is incredible diversity with construction methods, sizes, weight, etc. but then again there is that special something that makes them all Viking swords. They were a clever, resourceful people who used their resources and skills in a variety of ways to produce swords that would meet their requirements. I can only imagine what is in other collections in Germany...it boggles the mind.
I think it is fair to say you could spend a lifetime studying these swords and be surprised at every turn and never really figure them all out...they are so marvelous!!! So, Viking swords are for those who are life long learners...lol...
Is it known whether the "U" rivets and hollow pommels were utilized outside of Scandinavia? I'm curious as to whether this was an identifiably Viking technique added to blades imported from the Rhineland during hilt construction or whether it would/could have been a feature common to blades of this type across Europe. Perhaps there's simply not enough information to say?
I know the type H hilts themselves have a very wide distribution throughout this time period, but almost all of the better documented examples I've been able to find any information on have been from the North.
I know the type H hilts themselves have a very wide distribution throughout this time period, but almost all of the better documented examples I've been able to find any information on have been from the North.
| Shane Allee wrote: |
| I would say the differences between the beaded band and plate are pretty small, and I would bet that there probably isn't a clear cut line between the two. Probably more dependant on how much things were hollowed out than anything else really. |
That is quite possible. I'm always wanting to learn more about these swords. In your research, have you found examples of plates put between the two pommel pieces? Being close to Norte Dame, you have access to a pretty massive library. There is a lot of stuff published that is in the form of thesis and such that we do not have access. If possible, can you post some pictures. I'm curious as to how they constructed it. One thing is for certain, those Vikings were very clever.
[quote="Eric McHugh"]
Easy enough to get access to most theses and dissertations . . . . .
Inter-Library Loan is a wonderful tool, and there are several anthropological/historical search engines that list unpublished theses.
What is difficult is finding the right keywords to use in the search. :-)
Edited to add:
Though you might be surprised by how little has been written on this subject by graduate students at major U.S. research universities. At least in American anthropology (of which archaeology is one of the traditional four subfields) and historiography, research on medieval arms and armor is (typically) strongly discouraged, to say the least.
| Shane Allee wrote: |
| Being close to Norte Dame, you have access to a pretty massive library. There is a lot of stuff published that is in the form of thesis and such that we do not have access. If possible, can you post some pictures. I'm curious as to how they constructed it. One thing is for certain, those Vikings were very clever. |
Easy enough to get access to most theses and dissertations . . . . .
Inter-Library Loan is a wonderful tool, and there are several anthropological/historical search engines that list unpublished theses.
What is difficult is finding the right keywords to use in the search. :-)
Edited to add:
Though you might be surprised by how little has been written on this subject by graduate students at major U.S. research universities. At least in American anthropology (of which archaeology is one of the traditional four subfields) and historiography, research on medieval arms and armor is (typically) strongly discouraged, to say the least.
It's Thanksgiving...
And I'm thankful for a forum where I can post a picture of a sword and someone posts stats translated from German (thanks Jeff!) and someone else goes to the museum where it's on display and takes a close up (thanks Jeroen!). What a great group to be a part of... thanks guys!
With that in mind....
Here are a few more pictures of Type H Viking swords with wire plated hilts.
This picture from Ian Peirce's "Swords of the Viking Age" of a sword from Kilmainham Ireland shows the wire inlay coming loose.
ks
 Attachment: 99.98 KB
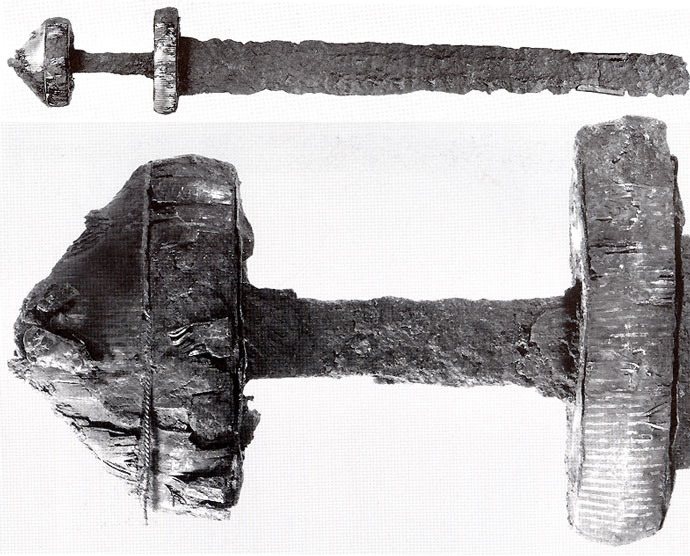
Total Length 97cm, blade length 79cm, grip length 91mm
 Attachment: 92.84 KB
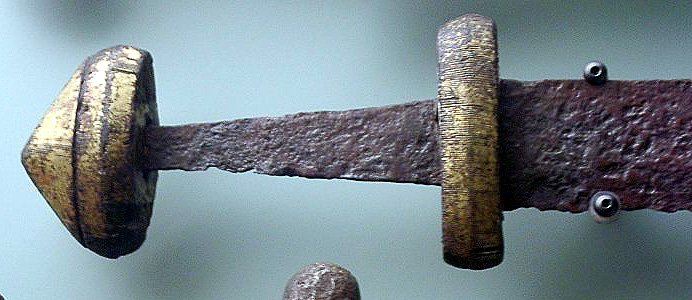
Photo by Jeroen Zuiderwijk
 Attachment: 84.53 KB
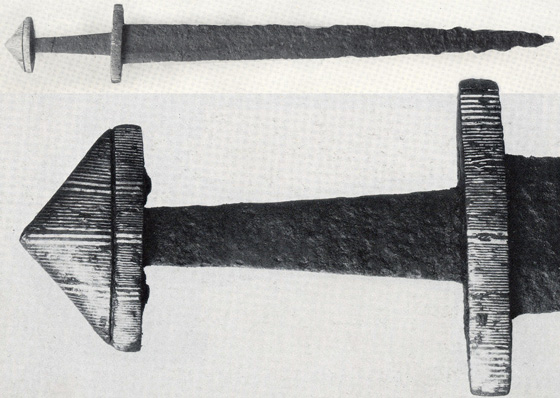
Barkarby Sword from Pierce's "Swords of the Viking Age" alternate silver and copper inlay
And I'm thankful for a forum where I can post a picture of a sword and someone posts stats translated from German (thanks Jeff!) and someone else goes to the museum where it's on display and takes a close up (thanks Jeroen!). What a great group to be a part of... thanks guys!
With that in mind....
Here are a few more pictures of Type H Viking swords with wire plated hilts.
This picture from Ian Peirce's "Swords of the Viking Age" of a sword from Kilmainham Ireland shows the wire inlay coming loose.
ks

Total Length 97cm, blade length 79cm, grip length 91mm

Photo by Jeroen Zuiderwijk

Barkarby Sword from Pierce's "Swords of the Viking Age" alternate silver and copper inlay
Here are a few more fancy plating jobs...
The first and last image shows inlay that appears to use twisted wires of silver and copper, inlayed at intervals to produce a diamond pattern.
ks
 Attachment: 99.33 KB
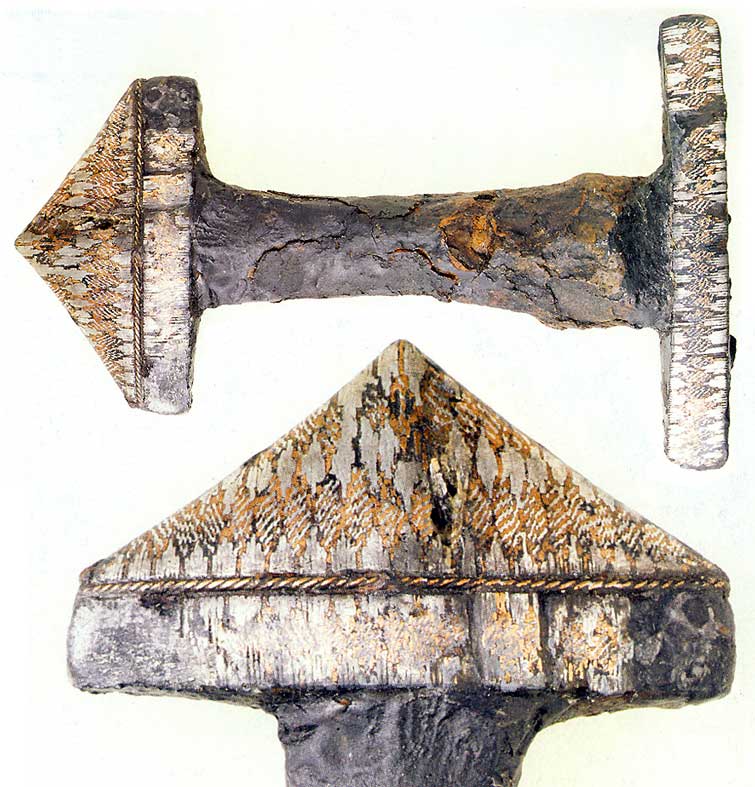
From Ian Peirce's "Sword of the Viking Age" Strandefjorden Hilt.
 Attachment: 73.57 KB
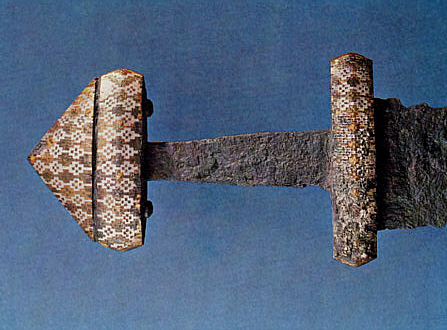
Sweden find, image from Claudio's Fantasy Page.
 Attachment: 87.77 KB
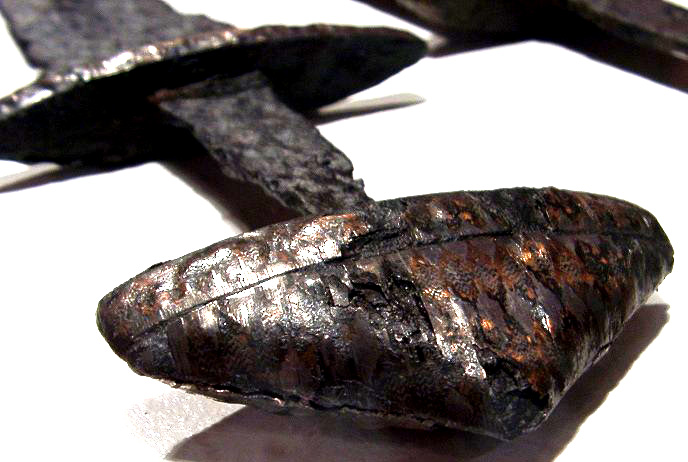
Photo by Jeroen Zuiderwijk
The first and last image shows inlay that appears to use twisted wires of silver and copper, inlayed at intervals to produce a diamond pattern.
ks

From Ian Peirce's "Sword of the Viking Age" Strandefjorden Hilt.

Sweden find, image from Claudio's Fantasy Page.

Photo by Jeroen Zuiderwijk
Kirk,
I am thankful that you posted these pictures. Those hilts are impressive, and must have been spectacular when new.
I am thankful that you posted these pictures. Those hilts are impressive, and must have been spectacular when new.
Sorry guys, I’ve been out of town for several days. It did give me a chance to think about and study some of these a bit more. So some of the points may be a bit on the random side of things, but just things I noticed.
The Kilmainham sword pictured above is a good example of how sheets have been inlayed to clad the hilt in certain materials. You can see where the sheets have started coming loose on the top and bottom of the lower guard and also on the bottom of the upper guard. Also noticed from Jeroen’s last picture of the original sword in question that you could see where it has been clad in such a way as well if you look at the top of the pommel cap you can see the seems where the side plates join a strip that runs along the top of the pommel. Also if you look closely along this top strip you can see where the silver colored inlays were cut into the bronze inlay, this gives a look into the different steps used when doing it. So I don’t think the one area of striations we see on the pommel cap is where individual wires have been inlayed, but rather a low spot in the bronze inlay that shows the cuts made into the base metal that hold the inlay in place.
Notre Dame is rather light on the Viking age research, so I mainly have been taking advantage of their wealth of Celtic books. The Viking Way and the Sheaths and Scabbards that I copied for you have really been about it. I’m sure there is a ton of research out there in the academic side of things, however I just haven’t really had the time tracking it down. Peoples’ thesis and dissertations can be great sources, but sometimes they are very hard to come by since many times there are only like three total copies world wide. Nate and I had a heck of a time finding one recently, we were almost to the point of emailing Wyss himself and asking if he could help us get a copy. Slowly they are creating very nice collections research that can be accessed totally online, it is a ton to search through though.
About the plates, I thought they were mentioned in Swords of the Viking Age, but I can’t find it now. Might have been thinking about the reference to the beaded band on one type H, although he says on the opposite page that it is a wire band. Page 49 does have a picture of one example that has plates on the top and bottom of the upper and lower guards, and C3118 looks like it might have a plate/band between the upper guard and pommel cap. I have this picture of a type H in my head that had more of a plate as well and thought it was in there as well, but guess it is somewhere else. If I find it, I’ll post it.
I have been talking a bit with Mark about all the different inlays types recently since he has a background in this type of jewelry work, and had a thought about a couple of the more complicated examples we see. Maybe it was just the lack of sleep, but it kind of hit me that the types like these last few look more like woven patterns than anything else. So I’m wondering now, could these have been made type weaving with fine metal wires, flattening slightly, and then inlaying over the parent material? I am pretty sure it was in the migration era that they found garments that had gold accent wire woven into them. Plus it might explain some of the ways we see the weathering happening.
Here is a link that Mark did send me that covers some types of inlays that is a pretty interesting read.
http://www.kougei.or.jp/english/crafts/0813/d0813-4.html
Shane
| Shane Allee wrote: |
| I have this picture of a type H in my head that had more of a plate as well and thought it was in there as well, but guess it is somewhere else. If I find it, I’ll post it. |
Okay, cool...thanks Shane
| Eric McHugh wrote: | ||
I believe so...but I hesitate to say that this is always the way they did it. They used many different techniques to build these swords. Whose to say that they didn't use a pressure fit on some of these swords. In other words, they could have some how wedged the pommel top onto the "U" rivet...I don't know. But the pitch/resin was one solution for this type of construction, and it would also account for all of those swords that are lacking an upper pommel piece and only have the "U" rivet showing. |
I had a look again at the example in the Army Museum in Delft, and was able to glance through the gap underneath the pommel. It too appears to have a U-shaped rivet and hollow pommel. The pommel appears to be a hollow shell some 3mm thick. It's cool to learn stuff here, then go back and suddenly see things that you didn't see. Fascinating! :)
A HTML-ization of Pettersen's section on the Type H.
http://www.aiusa.com/medsword/petersen/ptsn089h.html
As far as I could gather, he makes no mention of the pommel atatchment, but there are more pictures.
For those of a Scandinavian persuation, or who like pretty pictures, here's a PDF of "the Norwegian viking sword", in the original norwegian language....
http://stud.imma.dk/nils.anderssen/norskesverd.htm
Whoa, 117 MB... Good thing I'm on broadband.
| Jeroen Zuiderwijk wrote: |
| I had a look again at the example in the Army Museum in Delft, and was able to glance through the gap underneath the pommel. It too appears to have a U-shaped rivet and hollow pommel. The pommel appears to be a hollow shell some 3mm thick. It's cool to learn stuff here, then go back and suddenly see things that you didn't see. Fascinating! :) |
Yes! That is a pretty stellar example. I talked with Peter Johnsson about these type H pommel just to make sure that I was thinking correctly, and he agreed. Some sort of organic adhesive was used to make fix the top to the lower pommel piece. I wish we knew what the glue was made of because it had some real holding power considering that these swords were used in battle. :)
I wonder if it was some sort of pitch like people seem to think. If that's the case, it would bring the balance point back a bit, that stuff's heavy!
It's pretty shock resistant, too if you get the mix right.... easy to fix, just heat it up!
It's pretty shock resistant, too if you get the mix right.... easy to fix, just heat it up!
Maybe someone will find some squeeze tubes of epoxy hardener and resin in a Viking archeological site. :p
But, seriously, held on by adhesive ONLY ? Wonder if the same adhesive would have been used for other things like shield board or plywood. Also to glue grips to tangs etc .....
Getting some chemical analysis of the residue would be very interesting: Might even be an interesting glue for modern uses !
Maybe something from the Viking age could be a good adhesive to hold those space shuttle tiles from falling off: Only half joking here because sometimes old technology can do things better than current stuff.
Thanks for the link to the full text Elling. Glad I picked up a couple new binders so I have someplace to put it.
Pretty safe bet it just wasn't hide glue holding them together, one warm day and everyones top would be popping off.
Shane
Pretty safe bet it just wasn't hide glue holding them together, one warm day and everyones top would be popping off.
Shane
Yeah, I've never worked with hide glue, so I don't know... But pitch ain't that bad... if you get the mix right, you gotta get it pretty hot (150f+) for it to really get soft.... 'course, it all depends on the sap, how long you cooked it, ect.....
Page 2 of 4
You cannot post new topics in this forumYou cannot reply to topics in this forum
You cannot edit your posts in this forum
You cannot delete your posts in this forum
You cannot vote in polls in this forum
You cannot attach files in this forum
You can download files in this forum
All contents © Copyright 2003-2006 myArmoury.com — All rights reserved
Discussion forums powered by phpBB © The phpBB Group
Switch to the Full-featured Version of the forum
Discussion forums powered by phpBB © The phpBB Group
Switch to the Full-featured Version of the forum