Hello again.
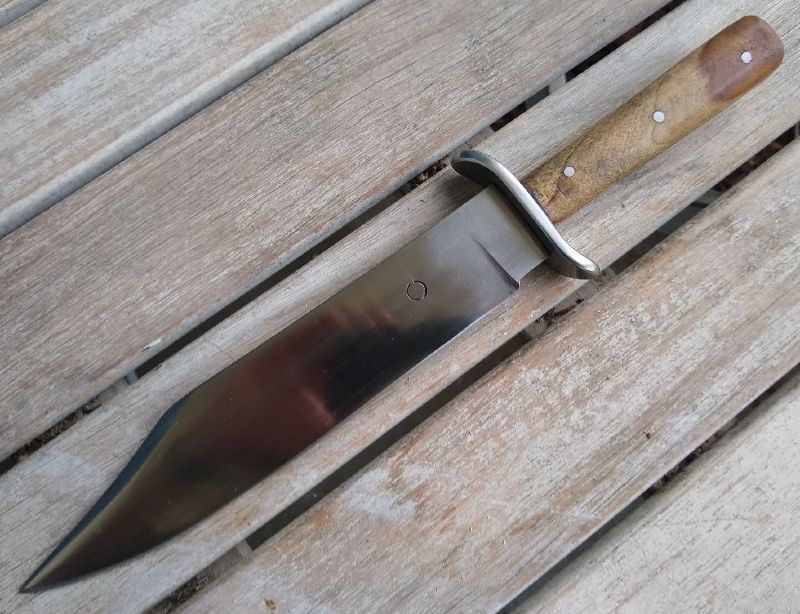
I've ordered a couple of unmounted Sheffield-style bowie blades, the kind with straight-edged slab tangs, similar to the attached image. I'm wondering how to make sure the hilts have a secure grip, given that they have straight edges and no widening at the butt end. Was the reason they were often given antler scales so the textured surface would make them grippier? If I use smooth wood grips, should I regrind the tang edges so that they flare at the end? Or am I worrying about nothing?
Attachment: 59.32 KB
[ Download ]
One thing you can do is make the grip scales grow slightly thicker away from the blade. Just a couple of millimeters thicker at the butt end often makes a surprisingly big difference!
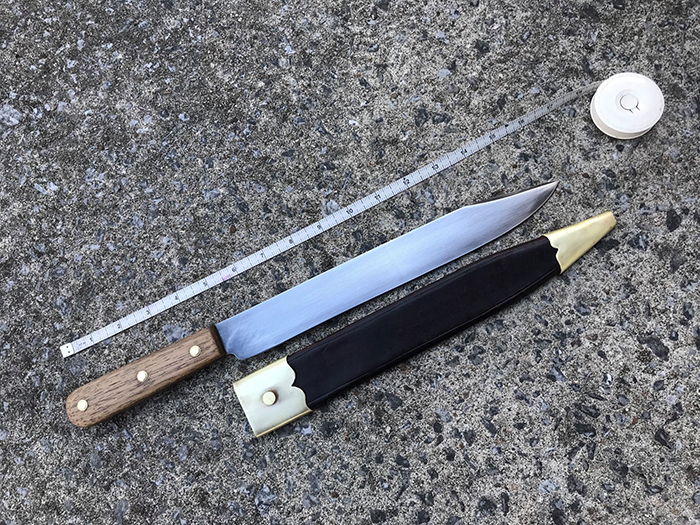
And, of course, you can also file the sides of the tang to the more common slightly waisted shape (as shown in the attached image, or probably a little more pronounced depending on personal taste).
Thanks. I unfortunately didn't inquire about the exact dimensions of the tang and fittings before ordering, so I'll have to find out how much wiggle room is available when they arrive.
Hi Dan,
Bone is a good choice for a grip scale material, you can work it to a nice satin finish and it’ll still have a bit of tack, grippiness even when wet, at least to bare hands. Good chance that’s what the scales are in the photo you attached in your original post.
You can certainly flare the grip toward the butt, either in thickness or in height (reducing the tangs breadth close to the blade if needed), as Mikko states before, but many of the older bowies that I’ve seen are pretty narrrow and straight in the grip. A fatter butt is an advantage if you’re building a chopper, but might not be needed or even desireable for an all-purpose outdoors knife (which most Bowie knives were).
Best,
Eric
Here is a Sheffield style bowie made by Tod Cutler
Attachment: 97.01 KB
Dan D'Silva wrote: |
Hello again.
I've ordered a couple of unmounted Sheffield-style bowie blades, the kind with straight-edged slab tangs, similar to the attached image. I'm wondering how to make sure the hilts have a secure grip, given that they have straight edges and no widening at the butt end. Was the reason they were often given antler scales so the textured surface would make them grippier? If I use smooth wood grips, should I regrind the tang edges so that they flare at the end? Or am I worrying about nothing? |
Not sure what you mean by reshaping the tang ? I wouldn't narrow the tang near the guard and risk creating a weak spot.
Narrowing the tang mid-handle with a gentle curve and have it swell back to it's original width at the end of the handle might work.
Another way to give a more secure grip would be to cut some narrow grooves into the sides of the handle scales in some interesting pattern. These could be a pair of shallow grooves close together and at the natural position of your fingers a bit away from the guard ? I might suggest also file work on the top and bottom of the tang but this is risky if it causes stress risers ?
I would use a dremel tool to create closely spaced but shallow cut lines and then use a narrow round jewelers file to make sure that the bottom of the cuts are rounded to avoid creating stress risers that could compromise the strength of the tang ?
A lot depends on a very very steady hand with the thin cutting wheels of the dremel, and not going too deep with the cuts.
If well done the cuts can be very aesthetically pleasing and give a good grip on the knife handle: A lot depends on skills using power and hand tools.
In case of doubt, doing some practice cutting grooves with the dremel on a 1/4" thick piece of mild steel controlling the depth of cut and the spacing of the cuts being regular.
Hope this helps. :)
Thank you for all your suggestions.
The blades arrived yesterday. Unfortunately the tangs aren't wide enough to give them a significant waist (though that does appear to have been a historical method). I think I'm going to taper the scale thickness. That won't make them look too different from the originals.
By the way, this is the blade I'm talking about, the 003 classic clip point Bowie. It's cheap because it's not finished at all, doesn't even have pin holes drilled. It was 4.5mm thick to start with, I sanded it down to just over 4mm and still couldn't get all the hammer marks out. The Sheffield Bowies, even old antique ones, never seem to look this rough.
Attachment: 163.19 KB
[ Download ]
Dan D'Silva wrote: |
Thank you for all your suggestions.
The blades arrived yesterday. Unfortunately the tangs aren't wide enough to give them a significant waist (though that does appear to have been a historical method). I think I'm going to taper the scale thickness. That won't make them look too different from the originals. By the way, this is the blade I'm talking about, the 003 classic clip point Bowie. It's cheap because it's not finished at all, doesn't even have pin holes drilled. It was 4.5mm thick to start with, I sanded it down to just over 4mm and still couldn't get all the hammer marks out. The Sheffield Bowies, even old antique ones, never seem to look this rough. |
If the tang is narrow enough you could make the blade a hidden tang by carving a channel the width of the tang into both halves of a two piece handle.
The external dimensions and shape can be up to you, maybe with a gentle curve to a rounded swell at the end of the handle, or even a different style of handle like a coffin grip.
For pins I have a suggestion about how to do it so as to have no issues with having the pin holes in the tang and pin holes in the two handle scales lining up before you epoxy the whole thing together.
1) Drill the holes in the steel tang.
2) Tape one scale to the tang and drill the holes for the wood though the existing holes in the steel tang as a guide.
3) Tape the other scale to the other side and drill from the first scale's side though the holes in the steel tang and out the side of the second scale from the inside of the second scale..
All holes should now align.
4) Glue all the part together ( Use slow curing epoxy should you run into any problems: in FORGED IN FIRE people are forced to use 5 minute epoxy because they can't wait for the next day to finish their knives, and if they screwed up the pin placement, or the pins don't fit or get stuck they have a lot of problems to fix with little time to do it.)
Note: Alternatively, you can use 5 minute epoxy if first you test everything for a perfect fit and you are very very sure that the pins will fit into the holes.
5) Check with the drill bit shank if the pin holes still align properly.
6) Insert and pean and/or epoxy in pins.
7) Do any finishing needed, the pins can be ground flush with the handle scales or rounded and left proud which would also help with grip retention in the hand.
Personally I would shape the handle scales to 95% finished shape before doing the assembly, others may prefer doing all of the shaping after everything is assembled together as they do on FORGED IN FIRE due in part because of time constraints.
Remember, less is more! Very subtle shapes are surprisingly effective at improving a grip - the biggest thing IMO is just having some kind of unintrusive tactile feedback so you can tell where along the grip your fingers are and which way the edge is oriented without looking. If you file the tang to be just a total of 2mm narrower in the middle than at the ends, and/or make the scales a total 2mm thicker at the butt than at the guard, that's easily enough to feel (and see!), and since it's not a huge heavy blade that's honestly all you need - and probably more than you strictly need; as was pointed out, a lot of the antiques are straight and smooth all the way, and with light knives that's most likely just not an issue at all, as long as they're not also slippery.
I managed to give the tang a very slight waist, but I felt the entire tang needed to be made narrower from end-to-end (and thinner) so as not to require making the slot in the guard so big as to weaken it. Drilled pin holes, shimmed and hard-soldered the guard, and I've got some holly for the grips. Also have some sheet nickel on order for the scabbard fittings and escutcheon plate.
Attachment: 257.88 KB
[ Download ]
Attachment: 257.88 KB
[ Download ]
Oh, I like that! Really nice subtle shape.
Thank you.
My scroll saw is in, but I'm planning to get a cart to keep it on and do all the cutting and shaping of wood components outdoors so sawdust won't be a problem. Made the frog button heads and the first escutcheon plate. They're pretty rough-looking, as expected at this point... but I'm going with the conceit that these aren't Sheffield Bowies but rather domestically-made Bowies in the Sheffield style, which is, of course, exactly what they are.
In the meanwhile, I have to ask about the frog buttons. Can I just silver-solder the head to the shank and the shank to the throat? How tall and wide should the shank be? Lastly, how do I design and build the frog sleeve and buttonhole so the button will go through the hole easily without the hole or sleeve being too loose?
Attachment: 545.28 KB
[ Download ]
Dan D'Silva wrote: |
Thank you.
In the meanwhile, I have to ask about the frog buttons. Can I just silver-solder the head to the shank and the shank to the throat? How tall and wide should the shank be? Lastly, how do I design and build the frog sleeve and buttonhole so the button will go through the hole easily without the hole or sleeve being too loose? |
For the frog sleeve one makes a hole the diameter of the shank and the frog has a slit in the top part leading to the hole, the scabbard is inserted into the frog shape first, the shank slips in the cut and ends up in the hole.
The button can be very much larger than the shank as the hole in the frog never had to get past the wider diameter of the button.
See the pics on this site of the Windlass 1880 bowie reproduction, the pics of the knife in the photo galler and sheath in the photo gallery clearly show what I'm attempting to describe.
https://www.reliks.com/bowie-knives/1880-bowie-knife/
Note one can use the frog for on the belt carry, but one can also use the shank and button by itself behind the belt close to one's body and the shank and button prevents the sheath from falling off the belt when one pulls the knife out.
Hope this helps. ;) :D
I recently finished a guardless early "Bowie" (a large, thick knife probably more like what Bowie used in the sandbar fight as opposed to the knives later called "Bowies"). Mine is inspired by a very rare example that sold for $13k at auction. That knife has stag scales, which would give a good grip. Mine uses smooth ash, so I left the solid brass rivets slightly proud and domed over brass washers to help with grip. This feels very secure to me.
Attachment: 445.48 KB
Attachment: 95.63 KB
Attachment: 445.48 KB
Attachment: 95.63 KB
Jean Thibodeau wrote: |
For the frog sleeve one makes a hole the diameter of the shank and the frog has a slit in the top part leading to the hole, the scabbard is inserted into the frog shape first, the shank slips in the cut and ends up in the hole.
The button can be very much larger than the shank as the hole in the frog never had to get past the wider diameter of the button. See the pics on this site of the Windlass 1880 bowie reproduction, the pics of the knife in the photo galler and sheath in the photo gallery clearly show what I'm attempting to describe. https://www.reliks.com/bowie-knives/1880-bowie-knife/ |
Thanks. That seems like it'd work, provided the leather is left stiff. Perhaps water-molding and being careful about conditioning there.
I'm noticing that among the rare photos of originals that even have frogs, there doesn't seem to be one routine way they were made and attached to the scabbard.
Sean Flynt wrote: |
I recently finished a guardless early "Bowie" (a large, thick knife probably more like what Bowie used in the sandbar fight as opposed to the knives later called "Bowies"). Mine is inspired by a very rare example that sold for $13k at auction. That knife has stag scales, which would give a good grip. Mine uses smooth ash, so I left the solid brass rivets slightly proud and domed over brass washers to help with grip. This feels very secure to me. |
Sounds good. With luck, the escutcheon plate will work similarly.
BTW Sean, I sent you a PM earlier.
In the final stretch now as far as the knife itself goes, with the grips polished and taking on their first coat of linseed oil. They look alright as they are, but hopefully subsequent coats will give them more of an aged bone color. I'm mainly posting because I feel the need to say: This holly is barely harder than poplar, and if it's representative of what holly in general is like, I'm surprised anyone uses it as a knife grip.
Attachment: 300.52 KB
[ Download ]
Attachment: 300.52 KB
[ Download ]
Dan D'Silva wrote: |
In the final stretch now as far as the knife itself goes, with the grips polished and taking on their first coat of linseed oil. They look alright as they are, but hopefully subsequent coats will give them more of an aged bone color. I'm mainly posting because I feel the need to say: This holly is barely harder than poplar, and if it's representative of what holly in general is like, I'm surprised anyone uses it as a knife grip. |
Boiled Linseed oil does tend to darken wood grain and become yellowish over time, it also takes times for the surface to acquire a semi gloss polish. ( This gives a more aged look, although some people prefer a finish that doesn't darken or change the colour of a piece of wood ..... I actually like it myself. )
I don't know or have ever used holly as I tend to like using harder exotic woods when I make a walking stick, or if I decided to make scales for a knife.
This Wood Data base is a great site to find out facts about different wood properties:
https://www.wood-database.com
Direct link to Holly, one type of Holly: https://www.wood-database.com/holly/
Direct link to Poplar: https://www.wood-database.com/poplar/
From the statistics Poplar is half as hard as Holly.
From the description and Janka hardness scale Holly is definitely not soft like Poplar, but it's below Oak or Ash in hardness.
One thing you can try to polish the handle and maybe harden it slightly is to burnish it with a hard and smooth piece of steel or even a dowel of harder wood: This can compress the grain a bit and it also helps in getting a satin finish on some woods.
Hope that this is helpful.
It is, thanks! Thing is, to me the holly just feels little harder than poplar. Of course, that's not a fine instrument for gauging and it's good to see the actual numbers. Surprising that holly has a Janka hardness comparable to black walnut! It may be that the particular piece I used is softer than average.
Remember that a whole lot depends on exactly how, and how fast, the tree grew, as well as which part of it the wood comes from.
Mikko Kuusirati wrote: |
Remember that a whole lot depends on exactly how, and how fast, the tree grew, as well as which part of it the wood comes from. |
YUP, I have one walking stick coming from a different Lilac Tree than the one's in my back yard that seemed much heavier relative to it's diameter than the other Lilac branches that I've used to make other walking sticks.
That Lilac came from a neighbour's very small Lilac bush that probably grew much more lowly than my Lilac trees because being in front of the houses on my street it grew very slowly because it was in the shade of very big Maple trees lining the my street.
My Lilac trees get a lot of direct sunlight and new branches grow extremely fast: One low branch that regrew from a trimmed and cut off branch went from nothing to being a 4" diameter tree trunk in the last 5 years or so. The odds are great that it's a lot less dense than the slow growth branch of the cut down Lilac.
Page 1 of 2
You cannot post new topics in this forumYou cannot reply to topics in this forum
You cannot edit your posts in this forum
You cannot delete your posts in this forum
You cannot vote in polls in this forum
You cannot attach files in this forum
You can download files in this forum
All contents © Copyright 2003-2006 myArmoury.com All rights reserved
Discussion forums powered by phpBB © The phpBB Group
Switch to the Full-featured Version of the forum
Discussion forums powered by phpBB © The phpBB Group
Switch to the Full-featured Version of the forum