Landsknecht or Bollock daggers pommel crimping technique?
Hi guys,

a question for professional or hobbyist knifemakers.
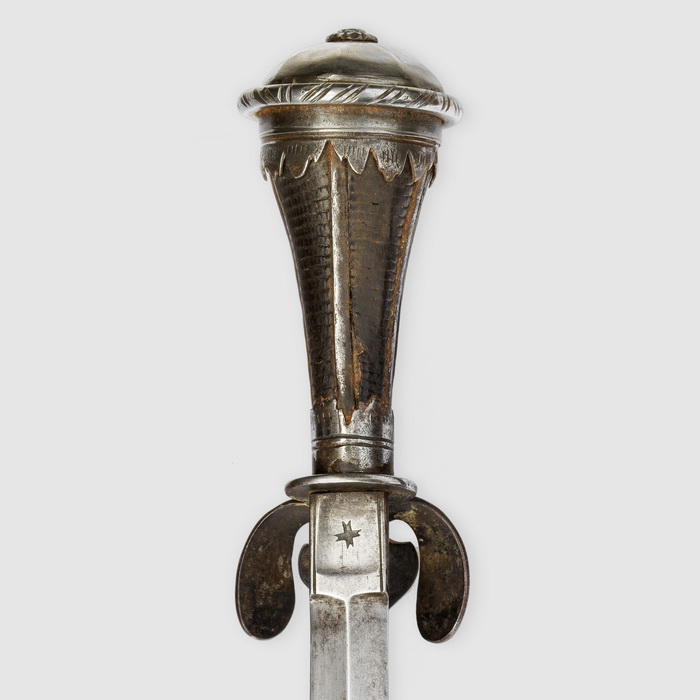
Many Landsknecht or Bollock daggers with the strongly flaring "trumpet" shaped handles have pommels that sort of grip the handle with small triangular or decoratively shaped protrusions all around the pommel's perimeter. These protrusions are presumably crimped down to the handle's surface after the pommel is put in place.
I attached an image as an example of what I am talking about. Here the flare of the grip is actually very slight, in most others I have seen it much more pronounced.

I am working on a hobby project of a little Landsknecht style dagger, mostly using it to experiment with new techniques: wire wrapped grip and this style of pommel attachment. When I got to test-fitting the pommel, I discovered that I can't crimp the protrusions all the way down. The metal (nickel silver in my case) has some springiness to it, so no matter how hard I push they spring back a little and stay about 1/16" away from the handle wrapping.

So, is there some trick to this? I would appreciate any suggestions.

For now, my plan is to try annealing the protrusions first (will put the pommel in a shallow pan with some water to preserve the soldered joint, and use a propane torch), and then lightly hammer them in place instead of pushing.

Thanks.
Alex.

 Attachment: 79.46 KB
Landsknecht_auction_handle.jpg

I do not have experience with those - however, the problem you're encountering is the same problem one encounters in clinching nails (hammering them through something and bending them over rather than riveting them). I have done that a fair bit and suffered the problem you're having quite a lot. I believe the solution was given by someone on here, as a matter of fact, but I can't recall clearly. I think it was from an old carpentry book that someone shared? Might be imagining that...

Anyway, with the clinched nails, the solution is that after the nail is bent over, you take a punch and use it to hammer just the tip of the nail in further. This puts the nail into less of an L shape and more of a U shape. It grips the wood and doesn't come loose/snag on things.

Based on the image you provided, it looks like the tips are bent more than the rest of each protrusion. I would try to use a punch (I'd use brass, copper or even a hardwood dowel if the protrusions are a soft metal or decorated) to focus on the tips and bend those in once you can't bend the whole piece in further.

Although, on that leftmost protrusion in your picture that is basically edge-on, is that a trick of the light or can you see an air gap?
Hi Alex,

Your plan sounds fine, a full anneal is really the only way to go and as peter says turning in the end is also good.

I will be interested to see your work, as this is a lovely piece and in fact I have to make this in around 4 or 5 months myself and am really looking forward to it.

Good luck

Tod
Thanks for the replies!

I will try to "turn in" the ends, but not sure how well it will work with my wire wrapped handle. I expect it would work for a wood or leather covered handle much better.

As to the air gap in the picture, I also noticed it but I think this is a result of handle's wood and leather shrinking over the years. Can't imagine the maker would leave the points sticking up like that originally - that could tear up or at least abrade a user's palm easily.

I am not making an exact copy of the piece in the picture, more like a simplified version inspired by this type in general. Will post when finished, hard to say when as I am working on this project in my very limited free time.

Alex.
Alex Indman wrote:
As to the air gap in the picture, I also noticed it but I think this is a result of handle's wood and leather shrinking over the years. Can't imagine the maker would leave the points sticking up like that originally - that could tear up or at least abrade a user's palm easily.


Most, and I really do mean a huge majority of, antiques have a lot of imperfections of fit and finish, asymmetry, etc. The concepts of perfection were very different than they are now. While it's probably a good call that shrinkage of organic materials happened, it's would also be of no surprise to me to know that those bits were not pressed completely flush even when new.
Nathan,

I understand that "imperfections of fit and finish" would be common. But here we are talking about a possibility of losing some of your skin to the pointed pieces that aren't flush with the handle. I really doubt that would have been acceptable even back in the old days...


BTW, just curious why was this thread moved to the "Off-topic" forum? I thought it was perfectly on topic, being about a specific aspect of historical weapons construction.

Maybe there should be a separate forum for discussions about weapon making techniques, period or reproduction (including how to's, DIY projects, etc.)?

Alex.
Alex Indman wrote:
BTW, just curious why was this thread moved to the "Off-topic" forum? I thought it was perfectly on topic, being about a specific aspect of historical weapons construction.


It was moved because you're discussing construction methodology of a very small detail. It's not a discussion of the weapon itself, but of the craft required to make it. Off-topic is more appropriate, as it would be if you were talking about martial usage of a weapon, as another example. All these topics are related to the arms themselves, but are tertiary.

Quote:
Maybe there should be a separate forum for discussions about weapon making techniques, period or reproduction (including how to's, DIY projects, etc.)?


I don't want to have a bunch of random forums. There's a ton of cross-over with our discussions and no need to overly-compartmentalize that. Let's leave that to the forums on the 'net that haven't really put a lot of thought into that sort of thing. DIY topics are marked with a DIY tag that can be clicked and linked to all other DIY topics regardless of their location.
Alex Indman wrote
Quote:
I understand that "imperfections of fit and finish" would be common. But here we are talking about a possibility of losing some of your skin to the pointed pieces that aren't flush with the handle. I really doubt that would have been acceptable even back in the old days...


I am mainly with Nathan on this one. Logic and my heart says that things like this would have been unacceptable, simply because people are no different now from then and our hands would hurt just as easily now as then. However as Nathan says you see this sort of thing all the time when looking at original pieces, and so the only real conclusion is that it didn't matter that much. Even things that you 'know' are totally wrong and as a maker or consumer now you would never accept were perfectly normal; just imagine if I delivered a sword to someone with a 3mm/1/8" gap between the blade and the guard which was filled with lead?

I am a great believer in people then had bills to pay, just as we do now, but with less equipment, there are less options. As you have discovered, clenching in the dags on the cap is not always easy. Lets say that he has assembled the whole cap and chose a slightly hard steel, or forgot to anneal the whole prior to soldering on the 'turban band'. He cannot do what you are proposing, as he does not have the equipment; his only option is to anneal the whole and this would risk losing the band, but at the least would require a repolish and it needs to be delivered tomorrow....If the customer doesn't care, whats the need to correct?

The other side of this is comfort verses appearance. For example, I made a knife for Nathan a few years ago with a very lumpy and uncomfortable looking handle (not as bad as it looks, but still not comfortable) and the first reaction is that it is simply daft. However a dagger is a not a hammer and is not used for 8 hours a day, 6 days a week. It is drawn once a month for 30 seconds - maybe. Comfort in many respects is not relevant, pose value and effectiveness are far more important.

So is that gap required? - no, is it desirable? - no, is it a problem? - probably not, would a modern consumer find it acceptable? - on the whole not, is it avoidable? - not always.

The conclusion is that if you have a gap like that, don't beat yourself up about it, just be proud you are taking on a difficult job

Tod
Posting an update as promised – mission accomplished!
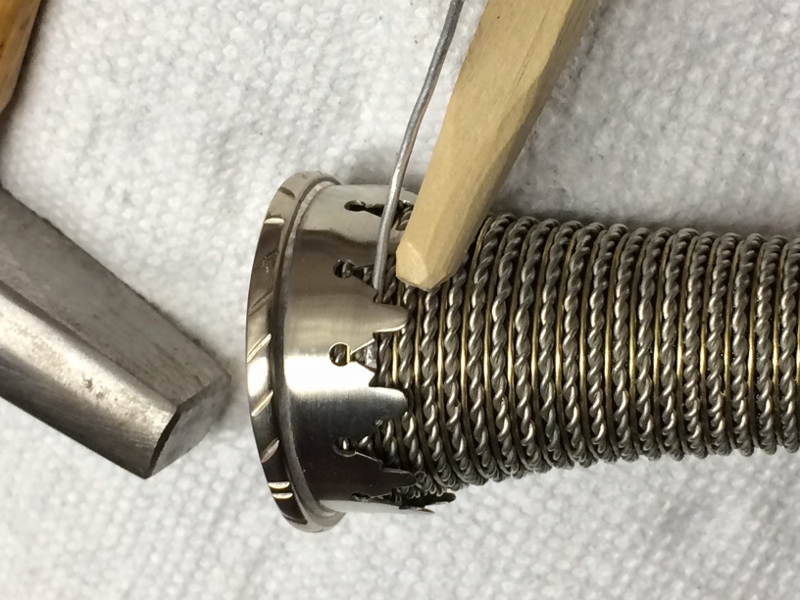
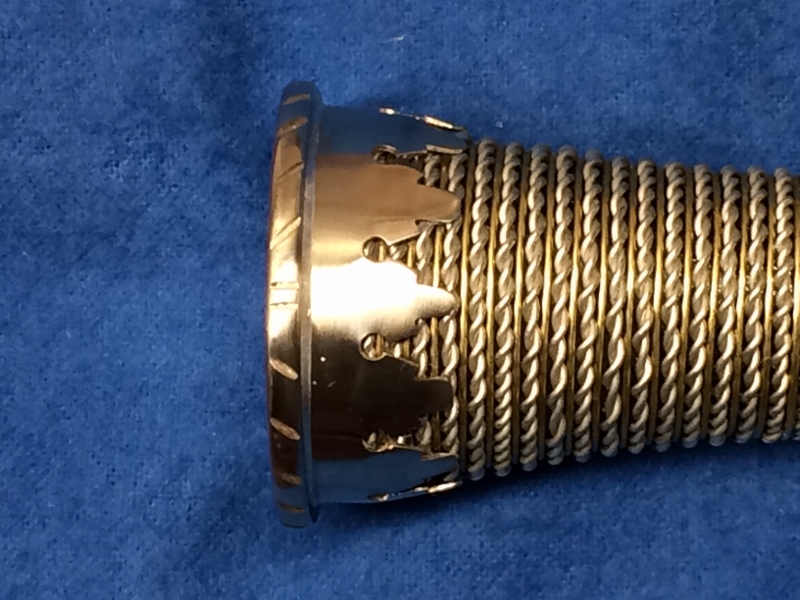
The annealing helped a little, and so did the use of a soft wood punch. What really helped avoid gaps, was a little trick I came up with. I first slid a piece of wire under the middle of a projection as shown in the picture, and bent down the point around it. Then pulled the wire out and bent the base half of the projection as far as it would go. Even if it didn’t go all the way to the wrapping, the “pre-bent” point did get down to wrapping with no gap!
BTW, I posted complete dagger as a DIY project on the Historical Arms forum, according to as I understood moderator’s explanation of forum policy. See here:
http://myArmoury.com/talk/viewtopic.php?p=305463#305463


 Attachment: 243.34 KB
IMG_0001 (800x600).jpg


 Attachment: 245.71 KB
IMG_0002 (800x600).jpg

Very well done Alex, it seems like it was a good way to crimp. Sure looks nice!

Page 1 of 1

Jump to:  
You cannot post new topics in this forum
You cannot reply to topics in this forum
You cannot edit your posts in this forum
You cannot delete your posts in this forum
You cannot vote in polls in this forum
You cannot attach files in this forum
You can download files in this forum


All contents © Copyright 2003-2006 myArmoury.com — All rights reserved
Discussion forums powered by phpBB © The phpBB Group
Switch to the Full-featured Version of the forum