Hello all. I acquired Arms and Armor's Schloss Erbach; the blade is naked and I thought I might try my hand at building a scabbard for it. Does anyone have photographs of typical 15th century German Scabbard style?
A subject dear to my own heart!
Here are the keys to the kingdom if you're willing to learn a few German terms ("schwertscheide" is a good one to know):
http://tethys.imareal.sbg.ac.at/realonline/
Under Zeitraum, just put in your start and end dates. Then select Materielle Objekte under the first set of buttons. Then type schwert or schwertscheide in the search box and enter. When the term appears in the list above, click Zeige Bilder. That will pull up all the available images. Click on Weitere Bilder at the bottom of each page to go to the next page.
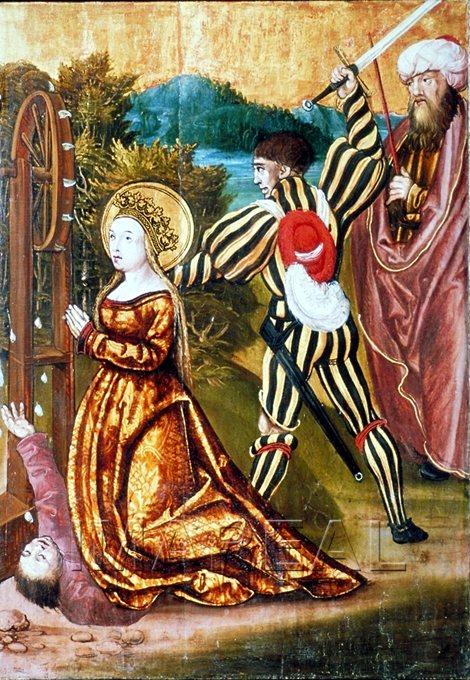
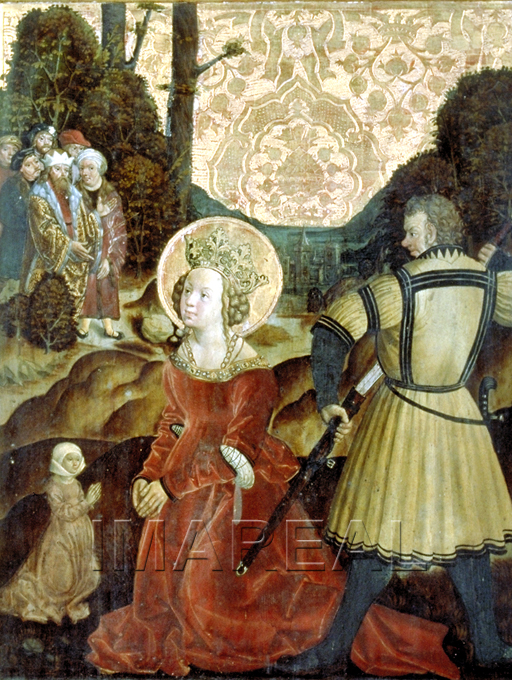
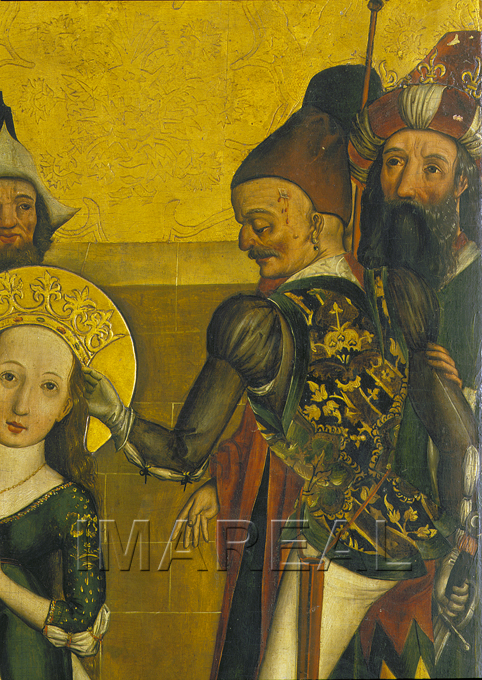
Some examples of what you'll find are included below. Please forgive all the bloodshed. Martyrdom images tend to offer the best views of scabbards, suspensions and bare blades. They also remind us that these are not toys.
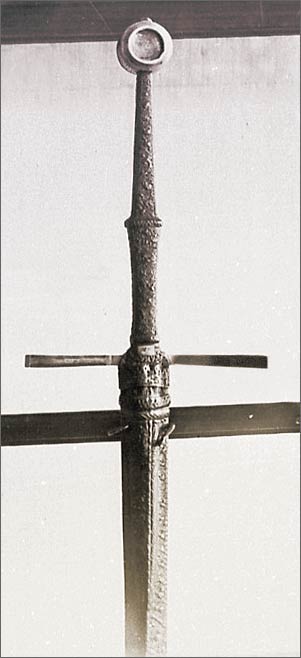
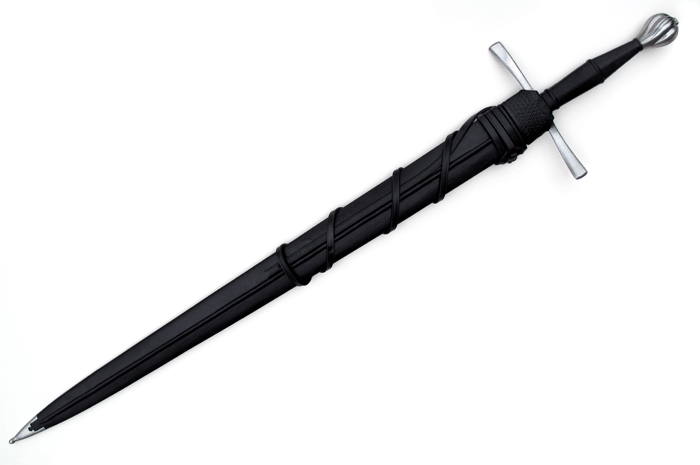
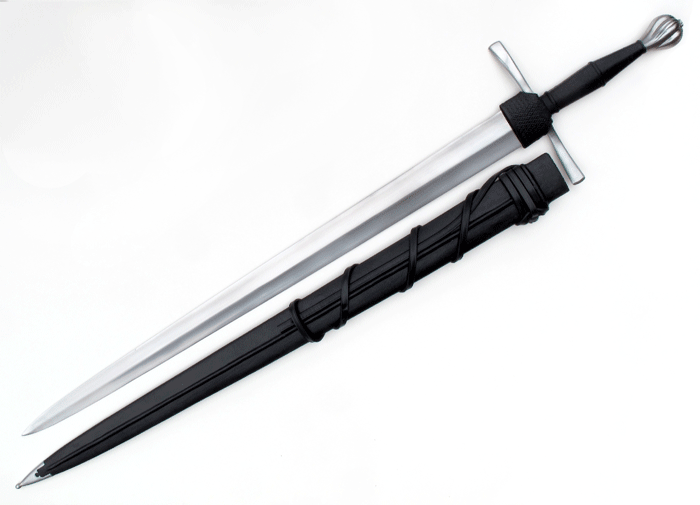
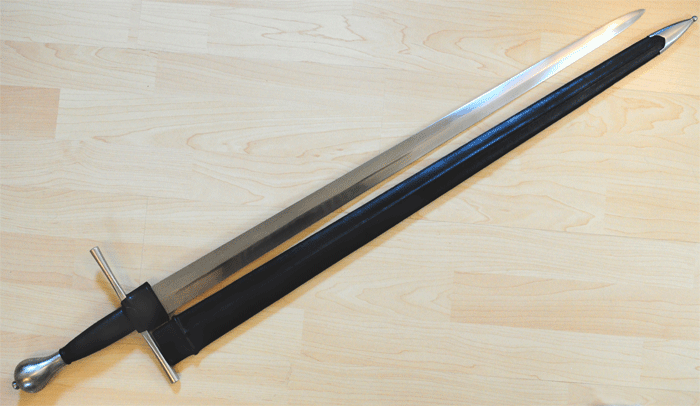
Also below are three of my projects showing two popular German types of the period. One of these is in-progress. That sword has modified Erbach pommel and guard and a broader, shorter, rounder blade. The scabbard core is finished. I'm working on the by-knives and chape now. I haven't chosen a suspension, but I'm leaning toward the basket-weave knot shown on the fantastic German sword shown in the next post.
 Attachment: 470.45 KB
 Attachment: 453.79 KB
 Attachment: 80.3 KB

 Attachment: 496.41 KB

 Attachment: 499.16 KB
 Attachment: 21.68 KB
 Attachment: 177.79 KB

 Attachment: 35.52 KB
 Attachment: 104.03 KB
 Attachment: 194.15 KB
Here are the keys to the kingdom if you're willing to learn a few German terms ("schwertscheide" is a good one to know):
http://tethys.imareal.sbg.ac.at/realonline/
Under Zeitraum, just put in your start and end dates. Then select Materielle Objekte under the first set of buttons. Then type schwert or schwertscheide in the search box and enter. When the term appears in the list above, click Zeige Bilder. That will pull up all the available images. Click on Weitere Bilder at the bottom of each page to go to the next page.
Some examples of what you'll find are included below. Please forgive all the bloodshed. Martyrdom images tend to offer the best views of scabbards, suspensions and bare blades. They also remind us that these are not toys.
Also below are three of my projects showing two popular German types of the period. One of these is in-progress. That sword has modified Erbach pommel and guard and a broader, shorter, rounder blade. The scabbard core is finished. I'm working on the by-knives and chape now. I haven't chosen a suspension, but I'm leaning toward the basket-weave knot shown on the fantastic German sword shown in the next post.


Last edited by Sean Flynt on Tue 21 Jul, 2015 6:50 am; edited 1 time in total
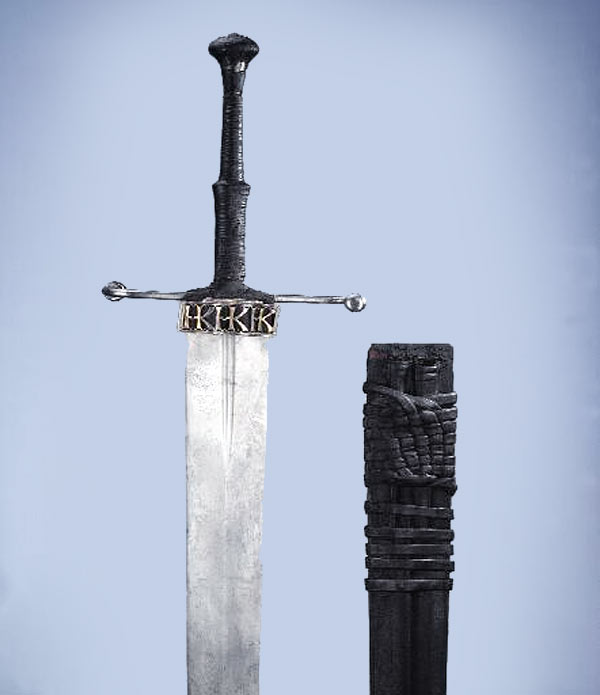
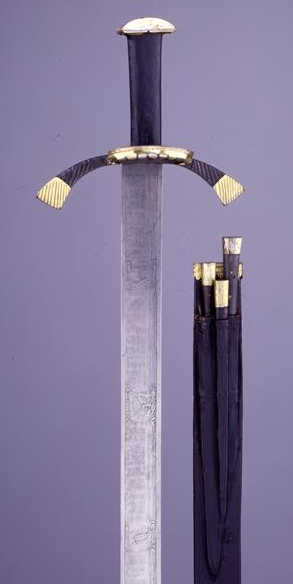
The Dresden sword (full-length view in the attachement,) plus a calendar sword with scabbard and by-knives from the same period:
 Attachment: 29.53 KB
 Attachment: 97.63 KB
 Attachment: 98.77 KB
[ Download ]


[ Download ]
Thank you, Sean! This is very helpful. Rain guards abound, eh?
In the event you wish to accumulate all the above data - then make your OWN scabbard as you see fit....
See.... (FREE PDF TUTORIALS) - You can always throw them away :).
"Make a Poplar Scabbard Core with a Router"
http://findlithui.deanandsandy.dyndns.org:808...ter1.2.pdf
"Leather Wrap a Scabbard Core"
http://findlithui.deanandsandy.dyndns.org:808...ore1.1.pdf
See.... (FREE PDF TUTORIALS) - You can always throw them away :).
"Make a Poplar Scabbard Core with a Router"
http://findlithui.deanandsandy.dyndns.org:808...ter1.2.pdf
"Leather Wrap a Scabbard Core"
http://findlithui.deanandsandy.dyndns.org:808...ore1.1.pdf
| Quote: |
| The Dresden sword (full-length view in the attachement,) plus a calendar sword with scabbard and by-knives from the same period: |
What is a calendar sword? I have not heard this term before. Awesome pics and work as always Sean!
Well, I do have a router... incidentally, why poplar? I know it is light, but are there any other considerations?
| J. Nicolaysen wrote: |
| What is a calendar sword? I have not heard this term before. Awesome pics and work as always Sean! |
They have calendars etched/ engraved/ etc. into their blades.
Well that makes sense! Found a thread here about it, unsurprisingly: http://myArmoury.com/talk/viewtopic.php?t=798...ndar+sword
Thanks Nathan.
Back to your regular discussion...
Thanks Nathan.
Back to your regular discussion...
I think poplar is an historical choice for scabbards.
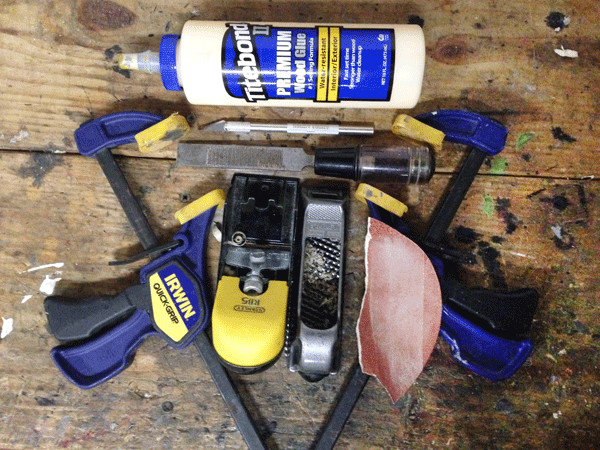
Done properly, scabbards are elegant and contain a hollow that matches the profile and taper of the blade. As that tutorial concludes, it's a sweet feeling when the blade slides in without any resistance until the last inch, and then needs a slightly firmer push to seat it. Then there's no rattle or excess wood anywhere and the bare core looks like a wooden blade rather than a cricket bat. If you can use power tools and calipers to achieve that, go for it. They're not necessary, though. Here's the kit I use.
DON'T USE TITEBOND II IN THE BLUE BOTTLE: I've just discovered some blade corrosion where the blade contacted the glue. Maybe it wasn't fully dry, but Titebond II has a reputation for this. Never had trouble with the original Titebond in the red bottle.
The only measuring I do is to get the centerline of the slats so that when I trace the blade on each side of a slat I can be confident that the outside matches the inside. Once I trace the blade, everything else is developed from that shape. Actually, I realize that I didn't include a compass in this shot. I use that with the point on the edge of the blade tracing and the pencil or other point set about .25" inch out to scribe a standoff around the blade. I do that on the outside of the slat.
I use the chisel to carve out the interior form and finish with light sanding. That work is done by eye and test fitting alone and it is absolutely no fun at all. Keeping your chisel sharp makes all the difference, though. Once the interior is close to fitting but slightly tight I glue the slats together and use the plane to zip off the edges to the standoff line. That gives me the completed profile. Starting at one corner, I then use the plane to create long, shallow facets down the length of the core according to whatever sectional profile I want. I do the tip with the Surform rasp. These tools give a very smooth finish, so all I need to do is run over everything with a bit of paper to create the final finish.
I try to avoid sandpaper, routers, Dremel, etc. because the fine particulates they dump into the air ruin me for a week, even though I'm religious about wearing a dust mask. What I have instead are long coils of wood from the plane and coarse gratings from the rasp. Once the exterior is right I'll use a few pieces of adhesive sandpaper on the blade of the sword to refine any sticky places in the interior. When I can just barely feel the binding areas on the paper I know that the bare blade will fit perfectly.
 Attachment: 203.7 KB
Done properly, scabbards are elegant and contain a hollow that matches the profile and taper of the blade. As that tutorial concludes, it's a sweet feeling when the blade slides in without any resistance until the last inch, and then needs a slightly firmer push to seat it. Then there's no rattle or excess wood anywhere and the bare core looks like a wooden blade rather than a cricket bat. If you can use power tools and calipers to achieve that, go for it. They're not necessary, though. Here's the kit I use.
DON'T USE TITEBOND II IN THE BLUE BOTTLE: I've just discovered some blade corrosion where the blade contacted the glue. Maybe it wasn't fully dry, but Titebond II has a reputation for this. Never had trouble with the original Titebond in the red bottle.
The only measuring I do is to get the centerline of the slats so that when I trace the blade on each side of a slat I can be confident that the outside matches the inside. Once I trace the blade, everything else is developed from that shape. Actually, I realize that I didn't include a compass in this shot. I use that with the point on the edge of the blade tracing and the pencil or other point set about .25" inch out to scribe a standoff around the blade. I do that on the outside of the slat.
I use the chisel to carve out the interior form and finish with light sanding. That work is done by eye and test fitting alone and it is absolutely no fun at all. Keeping your chisel sharp makes all the difference, though. Once the interior is close to fitting but slightly tight I glue the slats together and use the plane to zip off the edges to the standoff line. That gives me the completed profile. Starting at one corner, I then use the plane to create long, shallow facets down the length of the core according to whatever sectional profile I want. I do the tip with the Surform rasp. These tools give a very smooth finish, so all I need to do is run over everything with a bit of paper to create the final finish.
I try to avoid sandpaper, routers, Dremel, etc. because the fine particulates they dump into the air ruin me for a week, even though I'm religious about wearing a dust mask. What I have instead are long coils of wood from the plane and coarse gratings from the rasp. Once the exterior is right I'll use a few pieces of adhesive sandpaper on the blade of the sword to refine any sticky places in the interior. When I can just barely feel the binding areas on the paper I know that the bare blade will fit perfectly.

Last edited by Sean Flynt on Wed 22 Jul, 2015 5:22 pm; edited 1 time in total
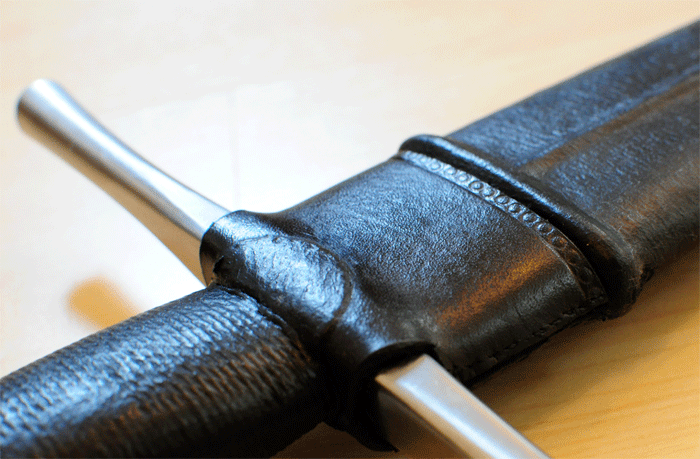
PS: Looking at originals with the tubular chappes, you can see that those devices fit close to flush with the edges of the scabbard. See, especially, the Bayerisches sword in its scabbard. I take two design notes from that:
• The chappe fits closer to the blade than many reconstructions suggest
• The area of the scabbard core under the chappe is reduced just enough so that you get that almost seamless flow from chappe to scabbard.
Done this way, and with a subtle taper of the scabbard mouth and beveling/skiving of the interior edge of the chappe, the two come together perfectly, with just enough friction to help retain the sword in the scabbard.
I tried that on my big Type XVIII project (with the twisted pommel) to most satisfying effect. You can see it on that piece if you look closely. It might be clearer in this detail from a different project. By the way, as usual, that chappe is the only piece of good top-grain veg tanned leather in that project (because you need that thickness/stiffness there). Grip and scabbard are covered with part of one $15 chamois from WalMart.
 Attachment: 181.45 KB
• The chappe fits closer to the blade than many reconstructions suggest
• The area of the scabbard core under the chappe is reduced just enough so that you get that almost seamless flow from chappe to scabbard.
Done this way, and with a subtle taper of the scabbard mouth and beveling/skiving of the interior edge of the chappe, the two come together perfectly, with just enough friction to help retain the sword in the scabbard.
I tried that on my big Type XVIII project (with the twisted pommel) to most satisfying effect. You can see it on that piece if you look closely. It might be clearer in this detail from a different project. By the way, as usual, that chappe is the only piece of good top-grain veg tanned leather in that project (because you need that thickness/stiffness there). Grip and scabbard are covered with part of one $15 chamois from WalMart.

Page 1 of 1
You cannot post new topics in this forumYou cannot reply to topics in this forum
You cannot edit your posts in this forum
You cannot delete your posts in this forum
You cannot vote in polls in this forum
You cannot attach files in this forum
You can download files in this forum
All contents © Copyright 2003-2006 myArmoury.com — All rights reserved
Discussion forums powered by phpBB © The phpBB Group
Switch to the Full-featured Version of the forum
Discussion forums powered by phpBB © The phpBB Group
Switch to the Full-featured Version of the forum