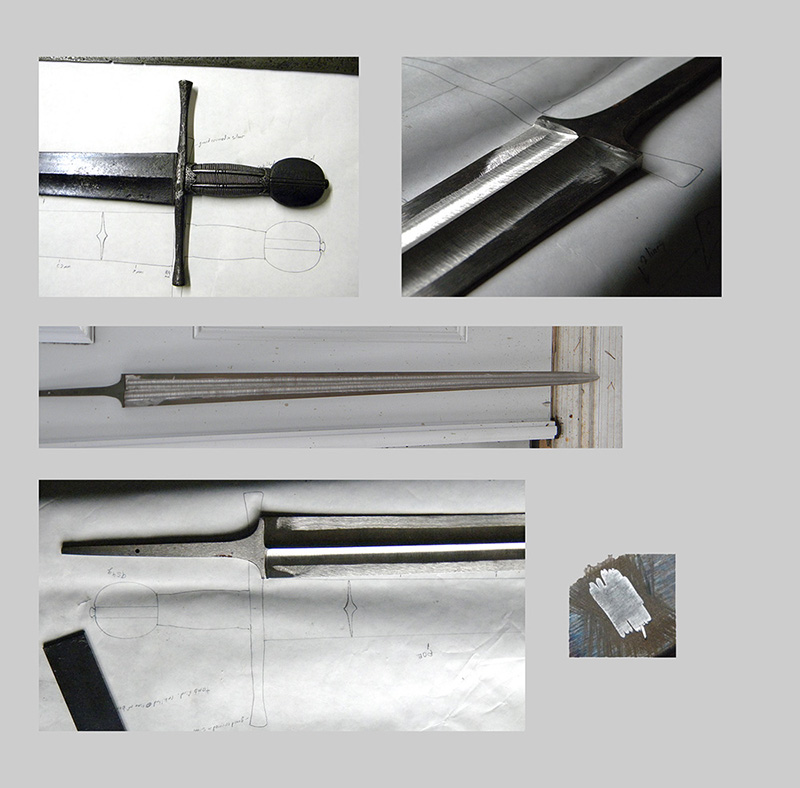
My latest piece is still in progress and coming together quite well and thought I would talk a little about it and introduce some images as well. It is inspired by a sword that I documented a few years ago, and while I am not attempting to make an exact replica, I wanted to make something that was extremely similar but without of the fuss of making sure that every single detail was dead on. Part of my changing aesthetic is to capture the handmade nature of originals, and try to incorporate the same feel and intention in my work. I feel that in the past I have shown that I am capable of very clean and precise work so hopefully the variation will not been seen as sloppy, rather a form of authenticity.
The piece is a grave find from France, which was reheated either at the time of burial, or shortly before. I have not been able to find out any additional information so as I have been working on this piece I have been thinking and dreaming up who the owner of the original may have been, what went through in its time of service, and what the meaning of this sword was and/or who the owner was. The blade has a complex cross section to work with in that it has a proud, hollow ground ridge which comes down to a flat surface, then a ever so slight drop to the edge bevel. At the guard the shoulders are visible, showing that the cross section of the blade was ground in with a plunge cut.
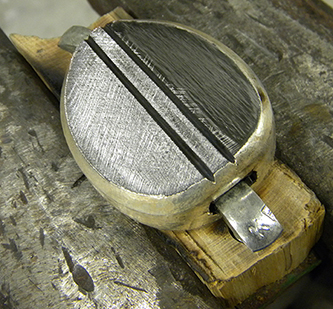
Lucky for me, there are traces of silver on the guard which means it was overlaid, and since I have been wanting to do a practical application of overlay this was the perfect piece to give it a go. I decided to used fine silver for the wire wrap, another first for me, use steel for the collars and the rails in the grip which was another first. I decided to overlay the pommel and the guard, but leave the peening block exposed steel. The pommel has been overlaid, and is awaiting the final burnishing, the guard still needs to be overlaid.
And here are some pictures, the blade is complete by the way, I just have not taken any images yet since the hilt has been my main focus.
Attachment: 157.84 KB
Attachment: 164.76 KB
Attachment: 159.69 KB
I can't wait to see how this turns out. I am especially interested in the overlay!
I have to say that A&A's replica of this piece has never been much of a draw for me, and therefore I've never quite been interested in the original which the sword was based on. HOWEVER, your work with the blade geometry changes that perspective entirely! Beautiful work, Sir!
What a cool sword. I used to have A&A's replica of it and I loved the replica. Of course this will be much cooler. I really like the overlay on the pommel. Is it silver or gold? It looks gold but could just be tarnish. The blade is just outrageous Michael. Really fine work. I assume this will get finished and then offered for sale like the last piece?
Thank you for the complements!
The overlay on the pommel is fine silver, it is slightly tarnished since after the initial setting of the silver the piece is heated up to anneal the silver, and then worked a little more. The final step will be to anneal the completely overlaid piece, and burnishing the high spots, followed by polishing with steel wool and lapping compound.
As for after the sword is complete, I am not entirely sure how I will be proceeding with the sale. Part of what I am trying to evolve is what happens with the piece after it is acquired, and with the asking price I think it would be a contradiction to have it sit in a box or just hung on the wall with a hanger or some nails. The previous piece will be getting a display case that will include pieces of a "maintenance" kit, and this one will be getting a more museum style display unit since I feel it fits with the story of being a grave find and something that is inspired by an actual object from history.
The actual sale is something that I am not entirely committing to right now, since I am trying to figure out how to fund an adventure of sailing on a tall ship from Fiji to Georgia traveling west around Africa. It would take about 11 months, and I need to raise a very significant amount of money. I am exploring options for using these two pieces, as well as my next piece to fund the journey. Still a bit of a long shot but if swordsmithing has taught me anything, it is that just about anything is possible with the right approach, hard work, and determination.
You are off to a terrific start with this piece, and you've chosen a very interesting sword too.
Really looking forward to your progress on this.
About the pommel - always wondered how such overlay worked. Are you heating up the piece and the silver band somehow fuses with the steel? Dum question maybe, thanks for your indulgence :)
Really looking forward to your progress on this.
About the pommel - always wondered how such overlay worked. Are you heating up the piece and the silver band somehow fuses with the steel? Dum question maybe, thanks for your indulgence :)
Hi Julien, The overlay is done with a technique which is similar to koftgari. The surface is scored in three directions, opening up the steel and creating burs which the silver catches and is pinched between. The initial setting will harden the silver, so it is annealed and worked again to close the surface and make it smooth. The method that I am using varies from koftgari in that I am shooting for a more aggressive scoring, since I want a better hold on the silver, and I am completely covering the surface so I don't have to worry about exposed areas looking rough, since they are all covered up. Here is a thread that got my brain working and through doing a number of test samples I figured out what worked best for me, http://www.bladesmithsforum.com/index.php?showtopic=3379
Fascinating stuff. Thx for the Explanation Michael - The pommel looks great, well worth the effort.
Really nice work, Michael! Did you use sheet or wide bezel wire for the circumference?
And your sailing trip sounds amazing- best of luck manifesting that!
In regard in overlay, I started working on the guard yesterday and snapped some progress pictures so that I could share more of the process and how I go about it. This is by no means the only or best way of going about it, but it does seem to work for me and get good results. If anyone would like to play with the process feel free to borrow bits and pieces, or reinvent the process however they see fit. It really isn't the most difficult process, but requires lots of time and patience.
First off the most important aspect is to make sure that the piece is very secure. Any kind of bounce and vibration in the piece being overlaid will result in chipping the edge of your cutting tool, the cuts wandering, and all kinds of headaches that really make the process a pain. Here I am overlaying the end of the guard, which is clamped between two pieces of wood in a post vise. For my cutting tool I decided to use one of the Little Seax that I had laying around the shop since it has a fine edge, great hardness, easy to sharpen and maintain. I rest a finger on the vise and keep the blade off the piece, the hammer blow forces the edge into the piece and the constant pressure brings the blade back up. This stamp action is very efficient, and slight movements make it easy to cover the entire surface.
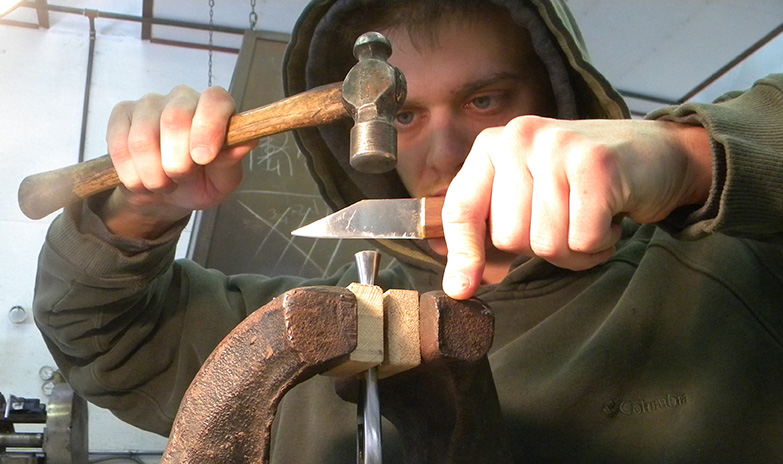
The first pass is made.
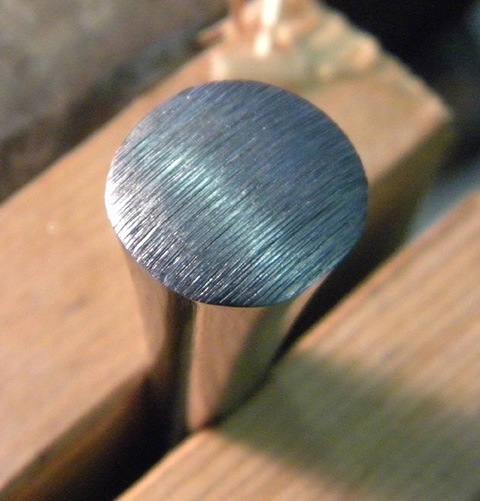
The second is made at an angle to the first.
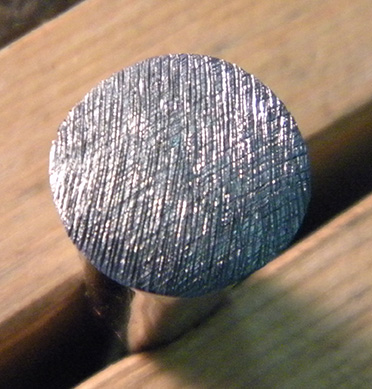
And a third is made across the previous two.
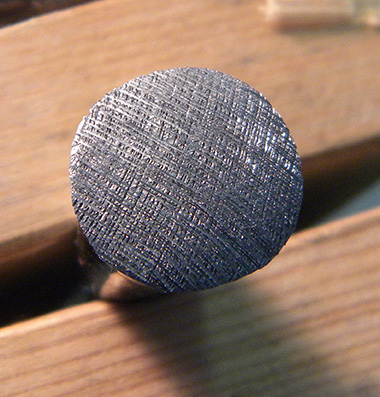
Next fine silver wire is set over the surface,
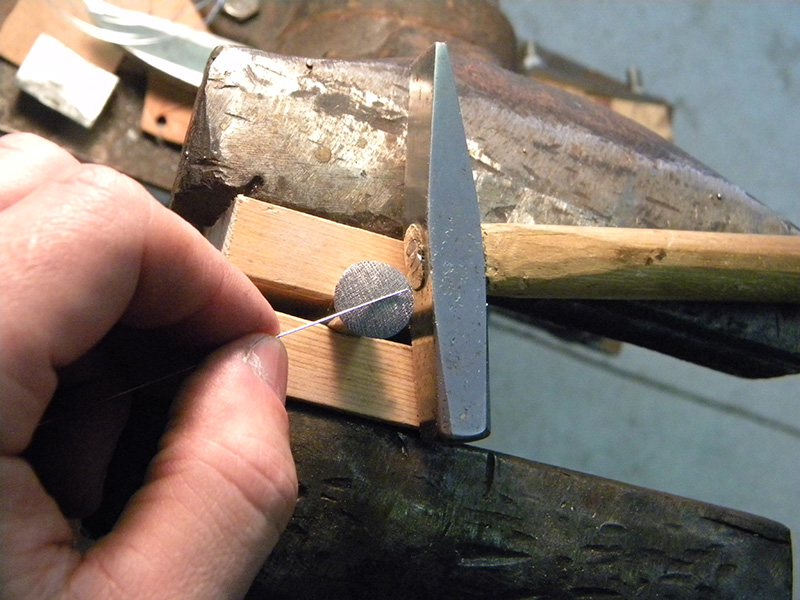
and hammered into place with a light hammer that has a polished face.
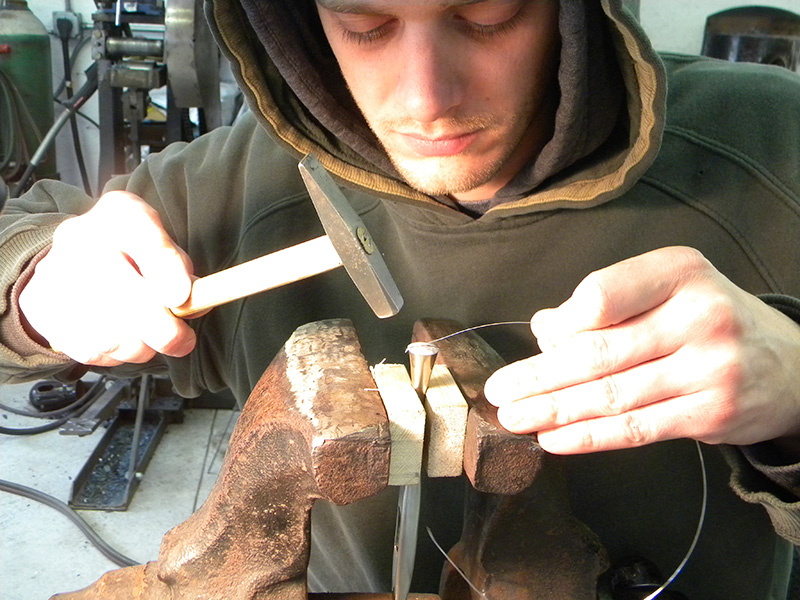
Once the wire is set, the Little Seax is once again used to trim the set wire from the stock. Cutting the wire off with a knife verses wire cutters saves a little bit of wire from going to waste in terms of becoming overhang, which can add up over the course of a project and yield significant savings.
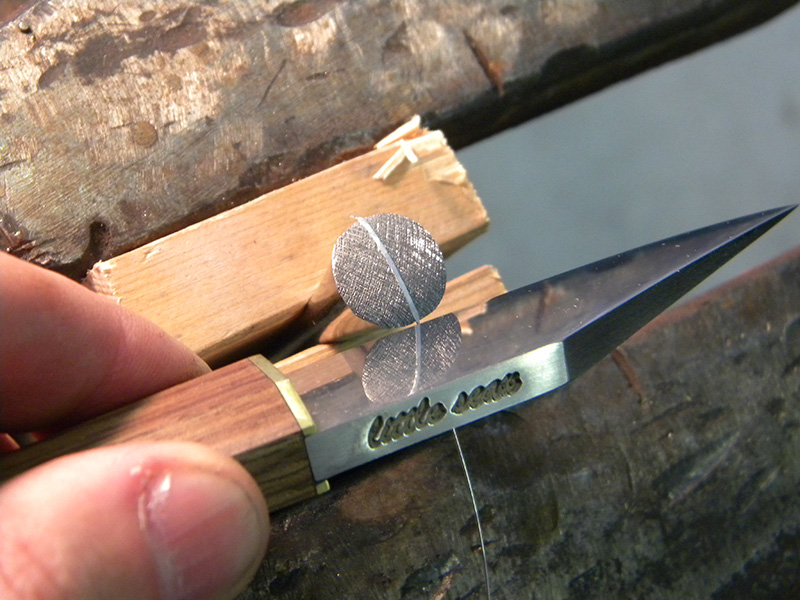
I find that it is best to start at the middle and work out,
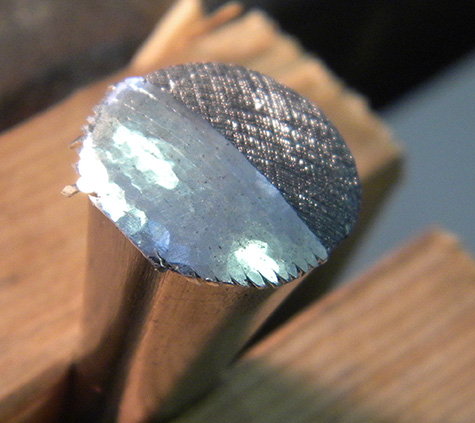
until the whole surface is covered.
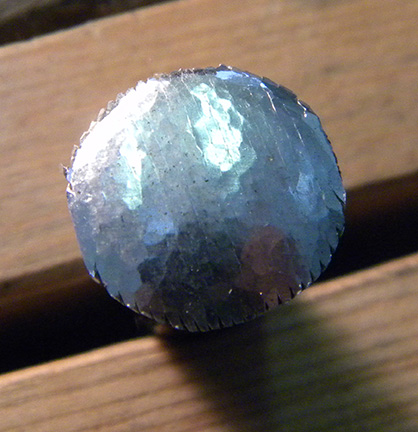
At this point the silver is stuck to the steel, and work hardened. The surface is not completely closed so the steel and silver are heated with a propane torch to around 700 degrees, about when the steel picks up a dark blue color.
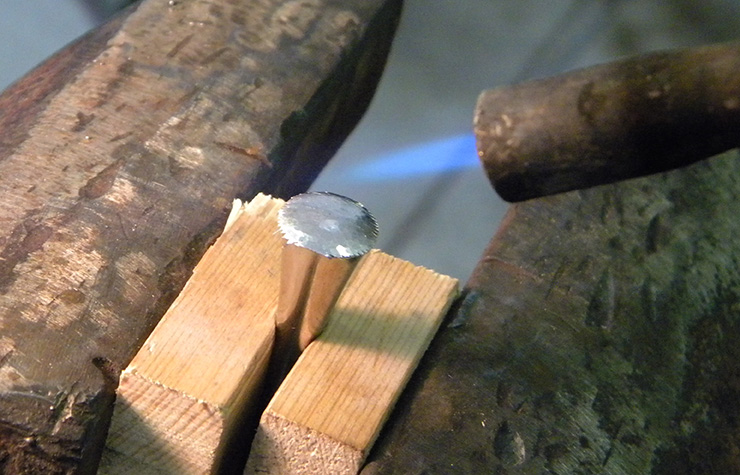
While still hot, the silver is gently planished and worked over until it is more or less smooth, and all the tiny gaps are closed.
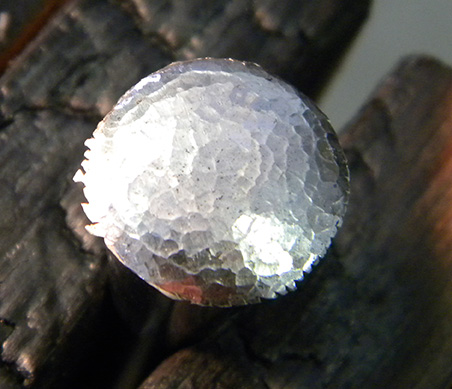
From the side you can see the dark color that the steel took on from the heat, as well as the silver that overhangs the edge.
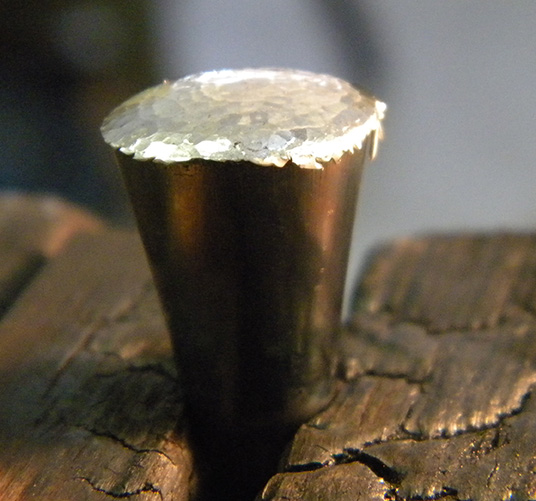
Now the piece can be cooled, and the silver hanging over the edge trimmed away with the Little Seax, the little bits of silver of course collected and saved for either remelting, or sending to a refinery.
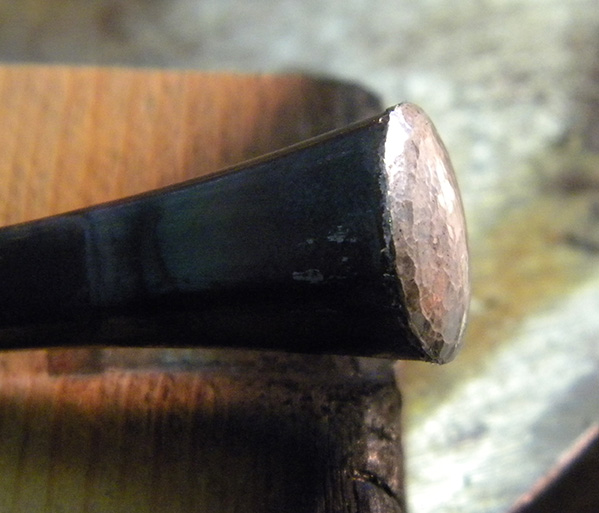
The final step is not shown, because it is the final step, but a burnishing steel will be used to go over the surface, pushing the high areas down, and creating a smooth clean surface which can then be finished by either buffing, steel wool, or a very fine abrasive, depending on the desired finish.
I hope this have been helpful in describing the process in better detail!
More updates coming soon.
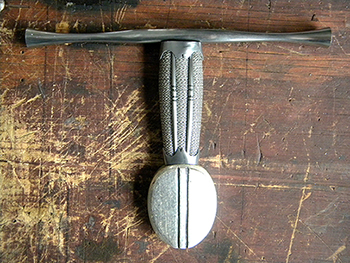
J.Arthur Loose wrote: |
Really nice work, Michael! Did you use sheet or wide bezel wire for the circumference?
And your sailing trip sounds amazing- best of luck manifesting that! |
Thanks! I used 28 gauge round wire for all the surfaces :)
I love process photos. Thanks! Looking forward to this finished piece and excited to seeing what you'll be tackling for the third.
Excellent - thanks for sharing Michael. So you've done the entire pommel edges that way??? I believe you when you say patience is key here :) Must be nerve wracking working with precious material too...takes time and cost a lot in case of a miss.
It looks awesome can't wait to see the finished piece.
J
It looks awesome can't wait to see the finished piece.
J
Michael Pikula wrote: |
My latest piece is still in progress and coming together quite well and thought I would talk a little about it and introduce some images as well. It is inspired by a sword that I documented a few years ago, and while I am not attempting to make an exact replica, I wanted to make something that was extremely similar but without of the fuss of making sure that every single detail was dead on. Part of my changing aesthetic is to capture the handmade nature of originals, and try to incorporate the same feel and intention in my work. I feel that in the past I have shown that I am capable of very clean and precise work so hopefully the variation will not been seen as sloppy, rather a form of authenticity.. |
Yes, you have.
One could certainly argue that perfection is not historically accurate. There's also the tricky question about whether obvious imperfections in the original should be replicated. I think your new approach could work equally well on commissions as long as the customer is on board with it. 'Perfect' replication is perhaps just as stressful for the customer as it is for you guys. I've never had a commission that looked exactly like the original, and even knowing this is just the way things are with handmade objects, one does tend to get stressed about it, if one is a perfectionist.
Micahel-
How much of the surface of the guard and pommel will you be plating like this? Very excited to see the finished piece. This is going to be special...
Thank you! I enjoy hearing the feedback.
Julien, yes, all of the edges were done this way.
Tim, all of the surfaces of the guard and pommel, except for the two scored lines will receive the same overlay treatment.
Julien, yes, all of the edges were done this way.
Tim, all of the surfaces of the guard and pommel, except for the two scored lines will receive the same overlay treatment.
Page 1 of 1
You cannot post new topics in this forumYou cannot reply to topics in this forum
You cannot edit your posts in this forum
You cannot delete your posts in this forum
You cannot vote in polls in this forum
You cannot attach files in this forum
You can download files in this forum
All contents © Copyright 2003-2006 myArmoury.com All rights reserved
Discussion forums powered by phpBB © The phpBB Group
Switch to the Full-featured Version of the forum
Discussion forums powered by phpBB © The phpBB Group
Switch to the Full-featured Version of the forum