Posts: 8,310 Location: Montreal,Quebec,Canada
Mon 23 Apr, 2012 10:22 pm
| William P wrote: |
i still keep thinking the greave needs the main plate facing forward, not outwards.. |
Design wise I could maybe see a half frontal plate covering just beyond the chin bone but leaving the inside of the leg uncovered. ( Not so wide as to touch the side of the horse ).
Although I trust that Boris based his version on what was actually used historically
Posts: 1,525 Location: Sydney, Australia
Mon 23 Apr, 2012 10:31 pm
| Romulus Stoica wrote: |
| Quote: | | ... though i can see the benefit since its for a horseman so his legs will be against the flanks of the horse ... |
Not only that! If you are a horsearcher, as most of the turkish cavalry were, you will need your legs to guide the horse and you need to "feel" the response of the horse with your legs. Wearing full greaves will hurt the horse and you will have no control over him with your legs. |
i hadent thought of that at all.
im completely ignorant of the nuances of horsemanship and the techniques of controlling the horses movements considering im used to bicycles and cars, which dont have feelings
(that said, ive tried shooting a bow in the way the japanese do yabusame tournements.... not easy to draw the bow and keep enough speed so that the bike stays balanced... but i was able to do it shooting at a tree while pedelling along a smooth straight road and taking my hands off the handlebars long enough to draw the bow and release. then riding along with the bow being held on the handlebars, wasnt easy let me tell you..
at least a horse is a fairly steady platform... until you hit rough terrain or start moving around alot.
that said i cant help but feel that the cavalry greave could stand to have more coverage of the front of the shin, even some maile.. just saying.
Posts: 103 Location: Sweden
Thu 26 Apr, 2012 5:57 am
Thing is, you don't need it.
More coverage will not do anything to help you, since if a spear actually gets to where the greaves are not protecting at the moment, and you do wear a shinguard, the spear would slide either upwards and straight into your kneecap, or to the side and be forced into the horse.
Neither of which are better than staying on the horse with a gruesome-looking, but not very lethal wound to the shin/calf.
To show you, find your nearest flat surface that you can press the inside of your leg against, an open door is a good example.
You'll notice just how little of your front is actually a target.
Now, picture the stuff you're pressing into is actually a bit maleable.
As well as the "shoulder" part of the horse being in front of you, sticking out an extra inch or two.
Couple this with the horse actually being at the front end.
To GET to that point as an attacker, you will have to stand VERY close to the horse, either right in front of it, or close enough that the swet on the horse wets whatever clothes you are wearing. Even with a calm and peaceful horse, this feels a bit uneasy (unless it's specifically your horse or you are a very horse-y person).
Now add in full gallop.
Armour
Kicks and motion
And the rider on top trying to kill you.
Posts: 700 Location: Bourgas, Bulgaria
Thu 26 Apr, 2012 11:30 am
Interesting discussion so far!
Actually I didn't expected these greaves to cause so much controversy.
But as Jean marked, I based them strictly upon historical pieces - just re-scaled them for my own body measurements. That's why I think they are correct - at least as proportions and shape.
Posts: 1,525 Location: Sydney, Australia
Thu 26 Apr, 2012 10:13 pm
| Henrik Granlid wrote: |
Thing is, you don't need it.
More coverage will not do anything to help you, since if a spear actually gets to where the greaves are not protecting at the moment, and you do wear a shinguard, the spear would slide either upwards and straight into your kneecap, or to the side and be forced into the horse.
Neither of which are better than staying on the horse with a gruesome-looking, but not very lethal wound to the shin/calf.
To show you, find your nearest flat surface that you can press the inside of your leg against, an open door is a good example.
You'll notice just how little of your front is actually a target.
Now, picture the stuff you're pressing into is actually a bit maleable.
As well as the "shoulder" part of the horse being in front of you, sticking out an extra inch or two.
Couple this with the horse actually being at the front end.
To GET to that point as an attacker, you will have to stand VERY close to the horse, either right in front of it, or close enough that the swet on the horse wets whatever clothes you are wearing. Even with a calm and peaceful horse, this feels a bit uneasy (unless it's specifically your horse or you are a very horse-y person).
Now add in full gallop.
Armour
Kicks and motion
And the rider on top trying to kill you. |
i thought about that, i was more thinking of arrows hitting you though, but even if you were alongside that guys horse and could hit his shin with your axe or sabre, arguable youd first try and hit a more vital area. unless that was covered too well
and i realise if he somehow was de horsed and not dead soon after, hes well armoured enough to hold his own in a fight to keep alive long enough until his friends help him out or something.
Posts: 678 Location: Australia.
Wed 29 Aug, 2012 6:42 am
I look forward to seeing this project completed!
I wonder if a new helmet might be in order to go with it?
Posts: 700 Location: Bourgas, Bulgaria
Thu 06 Sep, 2012 4:38 am
Unfortunately, I'm not in a mood to work over this project.
Although I've got only minor things to do (except the helmet), I still can't start it up.
But I hope to do so next week.
Posts: 700 Location: Bourgas, Bulgaria
Wed 07 Nov, 2012 3:38 pm
The Bazubands - Ready
Recently, this armour was chosen to take part in a temporary museum exhibition, dedicated to the anniversary of the Battle of Varna, 1444.
And doesn't matter if I'm in a mood to work over it or not, I have to finish these minor things left.
Today I started with the bazubands. If you remember, what was left was to was to trim the maile section and to sew it to the padding (page #12).
When this was done, the bazubands were ready and these are some pictures from the final result:
* outside
[ Linked Image ]
[ Linked Image ]
[ Linked Image ]
[ Linked Image ]
[ Linked Image ]
** closer to the maille sections
[ Linked Image ]
Last edited by Boris Bedrosov on Thu 08 Nov, 2012 1:56 pm; edited 1 time in total
Posts: 700 Location: Bourgas, Bulgaria
Wed 07 Nov, 2012 3:43 pm
The Bazubands - Ready
Some more pictures:
*closer to the decorations (do you remember them?)
[ Linked Image ]
[ Linked Image ]
** and inside
[ Linked Image ]
[ Linked Image ]
[ Linked Image ]
Posts: 8,310 Location: Montreal,Quebec,Canada
Wed 07 Nov, 2012 9:07 pm
Incredibly attractive work and it makes one wonder how one could tolerate the idea of having someone hitting them with a weapon and causing even a small scratch ! ;)
But I guess if you where rich enough in period to own armour of this aesthetic quality you could afford to have it repaired or replaced, and looking good on the battlefield was as important as the protection afforded by the armour.
Also congratulations in making reproduction armour for a museum exhibit.
Posts: 700 Location: Bourgas, Bulgaria
Thu 08 Nov, 2012 2:52 pm
| Jean Thibodeau wrote: |
| Incredibly attractive work and it makes one wonder how one could tolerate the idea of having someone hitting them with a weapon and causing even a small scratch ! ;) |
I know it's hard to understand that, but when started my work over the project, the initial intent was for purely "combat" armour and just later came all these decorations. So, in my mind I am prepared just from the beginning that this armour will take a lot of battle damage - it's just unavoidable and I know it. ;)
Posts: 700 Location: Bourgas, Bulgaria
Fri 09 Nov, 2012 10:52 am
The Bazubands - Ready
Some pictures of the bazubands on:
[ Linked Image ]
[ Linked Image ]
[ Linked Image ]
[ Linked Image ]
Interestingly, I feel the right one just a little bit tighter than the left one. The plates are identical, so the only explanation is a minor difference in the hammer-work.
Posts: 700 Location: Bourgas, Bulgaria
Fri 09 Nov, 2012 10:56 am
The Bazubands - Ready
And pictures with a weapon in hand - although not quite appropriate, that mace was the nearest within reach ;)
[ Linked Image ]
[ Linked Image ]
[ Linked Image ]
Posts: 15
Fri 09 Nov, 2012 12:03 pm
Re: The Bazubands - Ready
| Boris Petrov Bedrosov wrote: |
Interestingly, I feel the right one just a little bit tighter than the left one. The plates are identical, so the only explanation is a minor difference in the hammer-work. |
Or that your right arm is thicker than your left :)
Great job, I really love the detail.
Posts: 700 Location: Bourgas, Bulgaria
Tue 13 Nov, 2012 12:55 pm
Re: The Bazubands - Ready
| Karl Edgar wrote: |
| Or that your right arm is thicker than your left :) |
Hell yeah!
From repeatedly striking with the hammer, I think ;) :)
Posts: 700 Location: Bourgas, Bulgaria
Tue 13 Nov, 2012 11:12 pm
The cuirass - continue
The last minor thing to do was the collar. Many of the historical cuirasses show collars with leather lacing. In such way they are more rigid, stand up (not roll over the shoulders and the back of the warrior), thus offering good defense at such vulnerable area as the neck.
After some training and recounting of different ideas
[ Linked Image ]
I decided to make double lacing like this (look at the center of the picture, bottom row)
[ Linked Image ]
and this is the result, when the whole collar was laced
[ Linked Image ]
Now, I must cut the ends of the laces and the collar is ready.
Posts: 45 Location: Hungary
Tue 13 Nov, 2012 11:36 pm
There is an other method of making the collar rigid: build in small plates. I made my armour's neck with two rows of plate, and now it works well. I sewed a strip of padded cloth to its inner side.
First I tried with lacing, but it didn't work for me. The collar wasn't rigid enough, it rolled over. When I strained it stronger, it strangled me. :eek:
 Attachment: 98.61 KB
[ Download ]
Posts: 700 Location: Bourgas, Bulgaria
Wed 14 Nov, 2012 11:58 am
Yeah!
Looks very well, and gives good protection I think.
Although I was familiar with this variant, I've always considered it as "later"; or at least - all dated examples I know, are later than 15th C. I clearly know I might be wrong, but the information I have reveals me this.
That's why I chose the variant with leather laced collar.
| Tibor Szebenyi wrote: |
| .......When I strained it stronger, it strangled me. :eek: |
Yep!
I had the same problem :eek: ;) , but somehow managed to find the thin balance between the satisfying rigidity and strangulation.
Posts: 3,654 Location: Maitland, NSW, Australia
Wed 14 Nov, 2012 12:36 pm
The weave on the gauntlets should ideally be rotated 90 degrees. That way the expansion and contraction of the links corresponds to the movement of the fingers.
Apologies for not commenting before all that beautiful work had been done. It is a wonderful project.
IIRC these pics are of the duelling gauntlets in the MET. Notice how the weave changes direction up near the wrist. That way the links can be easily attached to the forearm plates but they can still flex properly down at the fingers.
Attachment: 67.31 KB
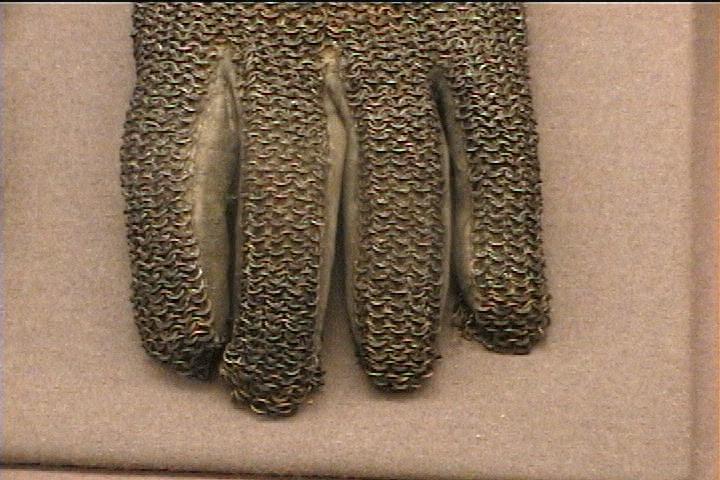
Attachment: 76.81 KB
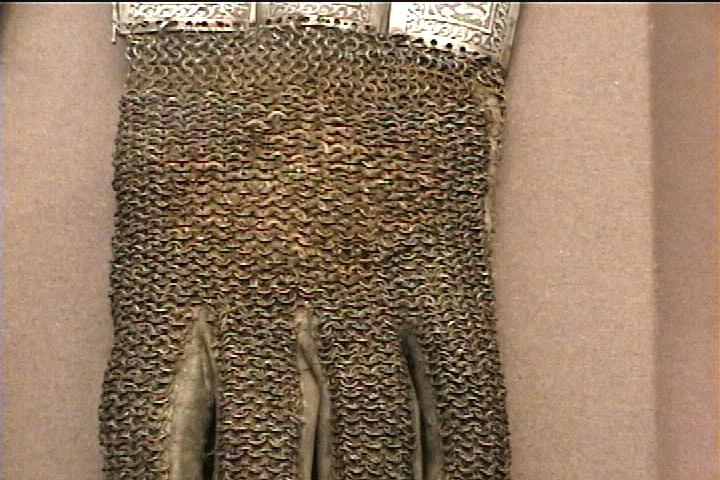
Posts: 700 Location: Bourgas, Bulgaria
Wed 14 Nov, 2012 1:47 pm
Wonderful pictures, Dan! Thanks for sharing!!
I didn't know them. Also I understand completely what you mean about the direction of the weave pattern. This really should be better than my way (only in one direction).
Ideally, I should re-work my gauntlets in this way, but I feel very, very reluctant to do the whole work again. :(
You
cannot post new topics in this forum
You
cannot reply to topics in this forum
You
cannot edit your posts in this forum
You
cannot delete your posts in this forum
You
cannot vote in polls in this forum
You
cannot attach files in this forum
You
can download files in this forum