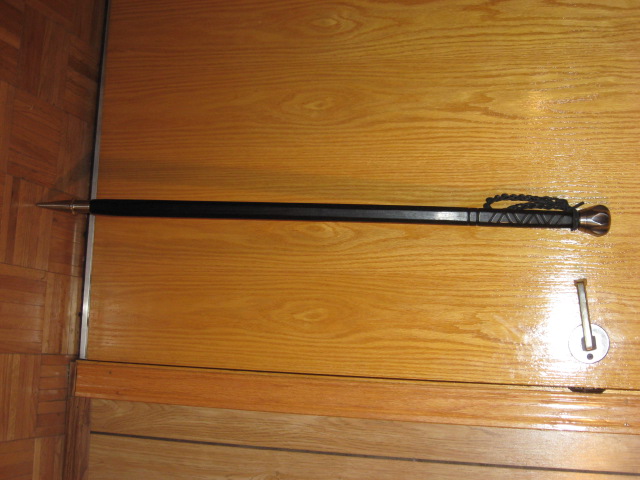
Here is a walking stick I made recently:
A)The wood shaft is Macassar Ebony and was of square section. I used a draw knife, a small hand plane and a spokeshave to make the cross section octagonal. Used coarse to extra fine sanding sponges and up to 1200 grit sand paper.
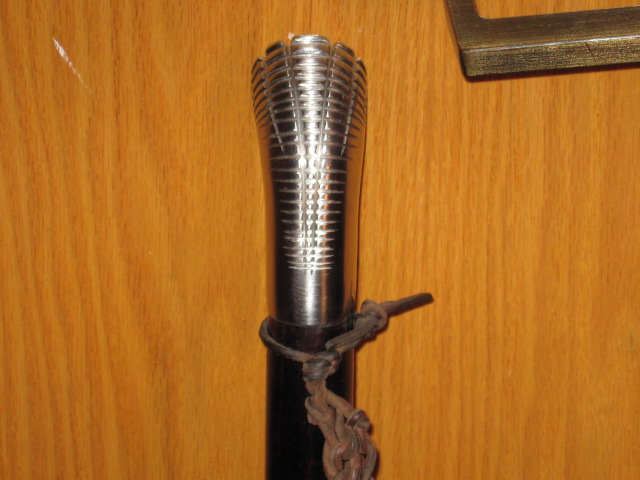
Oil hand rubbed finish. The grooved pattern on the top 7" of the shaft was done using a small diameter round file.
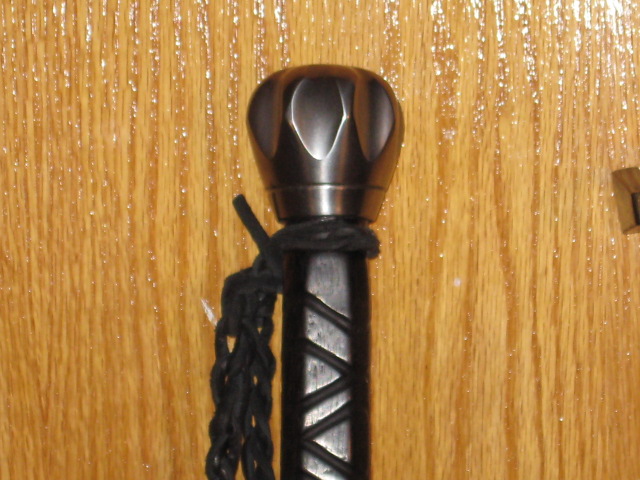
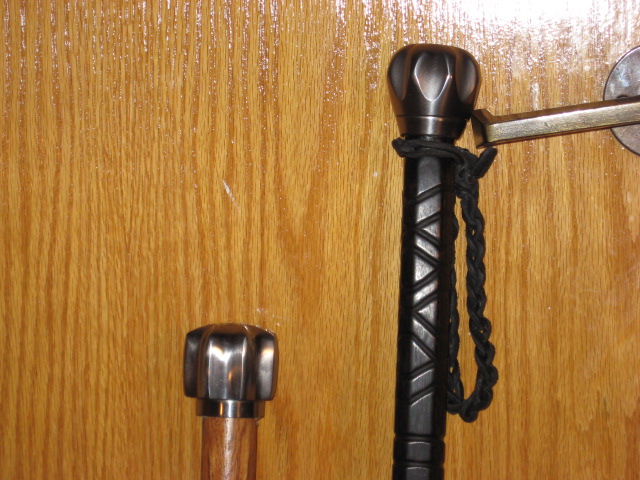
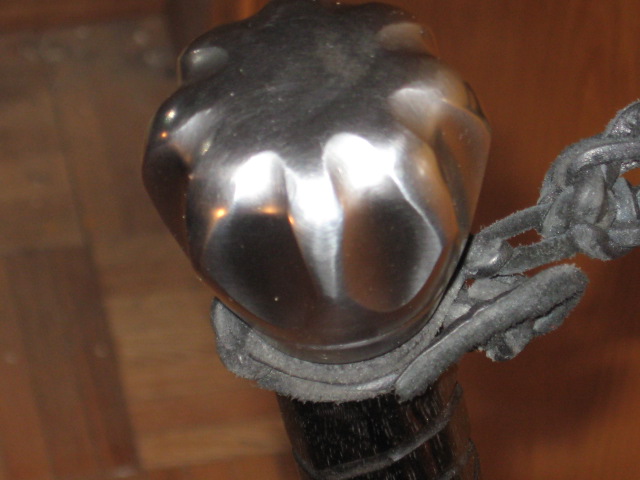
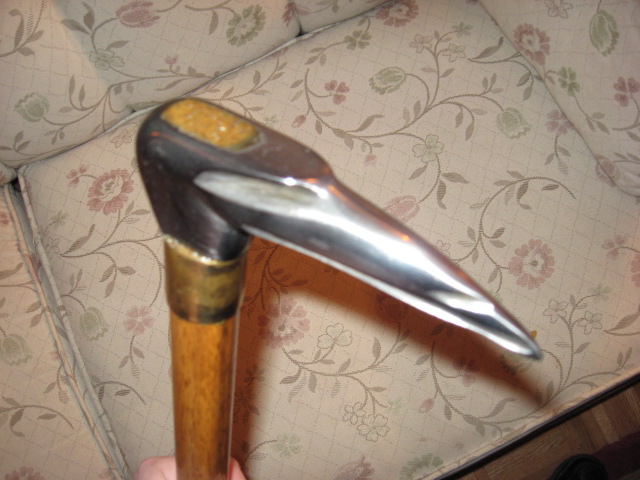
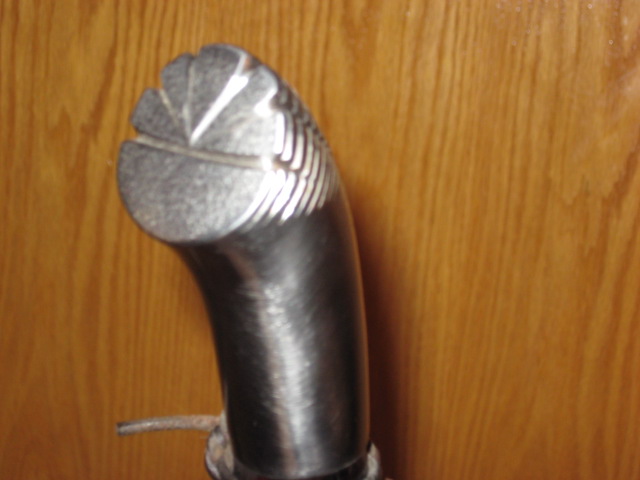
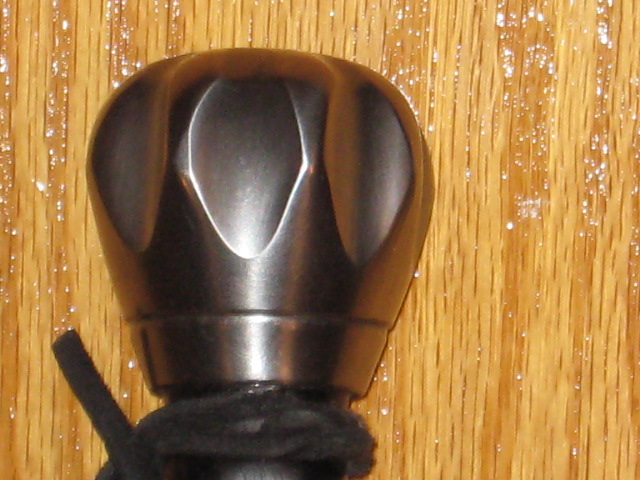
B) The head is a Windlass steel mace head purchased from Kult of Athena that I used a belt sander to reprofile:
http://www.kultofathena.com/product.asp?item=...+Mace+Head
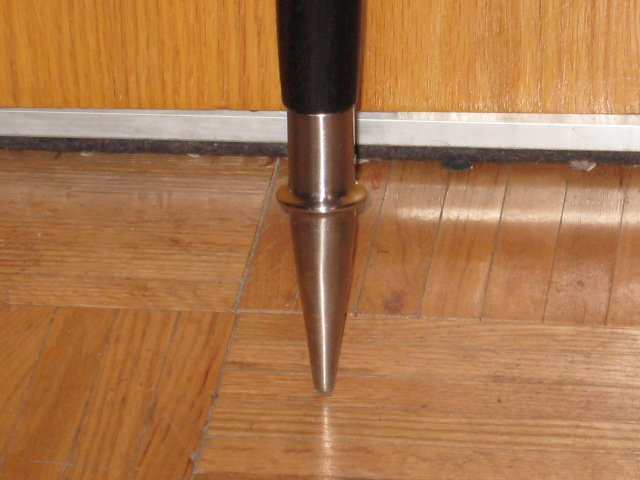
C) For the butt end I used a spear buttcap made for this Hanwey lance:
http://www.kultofathena.com/product.asp?item=...Lance+Head
This really works really well on icy and slippery side walks, and the steel of this buttcap is hardened steel as it was a challenge drilling a hole in it for a retaining pin. It is also stainless steel which is very good since in Winter the tip gets wet from snow, ice or puddles and is exposed to corrosive salt.
NOTE: The steel mace head is much softer mild steel and I have to check for rust after taking it out in cold weather since condensation on the cold steel when taking it indoors can quickly produce rust if not rubbed dry and oiled.
A coat of Renaissance wax does help prevent rust but still one has to check for rust before putting it away.
The brass version of the Windlass mace head would avoid the rust issue but it only take a minute or so to polish off light rust with a sanding sponge.
The stick weighs 2 lbs 8 oz.
38 1/2" long.
Shaft diameter 1 1/8".
POB 13" from the top of the head. For some odd reason :surprised: the stick when held with the head acting as a pommel feels very much in handling to many of my good one handed swords with presence on the scale/similar to my Albion Tritonia. :D :lol:
Note: I'm waiting on an ordered AC adapter for my digital camera as my camera seems to be a battery hog and I feel rushed to take pics before the battery give out with the camera's low battery signal flashing. When I get this AC adapter I will be taking more pics of various things in my collection or other DIY projects and reviews of my new toys.
Attachment: 97.59 KB
Attachment: 120.04 KB
Modified steel head.
Attachment: 93.37 KB
Butt cap & tip tapering from octagonal to round.
Attachment: 116.13 KB
Closer view of head profile.
Attachment: 131.91 KB
Unmodified head next to modified profile head to show how much material was removed.
Attachment: 69.57 KB
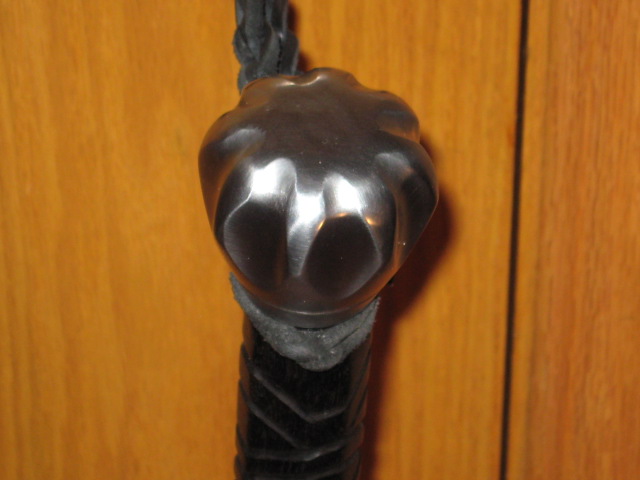
Angled pic of head.
Attachment: 77.47 KB
A closer angled pic of head.
That is a great walking stick, beautiful work. The spear buttcap is a great idea to use in a walking stick.
They say that a walking stick is the only weapon you can take with you when flying in a commercial aeroplane. Could you get that through airport security? :p
Looks great Jean! How do you get the ends to stay? Epoxy?
This is a neat and naughty walking stick!
Your description and pictures really put me in the mood of trying to do own of my own.
Unfortunately I would look silly carrying a walking stick with me - I am not old enough. But time will change this.
Herbert
Your description and pictures really put me in the mood of trying to do own of my own.
Unfortunately I would look silly carrying a walking stick with me - I am not old enough. But time will change this.
Herbert
Pauli Vennervirta wrote: |
That is a great walking stick, beautiful work. The spear buttcap is a great idea to use in a walking stick.
They say that a walking stick is the only weapon you can take with you when flying in a commercial aeroplane. Could you get that through airport security? :p |
I suspect not a " sure thing " since it is quite " solid " for a stick, and if travelling I would make or use something more " ordinary " but still solid. ( Mostly an all wood stick with only a simple copper buttcap + a rubber tip ).
locally I have had no problems with my sticks and even got past a random security check at a bus terminal with a walking stick with not even a second glance.
One potential problem is inconsistent rules or application of the rules at security check points, and in different countries, it does mean that one should be informed about the laws at one's destination.
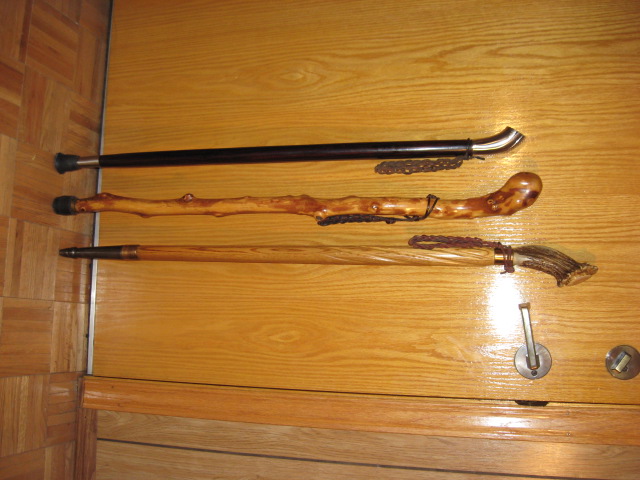
Attachment: 104.78 KB
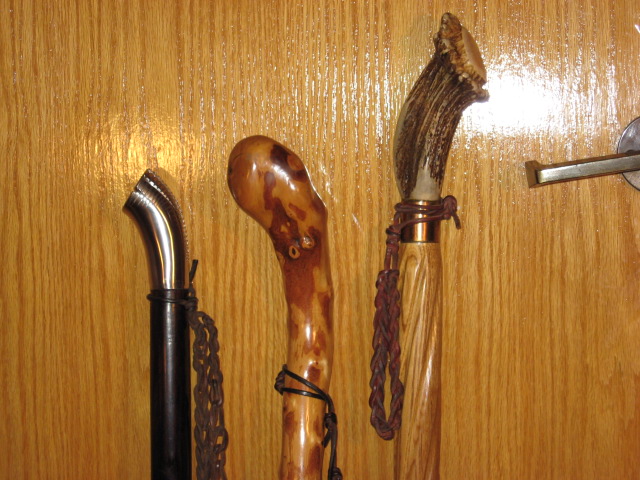
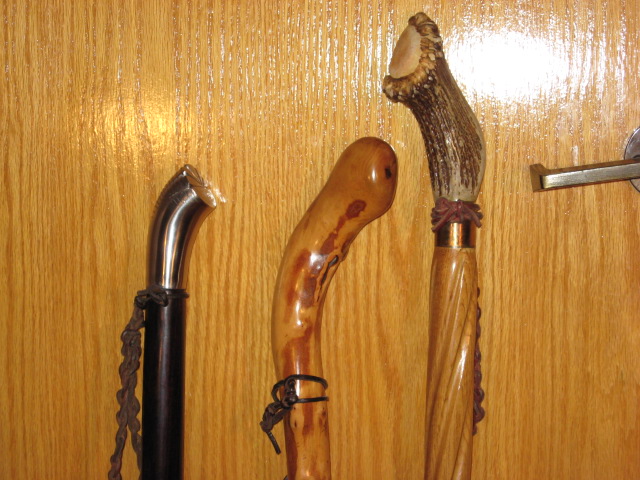
The all wood Hard Maple one in the middle would be my travelling stick, or one like it.
Attachment: 135.43 KB
Close up.
Attachment: 132.86 KB
Other side of stick(s).
Bryan W. wrote: |
Looks great Jean! How do you get the ends to stay? Epoxy? |
Epoxy is enough but I usually back it up with a small nail after assembly by drilling a hole through one side and if the hole is slightly over sized a drop of epoxy makes sure the nail doesn't " walk out " due to vibrations or impact with the ground.
This can vary as at times, I have put a nail from both sides mostly for aesthetic reasons ( Symmetry ) and also at times I have used a masonry heat treated nail when using the same kind of assembly on a spear or polearm. ( Much much railroad engineered ;) :lol: ).
Herbert Schmidt wrote: |
This is a neat and naughty walking stick!
Your description and pictures really put me in the mood of trying to do own of my own. Unfortunately I would look silly carrying a walking stick with me - I am not old enough. But time will change this. Herbert |
You could always break your ankle and have a limp ...... ;) :p :lol: :cool:
I also use and make much longer walking staffs around 4' to 5' long and those are good for very long walks and hiking in uneven terrain.
One gets used and addicted to using a stick even if one doesn't really need one due to some health problem. I also find them very much essential on our very slippery sidewalks in winter and to pole vault over the big puddles at street corners when the snow melt.
Oh, one other use is carrying my groceries back home.
( I don't drive and I walk everywhere if it's within a mile or two and Montreal has a good public transmit system )
With the stick on my shoulder, and the grocery bag handles looped over the handle, I can carry up to 75 pounds of groceries with relative ease compared to having the bag handles cut into my hands.
Jean, the middle one in your pictures looks like the ones I have made of birch and mountain ash. I dug up the roots to get a knob in the end of the shaft. The result looks a bit like the irish shillelaghs. My sticks are about 90-100 cm. Your innovation of using a spear buttcap gave the solution to how to ger a non-slip but traditional looking point to a stick, thanks!
Jean Thibodeau wrote: | ||
You could always break your ankle and have a limp ...... ;) :p :lol: :cool: |
As I am going bald and I am grey before my time (even sporting a grey beard) I could be taken for much older... ;)
I noticed all your wonderful walking sticks have slings. Do you use the to simply secure them to your wrist or do they serve another purpose. The reason I ask is that I always found walking sticks a bit... unhandy in everyday life. Where do you put them when you need both hands (shopping springs to mind).
Apart from all that - a walking stick is just stylish.
Herbert
Herbert Schmidt wrote: | ||||
As I am going bald and I am grey before my time (even sporting a grey beard) I could be taken for much older... ;) I noticed all your wonderful walking sticks have slings. Do you use the to simply secure them to your wrist or do they serve another purpose. The reason I ask is that I always found walking sticks a bit... unhandy in everyday life. Where do you put them when you need both hands (shopping springs to mind). Apart from all that - a walking stick is just stylish. Herbert |
The wrist straps are very functional and I use them in various ways, at times around the wrist if I need to do something with both hands but usually I prefer having the loop around my palm as the arm is not trapped by the strap if one has to let go of the stick for some reason quickly.
Most of my sticks are on the long side as I usually prefer holding them under the head cradled between thumb and forefinger and with the strap one can keep the hand completely relaxed when walking with the stick and even completely open the hand without dropping the stick.
The strap between thumb and forefinger also gives a point of support below the head that make it possible to put weight on the stick supported by the wrist strap in the same way one would use the head of a stick or a cane handle for support.
In other words a good strap can make even a simple stick without any handle or head supportive as well as a cane.
Oh, also, by keeping it on my wrist or in my hand I risk less to lose or forget the stick if I just lean it against something. ( I've lost a few good umbrellas walking away too fast and only remembering later that I had an umbrella that day. ;) :lol:
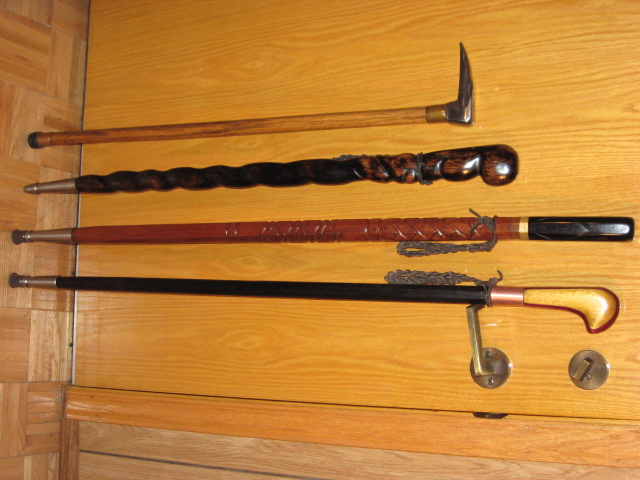
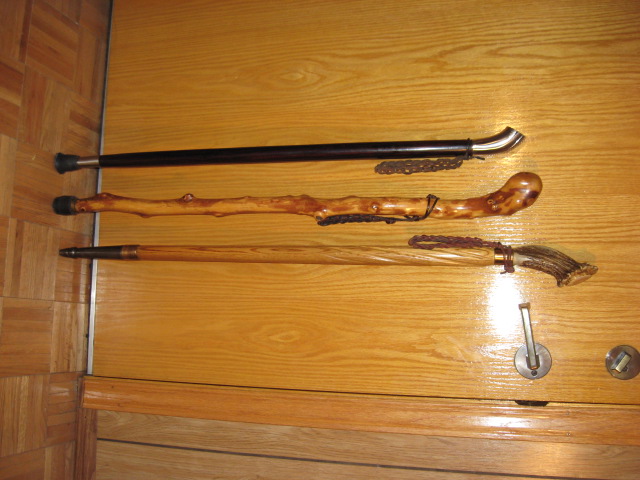
Pics of other sticks: The two on the bottom ( Pic rotated for an unknown reason ? ) are longer sticks meant to be held below the heads when walking although they can be held at the top when standing of resting on them or if using them to walk downhill. Both are about 46" ( 117 cm ) long
The steel eagle headed one on the left is of cane height of 36" ( 92 cm ), that one I made a long time ago using a prospector's steel rock pic ( I guess that is what it was ) and turned it into an eagles head with an angle grinder.
Attachment: 101.54 KB
Attachment: 110.57 KB
Attachment: 103.21 KB
Made from a rock pic decades ago using an angle grinder freehand.
Very nicely done, Jean. :) Love the idea of using weapon parts for a perfectly innocent walking stick.;) And the eagle headed one looks absolutely wicked.
You really do inspire me, motivate me.
Excellent - I think I will try to make one someday.
Is there a rule regarding the length related to your body height?
What did work for you, what did you find comfortable?
Thanks for sharing!
Herbert
Excellent - I think I will try to make one someday.
Is there a rule regarding the length related to your body height?
What did work for you, what did you find comfortable?
Thanks for sharing!
Herbert
Herbert Schmidt wrote: |
You really do inspire me, motivate me.
Excellent - I think I will try to make one someday. Is there a rule regarding the length related to your body height? What did work for you, what did you find comfortable? Thanks for sharing! Herbert |
Some sites selling walking sticks have FAC pages that suggest the ideal length of canes or sticks but mostly I just made what was comfortable for me, but like I wrote before I make them longer than ideal cane length because I mostly hold them on the shaft rather than the head: With a shaft hold one can change one's grip height easily to what feels comfortable depending on what one is doing. With a cane type where the handle is the main way to hold too short or too long a stick will cause stress or not give good support.
http://www.brazos-walking-sticks.com/personalize/
36" to 40" seem to be the average range for the average height person 5'8" to 6' I think.
For a walking/hiking staff 4' to 5' should work for almost everyone favouring the shorter 4' for everyday city use in my opinion: Not so long as to be a nuisance sitting in a movie theatre of as passenger in a car.
What I find a comfortable length is maybe just what I'm used to or have adapted to and might not suit everyone. ;) :D
That's a great project Jean, and a very attractive cane.
I have been kicking around the idea of doing something similar with a Tods stuff mace head.
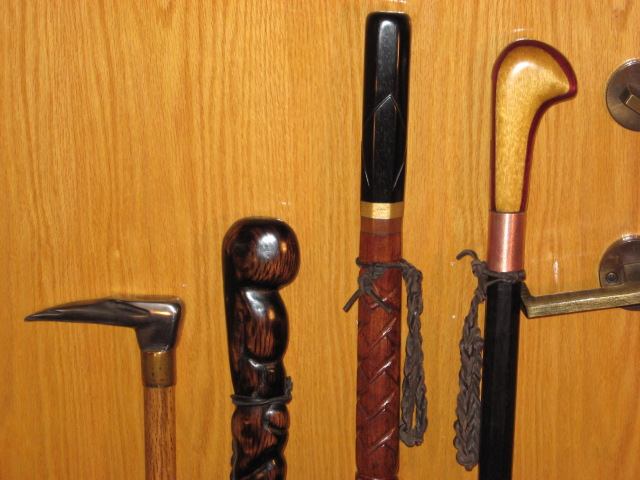
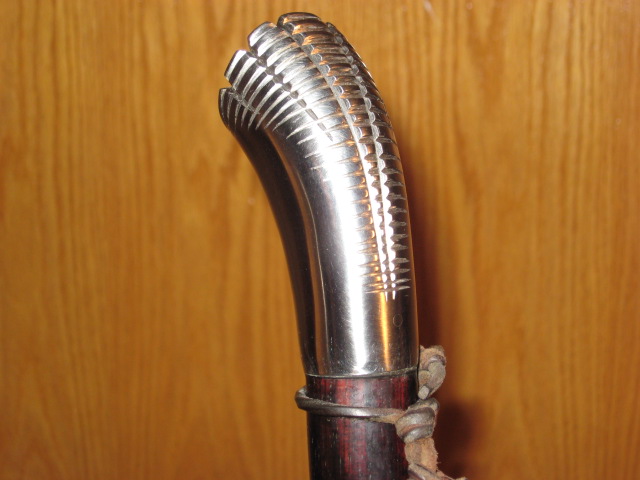
A little more about one of the other sticks that has some file work on the handle and other pics showing these in closer detail:
Stick on the top: This one was a custom commission made originally in the late 1980's but that I recently modified. It was originally very heavy and the head was a bulbous pistol grip in shape. When I picked it up from the maker ( Local knife maker ) I decided that maybe I had over done it by designing it too big which made it too massive.
The maker took it to the grinder and was slimming it down when we found a flaw in the casting just below the surface and stopped grinding at that time leaving just a small and narrow visible crack.
I later did some more grinding hoping I would get past the flaw but the more I ground down the bigger the hole became ....... Finally gave up on it for for a while.
A few years later I ground away some more of it but the hole was still there so I ended up filling it with a white epoxy filler and sort of tried convincing myself that it could look like some sort of deliberate inlay .......
Well, finally some more years later and still bugging me so I took a hacksaw to it turning the end into a flat and finally the flaw was really gone .... LOL ! ( 8 hours of frustrating hacksawing and lots of blisters on the inside of my hand ... About two inches of steel to get through with a not too fresh saw blade ! ).
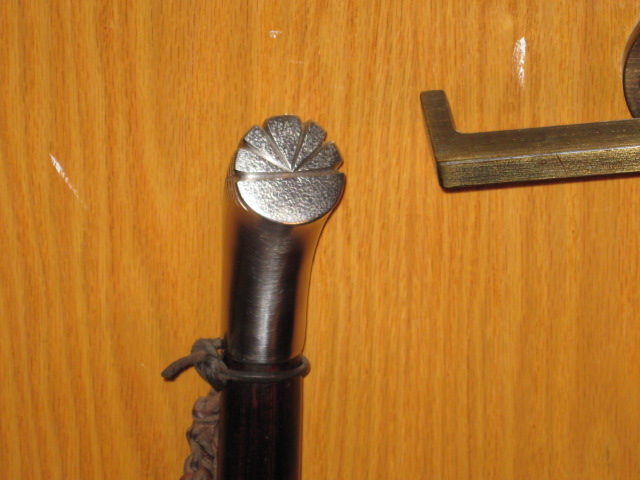
Late last year I did all the file work and hammer peaned dimples into the face as a texture.
Oh, the shaft is Rosewood and the tip and head are 300 series cast stainless steel.
Attachment: 104.78 KB
Stick at the top.
Attachment: 79.05 KB
File work on back.
Attachment: 67.64 KB
Flile work on flat face.
Attachment: 88.54 KB
Flat other angle.
Attachment: 88.16 KB
Back strait on.
Great "sticks"
Jack
Jack
Nice sticks. Have you ever used any of the staff and cane tips from Lee Valley Tools? I've seen them in the store and they always looked good but never knew anyone who tried them.
http://www.leevalley.com/en/wood/page.aspx?p=...3243,63218
http://www.leevalley.com/en/wood/page.aspx?p=...,250,43243
They also have some nice looking hardware for making traveling canes
http://www.leevalley.com/en/hardware/page.asp...1306,41319
http://www.leevalley.com/en/wood/page.aspx?p=...,250,43243
Cheers,
Tom
Tomas B wrote: |
Nice sticks. Have you ever used any of the staff and cane tips from Lee Valley Tools? I've seen them in the store and they always looked good but never knew anyone who tried them.
Cheers, Tom |
No never used these tips, but thanks for the " tip " :D :cool: ( Sorry, couldn't resist the pun ).
The tips I have used which are spear buttcaps are very robust.
I like these ( Link ) the best and at times I cut the socket shorter and get a smaller diameter opening for smaller diameter sticks.
http://www.kultofathena.com/product.asp?item=...r+Butt+Cap
The Lee Valley cane tips are certainly a possibility and also look very practical and multifunctional with various tip inserts.
My other " style " of cane tip is to use 3/4" or 1" copper caps used as end caps for plumbing copper pipes.
I also use rubber tips sold at pharmacies as replacement cane tips but I always use a copper cap even if it gets hidden by the rubber tips: I just prefer to make my sticks as robust as possible within reason.
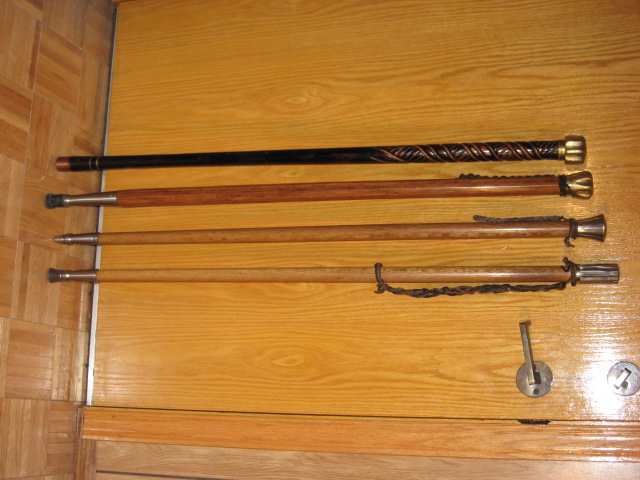
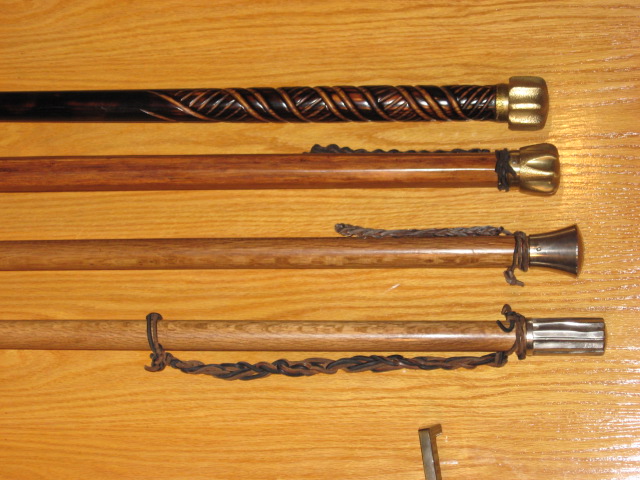
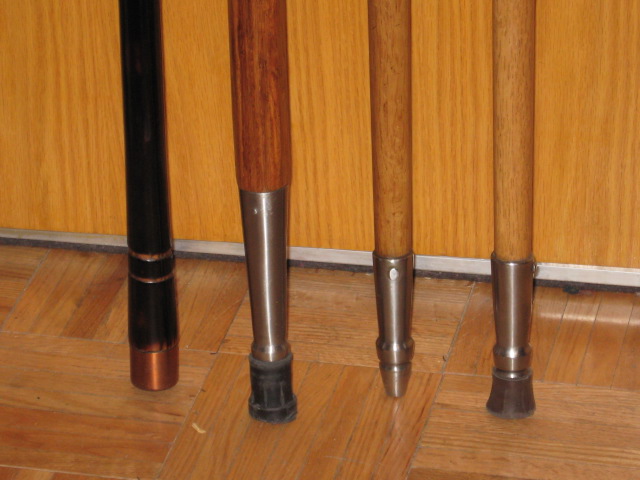
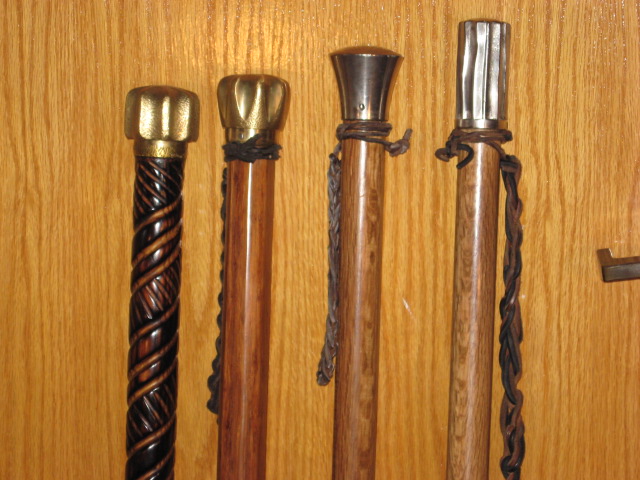
Some more sticks I made a while back:
Here are some of the older generation sticks just before I started buying and using exotic woods.
Left to right or rather top to bottom for the first 2 pics.
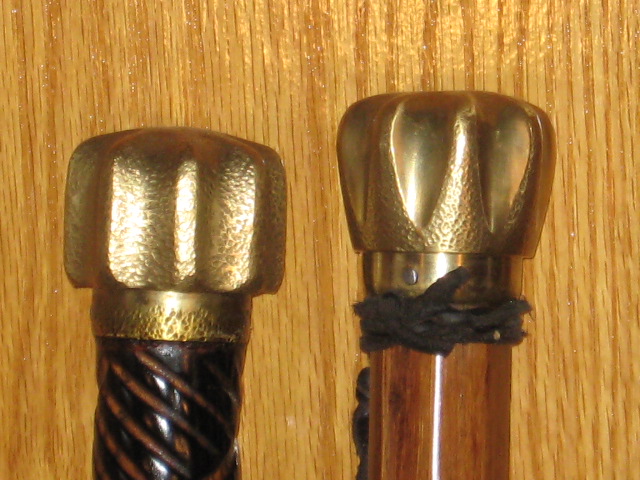
A) Mace head, dimpled by hammer blows, fire burnt Ash grooved after burning to highlight the grooves.
Copper cap tip.
http://www.kultofathena.com/product.asp?item=...+Mace+Head
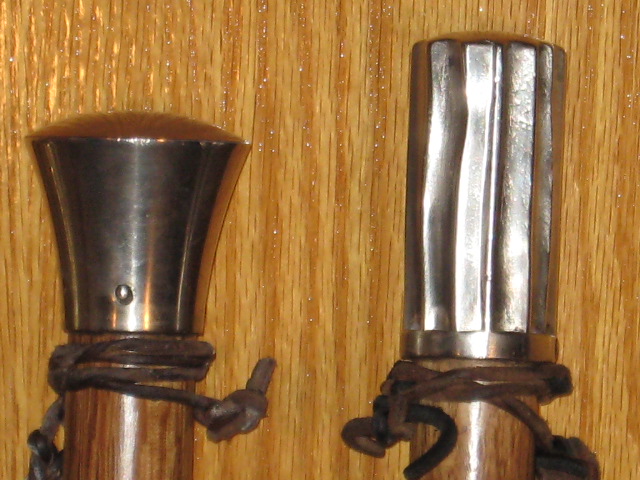
B) Mace head like above but also ground and tapered at bottom of flanges, octagonal Bamsteel ( Laminated bamboo shaft: Very hard and strong, 2X as strong as Oak ). Full length socket steel spear buttcap + rubber tip.
C) Curtain rod ornament tapered conical head, White Oak " Bo " tapered shaft cut to length, steel shortened socket steel spear buttcap.
D) Curtain rod ornament strait flanged head, White Oak " Bo " tapered shaft cut to length, steel shortened socket steel spear buttcap + rubber tip.
Attachment: 104.78 KB
Top to bottom A) B) C) D)
Attachment: 118.6 KB
Closer look at top half of stick.
Attachment: 93.14 KB
Close up of buttcaps
Attachment: 122.71 KB
Close ups of all 4
Attachment: 128.3 KB
Modified by belt grinder of mace tops.
Attachment: 127.32 KB
Curtain rod ornaments used as stick heads.
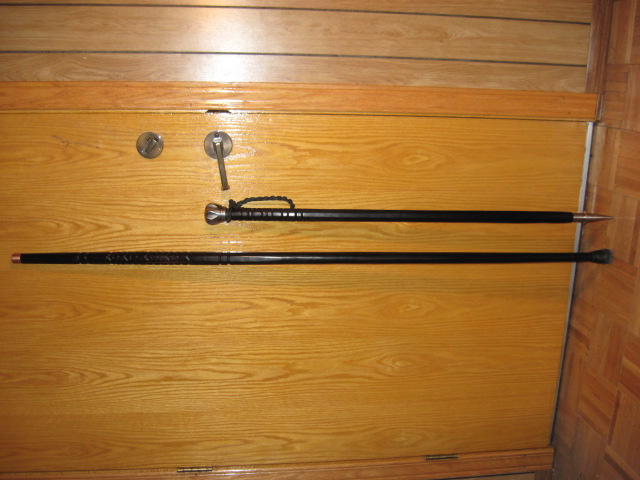
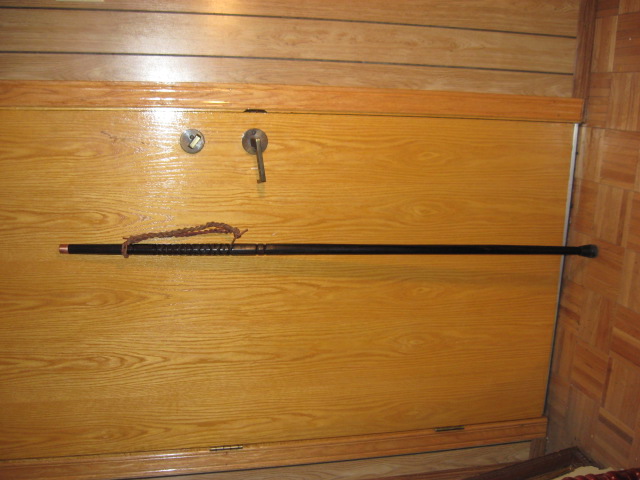
New stick: Walking Staff this time.
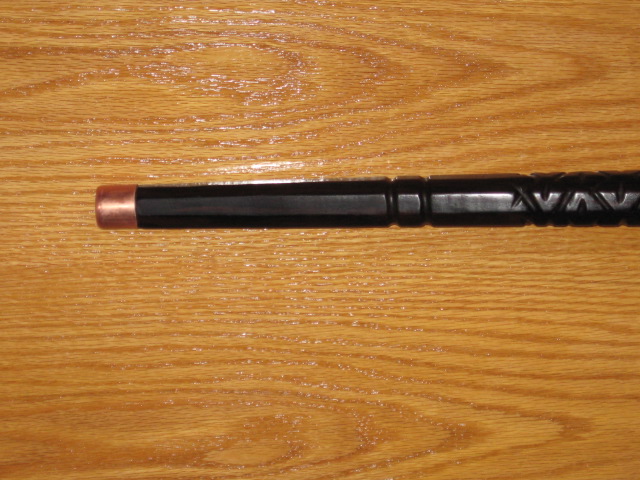
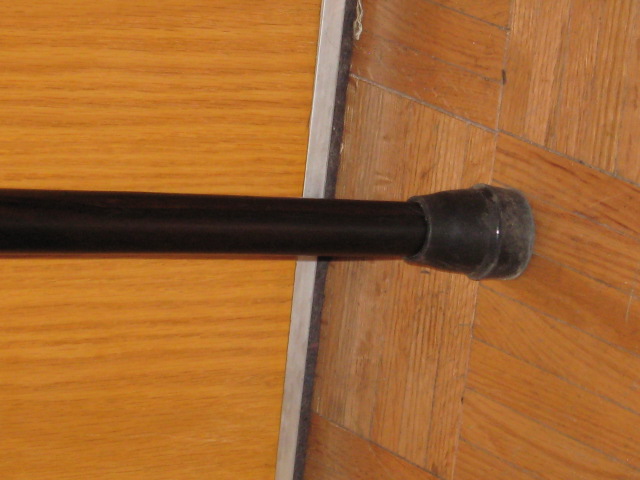
The copper cap at the bottom is hidden under the rubber tip, and the rubber tip is so tight that I can't remove it without major force or destroying it: Should have taken one pic before putting the rubber tip but I think you can imagine what it looks like from the appearance of the top copper cap.
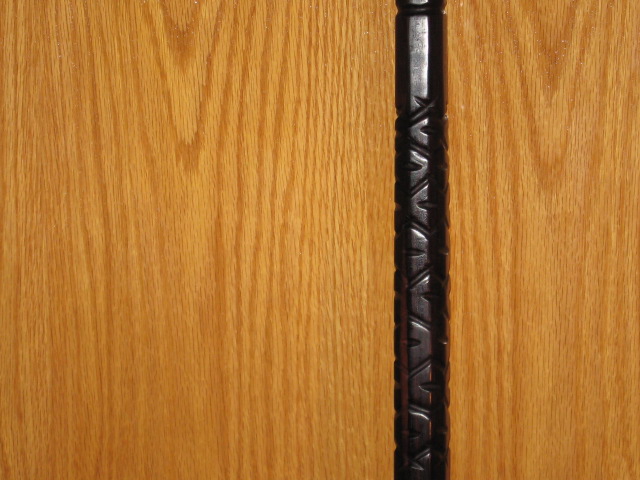
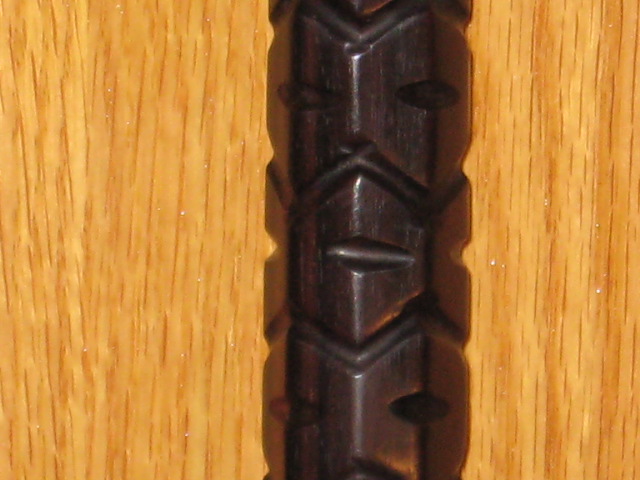
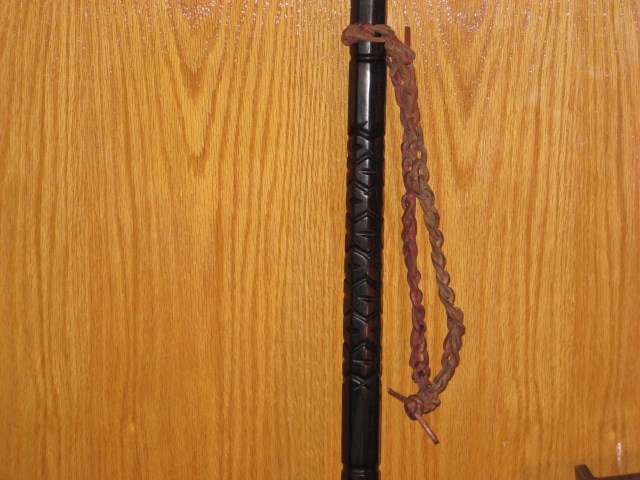
Octagonal for the top 40% transitioning to round below the carved grooves.
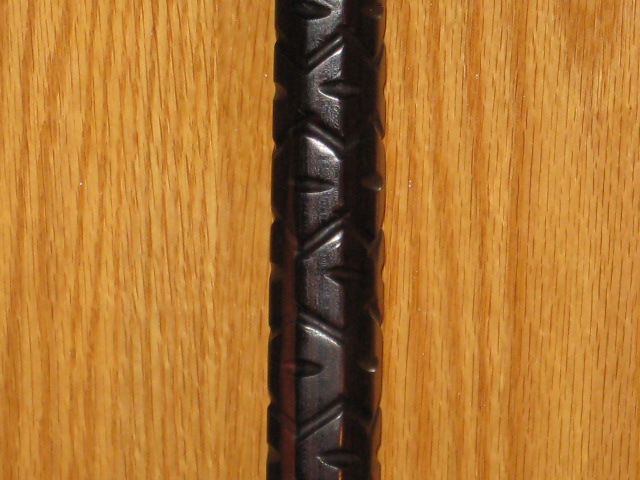
The carving was an abstract pattern of grooves but after the carving I noticed that they look like a series of faces one on top of each other on all sides of the stick. ;) Happy happenstance. :lol:
Took it to the Gym to practice with it Quarter Staff solo forms on the weekend.
Used it as a walking stick/staff today but will choose how long a stick I use depending on the day's activity .... 56" pole can be a nuisance at the movies ..... ;^D
Still adding oil and rubbing and the Ebony seems to drink in the oil ! Thirsty/dry wood I guess or Ebony likes to absorb oil ? Not sure but I imagine that if it drinks in so much oil the oil is getting in deeper than a few thousands of an inch and I'm hoping that this also help to make the wood more chock resistant and resilient.
Found an article that said that some very hard wood can be shock sensitive including African Ebony, but luckily it seems that Macassar ( Coromandel ) Ebony gets very high marks for strength and chock resistance
Coromandel Ebony
Quote from article:
The Ebony in the article that speaks of woods best used for impact weapons is recommended more for a display piece, but not so much because of it being inferior but rather that being so superior that it could reduce the useful life or destroy a lesser stick in paired bouting if both sticks are not using the same superior materials.
Lots of good information in this article, and very useful in choosing the best woods for the job:
http://www.aikiweb.com/weapons/goedkoop1.html
Another related article: http://ejmas.com/tin/tinart_taylor_1100.htm
Check out the impact resistance of Hickory ( Note, impact grade Hickory is different and much better than " common " Hickory often used in furniture making ).
Attachment: 94.16 KB
Staff next to the first stick on this Topic for scale, same Macassar Ebony.
Attachment: 122.75 KB
Top end with copper cap.
Attachment: 109.33 KB
Upper middle part carving.
Attachment: 109.13 KB
Closer look at carving, the stick is octagonal for the top 40% of it's length.
Attachment: 95.05 KB
Extreme close up, notice how the carving looks like a series of faces one on top of each other.
Attachment: 115.06 KB
Top end + braided wrist strap.
Attachment: 91.72 KB
Whole stick again with wrist strap.
Attachment: 84.56 KB
Bottom end, round and rubber tip, there is a copper cap like at the top under the rubber tip.
The copper cap at the bottom is hidden under the rubber tip, and the rubber tip is so tight that I can't remove it without major force or destroying it: Should have taken one pic before putting the rubber tip but I think you can imagine what it looks like from the appearance of the top copper cap.
Octagonal for the top 40% transitioning to round below the carved grooves.
The carving was an abstract pattern of grooves but after the carving I noticed that they look like a series of faces one on top of each other on all sides of the stick. ;) Happy happenstance. :lol:
Took it to the Gym to practice with it Quarter Staff solo forms on the weekend.
Used it as a walking stick/staff today but will choose how long a stick I use depending on the day's activity .... 56" pole can be a nuisance at the movies ..... ;^D
Still adding oil and rubbing and the Ebony seems to drink in the oil ! Thirsty/dry wood I guess or Ebony likes to absorb oil ? Not sure but I imagine that if it drinks in so much oil the oil is getting in deeper than a few thousands of an inch and I'm hoping that this also help to make the wood more chock resistant and resilient.
Found an article that said that some very hard wood can be shock sensitive including African Ebony, but luckily it seems that Macassar ( Coromandel ) Ebony gets very high marks for strength and chock resistance
Coromandel Ebony
Quote from article:
Quote: |
Also known as Macassar Ebony, this exceptional wood deserves special consideration among the natural woods available for the construction of wooden swords, staffs and martial art weapons. Because of its superb character, it conveys a unique and unmistakable feeling of presence. Coromandel is strong, hard, has a ideal weight with a fine dense texture. If skillfully shaped and finished, an alive almost reptilian quality emerges with predominantly black with tan figure patterns and occasional subtle but surprising hints of green and other colors. It is arguably one of the most beautiful of all woods.
Upon reading this description, it may be tempting to conclude that a fine weapon of Coromandel Ebony is the optimal personal choice for the serious student of the martial arts. Its unrestricted use however, would actually be inappropriate. Acquiring unique and rare weapons of limited natural resources often reflects the enthusiam of aspiring students where, due to the cost and scarcity of this material, is best reserved for special situations - a gift perhaps to a senior instructor from an appreciative dojo. |
The Ebony in the article that speaks of woods best used for impact weapons is recommended more for a display piece, but not so much because of it being inferior but rather that being so superior that it could reduce the useful life or destroy a lesser stick in paired bouting if both sticks are not using the same superior materials.
Lots of good information in this article, and very useful in choosing the best woods for the job:
http://www.aikiweb.com/weapons/goedkoop1.html
Another related article: http://ejmas.com/tin/tinart_taylor_1100.htm
Check out the impact resistance of Hickory ( Note, impact grade Hickory is different and much better than " common " Hickory often used in furniture making ).
Attachment: 94.16 KB
Staff next to the first stick on this Topic for scale, same Macassar Ebony.
Attachment: 122.75 KB
Top end with copper cap.
Attachment: 109.33 KB
Upper middle part carving.
Attachment: 109.13 KB
Closer look at carving, the stick is octagonal for the top 40% of it's length.
Attachment: 95.05 KB
Extreme close up, notice how the carving looks like a series of faces one on top of each other.
Attachment: 115.06 KB
Top end + braided wrist strap.
Attachment: 91.72 KB
Whole stick again with wrist strap.
Attachment: 84.56 KB
Bottom end, round and rubber tip, there is a copper cap like at the top under the rubber tip.
Page 1 of 6
You cannot post new topics in this forumYou cannot reply to topics in this forum
You cannot edit your posts in this forum
You cannot delete your posts in this forum
You cannot vote in polls in this forum
You cannot attach files in this forum
You can download files in this forum
All contents © Copyright 2003-2006 myArmoury.com All rights reserved
Discussion forums powered by phpBB © The phpBB Group
Switch to the Full-featured Version of the forum
Discussion forums powered by phpBB © The phpBB Group
Switch to the Full-featured Version of the forum