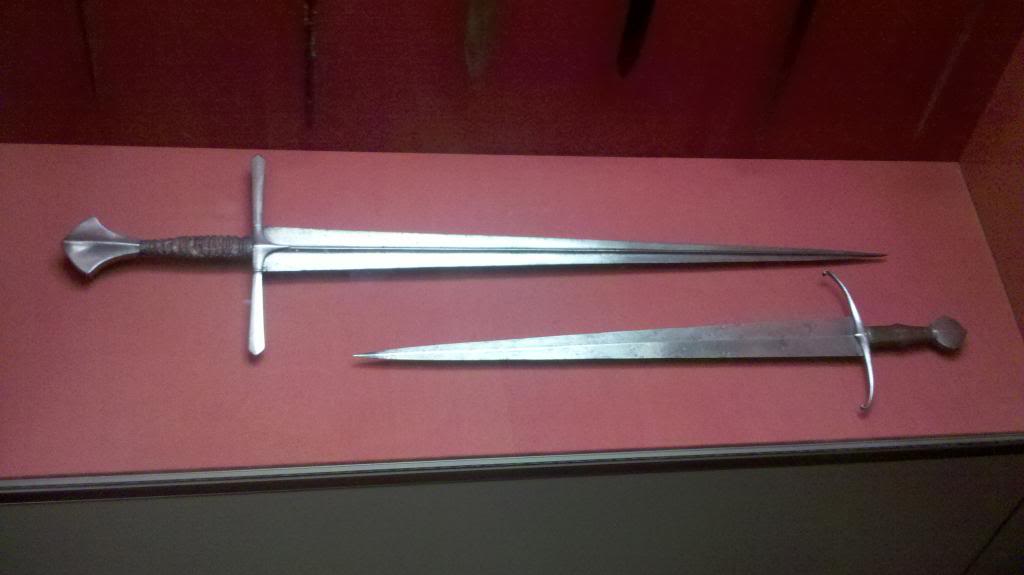
Hi all. Here is another project I've also started on the side: a redo of the so called sword of Auray by MRL. I am a huge fan of the original sword kept in the Philadelphia museum of art (below). it is one of the most elegant late medieval swords IMO (I just realized what that acronym meant and I intend to use it :) ).
I won't make a review here. Let's just say that, like many, I had been pleasantly surprised by this sword, mainly because I was not expecting much of it. Handling wise it really shines: light and fast, it is very pleasant in the hand. The blade is its most attractive feature. Hollow ground, quiet stiff and certainly not wippy. It is quiet thin compared to the higher end swords of the same type, but solid enough and well made.
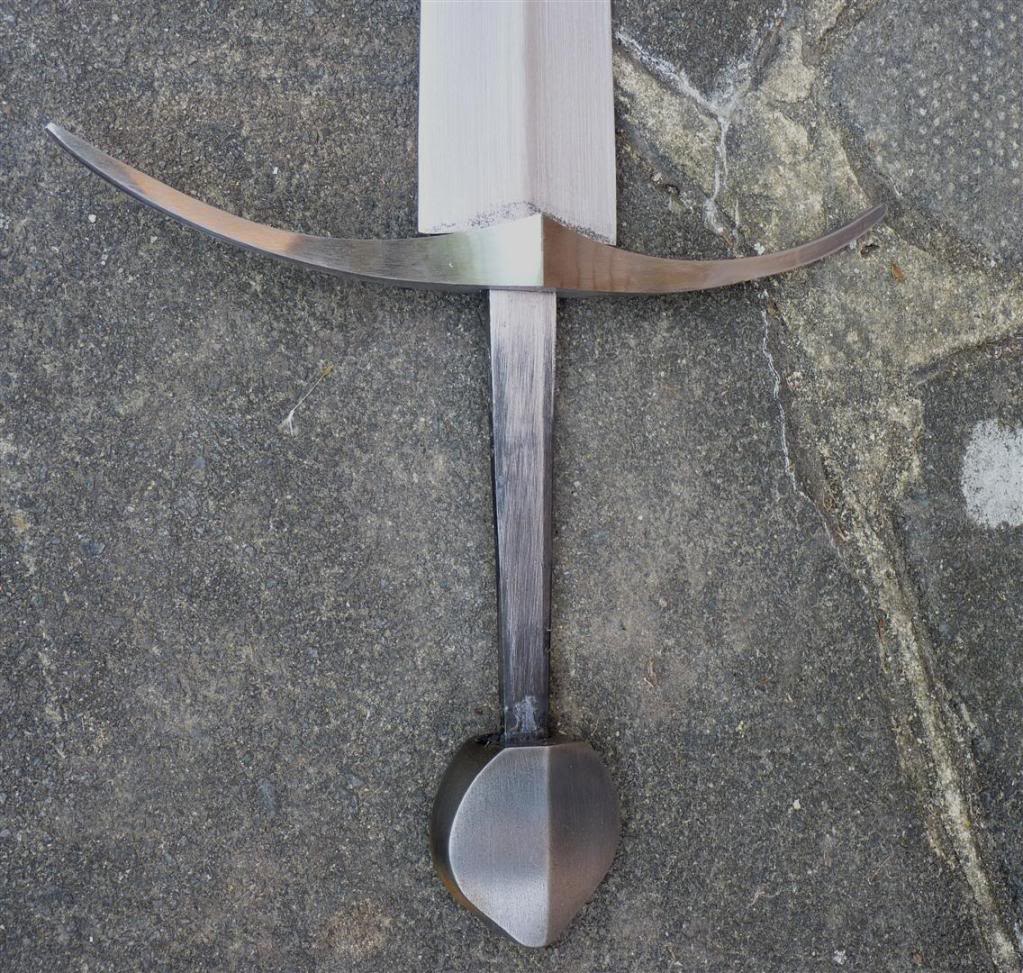
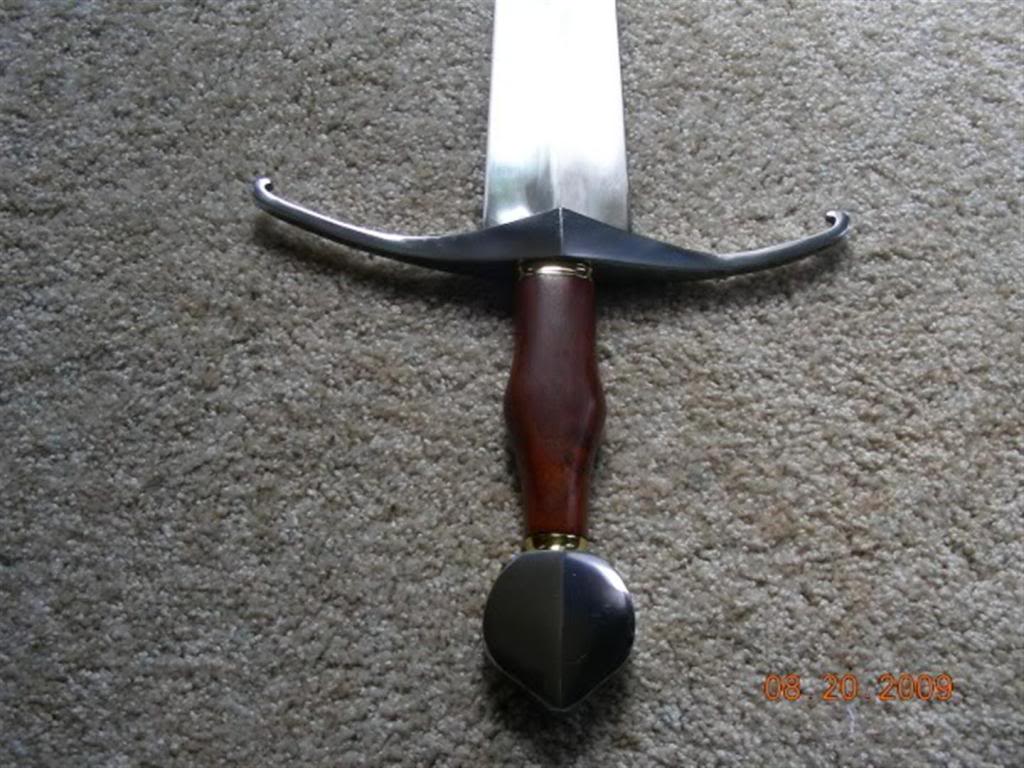
However, windlass completely butchered the guard. It is ugly and chuncky, and features very odd angles and lines...in short, a far cry from the elegant and slender quillons of the original sword. Most pictures I had a look at before purchase tended to choose the more appealing side of this guard, but in fact, what you get is like the picture below (it's not mine as I did not bother to take a shot of the guard prior to re grinding, but mine was identical).
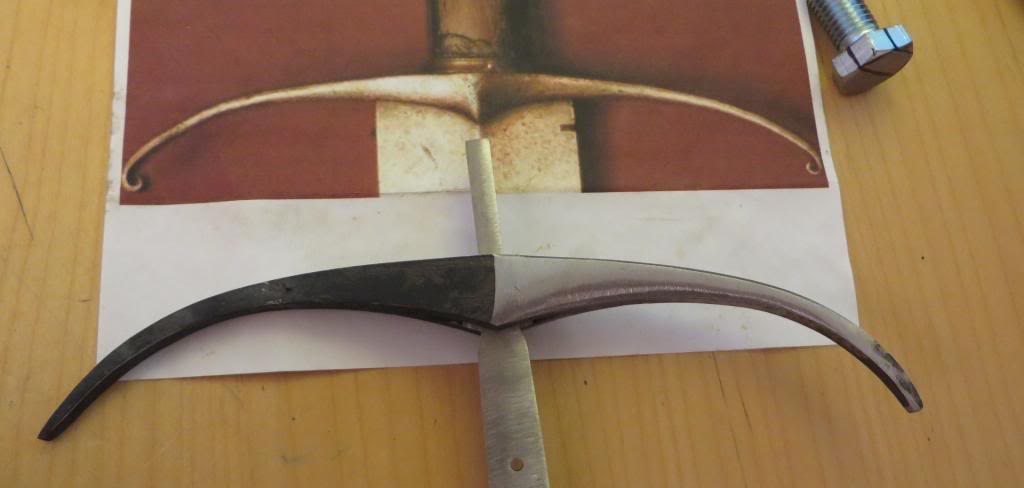
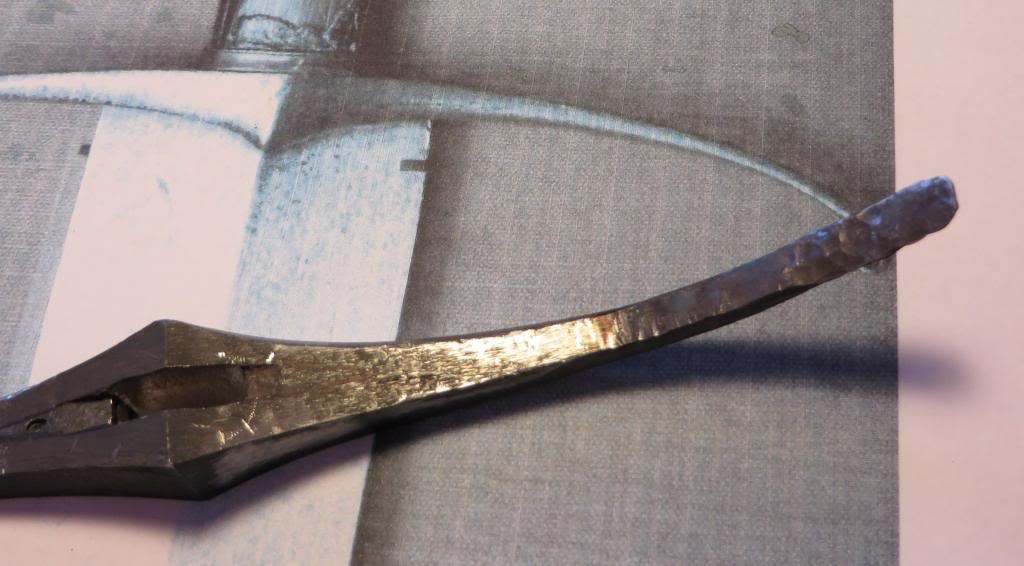
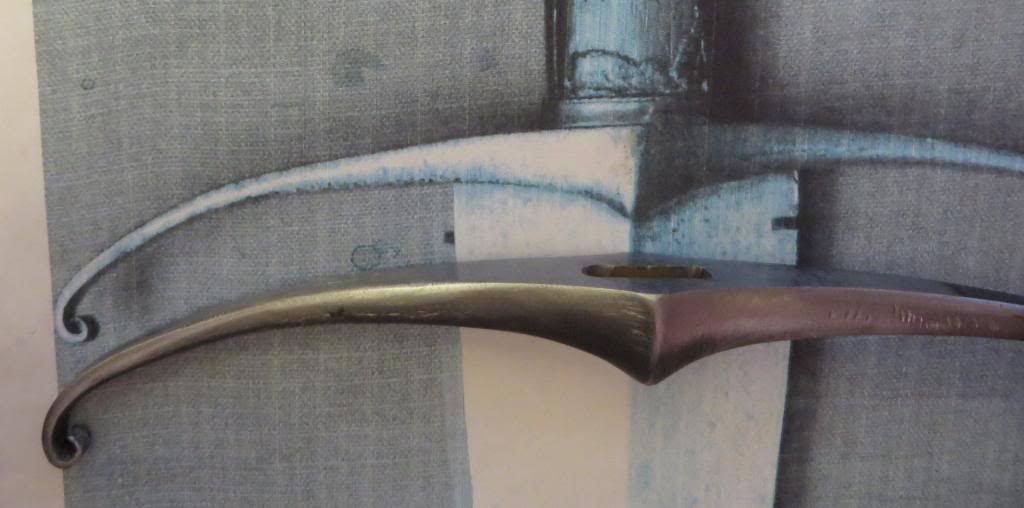
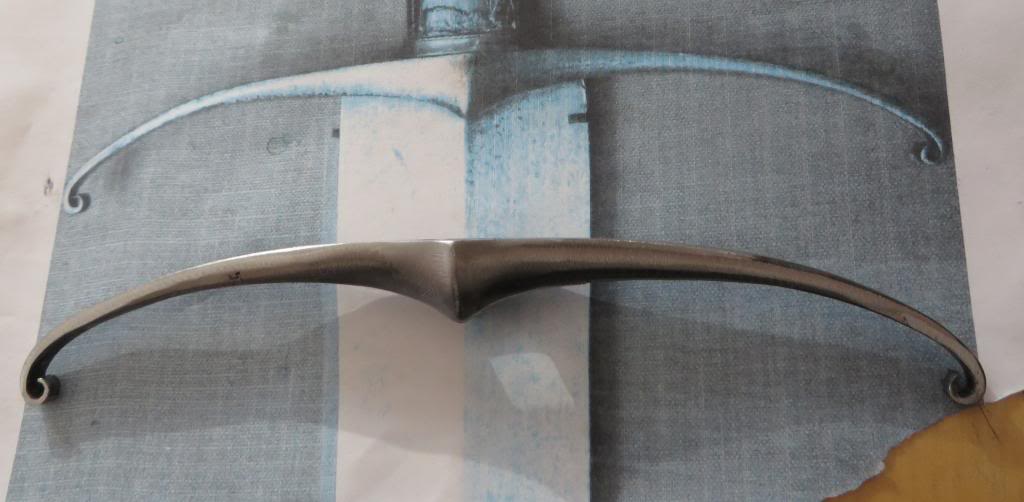
The pics below show where I am now. I have already removed an awfull lot of material and started to reshape the overall profile making sure the quillons taper evenly towards the point). The tricky thing here is to match the intersection of the lines at the ecusson (front and under the guard). To facilitate grinding I have bent back the tip of the quillons, that I will bent again once I've got it right.
With that much material gone, the guard revealed partially why it was so badly shaped to start with. This guard was certainly not cast, but made of at leat 3 seperate welded bits(center part, and quillons). Lines appeared on the lower part of the guard (facing the blade, showing the structure (you can see them on one of the shot, near the blade shoulders). I suppose this was made to facilitate production.
Then grip, leather on top, fitting the brass rings back on the top at the bottom and top of the grip (which I kept...somewhere)...and of course scabbard.
Cheers,
Julien
The original at the Philadelphia Museum of Art
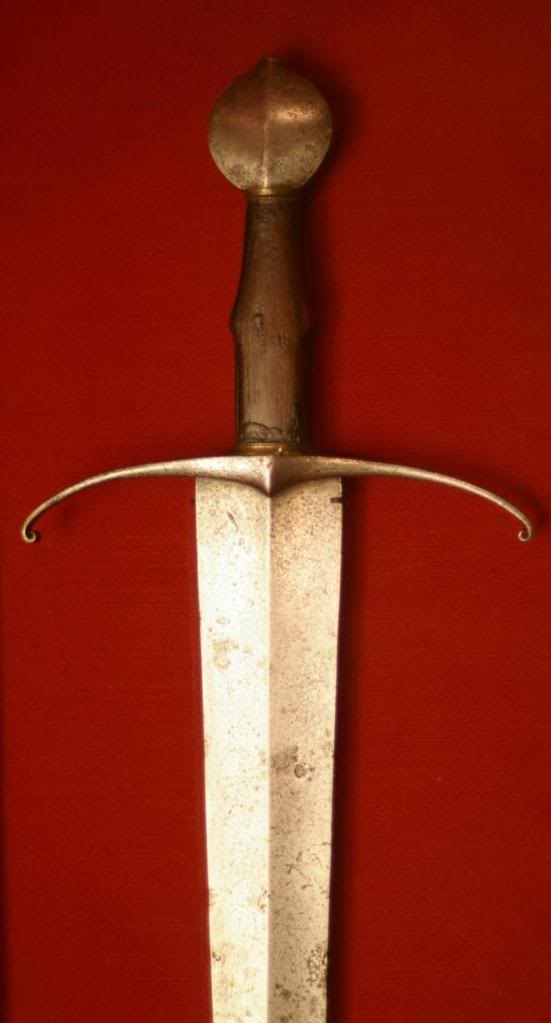
the abomination: the windlass guard as it is out of the box
wip
Last edited by Julien M on Fri 29 Apr, 2011 3:13 pm; edited 1 time in total
By the way, would anyone have a picture showing the thickness of the guard from above or below. Facing the sword they look awfully thin so I guess there must be some thickness sideways. I wonder if I did not remove too much material already...
Thanks,
Julien
Thanks,
Julien
It looks good to me Julien - enough and not too much. I used to have one of those and also thought it was a very attractive and handy piece, although not knowing the original, I didn't realize how far off the guard was until you showed this comparison. -JD
I printed the hilt to exact size and laying the guard and pommel on it I can see that I am quiet close. I have thinned the quillons sideways too much but luckily I still have enough thickness on the front and will flaten them with some forging.
looking at it the guard one can see that it is more complex than first expected. It will take some grinding to round it in some places.
I have also measured the sword of auray and it is 4 or 5 cm longer than the original, so I will print out the sword to size, cut the outline on paper, and trace the profile of the original on the blade. I will then cut the tip and reshape the lower part on a grinder. Hopefully the windlass blade is wide enough to match the original.
Again, if anyone has some information I'll take those (visual or measurements, as I have only guard width and sword lenght, which is enough to print to size and use the print to proportion the rest).
A picture of the guard seen from the top or below would be of tremendous help, otherwise I'll have to interpret and improvise.
Cheers,
J
I'm a fan of that sword, too, and your project is already looking fantastic!
Thanks Sean!
I've only done rather simple grinding on it so far (almost flat on the wheel on all four sides) and it's going to take a bit more efforts to bring it close to the original (some rounding, filling and forging)
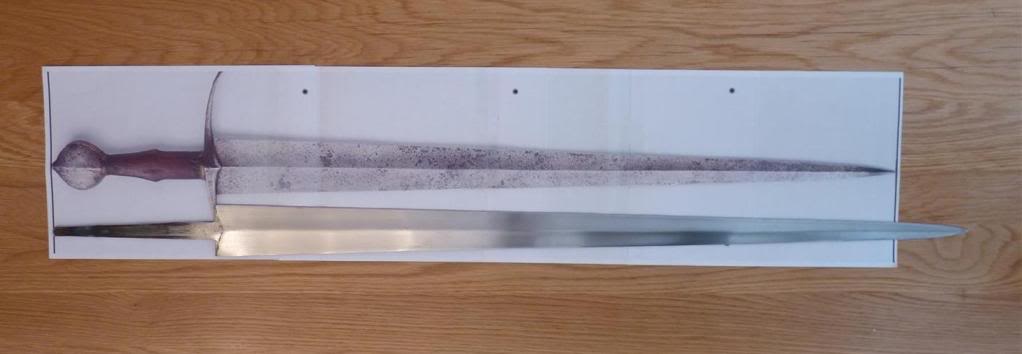
On the shot below, one can see clearly that this sword is a fast and light rather short bladed arming sword, nothing like the windlass longuer blade that almost feels like a short one and a half sword. That's why I'll go through the trouble of shortening and regrind the profile of the blade.
Great job Julien, in turning a piece with real problems into an attractive weapon. I'm eager to see how your project progresses.
A tiny update on this.
As I have very little measurements available for the actual sword (save for overall lenght and cross width) I have to figure out the rest using the "print to size technique". The best picture available showing the sword flat can be found on the PMOA website, embedded in a flash player. Now in full zoom you have only a fraction of it so after 5 or 6 screenshots, I got the all sword in max resolution. I completed the puzzle on an image editor to get my full sword picture (if anyone knows of a less archaic method to get a max res pict from a flash image player I'm all hears). I then resized it to 91 cm (the actual lenght of the original) and checked the cross width once it was printed...spot on 21.5 as it should be, which tells me the rest of the sword is true to proportion (if anyone needs me to elaborate on how to do the above on an image editor I can do that, but it's very straight forward really (I use fastone image viewer and pixlr, a free online image editor).
Now laying the windlass blade on it or side by side, I can see that the MRL guys are spot on as far as the tang lenght is concerned (down to the mm). The windlass blade however is slender and longuer, as previously said. As far as the blade width is concerned, it is as I feared: a little less than2 mm are missing on each side below the guard, and I can't do anything to cheat that. However, I will cut the outilne of the blade on paper, lay it on the blade and mark the rest of the profile. Then I will chop the tip (2 inches probably) and grind the blade as close to the original as I can. All in all, I might end up with something pretty close.
J
While I can't seem to be able to drill through steel, other projects are back on track, such as this one, as Santa kindly brought me an angle grinder which considerably speeds up the shaping of metal bits. I wonder why I did not try this before (just used these to remove forge scale in the past). This guard is well on its way. It's the original windlass that I had completely re grinded above. Now I can get the curves right with the angle grinder/files etc. Also my bi gas welder now allows me to heat the quillons red hot to hammer and extend them on the side of my vice, and will also allow to bend the tips - that I'll do last as the straighter the easier to bevel and work the guard.
Potential headache and to be noted if you rework windlass hilts extensively: the guard is an odd sandwich construction (3 layer of steel, to avoid drilling the tang slot). These sections are revealed randomly during grinding. Some disappear some grow larger...so let's hope for the best.
This project has also benefited from a major upgrade: I'll use my Albion bare blade (single handler type XVIII, which is almost spot on both length and width wise (and it is the width below the guard that give this sword his character IMO.
The pommel is already done, and well done. I'll need to draw the steel from the tang to match the original sword (an inch maybe) and the biggest challenge will be to accentuate the Albion hollow ground which from the milling is hardly noticeable.
TBC
Wow...I never dreamed that this sword would have such a meaty tang. I always figured it was a rat-tail going through that beautifully shaped wooden grip. I want one!!............McM
Mark Moore wrote: |
Wow...I never dreamed that this sword would have such a meaty tang. I always figured it was a rat-tail going through that beautifully shaped wooden grip. I want one!! |
That depends on which tang you are referring to. The pictures at the very top show the windlass blade. The tiny bit of tang you see in the more recent shots are showing the tang of the Ablion bare blade I chose to use for this project. the windlass blade is very good, but on the thin side, and anyway not matching the original sword. I might use it for something else or exchange it later on.
Ok so after some heating, and some more angle grinder and file work, I've got one quillon down to size (I can lay it on paper and the curve is spot on compared to the picture so I'm rather glad!). Of course it needs more refinements, I want the curve to be very even from the top to bottom and that very neat finish at the very end. I created the central ecusson with the angle grinder, mostly freehand. The quillon was heated red hot, hammered, then I finished with a pair of pliers.
Hope you like it.
Btw you see that black spot in the middle of the quillon. These are the cracks I was referring to due to the layered construction...I'll need to find a way around that. Same issue around the tang slot. It reveals a grainy black metal that does not sand well but crumbles until you land on good steel under it...weird really. But the guard is very solid overall so I'm not too concerned.
Looking great, Julien. I'm eager to see how this turns out.
Great Project - and GREAT info on the Windlass sandwich construction of guards... and a great decision to use a better blade with a far better tang.... one with some serious meat, and a bit stiffer than those I've seen out of Windlass blades.
Dying to see you make a nice, new, sharp, wasp wasted grip core :) ... then wrap the dog :). I swear that shape was invented by the Inquisition to torture Leather workers :).
Not sure I follow here.....Do you have a pic of the Windlass tang?............McM
Or, more exactly, which photo shows the Windlass tang? The one on top of the paper drawing? If that's the case, I'm sold. Will be posting a 'wanted ' ad in the Marketplace..............McM
Hi Mark,
Any of the 2011 shots show the windlass tang and blade.
As said, nice enough windlass blade, light yet rigid enough, not wimpy either.
Cheers,
J
Any of the 2011 shots show the windlass tang and blade.
As said, nice enough windlass blade, light yet rigid enough, not wimpy either.
Cheers,
J
It's one of my favourite swords (spent a while drooling over it a few weeks back) and your project gives me hope for my Windlass version sitting in a cupboard somewhere, nice job!
Mark Griffin wrote: |
spent a while drooling over it a few weeks back |
I take you've seen the sword up close? Would you happen to have more pictures? especially of the lower and upped sides of the guard? I'm only guestimating the thickness of the guard, as no shots I have will show this clearly.
And quillon number 2 done. Now to files and belt sander to refine - and dremel to drill the blade shoulder recess. Problem is that my blade is a blank and therefore much thicker than the blade will be once finished...so my recess will end up being a bit larger than needed...need to give this more thoughts.
Julian -
You are doing a top notch job with that guard. Its looking fantastic!
I took a picture of the sword a couple of years ago, it does not really show the cross all that well and you already have basically the same picture in your post above, but none the less here it is, you never know.
You are doing a top notch job with that guard. Its looking fantastic!
I took a picture of the sword a couple of years ago, it does not really show the cross all that well and you already have basically the same picture in your post above, but none the less here it is, you never know.
Last edited by Bryan Heff on Mon 03 Feb, 2014 3:49 am; edited 1 time in total
Hi Julien,
You probably already have these, but anyway: the sword is on the Museum´s website http://www.philamuseum.org/collections/perman...0184243|39 and there are couple of pics in this set http://www.flickr.com/photos/98015679@N04/set...214/page2/
none shows clearly the thickness of the guard, though...
And btw - you´ve done a very nice job so far!
Page 1 of 2
You cannot post new topics in this forumYou cannot reply to topics in this forum
You cannot edit your posts in this forum
You cannot delete your posts in this forum
You cannot vote in polls in this forum
You cannot attach files in this forum
You can download files in this forum
All contents © Copyright 2003-2006 myArmoury.com All rights reserved
Discussion forums powered by phpBB © The phpBB Group
Switch to the Full-featured Version of the forum
Discussion forums powered by phpBB © The phpBB Group
Switch to the Full-featured Version of the forum