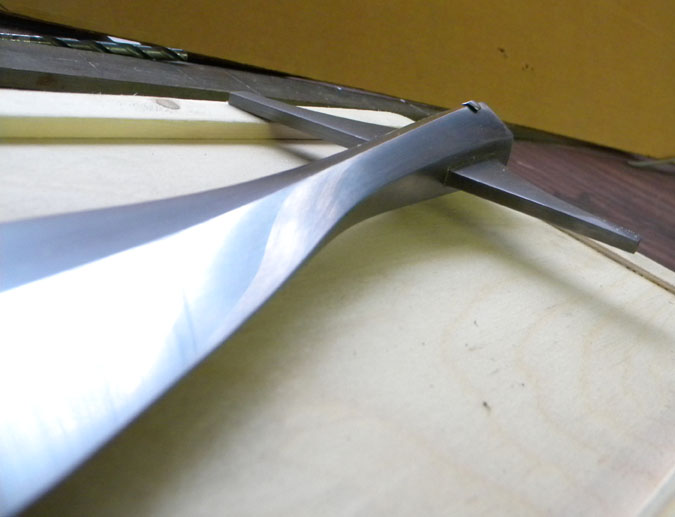
Michael Pikula Viking Spear Review.
Just received the Viking Spearhead made by Michael that I picked up from his orphaned projects that needed a Patron.

Firstly this spearhead looks and feel much more substantial than the statistics or pics would lead one to believe and I'm certainly happy here as I was expecting something more " dainty " which would have been fine but I prefer a stouter spear head like this.

Lets first get some statistics out of the way:

A) Total length: 15 3/4".
B) Length of head alone approximately: 11".
C) Sharpened length approximately: 6 1/2" from tip ( After this the blade slowly become blunter and blunter and seamlessly transitions into the socket.
D) Width from tip of wing to wing tip: 5 3/8".
E) Width of neck leading to socket at it's narrowest: 11/16".
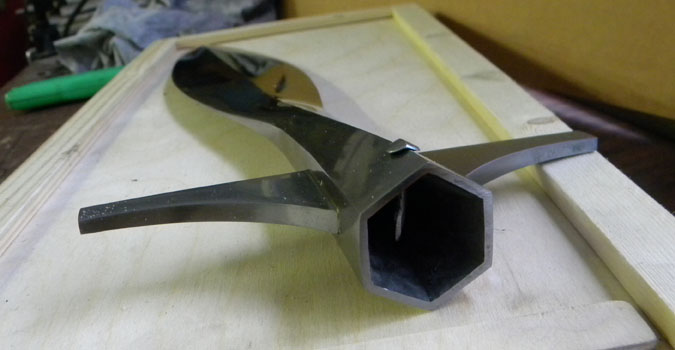
F) Socket: 1 1/16" wide " Flat to flat ", 1 1/4" Ridge to ridge, wall thickness approximately 1/16".
G) Weight: 1 lb 4oz.

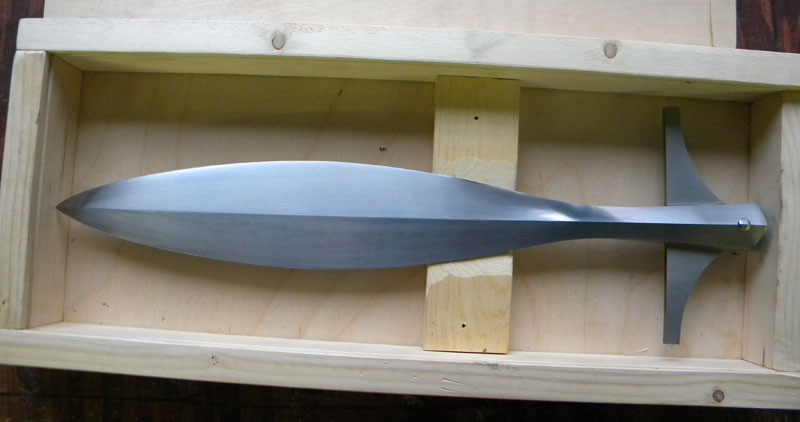
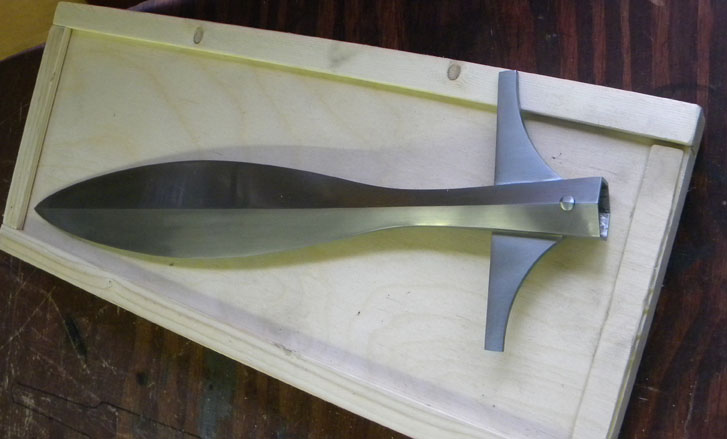
The blade is an elegant oval in shape and the central ridge running from the hexagonal socket to tip is perfectly strait and everything is also perfectly symmetrical ( Perfectly seems to be a standard feature of all the work I have seen made by Michael ).

The finish is basically " Albion " like and easy to maintain and restore with a fine abrasive sponge should one need to remove scratches if one cuts with it.

The sharpened part of the spearhead is very sharp and even the blunter part on the half nearer to the socket gradually transitions from sharp, to butter knife sharp, to thicker still until it forms the sides of the hexagonal socket.

( Note the edges where sharp are of an appleseed kind with little to no secondary bevel ).

This head has a lot of mass and because of the curve and belly of the sharpened blade I think it would be devastatingly effective slashing and cutting although it certainly, as a spear, is meant to be used primarily in the thrust but tip cuts would also be effective.

There is also enough mass in the head that even a cut on maille would do some concussive damage in my opinion.

The wings are obviously designed to parry/block other spears and would also be very effective grabbing the edges of a shield or strip up an opponent behind the knees or any other body parts.

I also think it could double easily as a boar spear for hunting as the wide blade would do considerable damage and the wings would keep an angry wild boar from running up the shaft to get revenge. ( One could also say that this might keep a dying swordsman out of range before he passed out and died maybe ? Usually this aspect is only brought up for hunting dangerous game but keeping a vengeful and mortally wounded foe a few feet away for a few seconds does have it's merits I think ).

I will be mounting this myself using a white oak " BO " staff but I'm not sure yet if I will use a strait or tapering shaft.

Michael also supplied a mounting nail with the head of the nail ridged so as to match the ridgeline of the socket: To not damage this nail head I will tape a small piece of wood to the face of a hammer when I set the nail into the haft. and I will pre-drill a small hole for the nail so that it doesn't bend when being hammered into the very hard oak and to not stress or spilt the wood. ( A close fit to the inside diameter of the socket + just a little epoxy cement at the mouth of the socked + the nail should make for a secure fitting of the spearhead. Avoiding filling up the socket with epoxy is just so I can more easily replace the haft should it become necessary in the future ).

Well, I am extremely happy with this spearhead and it's really an opportunity I'm glad I didn't miss since the value for money spent is such that even at twice the price I would be still getting a bargain I think: I can't recommend Michael's work more highly as well as the excellent customer service. :D :cool:

P.S. The wooden box in came in is great for storage should one want to collect spearheads and not have them mounted as well it assures that damage in shipping would be close to impossible if one excludes nuclear attacks. ;) :p :lol:
 Attachment: 61.31 KB
DSCN1104.JPG


 Attachment: 52.63 KB
DSCN1105.JPG


 Attachment: 65.29 KB
DSCN1108.JPG


 Attachment: 58.29 KB
DSCN1110.JPG

Very nifty, and the ridged nail is a great little touch. :)

Personally, I think a tapered shaft would better complement the blade shape.
That spearhead is beautiful.
Jean that is one of the most elegant blades i have ever seen, congratulations. :D

Will you have to plane the haft to match the flats of the socket or is it reasonable to just use a round section with an interference fit?
Jean, could you post a link to michael's web site?
Jean - Congratulations! Nice spear! & merci for the review.

Larry... last I recall seeing about Michael's web site is this. If anyone has newer info please post.

http://www.myArmoury.com/talk/viewtopic.php?t...highlight=
:) Now I think I'm blushing a little.

Thanks for the wonderful review Jean and I'm happy you are enjoying the spear :)

As for my website, I have one that is in the works, ok, just starting to be in the works, and I'll be posting a update on it as soon as it goes online.
As always, top notch work from Michael! That is a really nice spear Jean, I'm sure you'll enjoy it. Post pics when you mount it!
Jean,

Congratulations to both you and Michael. The spearhead is really beautiful work. I especially like the hexagonal socket, good engineering and a very nice visual feature as well.

If you mount the head on a haft I, for one, would be interested in a picture or two.
Jean,

Congratulations on a fine purchase! That is one of the most elegant looking spears I have ever seen. It also sounds like it would be highly functional.

When you have a chance, please post a link to Michael's website. I would love to learn more about this spear as well as his other offerings.

Best wishes,


David
Larry Bohnham wrote:
Jean that is one of the most elegant blades i have ever seen, congratulations. :D

Will you have to plane the haft to match the flats of the socket or is it reasonable to just use a round section with an interference fit?


Simpler and easier to just taper rounded and with the epoxy and nail it should be just as stable.

Plaining the socket interface hexagonal might be worth it if the whole haft was going to be hexagonal anyway.

Using a " BO " staff to mount the spearhead that tapers as I think the curve of the taper will match the aesthetics of the curves and recurves of the spearhead. As well reducing the diameter of the haft to fit the socket hole leaving the thicker haft flush to the outside surface of the socket might look " cool " but structurally I think that the sharply reduced diameter might create a stress riser and a weak point just at the junction of socket and haft. ( Maybe a slight theoretical weakness, not sure, but there was a long discussion about this in a Topic some years back ).

What I might do is cord or leather tong wrap the haft a few inches below the socket to make it flush and this wrap would strengthen the haft I think as well as looking good ( Not overly concerned about historical accuracy and frankly we don't know much about cord wraps around spear hafts and how they might be done ).

I might had a cord or tong wrap a foot or two below the head just above the position of the top hand holding the haft: This would give a slight reinforcement mid haft and the bulge or band created might stop or defect a blade sliding along the haft sort of doing a little bit the job a mid haft rondel does for a poleaxe. ( Also to hide a small surface flaw in the haft that is not structurally important but leave a small flat on the surface of the haft ).

I'm going to add a blunt butt spike and maybe do the same cord wrap ending a few inches up from the but cap to reinforce that end also and to match the look of the top end.

Currently I have just sanded the " BO " staff to remove a few surface flaws and prepare it for a nice oil finish.

I should start on this in the next few days.


Last edited by Jean Thibodeau on Sun 06 Feb, 2011 6:42 am; edited 1 time in total
David Martin wrote:

When you have a chance, please post a link to Michael's website. I would love to learn more about this spear as well as his other offerings.

Best wishes,


David


Michael Pikula wrote:
:)
As for my website, I have one that is in the works, ok, just starting to be in the works, and I'll be posting a update on it as soon as it goes online.
Well I spent the evening carving the tip and butt of the " BO Staff " to fit the socket of the spear and the butt spike.

My original idea was to just carve it round but it actually seemed easier making it hexagonal so I went with that and changed my mind on the fly. ;) :lol:

The inside profile of the socket is hexagonal but after two inches it narrows and become circular i profile.

The final carving ended up a close match I think to the inside dimensions and geometry of the inside of the socket and it was sort of challenging I used a rasps, a wood file, a draw knife.

The haft below the head is almost flush with the socket's exterior ( socket a little wider than the haft ) forming a half shoulder before it tapers with a curved tapering hexagonal section for the first 2 inches and then become round and fairly small in diameter for another 2 or 3 inches.

I used slow setting epoxy because the 5 minute stuff can set so fast that it makes adjustments or changing one's mind difficult if one has to remove it if the fit is not right and gives too little time to decide if it's properly fitted or not.

To fill any gaps and/or corners I added the wood dust from the rasping and filing to the epoxy mix and made sure to fill the hole so that with pressure all the extra epoxy was extruded out so that when it hardens there should be little if any hollow spaces and any imprecision of my carving will be filed with the epoxy/wood dust. ( Michael mentioned in an e-mail that to re-haft one can heat the socket to 250 degrees F to break the hold of the epoxy and that this heat would be too low to affect the heat treat of the spearhead ).

Getting the spear head 100% strait to the haft is not that easy and I think I was generally successful but might be out of true by a couple of degrees in the axis of the edges. I also think it's 100% strait as far as the axis of the flats are concerned: I had to decide if this would be enough out of true to really bother me later and decided to leave it as is because I doubt I can get it better. ;) :lol: ( If it ever bothers me enough I guess i could always re-haft it ;) ).

Lets just say that if I squint very hard I can perceive a slight misalignment but probably much less than what would have bothered people in period where lumpy and asymmetrical pommels and guards didn't seem to bother them at all. ;) :p

After the epoxy cures tomorrow I will drill a small pilot hole for the nail supplied by Michael and I will also put a nail in the butt spike I fitted to the butt.

Used this one: http://www.kultofathena.com/product.asp?item=...Lance+Head

The lance head above I may later mount as a javelin.

Couldn't really handle the mounted Viking spear much before the epoxy cures properly but the handling of the spear seems very agile and fast as far as I can tell just holding it: It's surprisingly fast.

I will give statistics later about length and weight and POB but I did mount this one a little shorter than my other spears as I wanted it more of an agile and close range weapon and/or hunting spear.

I would say it took about 6 hours of work to fit the haft.
Here are a few statistics on the finished and mounted Viking Winged Spear:

Weight: 3 lbs 8oz.
P.O.B. measured from point: 31"
Total length: 76 3/4"

Like I said in the previous post it's very fast and agile.

For comparison here is my Partizan made by Michael a while back:
http://www.myArmoury.com/talk/viewtopic.php?t...p;start=60

There are pics on the above Partizan Topic on page 3 of posts for reference and for those who haven't seen them before as well as the entire " Making of Topic ".

The Partizan is heavier at 4 lbs 8 oz. and 82 1/2" long, it has a heavier octagonal haft and feels a little more " ponderous " or robust.

Here is just some thoughts about the fighting qualities and the designs in comparison in my opinion:

The biggest difference I think is in the uses of the wings:

A) Both can be used to parry but the Viking Spear's wings are wider and more likely to be able to intercept/parry and have little to no direct uses to wound although I guess a heavy concussive hit would hurt and could cause some blunt trauma.

B) The wings on the Partizan can also parry but are narrower and the closeness of the shoulders of the main blade make then less likely to intercept/parry I thinks. The notch between the shoulders and the wings is designed in part to trap or grab a sword or polearm or shield rim and be able to either pull or push from an engagement in the notch.

C) The wings on the Partizan where also designed by me to be sharp on the reverse " slope/angle " away from the main blade to be a wounder if the Partizan is used to go beyond a body part and cut when pulled back. The points might also be able to grab at gaps between plate armour and/or grab/pierce maille armour ..... well that is my design intent for tactical use. As well the gaps is very much and aesthetic choice as I really liked what this looked like on an actual period Partizan in one of my reference book.

D) The very wide blade of the Viking Winger Spear has a robust point with a shape making tip cuts very effective.

E) The rear of the elliptical blade ( Viking Spear ) is not sharpened past the mid point and in combination with the wings gives one the equivalent of a sword's ricasso or strong that is robust and won't take edge damage where it is most likely to parry leaving the sharp 6" to 7" least likely to be used to parry being as sharp as possible.

F) The extra weight of the Partizan is due to 1) Heavier haft 2) Steel languettes 3) Butt plate may not be much heavier than the butt spike I added to the Viking Spear. I don't think there would be much difference in weight in the heads themselves i.e. a few oz. at most.

By the way the tip with cut paper with frightening ease. ;) :lol: :cool:
As they say on some other forums I frequent, "Pics or it didn't happen!" :)
Mikko Kuusirati wrote:
As they say on some other forums I frequent, "Pics or it didn't happen!" :)


Well I guess it didn't happen. :p :D ...... :cool:
Update:

Well, after a couple of days the crooked haft started to really bug me so I decided to give it a try to fix it. I used Michael's suggestion of heating the spear head moderately to make the epoxy let go of the spearhead and it worked quite well: I used the kitchen stove and turned on one of the top electric elements and put the socket in contact with the socket turning the spear often to get both sides hot.

To check for temperature I sprinkled drops of water on the socket and when they started steaming away I tried pulling on the head and it came off the haft easily. ( Works really well to loosen epoxy ).

I don't think I overheated the socket since it never changed colour, and although to hot to comfortably touch, I don't think I got much higher than 300 degrees F.

The only hard part was removing the nail and I did bugger it up a bit wedging it out a little bit at a time using a cold chisel on the bottom corners until I got it out enough to use a claw hammer to get the nail out: I'm fairly sure I can hand file the " buggering " out of it with a fine file and then refinish it with abrasives sponges. ( Note had to remove the nail first otherwise the spearhead couldn't have been pulled off after the heating of the socket ).

A slight negative but much better than leaving the spearhead on crooked. ;) :lol:

Anyway, I feel much better now ..... LOL.

Oh, I adjusted the fit by filing the haft a little bit at a time and I used some flat glued down toothpicks to build up on one side and cut away on the other side and try and fit and check alignment in both dimensions up/down and side to side.

I can now continue oil finishing the haft after I add a few inches of cord reinforcement below the socket on the haft and maybe a matching cord wrap near the butt spike just for visual symmetry. I may cover the cord ( nylon for strength ) with leather lacing in some sort of Turkish/Celtic knot pattern.
Jean Thibodeau wrote:
Update:

Well, after a couple of days the crooked haft started to really bug me so I decided to give it a try to fix it. I used Michael's suggestion of heating the spear head moderately to make the epoxy let go of the spearhead and it worked quite well: I used the kitchen stove and turned on one of the top electric elements and put the socket in contact with the socket turning the spear often to get both sides hot.

To check for temperature I sprinkled drops of water on the socket and when they started steaming away I tried pulling on the head and it came off the haft easily. ( Works really well to loosen epoxy ).

I don't think I overheated the socket since it never changed colour, and although to hot to comfortably touch, I don't think I got much higher than 300 degrees F.

The only hard part was removing the nail and I did bugger it up a bit wedging it out a little bit at a time using a cold chisel on the bottom corners until I got it out enough to use a claw hammer to get the nail out: I'm fairly sure I can hand file the " buggering " out of it with a fine file and then refinish it with abrasives sponges. ( Note had to remove the nail first otherwise the spearhead couldn't have been pulled off after the heating of the socket ).

A slight negative but much better than leaving the spearhead on crooked. ;) :lol:

Anyway, I feel much better now ..... LOL.

Oh, I adjusted the fit by filing the haft a little bit at a time and I used some flat glued down toothpicks to build up on one side and cut away on the other side and try and fit and check alignment in both dimensions up/down and side to side.

I can now continue oil finishing the haft after I add a few inches of cord reinforcement below the socket on the haft and maybe a matching cord wrap near the butt spike just for visual symmetry. I may cover the cord ( nylon for strength ) with leather lacing in some sort of Turkish/Celtic knot pattern.


I really admire your persistence and DIY'ness! I know that I am not really a fixer-upper, so I love to see others really get into it.

That's why get my spears, polearms, whatever- hafted for me. . . . . :lol:
Jean Thibodeau wrote:


I used the kitchen stove and turned on one of the top electric elements and put the socket in contact with the socket turning the spear often to get both sides hot.
To check for temperature I sprinkled drops of water on the socket and when they started steaming away I tried pulling on the head and it came off the haft easily. ( Works really well to loosen epoxy ).


Remember you the Oakeshott's sword “Ingerlii”?
It's fun to imagine Oakeshott rubbing it with various household solvents, with his own hands, until the inscription 'fairly lept into view'.

I think to this when I read your post. :)
Very household, but it works.
Congratulations on your purchase, the lance is very beautiful. I am curious how the fins are attached.
Maurizio D'Angelo wrote:
Jean Thibodeau wrote:


I used the kitchen stove and turned on one of the top electric elements and put the socket in contact with the socket turning the spear often to get both sides hot.
To check for temperature I sprinkled drops of water on the socket and when they started steaming away I tried pulling on the head and it came off the haft easily. ( Works really well to loosen epoxy ).


Remember you the Oakeshott's sword “Ingerlii”?
It's fun to imagine Oakeshott rubbing it with various household solvents, with his own hands, until the inscription 'fairly lept into view'.

I think to this when I read your post. :)
Very household, but it works.
Congratulations on your purchase, the lance is very beautiful. I am curious how the fins are attached.


Thanks you Maurizio, and yes its a very beautiful and elegant spear ( In French we use the word Lance for both lance and spear and I assume the same in Italian. :?: )

The wings are brazed onto the socket ( I assume bronze brazing which gives and exceptionally strong soldering ):
http://en.wikipedia.org/wiki/Brazing
http://www.phred.org/~josh/build/brazing.html

Page 1 of 1

Jump to:  
You cannot post new topics in this forum
You cannot reply to topics in this forum
You cannot edit your posts in this forum
You cannot delete your posts in this forum
You cannot vote in polls in this forum
You cannot attach files in this forum
You can download files in this forum


All contents © Copyright 2003-2006 myArmoury.com — All rights reserved
Discussion forums powered by phpBB © The phpBB Group
Switch to the Full-featured Version of the forum