Rehilting my Hanwei Practical Bastard Sword
Some time ago I purchased Hanwei's Practical Bastard Sword to practice with.

However, I found I've come full circle. One of my first posts on these forums was whining about how my two new Windlass swords had itty-bitty thin hilts. After some test swings I found the Hanwei Bastard's hilt was far too thick, with a circumference a good half inch or so greater than the other pointy objects I have laying around. :lol:

Now having some idea of how a "real" sword should handle I decided I would venture forth into the DIY realm and see if I could fix this. I contacted the good Mr. Flynt with my fingers crossed, hoping he had taken this particular sword apart before. He apparently has not, but gave me some general advice and encouraged me to get to it, specifically urging against my lazy "Maybe I'll just rip off the leather and go with bare wood" idea and suggesting I aim for a more historical look.


Since I am presently between exams I decided to just do it last night. As you can see from the picture below, taking it apart was easier than I thought. (I tossed the hammer into the picture for fun. Didn't need it for anything but my strange sense of humor.)
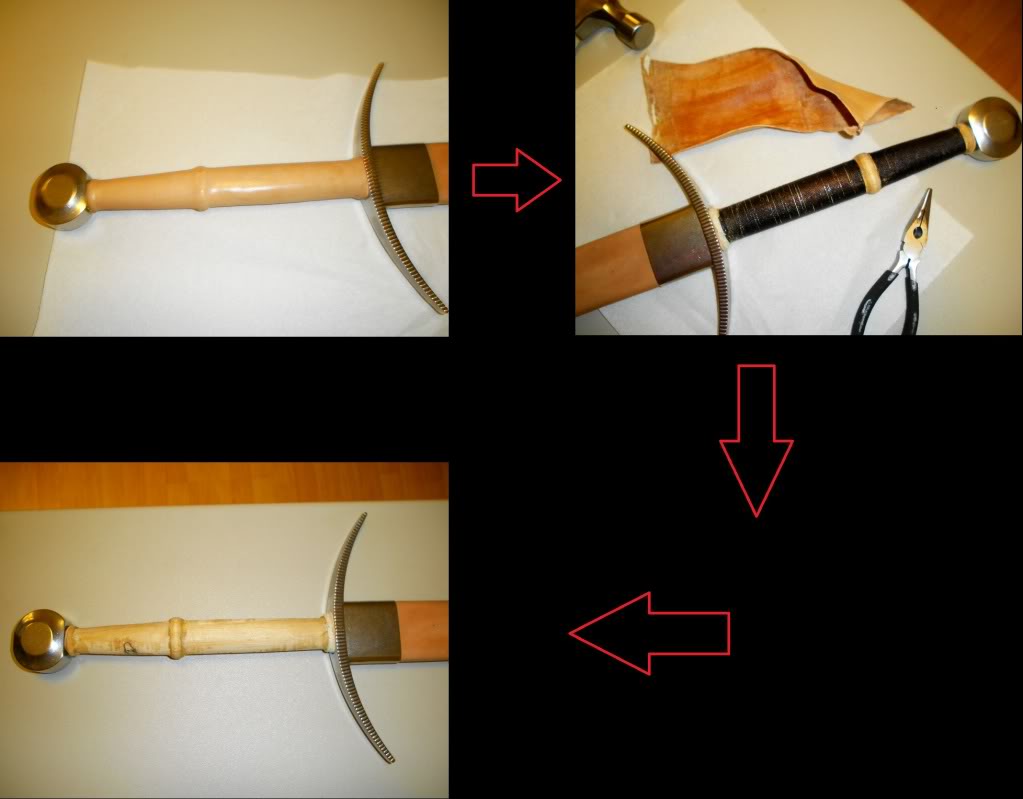


The leather was merely glued down and I tore most of it off with my bare hands. I was surprised to find the cord underneath. I thought you put cord under leather to give a grip texture or risers, but on this sword it doesn't seem to serve any real purpose. Upon hefting it, I was immediately satisfied I was doing the right thing by undertaking this project. The leather was worth a good quarter inch in circumference, and even though it was still a thicker hilt than my other toys, it felt like an entirely different sword in my hands.

I continued by removing the string. With all of that gone I now feel like the hilt has the correct dimensions or close enough for my purposes. However, I remember Sean's advice and intend to remove some of the wood and replace the leather. The local ACE hardware store is having a sale tomorrow and I should be able to get everything I need, wood rasp, sandpaper, glue, etc.


Now for some questions. I was thinking of only replacing the leather for the upper portion. (Actually it'd be lower, as it is closer to the blade... haven't quite adapted to that aspect of sword terminology yet, still tend to think of the pommel is down for some reason.) For the lower (upper) part near the pommel I was pondering trying to do a wire wrap.

However, I figure the sharp version of this would have it's closest historical equivalent in the 14th century. Would such partial wire wraps be a common feature then? Does anyone have a good picture of a well-preserved hilt or a modern replica? (Some searching on this site found several examples of swords listed as having been wire wrapped, but all were in bad shape and I couldn't make out much.)

I realize that historical accuracy with such a cheap sword designed as a modern "practical" version is almost a joke, but I thought I'd throw the questions out there and see what the answers are anyway. It might be fun to do it anyway even if it flies in the face of all reason.
Re: Rehilting my Hanwei Practical Bastard Sword
Colt Reeves wrote:
I was surprised to find the cord underneath. I thought you put cord under leather to give a grip texture or risers, but on this sword it doesn't seem to serve any real purpose.


The cord will strengthen it. Wrapped in cord (or wire), even if the wood core splits, it still isn't going to go anywhere. Even better, wrapped in cord or wire, it's less likely to split in the first place.
... Ummmm.... I knew that! ;)


Oh, and just in case anyone was interested, they went with the sandwich construction for the hilt. I didn't think about that before. I wonder how common that is in the modern sword market...
Colt Reeves wrote:
... Ummmm.... I knew that! ;)


Oh, and just in case anyone was interested, they went with the sandwich construction for the hilt. I didn't think about that before. I wonder how common that is in the modern sword market...


Albion, among others, does that. Historically, you have both bored-through grips and sandwich style.
I'm back.

As usual, I managed to keep a weekend project going on for several weeks now. Got caught up in other things, took a couple more exams, etc.


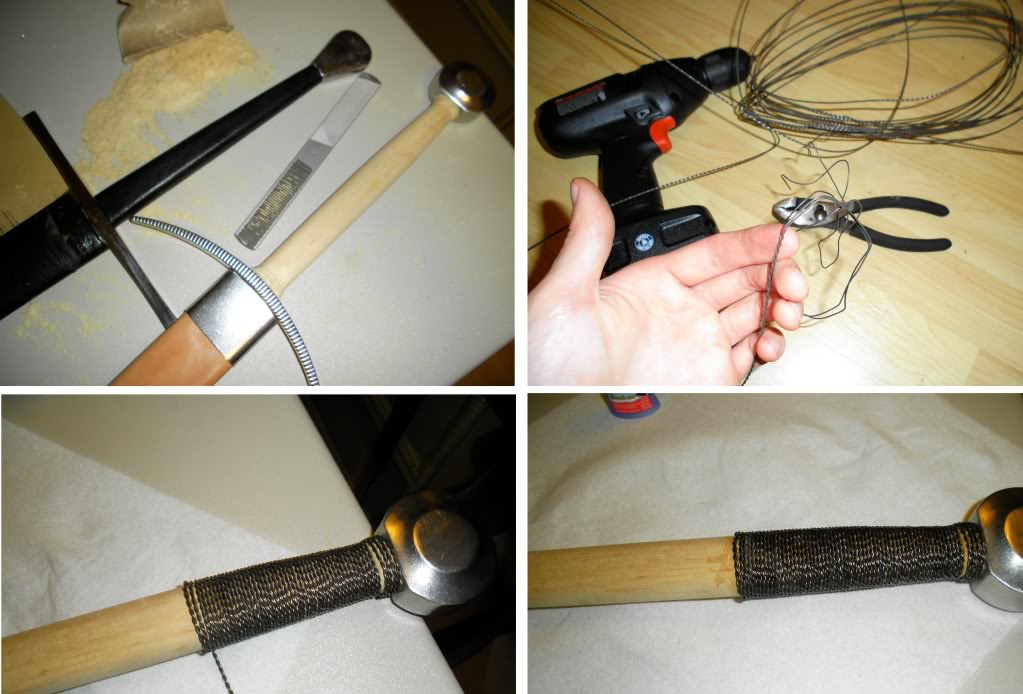
However, I've not been entirely idle, and sanded/rasped the hilt down to the size and shape I wanted, as can be seen below in the first picture. It's next to my Tinker Longsword just for comparison. (I've decided that the hilt should be thicker than the Tinker.)


The next picture is just after twisting the wire I had together with my cheapo cordless drill. It went better than I expected. I simply went outside and tied two ends to a signpost then chucked the other ends in the drill and revved it up. Kept a steady pull to keep it from getting out of hand, and continued to plug away til it abruptly snapped off at the bit.

Only problem was when I was uncoiling the two spools in the beginning. I had the clever idea of trying to do both at the same time and got them tangled. Sorting that out took almost as long as the actual work. So, for anyone tempted to try this: Do it slowly and carefully, one wire at a time. ;)


And the last two pictures are of the wrapping. For this I went and drilled a small hole at the base near the pommel and shoved the tip into it with a helping of superglue. Then I wound it by hand. As you can tell, I didn't handle the wooden "riser" at the base there very well, resulting in slippage and gaps, but once I got on level ground so to speak it went better.

As I coiled it I put down dabs of superglue, then after getting a fair distance covered, "painted" it with some more to help hold it together. Eventually I reached my stopping point and tried to put the end into another hole I drilled. I bungled it trying to get it into the hole and it started to unravel a bit, so I crammed it in everywhich way and superglued the crap out of it. I now plan to overlap that part with cord and leather for cosmetic reasons.

Oh, and just to be clear, it is all as tightly bound as I could make it by hand, the only loose part is that last bit I plan to cover. Even those gaps I have are fairly tight and the strands can't be moved via my bare hands. My sore thumbs made it happen.


A few points of interest:
1. I probably should have painted or stained the wood first. Those gaps really stand out with the color difference.
2. I don't need nearly as much wire as I planned for (used two fifty foot spools, which shortened by two or three feet in the process). I have maybe a little over half left. *Looks at plain Tinker Longsword hilt*
3. Should I do this again I will avoid any major protrusions such as that wooden "riser". Maybe I could have made it work, but why make things hard on myself?
4. When handling twisted wire, don't grip too tightly with pliers. That's how I bungled it. I did pretty much everything by hand until I tried to fit the very end into the hole I drilled. I gripped it too tightly and bent the wires until they popped apart.


Disclaimer: In case my use of the superglue didn't make it clear, I didn't even try to do it historically. I'm not even sure how it should have been done and just went ahead with the first thing to pop into my head.
IT LIVES!

My Frankenstein creation:


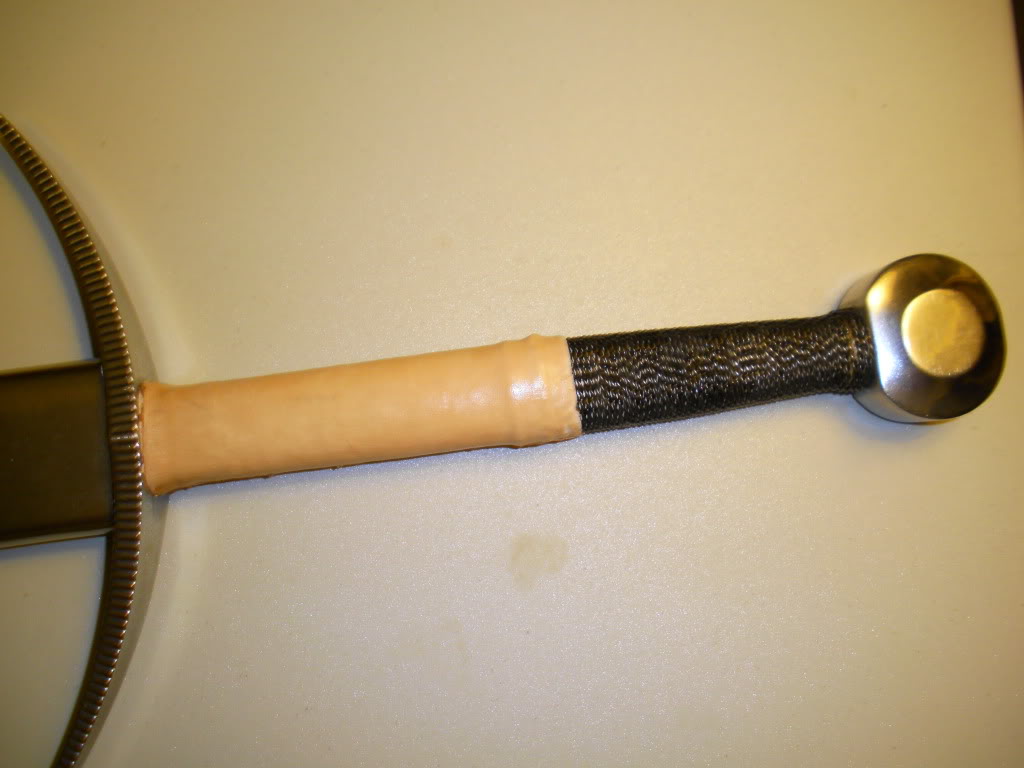
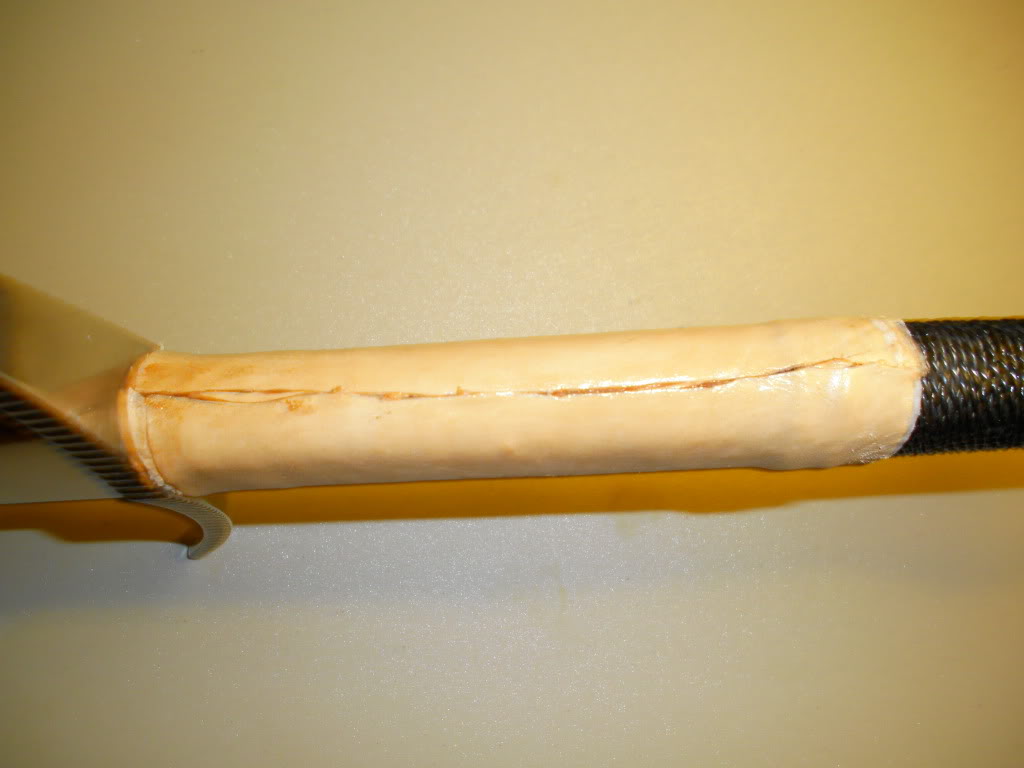
Alas, my leatherworking skills are... well, non-existent:


Nonetheless, I am fairly pleased with the results. There are a few things I feel were failures, such as my hack-job with the leather, and the screw-up with the ending of the wire, but all and all, I am proud of my new "custom". Could have been worse, and should I do something like this again I will have a better idea of what to expect and improve on.

Note: Though I don't show it here, I replaced the cording underneath the leather for strength, as Timo mentioned. Everything has been superglued to everything else and I hope nothing will come free.

Page 1 of 1

Jump to:  
You cannot post new topics in this forum
You cannot reply to topics in this forum
You cannot edit your posts in this forum
You cannot delete your posts in this forum
You cannot vote in polls in this forum
You cannot attach files in this forum
You can download files in this forum


All contents © Copyright 2003-2006 myArmoury.com — All rights reserved
Discussion forums powered by phpBB © The phpBB Group
Switch to the Full-featured Version of the forum