Posts: 107 Location: Germany
Sat 06 Feb, 2010 3:42 am
Iron-Age Crafts
I start this new topic split from Germanic Iron-Aged weapons topic
http://www.myArmoury.com/talk/viewtopic.php?t...;start=110 because of the great interest in other non weapon-related crafts from the pre-roman iron-age to the late roman iron-age. Here we can discuss all the equipment of warriers found e.g. in the bog-sacrifices of Denmark, Northern germany and Sweden, like combs or so...
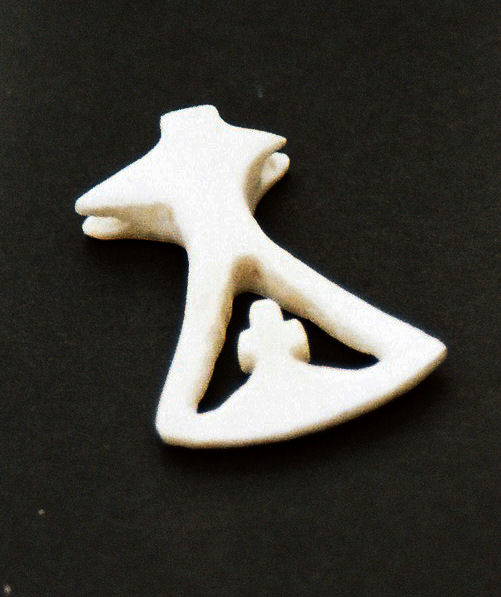
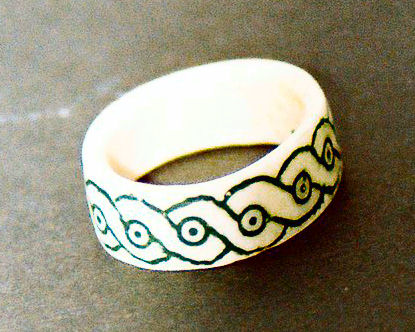
Here are a few examples of reconstructed bone-work from the roman and germanic iron-age...
but we also can discuss wood-work, and non weapon-related iron-work.
 Attachment: 65.96 KB
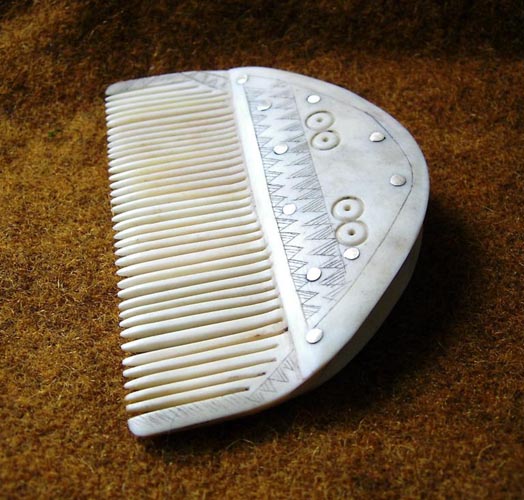
Comb made from antler, found in Illerup Ådal, Denmark, 200 A.D.
 Attachment: 61.18 KB
 Attachment: 103.17 KB
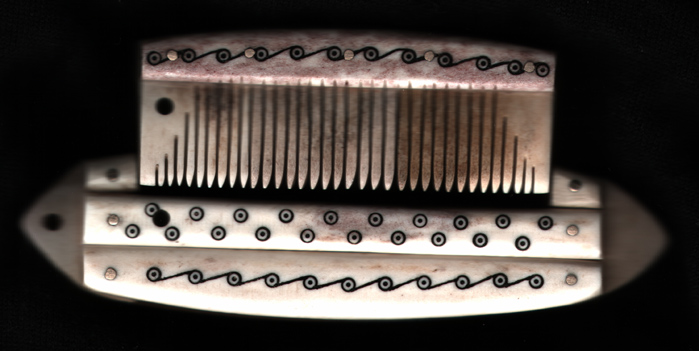
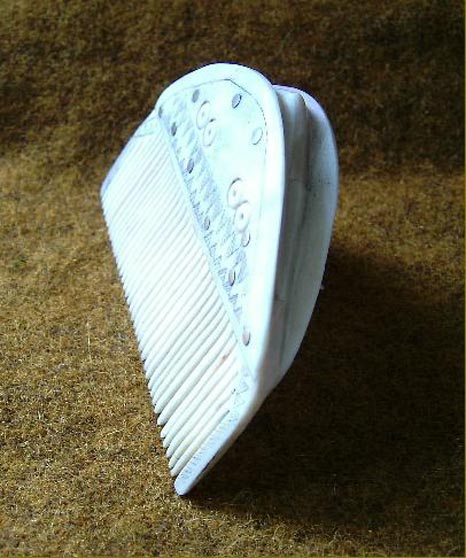
Comb made from antler, found in Elisenhof, Northern Germany, 10th cent.
 Attachment: 83.44 KB
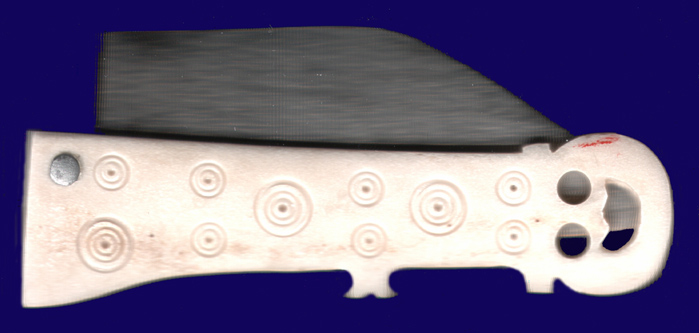
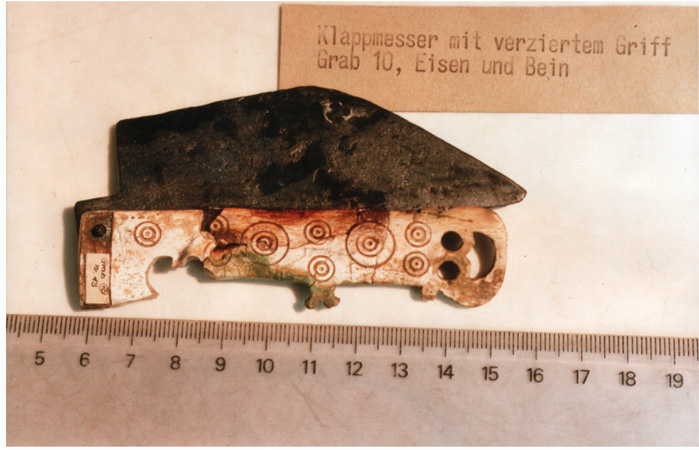
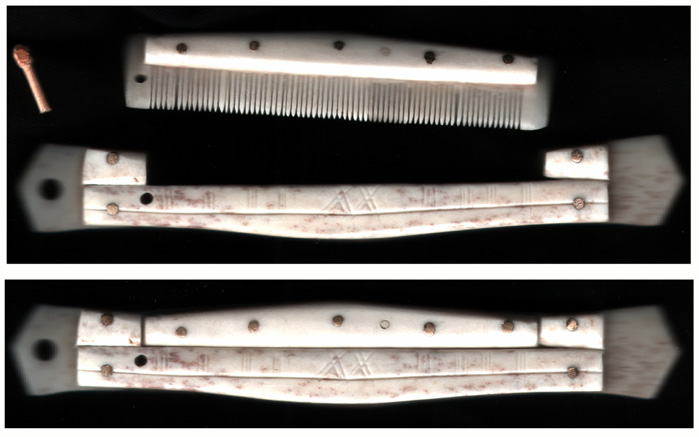
Folding knife found in a burial in Middle-germany, roman import, early or mid 3rd century
 Attachment: 117.15 KB
 Attachment: 57.33 KB

Last edited by Christian Böhling on Sat 06 Feb, 2010 4:15 am; edited 4 times in total
Posts: 107 Location: Germany
Sat 06 Feb, 2010 3:51 am
Myles Mulkey asked: Do you have any examples of what the continental Danish and German combs looked like? Were they similar to the thinner Viking combs you showed?
Myles, the "continental" combs were very similair to the scandinavian ones but assembled with more parts due to the lack of big material...but there is also a chance, that this is only the actual state of knowledge. Maybe tomorrow we find a comb in Germany with exact the scandinavian proportions, made of elk-antler.. as materials have been traded a lot, why not antler. To have no finds yet may mean nothing.
Hope many of you chime in this thread!
Posts: 95 Location: Suffolk, England
Sat 06 Feb, 2010 4:24 am
do you have a technique for cutting the teeth straight and even on your combs?
Posts: 656
Sat 06 Feb, 2010 5:55 am
Christian,
Your work is very impressive and your recreations are remarkably exact; were they made for a museum display?
I wonder if you would share with us what you do to bone to make it a usable material and what kind of bone (s) you use.
Working at Kalkriese must be fascinating. Are there still archeological digs going on?
Posts: 107 Location: Germany
Sat 06 Feb, 2010 6:12 am
| K J Seago wrote: |
| do you have a technique for cutting the teeth straight and even on your combs? |
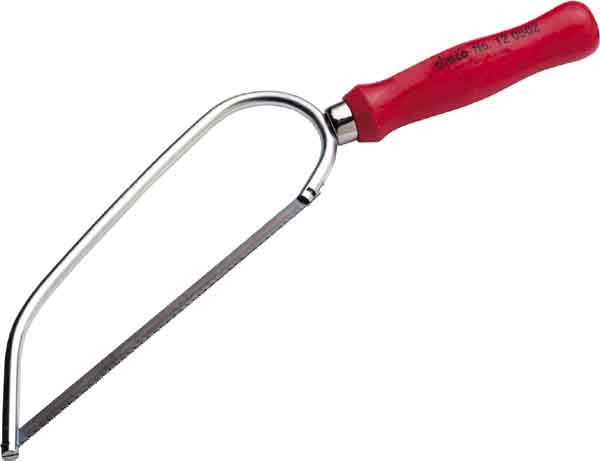
yes, I start with drawing thin lines with a pencil to be oriented while sawing, the I fix the comb at the edge of my table so that the later teeth are pointing towards me and reaching over the edge of the table so that there is nothing below the teeth-plates than air ;) (hope I expressed it good enough). Then I carefully start sawing from left to right (as right-handed, if left handed, do it from right to left). So you can assure that you see where to do the next cut. Saw quick enough to make sure your saw does not struck cause this could easily damage the thin fresh sawed tooth. When sawing the next tooth support the last one with your left hand thumb a bit, so it won´t brake... It is necessary, that the teeth-plates ar cut in the natural growing direction of the material (just like it was, if you were cutting thin wood-plates) otherwise they will break immediately.
It is a matter of experience and skill....try first on an unfinished comb-plate, to exercise! If you damage a teeth on a nearly finished comb, you could cry. Use a saw for fine metal cutting and use wax on the saw-blade to make it slip easier through the material and not strucks. Fix the comb in a clamp with wooden packets not to damage the material. Dont stop sawing until all teeth are sawn (so you make sure not to change your position once a good is found).
When finished sawing, take a thin and about 8 inch long fine sand-paper, fold it and fine trim the teeth. When finished it, polish the teeth with a thin but rough paper, after you had softened the comb by putting it into hand-warm water for about 5 minutes....With this warm-water method and a very dry terry towel you can polish the whole comb at the end of the finishing process.
Least: Don´t cry when your first try looks crappy! My first one looked like this:
 Attachment: 26.19 KB
 Attachment: 72.13 KB

My very first comb, made 15 years ago...it does not have the fine teeth as my more recent works but is still stored proudly ;)
Last edited by Christian Böhling on Sat 06 Feb, 2010 6:23 am; edited 1 time in total
Posts: 107 Location: Germany
Sat 06 Feb, 2010 6:21 am
| Ken Speed wrote: |
Christian,
Your work is very impressive and your recreations are remarkably exact; were they made for a museum display?
I wonder if you would share with us what you do to bone to make it a usable material and what kind of bone (s) you use.
Working at Kalkriese must be fascinating. Are there still archeological digs going on? |
Thank you! I just always try to do my best. Some work I did for museums to be displayed, some things I did for private persons from the reenactment scene or for enthusiasts who are interested in archaeology: who is giving money for it, I work for :)
What do I do to bone/antler to make it usable: I try to do as little as I can, because the material is best as is by nature! Bleeching makes it weaker if one uses chemicals like hydrogen-peroxyde. So I choose only antlers with a clear white compacta under the surface....
When ever I can I use antler because it is much more stress resistant than bone, which is harder and breaks easier.
Bone is not the raw material of my choice for making combs.
Kalkriese: Last year (2000 year-anniversary) we had the biggest trench. We will need this year to analyse the datas. But we hope to continue with excavating in early summer 2011. Yes, there is much left to be found for the next 500 years... ;)
 Attachment: 77.65 KB
Over 70 teeth at only 9 cm! For this I used a special saw which is hard to find (dental laboratory), a third of a milimeter blade!
Posts: 95 Location: Suffolk, England
Sun 07 Feb, 2010 6:55 am
thanks for the walkthrough, i have made one already, placed the comb in a vice teeth up, didn't breat any teeth but they are all quite wonky, i did use wax on the saws blade, the picture of your first comb hasn't come up. i didn't think mine was too bad, but i think i've got a way to go. well heres mine.
 Attachment: 203 KB
my first, (after many months of planning and deliberation!) [ Download ]
Posts: 107 Location: Germany
Sun 07 Feb, 2010 2:30 pm
| K J Seago wrote: |
| thanks for the walkthrough, i have made one already, placed the comb in a vice teeth up, didn't breat any teeth but they are all quite wonky, i did use wax on the saws blade, the picture of your first comb hasn't come up. i didn't think mine was too bad, but i think i've got a way to go. well heres mine. |
Jupppieh! Your first comb is great, much better than my first 4 or five! Could have been found in Haithabu exact this way. You´re well on your way to get it perfect and I believe the day is close! So I´m glad if this topic helped you over the hesitation! :)
Just go between the teeth with a fine thin sand-paper and "file" them carefully thinner! Start between the 20th tooth seen from left and the 21st and sand the 20th tooth thinner until the little failure disappears. Take this tooth as measure for all the others and make them exact same thin, then you got it!!! And then use fine sand-paper to make a smooth finish to the whole comb and it´ll be absolute authentic. How long did it take? And: when will you try the next? Try the next with an etui! Let me see how you get better and better with each comb you make! And: never sell this comb! This will bring you luck! My first comb is still here...
The image of my first comb is the small one below the big one of the saw in the earlier post (I thought better make it not that big, hehehe).
But: When you see originals, you can see that they saw the combs horizontal, not up, if you do so, you can control the straitness of the cuts much better and: you will get a v-shaped end of the cut if you saw the teeth, than turn the comb to the other side and saw the last milimeter on this side....the v-shape at the end of the cuts makes the teeth more stabil...
Great job!
EDIT I recognized your comb is riveted between the teeth-plates! Know what? This is exactly the way the old did it more than a thousand years ago! So you did it the correct and authentic way! The reason why I did not is: I am too afraid it won´t be stabil, but I know thats not true. But I continue riveting them in the middle of each plate..
Did you have an image of an original as a model?
Posts: 21 Location: Minneapolis, MN
Mon 08 Feb, 2010 1:08 am
Question on the folding knife. It appears there is a shoulder on the knife blade to keep it parallel to the handle when the blade is folded out but is there any locking mechanism other than the tension provided by the rivet holding the blade in place? Very interesting knife, almost looks like a pocket folder broke back mini-sax.
Posts: 107 Location: Germany
Mon 08 Feb, 2010 3:30 am
| Hanns Wiechman wrote: |
| Question on the folding knife. It appears there is a shoulder on the knife blade to keep it parallel to the handle when the blade is folded out but is there any locking mechanism other than the tension provided by the rivet holding the blade in place? Very interesting knife, almost looks like a pocket folder broke back mini-sax. |
There is a socket where some kind of fitting probably was mounted, but this fitting was not preverved at the original find. If it was of iron, I see no reason why it did not survive (as the blade survived, too). Maybe it was lost. But I could not see that such could hold the blade in place technically....so this question is not to be certainly answered. But as this kind of blade could only be used downwards for cutting, it could have been unneccessary to fix the blade in its opened position. Other finds of roman folders had some mechanism to fix or to secure the blade when it is open. This may not.
This kind of socket you can see at the original may just have been the place where some decorative plates were attached, maybe from an organic material. I left it out as I could not explain what kind of function this socked had originally...
When you open the blade, it rests at the bone-grip with its shoulder.
This is indeed an interesting knife as it was found in an germanic burial!
Posts: 95 Location: Suffolk, England
Mon 08 Feb, 2010 12:11 pm
Posts: 107 Location: Germany
Tue 09 Feb, 2010 3:41 am
| K J Seago wrote: |
Anyway as a thank you and to show off i'll post a bit more of my bonework for you. :) |
Sweet little bone art! Its not an easy thing to carve in bone, you do a good job!
Not satisfied with the comb? Take your time and make it perfect! I know what it feels like to be not satisfied until its perfect, I often feel the same. And then I make it until I think its perfect, even if others not see any difference ;)
Posts: 250
Tue 09 Feb, 2010 8:06 pm
Christian, could you say a word or two about the firestrikers? It's my understanding that there were (much like the combs) distinctively Scandinavian styled firesteels found at Illerup. Is this correct?
Posts: 107 Location: Germany
Wed 10 Feb, 2010 1:12 am
| Myles Mulkey wrote: |
| Christian, could you say a word or two about the firestrikers? It's my understanding that there were (much like the combs) distinctively Scandinavian styled firesteels found at Illerup. Is this correct? |
The tools from Illerup which are described as special "scandinavian type fire-strikers" are made from a wooden handle with an iron pin of mostly sextagonal or octagonal cross section and mostly found together with a small stone with typical "strike-marks" from their usage. The wooden handle is in the most cases formed very special (see image below). The "normal" continental fire-striker is from the commonly known type, a piece of steel. I don´t know if the steel of the "scandinavian" type is surveyed for carbonate. To make it usable as fire-striker, a high carbon steel well heat-treated is necessary. But it is the special handle which makes me sceptical about its usage as fire-tool. You can see a special drilled hole in the wooden grip, which begins at the middle of the top which itself is formed like a mushroomed head. The hole goes downwards in a diagonal way and comes out at the side exactly under the head (in the neck). Ilkjaer said, it could be used as hole to put a leather strap through to fix it to the belt. But would you make such a complicate hole just to fix it to the belt? In nearly all hundred cases? A simple wooden grip would be enough with a simple hole through it. But nearly all are formed like the example shown below, which is a reconstruction I made with well heat-treated steel (from a rasp). Together with a flat pebble you can make sparks. But it is difficult and you easily can hurt yourself. Because you need to put the flat pebble in your hand and press the point of the steel onto it with the other. Then - in a fast and strong movement under great pressure, you have to strike the steel over the stone to get some few sparks!
In Illerup they found five typical fire-steels from the form we all know. When I compare, how easy they are to be used as fire-steel, I cannot undersand, why the scandinavians should invent another type which a worser functionality. Some say, the "scandinavian Type" was older and adapted from the roman fire-tool, and the other one was the invention! But I have never seen such a "roman fire-tool" from which it could be adapted from (show me, if you can).
So to the so called scandinavian fire-striker from Illerup: I had the suspicion that the special features of the wooden handle must have been needed for special use - but for what? I thought at just anything. To put a strap through and turn it around the neck to be unturned quick, but for what? ...to put a piece of wood through to have an angle...but for what?
I though that it could have been used as tool for usage in boats as the army must had come by boat, but for what usage?
Note: I couldn´t find an answer. All pieces found (exept one or two) are made like this. And when you compare the holes you can see that they describe an angle which is equal in every piece. I think it must have had a function, we don´t know. I think it´s not a fire-tool. But thats just me poor boy...
I wish all of you much fun with your own speculations! Maybe some of you thought the same thoughts than me. Maybe one or two of you had already guessworked like I did. And maybe there is one of you out there who already solved the problem!
EDIT: I forgot to say, that some of that holes are broken in a way which was typical if there was a kind of power having an effect to it..
EDIT 2: I gave dozends of recreations of this tool to friends of mine which are all active experimental archaeologists to try things with it. They tried just everything but found no clear and perfect function. But: They all said, to be used a fire-tool it is not practical, nor handy.
Cheers
Chris
 Attachment: 92.59 KB
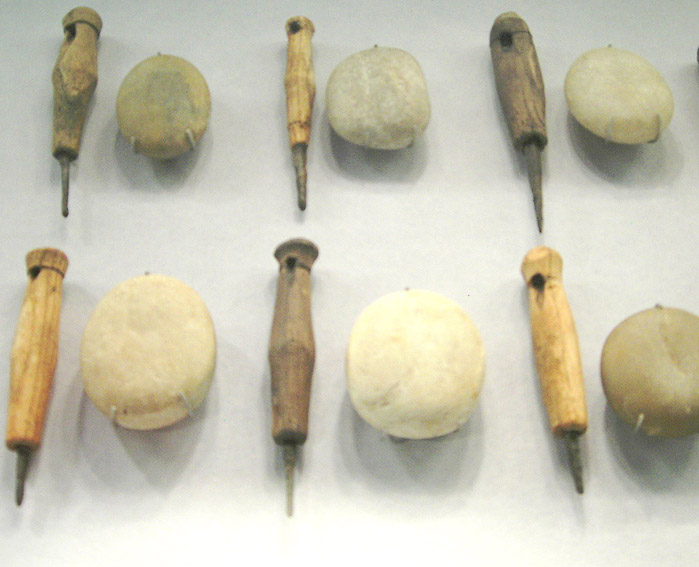
originals
 Attachment: 81.26 KB
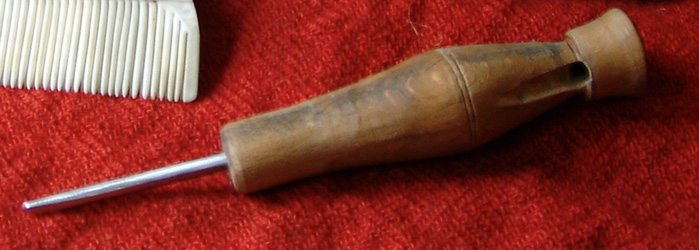
my reconstruction
Posts: 1,757 Location: Storvreta, Sweden
Wed 10 Feb, 2010 4:15 am
Christian,
I made a reconstruction of one of these as well, based on finds in a warriors grave: lance, sax, pair of scissors, buckles and then this little awl like thing with a stone + tell tale scratch mark. I tried to make it work as a fire steel, using a stone of the same type as the find, but it was difficult to get good sparks. Some, but rare and pretty weak.
I wonder what we are missing?
Posts: 107 Location: Germany
Wed 10 Feb, 2010 5:14 am
| Peter Johnsson wrote: |
Christian,
I made a reconstruction of one of these as well, based on finds in a warriors grave: lance, sax, pair of scissors, buckles and then this little awl like thing with a stone + tell tale scratch mark. I tried to make it work as a fire steel, using a stone of the same type as the find, but it was difficult to get good sparks. Some, but rare and pretty weak.
I wonder what we are missing? |
Peter, just before you replied I thought "I am shure, Peter has tried the same himself,too!" And here is your reply! We are soulmates! :)
Yes, I made the same experiences. Difficult and dangerous ;) I hit the hand that held the stone so bad I was bleeding! I thought to myself "that´s a bloody poor technique to get some sparks" hehehe....feels good I was not alone :) Maybe that was the reason why this fire-tool died out - archaeological evolution ;)
After I tried with several techniques and several stones (same type as found in Illerup) and several reconstructions I temporarely gave up and put it in the box named "unsolved questions". Peter, we are not the first who tried, friend from Lejre tried also and wondered, too. But still there is the important question! Do you also think like me, that the very special construction must have had a special function? I studied the drilled holes very well and also the broken out holes and the special angle of the holes, too. I think these holes are the key to the box! If we could understand their function.. and it is not necessary to make the iron pin octagonal, as most are, just to get some poor sparks. But they are made octagonal, some sextagonal....it is a miracle ;)
But I am glad! If it all would be easy, what would we do with the time in our life? It helps us to argument for the experimental way in Archaeology!!
Greetings to Sweden
Posts: 107 Location: Germany
Wed 10 Feb, 2010 5:19 am
| Peter Johnsson wrote: |
I wonder what we are missing? |
Magnesium :) :) :)
Posts: 438 Location: Canada
Wed 10 Feb, 2010 5:58 am
Is it at all possible that these are honing tools? I could imagine they would be useful for the last bit of tidying up after sharpening one's knife...
Posts: 1,757 Location: Storvreta, Sweden
Wed 10 Feb, 2010 6:39 am
I am no chemist. That is something I get to deplore on many occasions...
Have there been tests to the type of iron used in these fire strikers?
That they are fire strikers seems like the most reasonable explanation, since there are other types fire strikers taking the place of these in the equipment in warrior kits of warriors from other regions.
The striking stones were fastened to the belts at the small of the back. That is another strange detail. Sometimes two stones, right? I have this volume of the Illerup finds, but not at home. I remember seeing warrior belts with metal loops to hold stones at the small of the back. I wondered why you placed the stones so you had to take your belt of to be able to start a fire...
Who would like to go around with a palm sized stone fastened to the small of his back? All so very strange.
If they are indeed fire strikers, I wonder if work hardened iron that is high in phosphorous might make better sparks against these type of stones?
The stones all (or just about al of them?) have a distinct shallow grove that seems to be the scar after many passes over the surface of the awl/fire striker.
I am befuddled and hope to learn more about these.
The design of the handle is very specific with this hole at an angle. I agree with you Christian that this might be a clue to the proper technique of using these. Perhaps a leather thong was looped around the wrist to give extra force or control? Perhaps you could loop it around the stone and so help increase pressure in scratching?
I did not keep up the testing, as I felt pretty sore in my arm after a while. Then it was time to deliver the whole set of artifacts to the exhibition and I never got around to make another one of these. The stone also went to the exhibit, so I need to find a new one of the right type. Like so many other things it has been sorted to the side. :cry:
Posts: 1,757 Location: Storvreta, Sweden
Wed 10 Feb, 2010 6:57 am
| David McElrea wrote: |
| Is it at all possible that these are honing tools? I could imagine they would be useful for the last bit of tidying up after sharpening one's knife... |
Yes, this is something I thought about too. It gives no explanation to the stones however. And they seem to lack fire strikers in the equipment, if these are *not* fire strikers...
More test!
Last edited by Peter Johnsson on Wed 10 Feb, 2010 7:14 am; edited 2 times in total
You
cannot post new topics in this forum
You
cannot reply to topics in this forum
You
cannot edit your posts in this forum
You
cannot delete your posts in this forum
You
cannot vote in polls in this forum
You
cannot attach files in this forum
You
can download files in this forum


