Hello fellow forumites,
The following project is my attempt to turn a Generation 2 "Pompei Gladius" into something a lot more historically accurate. This was my first sword (I have two :lol: ), and I bought it knowing that it had little historical value. The reason I chose this blade was due to several review I had read about Generation 2 producing sturdy beaters, and I wanted something tough. The more I had been reading this forum, the more confidence I had gained toward the idea of doing something to "fix" this sword (thanks to the help of other members). And so here I am introducing my first sword modification.
Stats (Out of box)
Blade Length: 22"
Hilt Lenght: 7.5"
Overall: 29.5"
POB: 3.5" below hilt
Weight: 1lb 14oz
Link to the sword on Generation2 site: http://www.imperialcoinc.com/Shared/IP-022.html
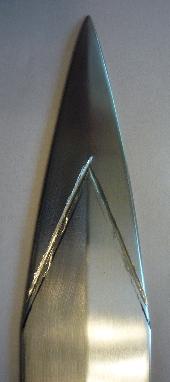
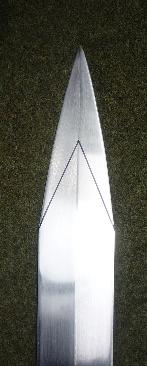
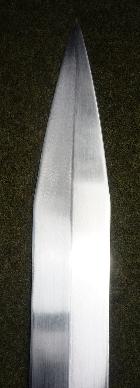
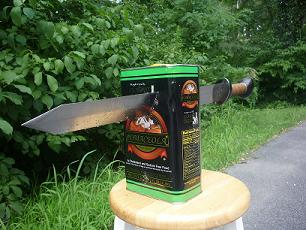
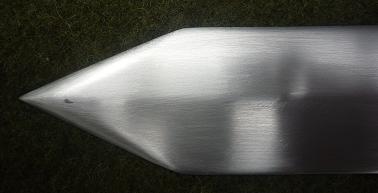
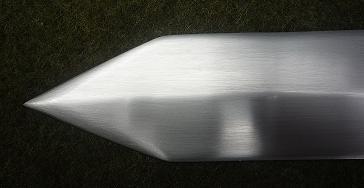
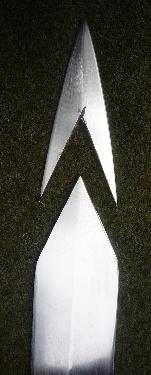
For the first installment of this project, I have been reshaping the tip of this sword. The original tip is just a little too pointy to be a classic Pompei Gladii. I removed a large portion of the tip using a Dremel cutting tool. I took things very slowly, making 3 or 4 passes then dabbing with a damp towel. This never allowed the blade to get hot, thus ruining the temper. After about 1.5 hours of cutting this is the result...
Attachment: 31.34 KB
Attachment: 27.49 KB
Attachment: 31.2 KB
Attachment: 28.91 KB
This project will eventually include...
-Reworked hilt, including inset brass in the crossguard, turned wooden or maybe bone handle, and reshaped pommel
-Possibility of wooden inlay in the hilt
-Peen block and peened tang
-New scabbard
This is a learning process for me so I welcome suggestions and information involving Gladii and how to achieve my goals.
Thanks for viewing
Luke
Looks like a good start Luke !
I keep wandering why people dont just make the tips the right shape in the first place - its hardly the most complex sword blade in the world ever .....
Have a good look around the net at real gladii hilts, a fair few good pics out there & dont make the grip too long, should only just fit the hand ie nice & tight grip with the pommel & cross bolcks.
Keep up the good work :)
Adam
Ave!
Good job so far! Sounds like good plans, too, though I've never seen any evidence for inlay on an original Roman hilt from that general era.
Been to my Legio XX page on the gladius, yet?
http://www.larp.com/legioxx/gladius.html
Bone grips were the most common, but you could reshape the current wooden one very easily. If nothing else it would be good practice for a bone one, though of course wood is easier to work than bone! Octagonal or hexagonal is typical.
I hope there is enough tang there to project through the pommel to be peened, once the metal spacers are removed and the pommel reshaped. My guess that there is a wood screw welded to the tang, but no idea how far through the pommel it might reach.
For the scabbard, the wooden core is probably fine, and you may want to keep the leather covering, too. Pull off the metal bits and make new brass frame parts, as simple or complex as you like.
Keep up the good work!
Matthew
Looks to be good. You could also reuse that old tip as some kind of simple arrow head :p
M.
M.
Well, it seems that your application of my suggestion to use a dremel with cutting wheels was very successfully accomplished. :D :cool: A lot lest frustrating than trying to hacksaw hardened steel or" slowly " wear things down with files/stones.
When you do a neat job of it like you seem to have done you have a lot less of work to do than if you had to take a lot of material away the hard way and a lot less work using stones to rebevel and sharpen the point ! :D
Last edited by Jean Thibodeau on Sun 09 Aug, 2009 12:04 pm; edited 1 time in total
Thanks for all the advice and word of encouragement.
Matthew,
I have been to the Legio page and have learned very informative things from there. I wasn't sure about the inlay thing but unless I find some evidence of it happening historically then I will exclude it. Really I was just looking for a reason to try inlay. :D Thanks for the heads up on the grip being octagonal or hexagonal. I might have trouble finding a piece of bone that large anyways. I do have access to a dairy farm and there are many shin bone strewn about in the one pastor... will have to go poke around and look. I did just get a lathe so I may turn the piece and then file it to a hex grip.
As far as the tang goes... I will be removing the spacers. I will be shaping my own cross guard, and as far as the pommel goes, I may be ordering a hardwood ball from the Hobby Lobby and work with it. I hear turning spheres is an advanced skill so probably won't go there yet. The current grip is just a little long so the one I turn on the lathe will fit my hand, and thus be a little shorter. So with all that done it should give me about 1.5cm of tang to play with. The remainder of the tang that I will need to peen this sword properly will be obtained by removing the necessary amount from the base of the blade. the blade length is 19.5 in so I can bare to lose a half inch or so, and still be within the acceptable blade length.
Later today I will be posting some picks of the reshaped tip. I am leaving it a little beefy so as to achieve to have a durable thrusting tip, and I will be giving it a basic polish. This part is taking me a long time. Been working on it since yesterday, and have about 4 hours into it. The tip is still hard so the Dremel method was a success in not ruining the temper (thanks Jean).
As far as the scabbard goes.. I want to try my hand at making one anyways so i might as well give it a go on this project. Although i am not sure about the typical brass fitting i see on other gladii scabbards, with regard to production.
Mr Eversberg,
I will be saving the old tip... was thinking about using it on a Native American ball club. i also had fun throwing it at my dart board last night.
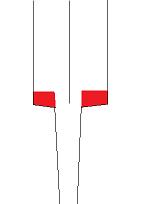
The following illustration shows how i plan to obtain the extra tang if need be. Will be removing the needed amount from red area with same method I used to cut off the tip.
Thanks all and check back for tip picture later on.
Attachment: 2.62 KB
Agreed Jean. I am also glad to just have a Dremel for other things too. Thanks for the tips. like I mentioned earlier... I wouldn't have to confidence to do this without this forum community.
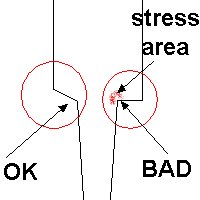
If you want to use the gladius in any kind of fight (as hitting something with it), be sure that the angle between the "shoulder" of the blade and the tang is wider than 90 degrees. In that portion of the blade, there is a very sensitive area where a lot of stress will accumulate.
Attachment: 9.65 KB
Attachment: 9.65 KB
Luke Zechman wrote: |
The following illustration shows how i plan to obtain the extra tang if need be. Will be removing the needed amount from red area with same method I used to cut off the tip. Thanks all and check back for tip picture later on. |
The only thing is that I would try for very radiused corners at the shoulder/tang area and avoid square corners.
One way to do this would be to first drill holes at the corners where the radius of the drill hole would correspond to where you want the curve, care taken to have the center of your drill hole(s) so that the outside of the drill circumference ends up at the right place.
Then I might use the dremel cutting wheel to cut the excess material in such a way as to have the straight blending with the curve of the drill hole.
I mention this also because if you try to cut the material using the cutting wheels in a strait 90 corner ( which you don't want anyway ) you risk having the cut prolonging the tang and the cut defining the new shoulder of the blade overshoot and cross the tang and cause and even worse situation that a 90 degree corner. :eek:
( EDITED: Posted the above before reading the other comment about angled shoulders which I think is a good suggestion but a radiused corner might still be better ? With the angled shoulders the radius could be smaller and be just as good: So you might consider combining the angled shoulders with a small radius. ;) :D ).
Yeah sorry about that illustration. I didn't intend for it to seem as though that was what it would end up as, but rather just to better explain how I will get extra tang if I need it. I was under the impression that the shoulder area was not at a right angle but it was just a quickie illustration.
Good idea Jean with the holes drilled, and I have a center punch so I should be able to get the drill where I want it. Also something to illustrate your other point about the cutting wheel being round. If you notice the cuts made on the removed part of the tip you notice I had to go past a little to get to where I wanted. Cutting to the hole will eliminate that. So when i rework the tang I will be make the shoulder more then 90degrees and I will round out the corners to minimize weakness in this inherently weak area.
Here are the pictures of the tip, and the tip in action. I did not get the geometry perfect, but the blade will still be serviceable. If you notice the tip leans a little bit to the one side. Oh well it is my first try. Tip test and both sides othe the blade... Enjoy!
Attachment: 42.96 KB
Attachment: 28.13 KB
Attachment: 27.57 KB
The next thing to do is dismantle the hilt, and order some materials to make the new one... Anyone have any advice on getting this thing apart?
Luke Zechman wrote: |
The next thing to do is dismantle the hilt, and order some materials to make the new one... Anyone have any advice on getting this thing apart? |
Luke,
It all depends on the original construction method. If it's epoxied on, then you're in for a treat. :eek:
If it's not, then it's probably compression fit. I don't know how Gen2 hilts are put together. A pic of the hilt might help.
~Adam
Well I think it is epoxied. There seems to be a little bit of it dried and pushing out of the cracks between the spacers. So basically I guess I will have to destroy it off. if anyone has done this before and knows of any helpful hints, then fill me in. Is there an agent you could apply to degrade the epoxy maybe?
Heat un-bonds epoxy...but if you are not carefull you can ruin the blade's heat-treatment. What you should first do is detach the "peen" (peen, peen block, bolt, screw block, etc.) you can cut it with a dremel, sand it, etc. Once it is detached you can see what can be pulled off, or tapped off with a hammer. Parts you don't plan on reusing can just be cut off. You can also wrap a cold wet towel around the base of the blade, and then you can take a blowtorch with a fairly small flame and heat up the different hilt parts and try and pull them off. Most ways will destroy the hilt parts, but as long as you are making new ones it doesn't matter. I would advise just pulling and tapping the pieces off with a hammer.
Goodluck
Hadrian
Goodluck
Hadrian
You may just try unscrewing the pommel first. Wrap some cloth or leather around it and clamp it in a vise, or grab it with big vise grips. If it really seems epoxied to the grip, maybe go between the pieces first with a hacksaw or other fine saw (being careful not to cut the tang, of course!). Once the pommel is off, the rest may come easier. But yeah, I've seen grips filled with epoxy, basically glued to the tang, and getting those off can be a challenge!
Pommels don't have to be spherical, and your guard is a good shape already. Some modification to the pommel may be all you need. It *looks* like ebony, which may be a little exotic for a gladius, but it might just be dark stain, easily sanded off. Oh--holding onto a pommel while rasping and filing is really a pain. You can try clamping it in a vise, but probably you won't be able to get a good enough grip without obscuring too much of the work area. So you hold it tight in your hands, and every other stroke either takes skin off you knuckles or knocks the damn thing out of your grip and you have to chase under your workbench into spiderweb land... So maybe take a rasp to it before even trying to get it off the tang? Nothing to lose.
A bone for the grip doesn't need to be very big. Heck, if you have them lying around you can afford to experiment! I just get dog chew bones at pet shops for about 3 bucks. Even messing up one of those is no big loss. But I wouldn't bother with the lathe for a bone. They tend to be pretty irregular, and with the hole through the center it might be hard to fit to a lathe anyway. Just rasp the flattest side flat, then the opposite side, then figure out if you are headed for a hexagonal or octagonal cross-section. Some octagonal grips were more like squares with the corners knocked off, so the sides don't all have to be the same. I've seen one which was actually 7-sided!
The point looks great! Don't worry, most original blades are lopsided or asymmetrical in some way. Worked fine anyway.
Glad the website has been helpful! Good luck and Vale,
Matthew
Luke - Well done. Did you hand hold that wildcat (dremel)?
Yeah I did it by hand. I actually used the cutting wheel to make like a dashed line on the sharpie line I had drawn. This meant holding very steady and touching it to the surface on the line. Then I touched down on the spaces between the dashes, until it was a complete line. Once the cut line was complete and deep enough it was there pretty easy to stay in groove. Like keeping water in a trough.
Good for you! It's liberating to start hacking up one of these things. You start to realize the possibilities!
Luke Zechman wrote: |
Yeah I did it by hand. I actually used the cutting wheel to make like a dashed line on the sharpie line I had drawn. This meant holding very steady and touching it to the surface on the line. Then I touched down on the spaces between the dashes, until it was a complete line. Once the cut line was complete and deep enough it was there pretty easy to stay in groove. Like keeping water in a trough. |
Yup that sounds like a good way to do it and I never thought of doing it this way: I would have " hoped " for a steady hand on that first critical establishing pass with the cutting wheel. A bad establishing cut is hard to recover from as the cutting wheel stays in the groove but at the same time if it's a good establishing cut holding the dremel steady in subsequent passes much easier.
Page 1 of 6
You cannot post new topics in this forumYou cannot reply to topics in this forum
You cannot edit your posts in this forum
You cannot delete your posts in this forum
You cannot vote in polls in this forum
You cannot attach files in this forum
You can download files in this forum
All contents © Copyright 2003-2006 myArmoury.com All rights reserved
Discussion forums powered by phpBB © The phpBB Group
Switch to the Full-featured Version of the forum
Discussion forums powered by phpBB © The phpBB Group
Switch to the Full-featured Version of the forum