Go to page Previous  1, 2, 3  Next

Jeremy V. Krause wrote:
Hello everyone,

I wanted to resurrect this topic as I have begun the process of comisioning a sword inspired by Records XI.5 Shaftesbury Sword. As actual measurements are unavailable (unless someone here knows of any) mine will not be an exact copy of this piece, but will incorporate a gold plated pommel and iron cross terminating in beast heads as per the original.

In any case what really excites me is that I am opting to have the +INNOMINEDOMINE+ inlayed in iron on one side of the blade and something else on the other. I would feel strange having GICELINMEFICIT reproduced. It seems through my reading that on this sword the inlay was applied in iron non-pattern welded strips. Well the process will be a long one and I will keep everyone posted. Needless to say I am excited as this is my favorite sword and I have a thing for inlay.

Lastly, can anyone point me to references to this particular sword besides the usual suspects i.e. Records, SAC, AOW?

Jeremy


It is also in Oakeshott's "Sword in Hand" page 38 . It has the full length shot there, as well as the hilt shot that is in "Records"

Alexi
Hello everyone,

I decided to resurrect this thread to announce what I feel, for me at least, is good news in that I am now on Patrick Barta's waiting list (3 years) for a commission based closely on XI.5 in Records. This sword features an iron inlay using non-twisted iron forge welded to the steel blade. On one side of the blade will be +INNOMINEDOMINI+ and on the other will be +GICELINMEFECIT+ or something else of similar length.

Patrick assures me he can faithfully reproduce the inlay and I am excited to see the results. I know that executing this inlay may be especially challenging in that these letters are much smaller and neater than those seen on the ULFBERHT and INGELRII blades are are located within the rather narrow fuller of this type XI sword.

Thanks,
Jeremy
So now we're waiting for one BARTAMEFECIT (or PATRICIMEFECIT?) and a PRINGLBERHT... ;)
Congratulations!
Although the inlay is a challenging technique, somehow I think Mr. Barta can handle it.
:D
Thanks Jeff,

I know I have already said it but I am really impressed with the iron inlay you executed on that 10th c. Viking sword. The copper inlay in the hilt is also excellent We need more smiths doing this. I would love to see a modern brass/latten or silver inlay in the blade but I know that this is not in your current time period. In any case, I have a long time to wait for my commission but I still have the good feeling of knowing that I will eventually get what I am looking for.

I think that it would be really cool if someone had an Albion Duke, Count, or Steward inlayed in brass on the blade. I don't mention the Baron because of the cross cut out on the pommel. I feel if this cross were inlayed in brass or copper then a blade inlay would look great but not if the cross design was left as an inscription. Heck, I might look into getting something like this done myself- now finding someone willing or able to do this is another matter. I find the precise lettering and sybology seen in latten and silver inlays to be most impressive. I have seen some antique islamic blades at the Higgins Armoury that were absolutely rediculous in their detail- and I say rediculous in a tone of awe not of disrespect.

Jeremy
Jeremy V. Krause wrote:
Heck, I might look into getting something like this done myself- now finding someone willing or able to do this is another matter.
Jeremy


I would ask Matthew at OlliN if they could do it and get a quote from them.

Here is some inlay work from their site: http://www.ollinsworddesign.com/osd-shopnotes.html

Hope this helps.

Jean
Hello everyone,

I am a post-graduate student of archaeology in Finland, and I have been writing my doctoral thesis on Viking Age swords, namely those with iron or pattern-welded inlays. I am hoping to finish my thesis within three or four years, after I have studied the material from Finland and, hopefully, from neighbouring countries.

My hypothesis is that various inscriptions and inlays were produced locally and not only in the Frankish realm. The number of inscribed swords is great in Scandinavia, perhaps hundreds. No one has actually examined all of them to find inlays or pattern-welding, which is practically an impossible task for one person, since there are already over 2500 Viking Age blades from Norway, and few hundreds from Sweden and Finland. Furthermore, the materials and outlook of inlays vary a lot, which also leads to suspect that some inlays are from different makers.

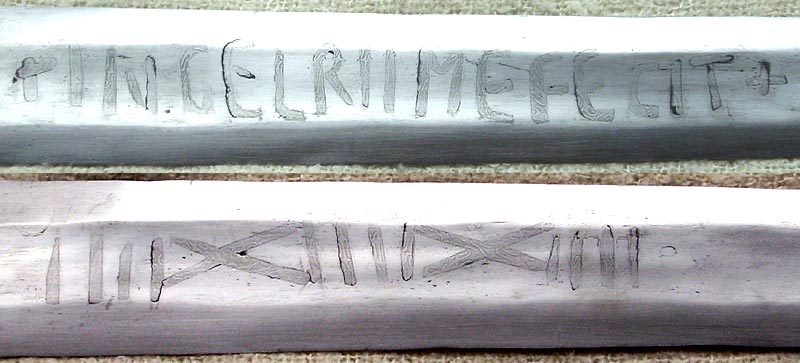
My main approach is experimental. Until 2006 I had forged seven blades with either ULFBERHT or INGELRII signatures, all with a little different technique to attach the inlays, and in a different phase of manufacture of the blade. These seven blades formed the basis of my master's thesis. After that I forged four more blades to finish the series of experiments. Since I had some training in blacksmithing from my uncle when I was still in school, I did all the forging experiments myself. By forging experiments I am trying to show that iron inlays could have been done in different ways and so by different makers in different parts of Iron Age Europe.

As a result I had different techniques with which to attach the inlays on the blade. The variations in the techniques occur mainly in the way the inlays are sunk into the blade, and in the phase of manufacture of the blade. Only a ready, polished and sharpened blade could not be inlaid.

I noticed this thread a few months ago, and finally I have time to show some pictures of my experiments. I am planning a short publication on the experiments, but for the sake of curiosity and comments, I will show some pictures here too.

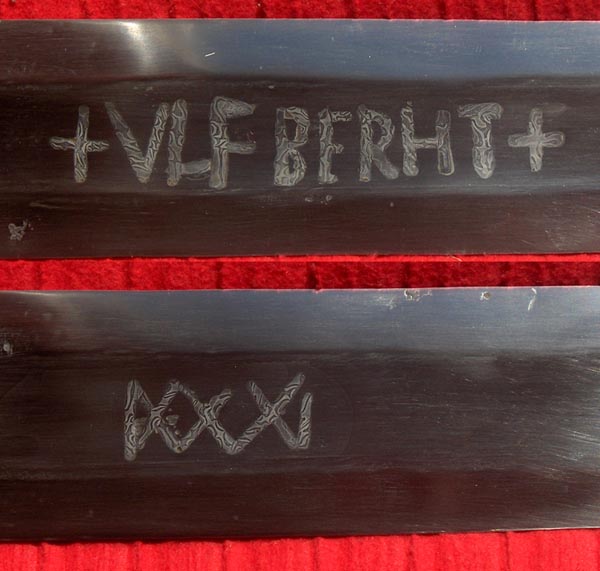
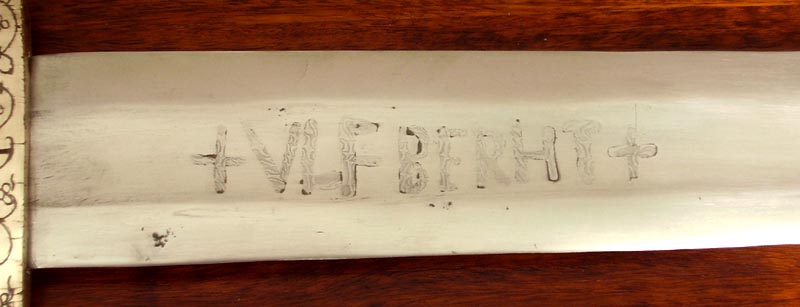
The first picture shows a reconstruction of the famous Ballinderry sword (Petersen type K) with its ULFBERHT inscription. The second picture is the same blade, this time photographed against a light to enhance the patterns on the inlays. The text ULFBERHT is on one side of the blade, while the lattice is on the opposite side. The inlays have been welded straight on the surface of the blade, having its fuller half-forged. Some of the inlays on the lattice side are missing due to their low depth.

The third picture shows both sides of the blade created in the latest experiment. The blade is made from 18th-century steel, quite close to that used in the Late Iron Age. The inlays were hammered cold in the hot blade blank, after which they were welded with few heats. The depth of the inlays is circa 1.5 millimetres, which is very close to archaeological finds. Only the first inlaid marks on the text side were not properly executed. I did not know that the primitive material of the blade was so soft, and so I did not realize that the inlays could be pounded all the way into the blade. Also, the flaws in the inlays are similar to some examined Finnish finds.

The outlook of the blades is a result of light etching. The materials in the blade in the third picture are contrasted by higher differences in carbon contents.


 Attachment: 67.67 KB
PetS1.jpg


 Attachment: 60.42 KB
PetK2.jpg


 Attachment: 40.49 KB
PetK1.jpg

And so the order of the pictures seems to be reversed...

Terribly sorry. A student of Humanities here tries to learn how to use a computer...
:lol:
Hi Nikko,

These look qbsolutely great! This issue of iron inlay is very interesting to me personally. Your swords shows excellently the type and execution of inlay applied to the ulfbert swords.

I am in the long proces of commissioning a sword closely inspired by the type XI. 5 in Records by Oakeshott. It is one of the 8 swords of the Gecilinmefecit group. These swords are dated a bit later than the Ulfberts. My particular sword has been dated 1130-1170. The inlay on these swords tends to be much smaller and neater (within the space of a 1 cm fuller) than that applied to the Ulfbehts.

The iron inlay is believed to been non-pattern welded wrought iron. What I unclear about is the technique of application. Do you believe that these later examples are struck onto the surface of the steel without having the letter previously cut out like the Ulfberts? Or is this inlay applied into inscribed lines.

Lastly I must say that since Patrick Barta will be making my sword I am sure he will use the correct method. I am interested though, in hearing your ideas on this issue.

Again, great and impressive job on these= how about a full length shot of these swrds?

Jeremy
Thanks for your comments, Jeremy.

To begin with, there are numerous disc-pommeled swords in Finland dating to the so-called Crusade period in Finnish chronology, i.e. circa 1050-1150 AD. Some of these swords are most likely a bit later. Many of these types of swords bear iron inlays, most often incomprehensible series of letters, perhaps illiterate versions of INNOMINEDOMINI or something else. As I am currently x-raying Finnish swords, these kinds of small inlays appear continually, and so their amount in the Finnish material cannot be accurately stated. By now there are around twenty swords bearing small iron/steel inlays, some of which are uncertain due to the very bad preservation of the finds.

What is noteworthy, is the material of the inlays. A common assumption is that the inlays are iron while the blade or its surface is steel. In Finnish material this is true in some rare cases. Most often though the inlays appear darker than the blade when etched with Nital or some other mild acid. Moreover, the inlays seem to be corroded more than the blade. Both these observations indicate that either the material of the inlays has a greater carbon content than the blade (or the surface of the fuller to be more precise), or there is some other element present in the blade material, which prevents corrosion. In any case accurate analyses are needed.

In my personal opinion the steel inlays make more sense than iron inlays. When etched the steel inlays appear darker against the polished blade. If blade with iron inlays is etched, the inlays will appear lighter while the surface of the blade etches darker and deeper. In this case the bottom (or the surface) of the fuller is hard to re-polish after the etch, because the inlays will also be polished and the contrast is then destroyed. Of course the welding seams around the edges of the inlaid letters will become more visible due to etching.

A note should also be made about these small inlays executed with pattern-welded material. So far two of these are found in Finnish material, both unpublished since the materials of the inlays have not been considered noteworthy. The patterns in the inlays are VERY fine, but can be observed with bare eyes.

I have once tried to make a sword with GICELINMEFECIT on one side, and INNOMINEDOMINI on the other. The material of the blade was modern carbon steel with a carbon content of 0.5 %, while the inlays were almost pure iron. I welded the inlays straight on the surface of the blade blank, just like I have experimented with ULFBERHTs. The problem was that the inlays did not get deep enough – just as with ULFBERHTs too. Since the inlays were also smaller in scale, they were more easily ground off while finishing the fuller. Also the problem of etching struck me while finishing the blade.

Just as with bigger inlays, the smaller ones should also be sunk deeper in the blade. This in turn can be achieved with multiple ways. One way is to carve the grooves for the letters. This is functional, although very laborious. Alternatively, the grooves could be struck with different punches. This I have done once to create an ULFBERHT-inscription, quite successfully. This also corresponds to archaeological finds, since the structure of the blade is sharply bent underneath the inlays, rather than cut. Still it should be mentioned that inlays of three blades have been analysed, so alternative techniques must have been in use… And none of these analysed inlays were the smaller ones, but big pattern-welded inlays.

Recently I had a commission to make a GICELINMEFECIT-sword. I will intend to sink the inlays by hammering them cold against the hot blade before welding them. At least this technique worked the best for bigger inlays. It is also the fastest one. Still it is yet to be seen, if the smaller inlays can be hammered into the blade before they heat up too much on the glowing blade…

And finally some overall pictures of swords:


 Attachment: 17.78 KB
PetK3.jpg
The Petersen type K sword, model from the famous Ballinderry find.

 Attachment: 24.58 KB
INGELRII.jpg
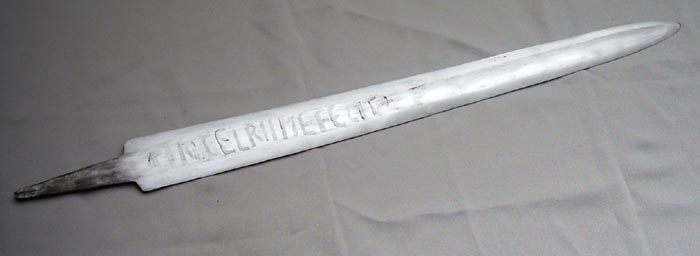
The INGELRIIMEFECIT blade. Still without a hilt.

 Attachment: 60.83 KB
A Mannheim-type sword with INGELRII inscription. [ Download ]
Any updates Mikko? I would love to see more of your work when you get it done! Have you gotten a chance to hammer the inlay when it is cold into a hot blade?

I have read that inlayes where not hammered into pattern welded fullers. Do you know if this is correct or not?
Hello all,

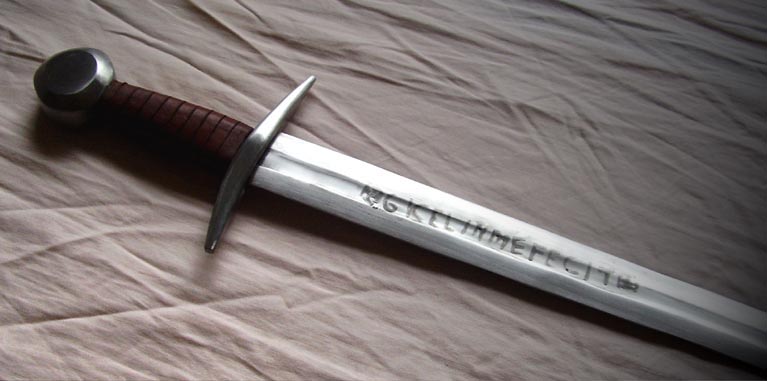
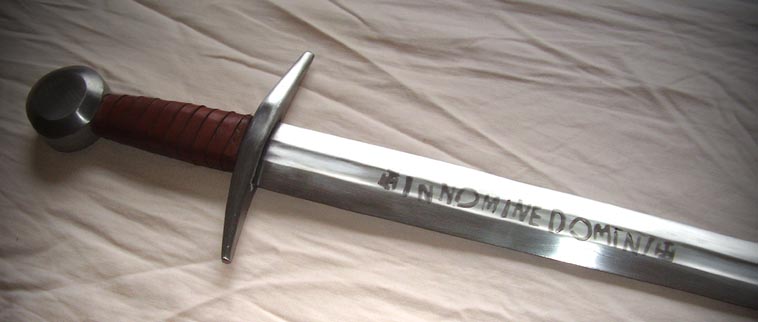
I've been quite busy lately, but still I managed to complete my commission. I made a disc-pommeled sword with +GICELINMEFECIT+ and +INNOMINEDOMINI+ inscriptions executed in higher-carbon material then the fuller (photos in the attachments). I found out that the same technique works well with both the big pattern-welded inlays and smaller iron/steel inlays. Both these can be hammered cold into a hot blade blank in such a way that the inlays sunk all the way into the blade without considerable widening. After hammering, the inlays are welded.

Still there is one modification when executing small inlays. When a large pattern-welded inlay is placed on top of a hot blade, there is circa 4-6 seconds time to carefully (and quickly) adjust the inlay into its correct position and hammer it in. Otherwise the inlaid rod will get too hot and it will only flatten when hammered. Now when smaller inlays evident in archaeological finds are placed on a hot blade, there is only about three seconds time to adjust and hammer the inlay before it gets too hot. Because of this the inlays in the pictured blade are tilted. I did not have enough time to adjust them straight. I think that this could be prevented by chiseling or punching very small and shallow guiding grooves for the inlays before hammering. In this way the inlays could be dropped into the shallow grooves and hammered more quickly.

Pattern-welded blades were sometimes decorated with inlays too. In Finland I have so far found five these kinds of sword blades, and the phenomenon is known also elsewhere in Scandinavia. One good example is pictured in Ian Peirce's Swords of the Viking Age (2002) on page 150. It must be noticed that actual inscriptions seem to be very rare; normally inlays on pattern-welded blades are some symbolical motives like figure-eights, circles, omega-like devices, lattices or plain vertical lines. One actual inscription is found in a sword from Netherlands, where iron text +ATALBALD+I is welded on a pattern-welded fuller. See e.g. Jaap Ypey: Einige wikingerzeitliche Schwerter aus den Niederlanden. Offa 41 (1984), p. 224.

The inlays on pattern-welded blades are also normally pattern-welded, but sometimes the inlaid figures are made clearer by using non-twisted rod (as in the case illustrated in Peirce's book). Twisted pattern-welded rods would probably look quite chaotic on pattern-welded surface also consisting of twisted rods.


 Attachment: 52.58 KB
GICELIN.jpg


 Attachment: 40.76 KB
IND.jpg

Thank you for all the wonderful information!

I was thinking about different ways of making steel inlay last night and I thought that perhaps a good way would be to make a punch in the shape of every individual letter then stamping that letters form into the hot blade, with the right handle and extra time one should be able to line up the letters rather well, and it could work for both large and smaller inlays. On a side note you could use the stamp to make a template for making the letters as well, then clean scale and everything should line up rather clean in the blade.

What do you think of this idea?

Also thanks for mentioning the inlay on pattern welded blades. I was reading:
The Serpent in the Sword:
Pattern-welding in Early Medieval Swords
by LEE A. JONES
and was referancing this section:

"Pattern-welded blades continued to be made at least
into the early 10th century, however, over the course of
the 9th century, twisted iron inlays forming letters, symbols
and geometric designs came to predominate. Lang
and Ager’s6 survey of the British material failed to
disclose swords with both a pattern welded structure
and iron inlays, however such swords are not uncommon
in the continental material."

Clearly their research was based more in British finds and think it is interesting how it translated to the swords that you studied.
YAY! My Favorite thread!

I love that sword Mikko! I am still on Patrick Barta's waiting list regarding the type XI sword with similar inlay and the same lettering. I believe the fuller on this sword may be a bit deeper but this is just based on black and white photos.

Again- Superb work!

Jeremy

P.S. Would it be possible for a full length shot and for a closer look of the inlay.


Last edited by Jeremy V. Krause on Sat 21 Feb, 2009 7:08 am; edited 1 time in total
Michael, I think your idea of making inlays is functional. Of course making an individual stamp for every letter takes much time and effort, but it would produce neat cavities in the blade for the inlays. I did one inscription by stamping the grooves, but I used three kinds of punches: one convex and two straight ones, a longer and a shorter one. The cavities were formed by combining the shapes of these punches. The technique worked very well, and it lets the blacksmith actually adjust the depth of the inlays. Moreover, I inlayed a ready-forged blade with this technique, instead of a blank. You are right that the punches could be used to make templates too.

And Jeremy, thanks for the comments. I believe Barta will manage to produce neat inlays. I can't wait to see his interpretation of the inscription.

I will post a full-length shot as well as a close-up of the inlay, as soon as I have time to dig up those photos from my second computer.
Michael Pikula wrote:
I thought that perhaps a good way would be to make a punch in the shape of every individual letter then stamping that letters form into the hot blade. ...... On a side note you could use the stamp to make a template for making the letters as well, then clean scale and everything should line up rather clean in the blade.

What do you think of this idea?


I like your idea, and suspect it is at the very least valuable as an easy form of layout. You could even develop (or possibly just purchase a ready made) stamp set strictly for the purpose of blueing-inking and hand engraving a room temperature blade that has not yet been tempered.

I have not tried inlay yet, but had the impression that the ideal method involved using a burrin to cut a channel with a slight angle relative to the surface on an untempered blade. (The channel should have a very small upturned burr that can later be hammered down to slightly overlap the inlay without heating.) After gently wedging and tapping inlay wire into the channel, the channel's burr is closed by some gentle tapping, and appropriate temperature fluxing for melting point of the inlay materials. (The blade may need to be tempered before inlaying and just localized torch heating and fluxing used for something like gold wire.) The advantage of this is that you can use soft metals (gold, copper, silver wire, etc.) The disadvantage of this is that you could not properly execute such a 3-D angled channel in a single stamping motion.

I am curious what others who do practice inlay have to say about their preferred way of doing it.
Mikko Moilanen wrote:
Michael, I think your idea of making inlays is functional. Of course making an individual stamp for every letter takes much time and effort, but it would produce neat cavities in the blade for the inlays. I did one inscription by stamping the grooves, but I used three kinds of punches: one convex and two straight ones, a longer and a shorter one. The cavities were formed by combining the shapes of these punches. The technique worked very well, and it lets the blacksmith actually adjust the depth of the inlays. Moreover, I inlayed a ready-forged blade with this technique, instead of a blank. You are right that the punches could be used to make templates too.

And Jeremy, thanks for the comments. I believe Barta will manage to produce neat inlays. I can't wait to see his interpretation of the inscription.

I will post a full-length shot as well as a close-up of the inlay, as soon as I have time to dig up those photos from my second computer.


Thank you sir!

I appreciate the work you are committing to this fascinating aspect of arms production. BRAVO!
Here is an overall photo of the INNOMINEDOMINI sword, and a close-up of its inscription. By the way, the original is illustrated in Ian Peirce's 'Swords of the Viking Age' on pages 134-135.


 Attachment: 26.54 KB
INDcloseup.jpg


 Attachment: 46.54 KB
INDcomplete.jpg

Nice work Mikko - both the sword and your research.


Now, one possible thing that could help in getting the letters in the proper position would be a third hand. And actually a fourth :

A helper. An apprentice.

We all too often think of the smith as someone working alone in the magical secrecy of his shop, but in all likeness it wasn't the case.

Two set of hands, holding the blade blank, hammer, tongs and whatever is needed to put the inlay in their exact final position. Less time wasted changing tools. More control.


All too often I have imagined how helpful someone even barely holding the piece I was working on would be.


I also suppose each letter needs one heat ?
Fabrice, you are very right. The inlaying process would be quicker and somewhat easier, if several people worked together. An apprentice, for example, would be ideal to adjust the inlay to its correct position immediately after the blade is taken from the forge. Then another person to hammer the inlay in.

It is possible to both sink and weld several letters with one heat. I have managed to hammer in two letters (or parts of letters) on the same heat. Then, even more letters can be welded with only one heat. I usually weld two or three letters when working with pre-industrial, softer steel, in which the inlays can be hammered secury all the way in before welding. I think that experience will also play a crucial role in this operation.
Go to page Previous  1, 2, 3  Next

Page 2 of 3

Jump to:  
You cannot post new topics in this forum
You cannot reply to topics in this forum
You cannot edit your posts in this forum
You cannot delete your posts in this forum
You cannot vote in polls in this forum
You cannot attach files in this forum
You can download files in this forum


All contents © Copyright 2003-2006 myArmoury.com — All rights reserved
Discussion forums powered by phpBB © The phpBB Group
Switch to the Full-featured Version of the forum