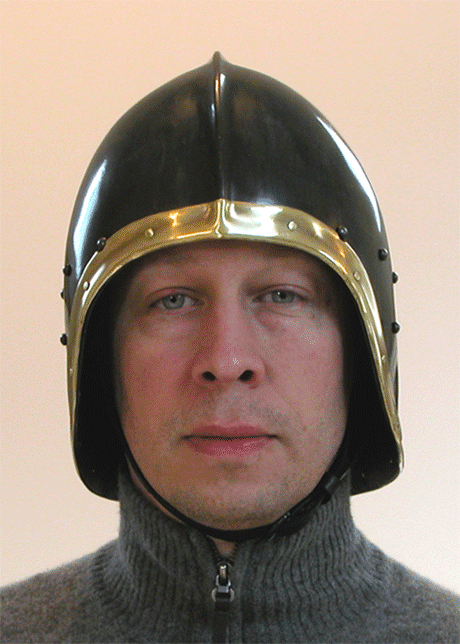
Sallet in the Milanese Style of ca. 1500
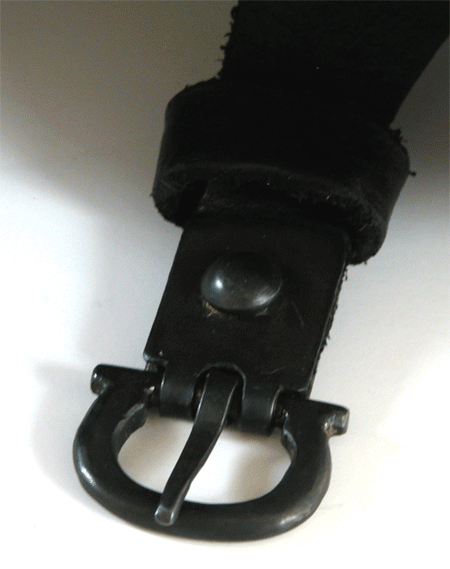
This project took forever, but it's finally done! Oh, the adventure--removal of visor, patching of holes, rivets, lining, reshaping of the edge to my new specs (by the original manufacturer of the bowl, Patrick Thaden,) cutting and shaping brass for the edging, manufacture of the buckle, bluing, experiments in brass, re-dos.... almost 20 months of research, waiting and work in the tiny increments of time I could find. I'm pleased with the results, though, and I have lots of new skills!


 Attachment: 131.45 KB
sallet1.gif


 Attachment: 148.22 KB
sallet2.gif


 Attachment: 53.56 KB
sallet3.gif


 Attachment: 101.16 KB
sallet6.gif

My redesign and finishing were inspired by Royal Armouries object # IV.424:

http://www.myArmoury.com/talk/viewtopic.php?t...ght=sallet

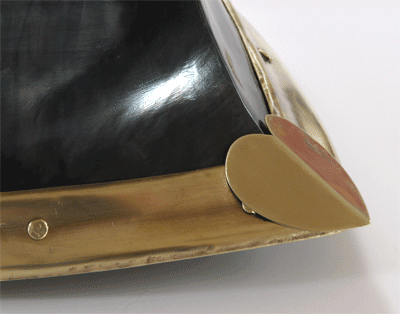
Working with an existing bowl didn't allow me to copy the sallet, so I stayed away from its unique details. I experimented with a variety of patterns for the brass edging, most of them successful, but finally decided that this would be the Negroli Econo-Line sallet, without the elaborately stamped/chased edging and plume holder. When I came up with a 1/8" gap between the ends of the edging on the tail, I decided to make a linden leaf cover to cover that and prevent the kind of damage the RA sallet suffered. My guess is that the missing part of the edging resulted in snagging the tip of the edging and pulling it away from the rivet (the brass is very thin--perhaps 22 ga., which is what I used). Why a linden leaf? The heart/linden leaf was prominent in Germanic culture and can be seen in German and Austrian armour of the period. In my case, it also reflects my affection for Austria.

I like to imagine this and my modified A&A Dürer the pair belonging to an Austrian man-at-arms. It's not out of the question. As I understand it, Austrian armourers of the South Tyrol were influenced by their north Italian counterparts.
Sean, VERY well done! Your carefull attention to detail and slow measured approach have yielded excellent results.
Fantastic!

I've been looking forward to seeing your results on this one. Even the buckle is great. The blueing is very well done and quite uniform across the piece as far as I can see. My only question would be "why not the plume holder?" As this isn't an exact copy of one particular piece, you could easily justify it's inclusion and I'd imagine that you'd agree that it's quite a classy addition to such a helmet. I must say however, that your brass work looks very fitting, and has obviously had a lot of effort put in to it. I'm (slowly) working on a similar sallet for my own collection and am definitely considering such a treatment for the edges. As I said, fantastic.

Darren.
Thanks! I think a sallet of this type probably should have a plume holder, and I even made one in the shape of a small pavise. The central ridge of the bowl presents a slight problem, but the pavise shape works around it. I think the sallet looks nice without it, but I might add one eventually since I've come this far. For now, I'm happy to say it's done!
Bill is that the Thaden sallet I took photos of a few years ago? If so, that's an impressive transformation Sean. The combination of the bluing and brass edging make for an outstanding look. Do you plan on making other items of kit to go with it?
Sean, that looks absolutely amazing! I can't believe that used to be my old sallet, because it never looked anywhere near that good when it was in my possession! You've completely transformed it into something entirely different! I really love the linden leaf on the tail of the helmet.
Patrick Kelly wrote:
Bill is that the Thaden sallet I took photos of a few years ago?


That's the one. Amazing what Sean did, no?
Ha! Yep, that's it. The visor was hiding the potential, and making it a bit shallower and back-swept also helped refine the form. I'm glad you like it, Patrick, because I thought of you several times during production. With the bluing and brass, and especially the shield-shaped plume holder, this has a distinct law enforcement look to it--like an ancestor of the English police helmet. :D

Many light sallets are shown in Austrian depictions of civil authorities--arresting Jesus, etc. They're worn with a surprising variety of kit, from full plate to almost nothing, so I it has crossed my mind that I could assemble a reasonable kit by either doing some of the work myself or drafting a hungry student. I think the piece would look fine with as little as a breast (blued, of course :D ). I'd really like to make a mail standard with brass edging, as the standard/light sallet combination seems to have been popular by 1500 (anybody want to buy my bevor?). My XVIIIb is a good match, especially if I decide to add a repoussé brass disc to the pommel. A short axe/streithammer would be a good choice, too. For the clothes, red seems to have been very popular and common. The only thing holding me back is the question of what I'd do with the stuff. I made a nice display stand for my wife's Roman kit, and could do the same thing for a medieval kit of sallet, breast and doublet.


I need to make some scabbards first, though....
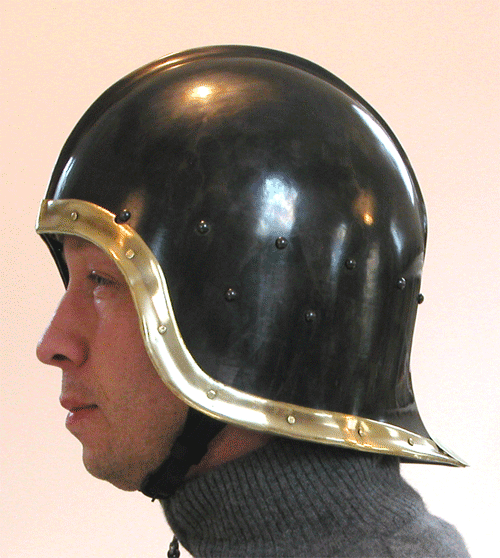
Nice work and you do have a face that wouldn't be out of place in a period painting or drawing by Dürer. :D ( A compliment by the way, just in case you weren't sure. :D ).

Did a nice bluing job that seems even but not so perfect as to look to modern I think.

One thing I tried with bluing recently that gave me a similar result is to first blue the metal using the bluing paste getting what looked to me like too deep a blue, and then using a wet sanding sponge to remove the blue ( Tone it down ).

The special thing I did was to use a diluted solution of the bluing paste and wet the sanding sponge in the solution: So at the same time that the abrasive is removing the deep blue the diluted bluing paste is rebluing it, this gives a lighter blue that looks more like a bluish patina.

The nice thing about using this technique is that it avoids the splotchiness that sometime is hard to avoid when trying to blue steel. ( I usually have difficulty getting a perfectly even finish ).

Anyway you might want to experiment with the idea for another project and I only mention it as you might find it worth trying.
Thanks for the tips, Jean! A paste sounds like a very good idea--I have to work so quickly with the regular solution. If I did much of this sort of thing I'd probably find a gunsmith who just keeps a giant vat of the stuff on hand. Quick, full immersion is probably the best way to get an even finish.
Sean Flynt wrote:
Thanks for the tips, Jean! A paste sounds like a very good idea--I have to work so quickly with the regular solution. If I did much of this sort of thing I'd probably find a gunsmith who just keeps a giant vat of the stuff on hand. Quick, full immersion is probably the best way to get an even finish.


That would be the G96 GUN BLUE CREME, and I have found it to be water soluble although it is not a recommended use of it on the instructions on the side of the plastic bottle.

Oh, they say on the bottle " Causes severe burns " and I guess one should take that warning seriously but I have been using this stuff for years and I have at times applied it using a finger and maybe my body chemistry makes me somewhat acid burn resistant ? Don't know if this varies with skin sensitivity or one's personal skin oils but I remember doing acid etching years ago in art school and I didn't seem to get burned if a little acid got on my hands or fingers and I washed immediately ? Nothing more than a little stinging if I waited too long to wash: Obviously didn't put my hands in the acid and leave them there for an extended amount of time,

Anyway, puzzling if off topic. :?: :confused:

Oh, using rubber surgical gloves with the paste is one way to rub it into corners using a finger safely.
Hi Sean,

It's been a long time ;) Just wanted to say "Outstanding Craftsmenship!"...now make me one ;)

Cheers,

Todd
Hey, Todd! Thanks! I certainly wish I could knock out a couple of these a year. I'd enjoy the work. But I bet you'd be surprised what you could do with an inexpensive sallet from GDFB or Windlass. A good liner, some PermaBlue and brass sheet....
Sean Flynt wrote:
Hey, Todd! Thanks! I certainly wish I could knock out a couple of these a year. I'd enjoy the work. But I bet you'd be surprised what you could do with an inexpensive sallet from GDFB or Windlass. A good liner, some PermaBlue and brass sheet....


Please keep up the great work. Are you going for the full harness?

When are you going to come to the North and see me? Chivalric Weekend I'm having an armorsmith symposium headed by Allan and Jeff Wasson: http://www.freewebs.com/chivalricweekend/ A good opputunity to exchange some skills.
That's an impressive lineup for your conference! I wish I could attend. But, economy, toddler, etc. For the same reasons, I won't be trying to acquire much more armour--either bought or homemade. I thought I might try something simple, like a mail standard, but I think even that is unlikely anytime soon. My next project will probably be a scabbard. I really need to learn to do that work.
Re: Sallet in the Milanese Style of ca. 1500
Sean Flynt
a copy of the original helmet, you have made
Barbute/sallet
Hi Sean

Just wanted to add my two pence worth and congratulate you on a stunningly good job done on that barbute/sallet :cool:

Also, (very sorry for highjiking this thread somewhat but I have just to ask the last poster Kessler) "who made your wonderfully deep kettlehat you are seen wearing in your avatar?" it looks great also.

regards
Stuart Q

Page 1 of 1

Jump to:  
You cannot post new topics in this forum
You cannot reply to topics in this forum
You cannot edit your posts in this forum
You cannot delete your posts in this forum
You cannot vote in polls in this forum
You cannot attach files in this forum
You can download files in this forum


All contents © Copyright 2003-2006 myArmoury.com — All rights reserved
Discussion forums powered by phpBB © The phpBB Group
Switch to the Full-featured Version of the forum