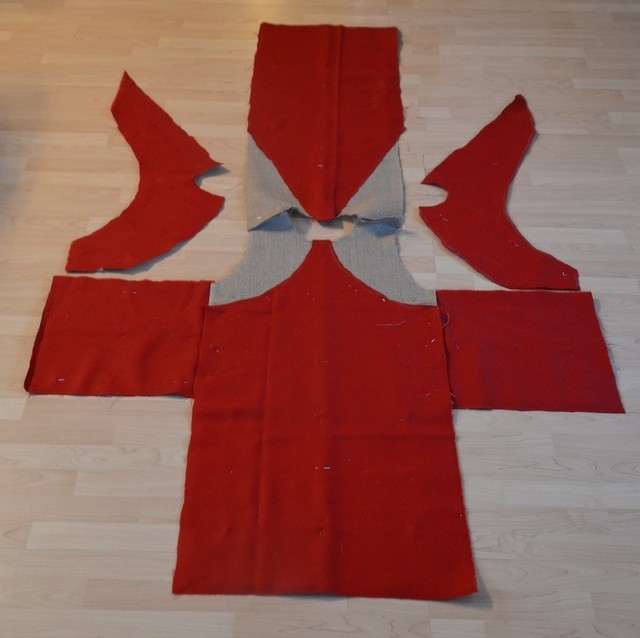
Following a discussion in the XIII century armour-group on Facebook and on the Armour Archive and Cite d'Antan's recent series of pictures of the Magdeburg-st Mauritius, i decided to incorporate Mart's theories (from Len Parker) in my CoP project. In short, the lines on the CoP of the st Maurice statue in Magdeburg as well as the st Maurice image in Lögumkloster church are interpreted as a separate textile piece tailoring the shouder and neck area avoiding unsightly bumps on the front and back of arm holes so often seen on reconstructions.
Layout of pattern for the st maurice CoP
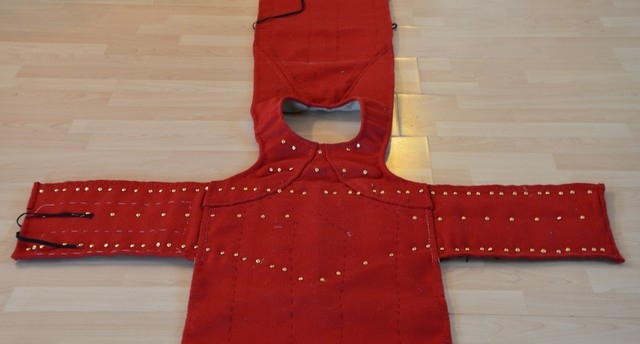
After most sewing is done, the theory seem to be working just fine.
[ed: Placed images in attachment due to photobucket-trouble]
Attachment: 571.31 KB
Layout of pattern for the st maurice cop [ Download ]
Attachment: 337.75 KB
After most sewing is done, the theory seem to be working just fine. [ Download ]
Interesting. It's looking good. Do you think this could set a new standard on how recreation coats of plates are made? Some sort of "missing link"?
Ben Joy wrote: |
Interesting. It's looking good. Do you think this could set a new standard on how recreation coats of plates are made? Some sort of "missing link"? |
These are sometimes called "armoured surcoats". They were the precursor to the coat of plates.
Ben Joy wrote: |
Do you think this could set a new standard on how recreation coats of plates are made? Some sort of "missing link"? |
Dan Howard wrote: |
These are sometimes called "armoured surcoats". They were the precursor to the coat of plates. |
We could go on calling the kind with flaps type B. Besides the ca 1250 Magdeburg st Mauritius, it is represented by the ca 1260-80 Konstanz sleeping guards and the Swedish 1323 Södra Rada Valerianus.
Type C without the flaps would interestingly enough be represented by another image from Lögumkloster, the ca 1300 massacre of the innocents-bad guy on the altar frontal, sligthly earlier than the other images. The type is more pronounced on the ca 1270 bad Jena dude. Neither of the images are referred by Thordeman,
Interestingly, all types would fit with Thordeman's type II or III with vertical plates, and making a chronological distinction between them seem speculative. Therefore, contrary to Blairs chronology, I would consider these more like variations of a theme rather than an evolusionistic development, woulden't you agree?
Well done! It looks very good. Do you have an inside shot of this?
Thanks,
RPM
Thanks,
RPM
Looking good so far Håvard. Well done.
Thank you guys. No inside shots yet, I'm afraid. The plates are just fastened with split pins for now. But here's the layout. Guess which Visby CoP-number it is based on.
[ Linked Image ]
I went for 1,2 mm (ca 18 gauge) mild steel as that was avaliable, but unable to harden the steel, I suspect I might regret it after the first spear trust my way. With 1 kg textile, the whole thing should come out at 5 kg (11 pounds). As rust protection I went for blackening the steel like you wold an iron pan. After dishing out the curve with a rubber hammer on a shaped stump, the barbecue commenced. Some test carbonization resulted in the kichen stove becoming out of bounds for the project.
[ Linked Image ]
Linseed oil carbonized just fine at ca 250 degrees celsius (that's 482 degrees Fahrenheit for you old schoolers), turning from transparent to sticky brown to blank, hard black in 20-30 min. It took two turns and a rubbing as I did not take the "thin layer of oil" seriously enough.
[ Linked Image ]
[ Linked Image ]
I went for 1,2 mm (ca 18 gauge) mild steel as that was avaliable, but unable to harden the steel, I suspect I might regret it after the first spear trust my way. With 1 kg textile, the whole thing should come out at 5 kg (11 pounds). As rust protection I went for blackening the steel like you wold an iron pan. After dishing out the curve with a rubber hammer on a shaped stump, the barbecue commenced. Some test carbonization resulted in the kichen stove becoming out of bounds for the project.
[ Linked Image ]
Linseed oil carbonized just fine at ca 250 degrees celsius (that's 482 degrees Fahrenheit for you old schoolers), turning from transparent to sticky brown to blank, hard black in 20-30 min. It took two turns and a rubbing as I did not take the "thin layer of oil" seriously enough.
[ Linked Image ]
Last edited by Håvard Kongsrud on Tue 18 Jul, 2017 12:11 pm; edited 1 time in total
This looks like it's really taking shape. I like the color too. I was wondering about the thoracic side plates, and their relation to the abdominal plates. If there is sufficient overlap of the lower plates over the upper set, there is no need for rivets on the bottom edge of the upper plates; however, if the lower edge of the plates were to share a rivet with the top edge of the abdominal plates, the upper and lower sections would function more as a whole, especially given the lack of flexibility in the vertical abdominal plate arrangement. I haven't see details of the Visby reports--does anyone know if here were holes low down on the upper plates? Does this make for an awkward garment?
Kai Lawson wrote: |
I was wondering about the thoracic side plates, and their relation to the abdominal plates. If there is sufficient overlap of the lower plates over the upper set, there is no need for rivets on the bottom edge of the upper plates; however, if the lower edge of the plates were to share a rivet with the top edge of the abdominal plates, the upper and lower sections would function more as a whole, especially given the lack of flexibility in the vertical abdominal plate arrangement. I haven't see details of the Visby reports--does anyone know if here were holes low down on the upper plates? Does this make for an awkward garment? |
Nope. None of the type II, III or IV had holes low at the thorax plates. Only in one (no 1) of the type I CoPs (with horisontal abdominal plates) one of the thorax plates shared rivets with the upper abdominal plate, and in a second (no 4) there were rivets low on the thorax plates. See Thordeman, Armour from the battle of Wisby.
[ed: corrected typo)
Last edited by Håvard Kongsrud on Wed 12 Jul, 2017 12:18 pm; edited 1 time in total
Looking good Håvard. It's nice to have a theory and then have someone make it happen.
I hope this works!
I hope this works!
I look forward to seeing the plates when worn, to see if the inverted-V tailoring over the chest does, in fact, improve the fit.
Håvard Kongsrud wrote: | ||
|
Sorry, I wasn't trying to say it in a sort of "evolutionistic paradigm" sense of the concept. I was referring more to a "missing link" as far as a crafting method that bridges a gap between what we have been doing for recreations and how it was actually "supposed" to be done.
Think of it like having a cooking recipe, but it's missing an ingredient to make it just right. Everyone else has been making it without the ingredient, but you've figured out the ingredient and are now making the recipe properly. Granted I'm not just saying "you" as in you exclusively, but as everyone who has posed this theory that you're now trying to execute.
Mart Shearer wrote: |
I look forward to seeing the plates when worn, to see if the inverted-V tailoring over the chest does, in fact, improve the fit. |
That makes two of us. Very curious to see how the concept turns out. If it improves the fit, this would probably fall within the purview of "I want to have one of these made."
Still some time left before the "missing link" is finished I'm afraid, but at least the last rivets have arrived and are prepared.
In the meantime a word on riveting. Many torials advise punching holes through the canvas. This reduces the strength significantly where you need it the most. In stead, the historical way to do it, shown on lacing holes, is to work a large awl, fid or knitting pin through the canvas, compressing the weave around the rivet. This way the textile around the rivet becomes the strongest in stead of the weakest part. I went for large diameter rivets for the same reason.
[ Linked Image ]
I needed some solid and historical laces to fasten the back flap to the torso beneath the plates, and decided to weave them myself using tablets and rather thick silk thread. (For ease of work I made myself a quite unhistorical combined schuttel and weaving sword, but let's keep that a secret, shall we?) For a first, it went relatively fast, and it is quite realistic to get a full set of laces finished for you full plate guys out there.
[ Linked Image ]
[ Linked Image ]
Soo. First test with all plates in place. The narrow curvature of the lower front plates gives the upper plates quite a large instep. I should've had some curvature in the vertical plane as well as the horisontal plane with the front plates, like we see in Magdeburg-st. Maurits,
What do you think of the fit around the arm opening? Shall we say this supports the theory of the lines and tayloring discussed above? (I do believe this would work just as well with the upside down V set lower in the front.)
How much flexibility is there across the chest? If there isn't any then there may be issues using some weapons. The solution would be to make the arm holes bigger to reduce the coverage across the chest.
Dan Howard wrote: |
How much flexibility is there across the chest? If there isn't any then there may be issues using some weapons. The solution would be to make the arm holes bigger to reduce the coverage across the chest. |
Good to know. I like your hand-woven laces. Little touches like that make the difference between a good result and an outstanding one. Looking forward to seeing it finished.
I don't see any sign of puckering in the front of the arm, so I would say the tailoring experiment is a success. I must say I am most impressed by the way your seams at the intersection of the side panels to the body look very much like the Magdeburg Maurice. Are you using flat-felled seams?
Thanks, Dan, appreciated.
Thanks, Mart. No, not with the lateral panel going all the way under the vertical one. The vertical panel got double hem seams before I sewed it onto the lateral panel with back stitches and a second row of tunnel stitches on each side. With the cut and thickness of the backing and cover fabricks, the visual impression is more or less given.
Mart Shearer wrote: |
I don't see any sign of puckering in the front of the arm, so I would say the tailoring experiment is a success. I must say I am most impressed by the way your seams at the intersection of the side panels to the body look very much like the Magdeburg Maurice. Are you using flat-felled seams? |
This is a very good project! I have long wanted to do a set like this but have not yet had the capital to do so. What did you use to cut your plates out?
M.
M.
Page 1 of 1
You cannot post new topics in this forumYou cannot reply to topics in this forum
You cannot edit your posts in this forum
You cannot delete your posts in this forum
You cannot vote in polls in this forum
You cannot attach files in this forum
You can download files in this forum
All contents © Copyright 2003-2006 myArmoury.com All rights reserved
Discussion forums powered by phpBB © The phpBB Group
Switch to the Full-featured Version of the forum
Discussion forums powered by phpBB © The phpBB Group
Switch to the Full-featured Version of the forum