I've found information about tying a turk's head knot with rope, but that's a LONG way from doing it with fine wire for a sword hilt. Is there anybody here who can share the secrets of this craft? How about a brief history and step-by-step guide in the form of an article?
Hi Sean-
Thats a very interesting question, unfortunately I don't have the answer. I think that the Turk Heads are
somehow put over the grip and then released. How you braid the knot.....
I also would like to know how to do this.
dave
Thats a very interesting question, unfortunately I don't have the answer. I think that the Turk Heads are
somehow put over the grip and then released. How you braid the knot.....
I also would like to know how to do this.
dave
FYI: Here's the rope version:
http://www.northnet.org/ropeworks/archive/turkhed.html
I'm thinking that locking forceps might be helpful in tying the hilt-size version of this knot.
http://www.northnet.org/ropeworks/archive/turkhed.html
I'm thinking that locking forceps might be helpful in tying the hilt-size version of this knot.
Sean,
You may want to contact Craig Johnson at Arms & Armor. They use turks heads on quite a few of their models. He could probably give you the run down on it.
www.arms-n-armor.com
You may want to contact Craig Johnson at Arms & Armor. They use turks heads on quite a few of their models. He could probably give you the run down on it.
www.arms-n-armor.com
Hi everyone,
For some reason Turk's heads knots have been coming up a lot the last few months: when I visited Vince and Grace this last June, they wanted to know how to do them. Then in July it was Rob Miller (Liongate). In both cases I was able to do a demonstration, although with Rob it wasn't too successful as he only had some very thick wire. With the Evans', I had taken along an antique sword that I was restoring, so they got to see a grip restoration in progress.
Unfortunately, describing how to do a Turk's head is very difficult; you really need to watch it being done. However, you can learn what to do if you have a grip that has real Turk's heads on it. I say "real" because there are some that are not done as the old ones were. Old ones are of only one strand of wire. New ones may be made of several wires or groups of wire. Both, however, can look good.
Here's how to do one the modern way: you know how girls braid their hair? You just do the same thing with strands of wire. When it's long enough, you wrap the braided piece around the ends of your grip, and cut off the ends a little long. The ends can then be tucked under braids to hide them.
If you have access to an original grip with Turk's heads, trace the path of a wire or group of wires around the knot. This should enable you to figure out what to do. As I said, this whole process is best understood via a demo. I'll take a look at the website you all mentioned and see if I can add anything to it.
--ElJay
Thanks for the tips, folks! I recently tried the three-wire braid with mixed success as you can see below. These faux THs looked a-historically thin to me so I scapped them. If I were to do it again I think I'd separate nine strands from the multi-strand picture hanging wire I used, braid those in three-strand bundles, then braid the resulting three braids into a final, single braid. That would make for a more robust and complex faux TH. I'd still like to learn to do this properly with twisted wire, but I suppose my best bet is to simply experiment using the rope diagrams as a guide.
 Attachment: 53.74 KB
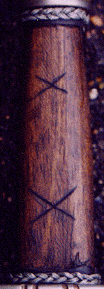

Hello all,
I agree with Mr. Erickson, that it is really much easier if you can see it done but it is possible to learn how from a rope guide like the one you found online Sean. The reason I say this is because that is how I learned, my teacher knew how to tie them but didn't like doing it so he gave me some pointers and a photocopy of a how to guide and I went to work. If you start with a thicker rope it might be easier because the stiffness will help the first two wraps hold their position while you are doing the weaving with the third wrap. once you have the first set of wraps completed it is just a matter of tracing them with the remaining rope till they are all equal. I usually do three times around per wrap (total of nine times around) but you can do more, it just becomes more cumbersome and harder to judge the finished size of the turks head and amount of material needed from the start.
I would recommend that you keep tying a rope turks head till you know how to do it by heart because when you start trying to size one correctly for a grip there are other things that you need to pay attention to. It is kind of frustrating but I just sat down with the TV on and kept trying to tie them with the guide, till I figured it out. I have found that for wire turk's heads for grips if you have 4'-6' of wire to start with that should be enough, but this will be determined by the diameter of your grip so that is just a loose estimate. I always try to have a little extra just for safety, it really sucks when you are in your last wrap and you run out of wire 3/4 of the way through.
Now once you get it down with rope, do the same thing with wire. I found that two 28ga wires twisted together gives you a good amount of resistance but not too much and looks nice as a finished piece. If you try to tie a turks head with heavy wire it is really a bear, especially if you are working with stainless so this might be more frustrating than it is worth. Silver or copper, bronze or really thin wire also have their drawbacks because they are so soft that they kink like mad as you are threading them through. If you want to work with really soft wire I suggest buying some good wire working pliers for jewelry applications which will help you smooth out the kinks. I have found that working with 2 twisted 28ga stainless steel or even annealed steel wires is a good medium to learn with because they play along better than thinner or thicker wire.
I usually bend little waves in the wire that outline the shape of the weave as I am starting the first 2 wraps, and then set them when I intertwine the 3rd wrap with the first 2, do your best to make sure that the bends are all the same distance from the centerline because if you have more material in one bend it will make the turks head lopsided in that spot. I use a ring mandrel, a soft mallet, an awl (to push the wire around and straighten out kinks), a pear of needle nose pliers (for grasping and pulling the wire), and of course a small wire cutter to cut the excess off when done. I often use a taylors measuring tape or some string to measure the circumference of the finished grip I am tying the turks head for then compare that to the sizing scale on the ring mandrel for reference. I then start my wraps slightly smaller in circumference than where the circumference of the grip came out to be. The reason for starting smaller is that when I have the turks head completely tied I then gently stretch it with the soft mallet on the ring mandrel till it reaches a just slightly larger circumference than the grip. The reality of a wire turk's head is that you can stretch it but not shrink it when it is finished. In addition this does a few things, it tightens up the weave as well as smoothes out the wire a little bit. You want the finished turks head to fit on the grip so that it will stay in place with a friction fit if possible, otherwise it will spin and move considerably on the grip. If it is a tad loose you can sometimes fix that with glue of some kind, but it is usually better to just tie another turkss head knot. I found that as long as the truk's head knot you have tied is in the right ballpark size you can shape a future grip to fit that turks head. Of course you can start this way, by tying a turks head then making a grip to fit it, but for me it usually works better to shape the grip so that it looks right and then make the truks head to fit that shape.
Hope this is of some help to you, good luck with your efforts.
Erik
 Attachment: 53.53 KB
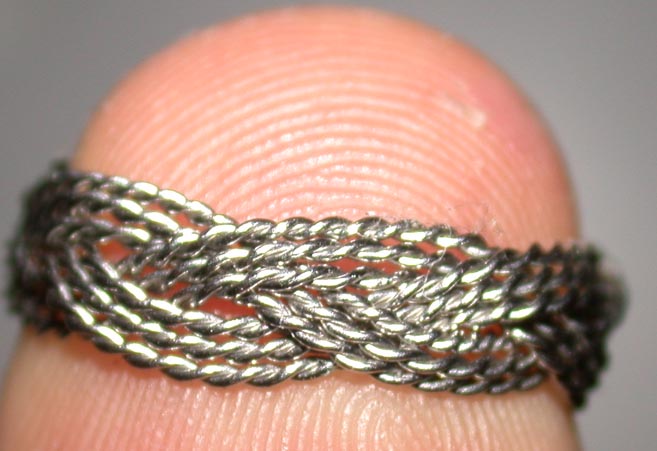
I agree with Mr. Erickson, that it is really much easier if you can see it done but it is possible to learn how from a rope guide like the one you found online Sean. The reason I say this is because that is how I learned, my teacher knew how to tie them but didn't like doing it so he gave me some pointers and a photocopy of a how to guide and I went to work. If you start with a thicker rope it might be easier because the stiffness will help the first two wraps hold their position while you are doing the weaving with the third wrap. once you have the first set of wraps completed it is just a matter of tracing them with the remaining rope till they are all equal. I usually do three times around per wrap (total of nine times around) but you can do more, it just becomes more cumbersome and harder to judge the finished size of the turks head and amount of material needed from the start.
I would recommend that you keep tying a rope turks head till you know how to do it by heart because when you start trying to size one correctly for a grip there are other things that you need to pay attention to. It is kind of frustrating but I just sat down with the TV on and kept trying to tie them with the guide, till I figured it out. I have found that for wire turk's heads for grips if you have 4'-6' of wire to start with that should be enough, but this will be determined by the diameter of your grip so that is just a loose estimate. I always try to have a little extra just for safety, it really sucks when you are in your last wrap and you run out of wire 3/4 of the way through.
Now once you get it down with rope, do the same thing with wire. I found that two 28ga wires twisted together gives you a good amount of resistance but not too much and looks nice as a finished piece. If you try to tie a turks head with heavy wire it is really a bear, especially if you are working with stainless so this might be more frustrating than it is worth. Silver or copper, bronze or really thin wire also have their drawbacks because they are so soft that they kink like mad as you are threading them through. If you want to work with really soft wire I suggest buying some good wire working pliers for jewelry applications which will help you smooth out the kinks. I have found that working with 2 twisted 28ga stainless steel or even annealed steel wires is a good medium to learn with because they play along better than thinner or thicker wire.
I usually bend little waves in the wire that outline the shape of the weave as I am starting the first 2 wraps, and then set them when I intertwine the 3rd wrap with the first 2, do your best to make sure that the bends are all the same distance from the centerline because if you have more material in one bend it will make the turks head lopsided in that spot. I use a ring mandrel, a soft mallet, an awl (to push the wire around and straighten out kinks), a pear of needle nose pliers (for grasping and pulling the wire), and of course a small wire cutter to cut the excess off when done. I often use a taylors measuring tape or some string to measure the circumference of the finished grip I am tying the turks head for then compare that to the sizing scale on the ring mandrel for reference. I then start my wraps slightly smaller in circumference than where the circumference of the grip came out to be. The reason for starting smaller is that when I have the turks head completely tied I then gently stretch it with the soft mallet on the ring mandrel till it reaches a just slightly larger circumference than the grip. The reality of a wire turk's head is that you can stretch it but not shrink it when it is finished. In addition this does a few things, it tightens up the weave as well as smoothes out the wire a little bit. You want the finished turks head to fit on the grip so that it will stay in place with a friction fit if possible, otherwise it will spin and move considerably on the grip. If it is a tad loose you can sometimes fix that with glue of some kind, but it is usually better to just tie another turkss head knot. I found that as long as the truk's head knot you have tied is in the right ballpark size you can shape a future grip to fit that turks head. Of course you can start this way, by tying a turks head then making a grip to fit it, but for me it usually works better to shape the grip so that it looks right and then make the truks head to fit that shape.
Hope this is of some help to you, good luck with your efforts.
Erik

Erik.
Thanks for the very informative post. Could you show us another photo of the side of the turks head where the ends come together? I'm curious as to how the ends are joined so that everything looks smooth and even.
Thanks for the very informative post. Could you show us another photo of the side of the turks head where the ends come together? I'm curious as to how the ends are joined so that everything looks smooth and even.
Hi Patrick,
Here is a photo of the inside of a different turks head, this is one of my practice ones. Because of the lighting and the close focus the wire ends are hard to see. The red circles show where the bent wire ends are. the tension of the weave holds everything together, I just kink the ends of the wire so they won't pull out of the weave but will hook on the other wire if they are pulled. If you try to twist the ends together or anything like that you get an ugly bulge in the turks head when it is compressed around the grip. In the rope demo they usually show a fishermens knot or something similar crossing over the back of the wires securing the ends together, but with wire this is unnecessary and very hard to make look good.
Cheers,
Erik
 Attachment: 78.32 KB
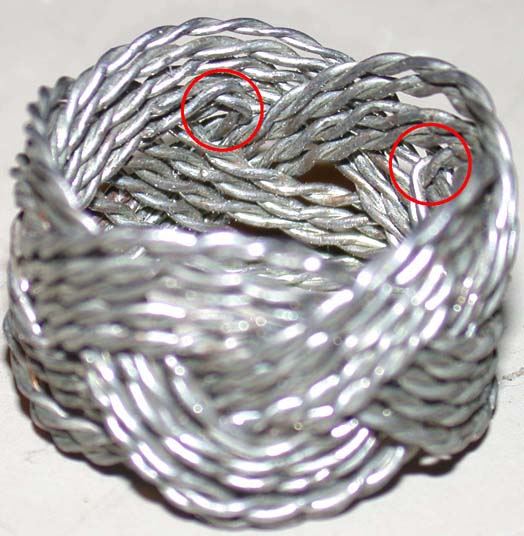
Here is a photo of the inside of a different turks head, this is one of my practice ones. Because of the lighting and the close focus the wire ends are hard to see. The red circles show where the bent wire ends are. the tension of the weave holds everything together, I just kink the ends of the wire so they won't pull out of the weave but will hook on the other wire if they are pulled. If you try to twist the ends together or anything like that you get an ugly bulge in the turks head when it is compressed around the grip. In the rope demo they usually show a fishermens knot or something similar crossing over the back of the wires securing the ends together, but with wire this is unnecessary and very hard to make look good.
Cheers,
Erik

Thanks Erik, that clears it up considerably for me.
Howdy All
Sorry I did not catch this thread earlier been so busy of late my computer is starting to think I don't like it any more.
I can add little to Erik's excellent thread. It all comes down to practice, practice, as Erik points out. As so much of what we do entails, the first ten are crap the second ten are nearly crap and it gets a bit better each time you do one. If you are into fancy grips check out a sailors knot tying guide from the great age of sail. Its all there, the ability to manipulate rope and wire was mastered long ago by fellows with way more time then we have. Its just trying to catch enough of their knowledge to do some today.
Keep well all
Craig
I know I am resurrecting this topic from way back, but thanks to the Boy Scouts there is a wonderful tutorial online for making a single strand turks head. It's located at:
http://www.troop941wc.org/forms/turks_head_slide.pdf
Mike
http://www.troop941wc.org/forms/turks_head_slide.pdf
Mike
For those of you interesting in more types of braiding, I would suggest
Leather Braiding by Bruce Grant ISBN 10: 0-87033-039-X
It not only covers braiding but different types of knots that are extremely useful.
Leather Braiding by Bruce Grant ISBN 10: 0-87033-039-X
It not only covers braiding but different types of knots that are extremely useful.
Here's a page from the BM's training manual. But it's a little bit light on the words (it is for BMs after all).
 Attachment: 58.18 KB
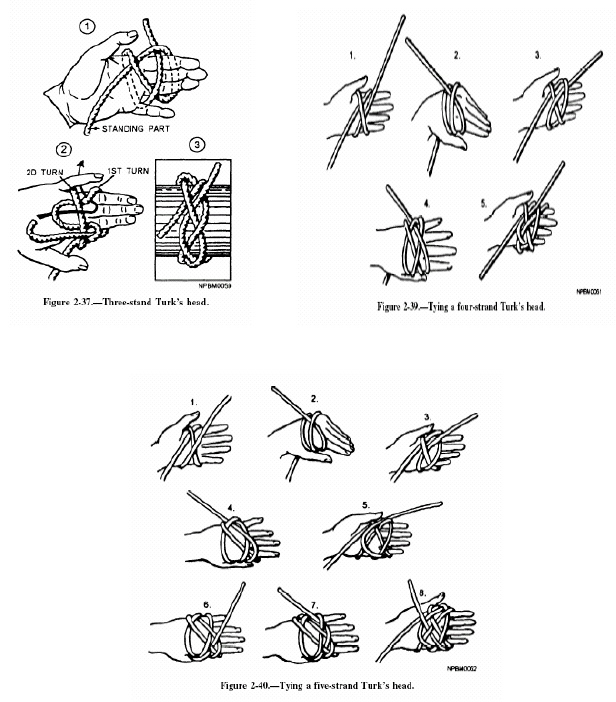

I finally took the plunge and found that this is not so difficult after all. It's just a matter of following the path of a single strand, but it's much harder to explain than to do. I'm not yet down to material the size of twisted wire, but I'm getting there. My i-Pod died and I happened to have the cord lying on my desk, so....
 Attachment: 56.57 KB
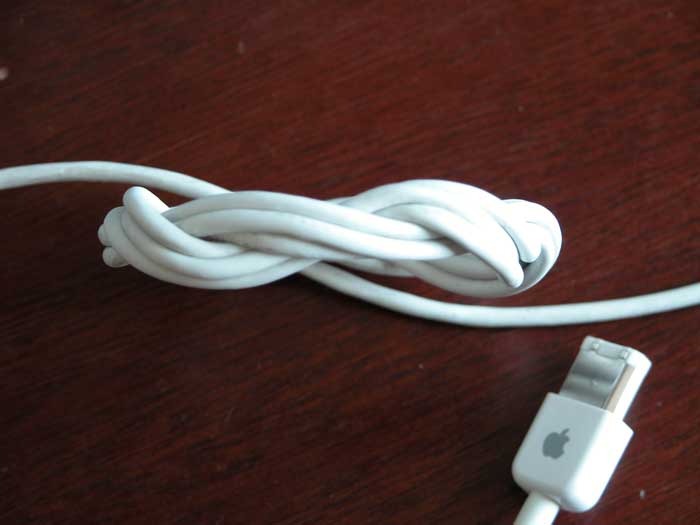

By the way, I think the knot diagram Sam posted is for a more complex TH knot. The book I have offers two TH knots, and describes "our" knot as the more primitive of the two.
I've been watching this thread since it began, and finally decided to chime in...
as a young Boy Scout, when it came time to tie a Turk's Head, I overcame my struggles with it when my father showed me that it was covered in his "Bluejacket's Manual" from WW2 (U.S. Navy). Good diagrams, and color-keyed to make following the diagram easier.
Sorry I haven't got a copy handy (all my Dad's things are packed away in another state), but if you can get your hands on a copy, it may help.
I just posted a new thread with some new questions and observations on turks head knots on this forum. Since this thread is old, and what I typed is a long post that has new observations and new questions about turks heads, I decided to make a new thread.
I would love to know everyones thoughts on the observations and questions in the new post.
It can be found here: http://www.myArmoury.com/talk/viewtopic.php?p=224351#224351
Thanks,
Carl
I would love to know everyones thoughts on the observations and questions in the new post.
It can be found here: http://www.myArmoury.com/talk/viewtopic.php?p=224351#224351
Thanks,
Carl
Page 1 of 1
You cannot post new topics in this forumYou cannot reply to topics in this forum
You cannot edit your posts in this forum
You cannot delete your posts in this forum
You cannot vote in polls in this forum
You cannot attach files in this forum
You can download files in this forum
All contents © Copyright 2003-2006 myArmoury.com — All rights reserved
Discussion forums powered by phpBB © The phpBB Group
Switch to the Full-featured Version of the forum
Discussion forums powered by phpBB © The phpBB Group
Switch to the Full-featured Version of the forum