Go to page 1, 2  Next

Viking shield construction
I'm building one of those round viking shields and I was wondering about a couple of issues. I bought 1/4 inch beech plywood because I wanted something light and I am hoping that I can make up for the thinner wood by strengthening it with glued-on linen. I read some of the other threads here but there were a few points I wasn't quite clear on, so I have a few newbie questions:

  • Do you guys normally glue linen to both sides of the sheild?
  • Do you use one or two layers of linen?
  • Do you seal the final layer of linen with glue?
  • Has anybody ever had a shield warp on them when the wood got damp and there is only linen glued to one side?
  • Which is better a laced or nailed rawhide rim?

I used an obscene amount of glue and the linen seems to be sticking on well even if it did not come through the weave everywhere on the shield face. Hope that's not a bad sign.

P.S. IKEA sells fairly cheap but strong linen.
If you start with plywood, *always* cover back and front. Plywood always looks like modern plywood, no matter what you do to it, and the public will notice! I generally don't use all that much glue--if the fabric is completely stuck to the wood, it won't come loose. Then a good coat or two of paint, and you're all set. I've never had a plywood shield warp, but then I haven't gone swimming with one!

Good luck!

Matthew
Re: Viking shield construction
I use linen on both sides, two layers in front, one in the back. I do not seal the outer layers with glue. A good waterproof paint will suffice.
I've had two shields warp on me, the first one wasn't backed with anything and got wet, the second one was backed with linen and got wet. Morale of this, paint the backside as well as the front!
Re: Viking shield construction
Baard H wrote:
I use linen on both sides, two layers in front, one in the back. I do not seal the outer layers with glue. A good waterproof paint will suffice.
I've had two shields warp on me, the first one wasn't backed with anything and got wet, the second one was backed with linen and got wet. Morale of this, paint the backside as well as the front!


I think I'll go with only one layer of linen on the front for the first shield and two layers for the second one just to be safe.

As for warping I was thinking this might happen. With the glue being water soluble when it is liquid it will remain sensitive to water after it dries so the shield would warp if you paint only one side but not the other and then get caught in a rainstorm or just store the shield in a damp place. I had been told that the linen would hold it straight even if you only paint one side but now I'lm definitely painting both sides.
I use cheaper cotton painting drop cloths to cover my plywood shields. Once they are painted, no one knows it is cotton.
Paul Mullins wrote:
I use cheaper cotton painting drop cloths to cover my plywood shields. Once they are painted, no one knows it is cotton.


I actually thought about just using old sheets but then I took a look at the stuff they have at IKEA and decided it looked a lot tougher ... and it was reasonably priced.
Yes, definitely cover both sides, and paint both sides if possible. You *may* be able to get away with only painting the front side, but you may notice your shield moving somewhat with atmospheric changes if it's solid wood rather than plywood. A plywood shield shouldn't move much at all.
1/4" is actually well within the historic range; you did well in choosing this thickness. Adding a linen cover to BOTH sides won't make much difference in this dimension. Historically, it seems, shields were covered in a layer of thin leather rather than in fabric, though the fabric will serve much the same purpose. The idea seems to be to add the fibrous cover in order to resist splitting, to stop any cracks from spreading. In your case it will also serve to disguise the fact that you're using modern materials.

I've never had any problems with a plywood shield warping, though this would be more of a concern with planked construction. The crossed wood grain in the plywood should help to resist this. Gluing your fabric cover on with water resistant glue should serve to seal the wood, but you might want to add a coat or two of thin satin finish polypropylene to everything once you have the shield completed. This is especially important for a leather or rawhide cover.

It's probably more historically accurate to stitch on rather than nail on your rim. A stitched on rim would have been easier to maintain in the field. You also won't want to be spraying folks with metal projectiles from your damaged shield. Some reenactment societies actually specify this for this very reason.

Hope this helps
Kevin Lehr wrote:
1/4" is actually well within the historic range; you did well in choosing this thickness. Adding a linen cover to BOTH sides won't make much difference in this dimension. Historically, it seems, shields were covered in a layer of thin leather rather than in fabric, though the fabric will serve much the same purpose. The idea seems to be to add the fibrous cover in order to resist splitting, to stop any cracks from spreading. In your case it will also serve to disguise the fact that you're using modern materials.

I've never had any problems with a plywood shield warping, though this would be more of a concern with planked construction. The crossed wood grain in the plywood should help to resist this. Gluing your fabric cover on with water resistant glue should serve to seal the wood, but you might want to add a coat or two of thin satin finish polypropylene to everything once you have the shield completed. This is especially important for a leather or rawhide cover.

It's probably more historically accurate to stitch on rather than nail on your rim. A stitched on rim would have been easier to maintain in the field. You also won't want to be spraying folks with metal projectiles from your damaged shield. Some reenactment societies actually specify this for this very reason.

Hope this helps


When I glued on the linen to the front of the shield it actually warped into a vaguely "Taco shell" shape even though I laid it on the ground and weighted it down. However, when I applied linen to the back side of the shield as well, laid the shield on the ground again and weighted it down the shield straightened out and remained more or less flat. So just for that reason I'd recommend covering both sides with linen and applying water proof paint like Baard H recommended although I suppose one could also try to straighten one's shield out by using a really long handle if one is to thrifty to shell out for two squares of linen. Both my shields ended up being quite heavy now that the boss has been riveted on so I'm pretty glad I went with 1/4 inch plywood. Most of the other people in my club use 9mm plywood which must be heavy as hell.

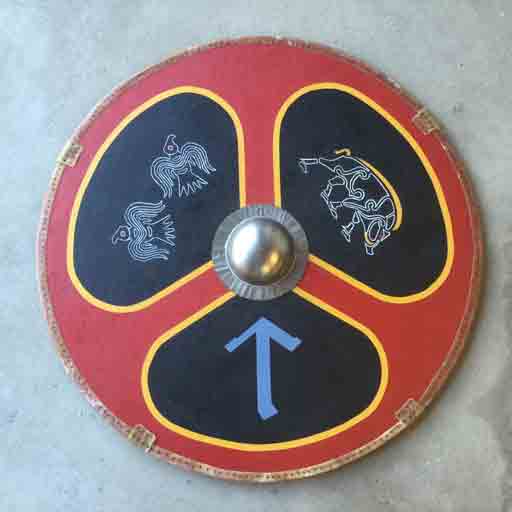
Here is a photo of the beast. I went for a size of 90cm which I feel is a bit big even though I'm 2m tall but it is smaller than the Gokstad shields who were 94 centimetres and the guys who used them were probably quite a bit smaller than me. I also nailed the edges and went a bit overboard with the nail density. I'll re-rim it if this turns out to be a problem


 Attachment: 13.66 KB
shield.jpg


Last edited by Kristjan Runarsson on Thu 25 Feb, 2016 3:18 pm; edited 2 times in total
I put only one layer of cotton on both sides and I have seen no problems (splinters) so far. My kids are using them pretty often and the rough handling did not damage the shields cover. Well, I had to refix the handles twice. ;-)[url]
Hello. Hope this isn't too much an act of necromancy.

I'm working on a similar shield and I was wondering about attaching the rim with cut tacks. Would short tacks in both front and back that don't go all the way through suffice, or would it be better to use long ones and clinch them?
Dan D'Silva wrote:
Hello. Hope this isn't too much an act of necromancy.

I'm working on a similar shield and I was wondering about attaching the rim with cut tacks. Would short tacks in both front and back that don't go all the way through suffice, or would it be better to use long ones and clinch them?


Hi,
I used 7mm black carpet tacks. They go almost all the way through since the plywood is about 6,5mm and the rawhide is ~1mm thick I also used 9mm tacks for the fold-over patches over the places where the strips of rawhide meet but only in places where there are two layers of rawhide on top of each other. You don't want any tacks coming through the shield and injuring somebody. These tacks hold amazingly well when using birch plywood. Softer plywoods may be a different story. Also keep in mind the head of the tacks is rather easily bent and I found it helps to hold them with a thin needle nose plier when getting them seated. I'd also recommend getting a buch of cheap plastic clamps like these:

http://www.pjtool.com/50-mini-plastic-spring-clamp.aspx

...since the wet rawhide will bulge up between the tacks and you want it to dry flat so weapons don't catch on the folds between the tacks. I used laundry clamps but they aren't very good for this purpose . After I finished the shield I found a bunch of plastic clamps like the ones in the link at the local hardware store for a few bucks. They are much better than laundry clamps.
Dan D'Silva wrote:
Hello. Hope this isn't too much an act of necromancy.

I'm working on a similar shield and I was wondering about attaching the rim with cut tacks. Would short tacks in both front and back that don't go all the way through suffice, or would it be better to use long ones and clinch them?


Why use tacks?
Why not stitch the rim on?

There's no evidence for the use of tacks to fix applied rims on (mind you, the evidence for separate organic rims is a bit sketchy too).
Matthew Bunker wrote:
Dan D'Silva wrote:
Hello. Hope this isn't too much an act of necromancy.

I'm working on a similar shield and I was wondering about attaching the rim with cut tacks. Would short tacks in both front and back that don't go all the way through suffice, or would it be better to use long ones and clinch them?


Why use tacks?
Why not stitch the rim on?

There's no evidence for the use of tacks to fix applied rims on (mind you, the evidence for separate organic rims is a bit sketchy too).


Genuine period shields seem to have made due with a leather or fabric covering glued onto the shield. There is no evidence for lacing the rims either, in fact there is no evidence for rims at all as far as I know. This has been discussed here before:

http://myArmoury.com/talk/viewtopic.php?p=264367

I just asked how to finish the shield and was told by people who'd been doing it for longer than I had to nail rawhide to the rim. When I asked about lacing the hide I was told to use tacks in stead. Re-enactment shields are rimmed with rawhide, as far as I know mostly to make the shield last longer. Somebody mentioned there is a danger of losing nails or getting hurt by flying nails. I have had no problems with that so far but I suppose that is a possibility.

As for period shield having rims, a shield made of planks and using an iron rim of sufficient gauge makes it heavier. Using rawhide edging has some benefits because it is light and if a blow hits the middle of the shield parallel to the grain of the boards and splits a board the rim keeps the shield together. However even with rawhide edging if the shield is hit on an edge and a board splits the rawhide edging does nothing. If you have no facing, putting reenforcing bands on the back and making the shield "double boarded" i.e. plywood as specified in the Gaulažing laws will do more to keep it together in the event of a blow that would have split a singe boarded shield than a rawhide rim. Hurstwic did some shield tests and posted the results on their page:

http://www.hurstwic.com/history/articles/manu...hields.htm

Generally, judging from shield testing I have seen the benefits of rawhide edging for real world combat shields are heavily outweighed by simply facing the shield on both sides with some form of leather or cloth and folding it over the edges. A sword blow to the edge of a cloth or leather faced shield will not go in more than a couple inches or so (there is a video on youtube somewhere of a guy going to work on a Viking shield with a fully sharp Katana). The boards will not split thanks to the facing and the weapon will often stick. With a leather or cloth faced shield, a blow to the surface of a shield that goes through will also not split the board if it happens to hit parallel to the grain and once again there is a danger the weapon sticks. In fact people were probably rather weary of losing their axe/sword by getting it stuck in somebody's shield so I don't think shield shredding was as popular on medieval battle fields as it seems to be with some re-eneactors.
Matthew Bunker wrote:
Why use tacks?
Why not stitch the rim on?

No more reason than that in the (admittedly limited) experience I've had, I find tacking faster and easier than stitching. No drilling or tedious drawing long threads through holes. I've also seen photos of museum shields with tacks/small nails around the edges, although it does occur to me that these could be modern additions to attach unstable shields or pieces to some sort of base to hold them together.

Reading the discussions here, there doesn't seem to be a consensus about rims.

In other news, does the weight of a linen cover matter? I've found sufficient remnants in both a shirt weight and a very heavy warp cloth.

Kristjan Runarsson wrote:
I'd also recommend getting a buch of cheap plastic clamps like these:

http://www.pjtool.com/50-mini-plastic-spring-clamp.aspx

...since the wet rawhide will bulge up between the tacks and you want it to dry flat so weapons don't catch on the folds between the tacks.

Thanks. I'll keep an eye out for them.
[quote="Dan D'Silva"]
Matthew Bunker wrote:
In other news, does the weight of a linen cover matter? I've found sufficient remnants in both a shirt weight and a very heavy warp cloth.


No, but the glue might. I used a whole bottle of this stuff applying 3 layers of linen:

http://www.amazon.co.uk/Soudal-Dispersion-Adh...soudal+30d

Of course the glue dries out so you don't add the whole weight of the bottle. The change I noticed most, weight wise, was the addition of the boss which was significantly heavier than that glue bottle.
It's not quite fair to say that there is *no* evidence for rims, it's the *archeological* evidence which is inconclusive. There are numerous *depictions* of shields with what look like rims, sometimes even with a row of little dots or circles that darn well look like nail heads. That said, numerous finds of shield bosses and handles in graves don't ever seem to be accompanied by a circle of nails!

Though there are bits and pieces such as Vendel/Valsgarde graves, Sutton Hoo, and one or two other sites that are not quite Viking era, or from a different region, which have turned up metallic shield rim parts. It's not much to go on, obviously!

When I'm gluing leather or rawhide rims down, or clamping them while wet, I always use wood or heavy cardboard shims between the hide and the clamp! Otherwise you can get all kinds of icky clamp marks permanently tooled into your rim...

Matthew
Matthew Amt wrote:
That said, numerous finds of shield bosses and handles in graves don't ever seem to be accompanied by a circle of nails!


Yes, but we do find the holes. It is important to note that we have relatively few examples of Viking era shields and none that are intact. Shields that are a little younger and in a much better state of preservation show a clear link between holes around the perimeter of a shield and rim reinforcement.

I've built a plank constructed shield with rawhide stitching running through the holes, I like it a lot and there's at least a little art evidence that suggests this might have been done but in the final analysis I have come to believe that nails or rivets are much more likely or at least much more common than stitched construction. Some probably didn't have have any additional rim reinforcement but I suspect we'd find those examples had more laminated layers of facing material than those that did which is something we also see with later shields.
Mike Ruhala wrote:
Matthew Amt wrote:
That said, numerous finds of shield bosses and handles in graves don't ever seem to be accompanied by a circle of nails!


Yes, but we do find the holes. It is important to note that we have relatively few examples of Viking era shields and none that are intact. Shields that are a little younger and in a much better state of preservation show a clear link between holes around the perimeter of a shield and rim reinforcement.

I've built a plank constructed shield with rawhide stitching running through the holes, I like it a lot and there's at least a little art evidence that suggests this might have been done but in the final analysis I have come to believe that nails or rivets are much more likely or at least much more common than stitched construction. Some probably didn't have have any additional rim reinforcement but I suspect we'd find those examples had more laminated layers of facing material than those that did which is something we also see with later shields.


The grave shields from Gokstad in Norway had rim holes but they may also have been built specially for the burial because their plankswere painted. Thus they cannot have had a facing since if they had one the decor would have been painted onto the facing and not the wood planks.Therefore these shields cannot be considered representative of combat shields. There is evidence of leather shield facing from Birka and from Anglo-Saxon Britain. I don't know how current this article:

http://members.ozemail.com.au/~chrisandpeter/shield/shield.html

...is but according to this there is little or no evidence of metal rims on shields and the only evidence of possible leather rims are the shields form Gokstad which were probably built specially for the funeral. There is a similar shield from Trellerborg which may or may not have had a leather facing:

https://wuhstry.files.wordpress.com/2015/12/capture-1.png

...I'm thinking it probably had one since the handle does not stretch over the entire diameter of the shield and I for one would not trust in a shield whose planks were only butt joined with glue. The boss does not seem to have survived so the alternative is that this thing had re-enforcing iron band (I cannot discern any nail holes in that photo) which would also have rusted away. In that case this shield could have been un-covered. Here is a summary of known finds, dunno how complete it is and I don't have time to go through it now but if any body is interested it's a good place to start:

https://sites.google.com/site/archoevidence/home/wooden-shields


Last edited by Kristjan Runarsson on Wed 02 Mar, 2016 6:41 am; edited 1 time in total
Are you sure what those shields are? I've heard, watched and read that shield purpose made for the Holmgang, essentially the Viking precursor to the judical duel, were made by a third party and intentionally made fragile. The idea was the same as the later giant staff shields, have a shield which both combatants are completely unfamiliar with using and you put them both on equal footing. No one would have the advantage of a better made defense.
Go to page 1, 2  Next

Page 1 of 2

Jump to:  
You cannot post new topics in this forum
You cannot reply to topics in this forum
You cannot edit your posts in this forum
You cannot delete your posts in this forum
You cannot vote in polls in this forum
You cannot attach files in this forum
You can download files in this forum


All contents © Copyright 2003-2006 myArmoury.com — All rights reserved
Discussion forums powered by phpBB © The phpBB Group
Switch to the Full-featured Version of the forum