Posts: 124 Location: Muncie, Indiana
Tue 02 Mar, 2021 9:51 am
So, I did my first of these a few years ago. I've made 4 more DIY scabbards since then, and haven't gotten around to posting them. I'll make a post for each.
This first one was made in the autumn of 2019. After my reasonable success of my first build, I decided to move on and try to make scabbards for all my bare swords. Along the way, I picked up some scabbards from Tod as well for a few of the swords, so that helps!
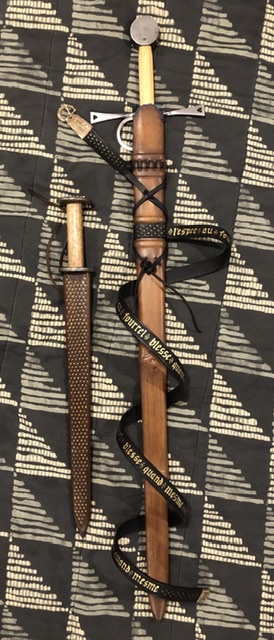
This first one is for an Albion
Poitiers. It's a fairly basic Type XV of a type that could have probably seen used from 1300-1450. It is, like all Albions, well made, but this one is fairly plain.... no bling. A simple Type I pommel and Style 7 guard. I think of this sword as a mid-status sword..... the kind of sword where someone can afford quality, but won't splash for pizzazz.
So the brief for this one was a mid-status sword of about 1350-1400. The user would either be a mid-status soldier, or a reasonably well-off merchant/craftsman who needs a travelling companion.
I learned from my first attempt to have the chape in hand when making the core to ensure a good fit! I decided that I wanted to try and expand my skillset a bit with each new scabbard, so for this one, I decided to try and do a better job of fabricating a metal locket with some attached suspension loops.
As with the first scabbard I made, this was made using the soak and bend method... I soaked the wood slats and then allowed them to dry clamped over a form. I then cut out the profile shape of the scabbard. I inserted some wedges between the slats on the tip to ensure room for the tip. I then trimmed for shape and fit to the blade. I use duct tape to hold the slats together while test fitting. Once I got a good fit, I glued it all together and Once the glue dried, I insert the sword (which is a little tight at this point) to let the scabbard "settle in." Finally, I shape the core using the belt sander, files and sandpaper. I then cut a slightly oversized piece of 3-4 oz leather and start fitting. I wet the center of the leather to get a good form fit on the wood core, trim the leather to meet at the center (sometimes more successfully than others) and stitch it up. To fabricate the locket, I used some sheet brass. The locket is mainly plain, though I cut and filed the bottom edge to reflect the decorative style of the chape, which is a Tod Cutler product. used dowels I shaped to be close to the edge shape of the scabbard and bend it. This worked okay, but I need to work on a better fit. I then silver soldered it closed on the back. I cut out the suspension loops from the sheet brass and the I cut and file the front "pads" to resemble shells. I silversolder those in place and clean everything up. The belt was made using fittings from Polish maker Lorifactor and Ukrainian maker Armour and Castings.
I added some very simple and subtle incised line and punch decoration on the leather.
Lessons learned:
Overall, I am pleased with the result, but I believe in constant improvement. So here's what I think of my own work.
I need to work on fitting the metal work to the scabbard. It's okay, but not as precise as I'd like.
I wanted the incisions to be subtle (and I didn't want to cut through the leather), but the impressions have faded over time.
The metal locket matches the chape nicely, and I'm pleased, but there is a LOT of blank space there. If I do something like this again, I'll do something about that.... pierce work or something.
My back stich is overkill. The stitched can be WAY less dense. I did not know at the time that cross stitching isn't really seen in this context in period.
So here's the pics. I didn't polish the brass and bronze after pulling it out of storage, so forgive the "rustic" look.
[ Linked Image ]
[ Linked Image ]
[ Linked Image ]